
Introduction
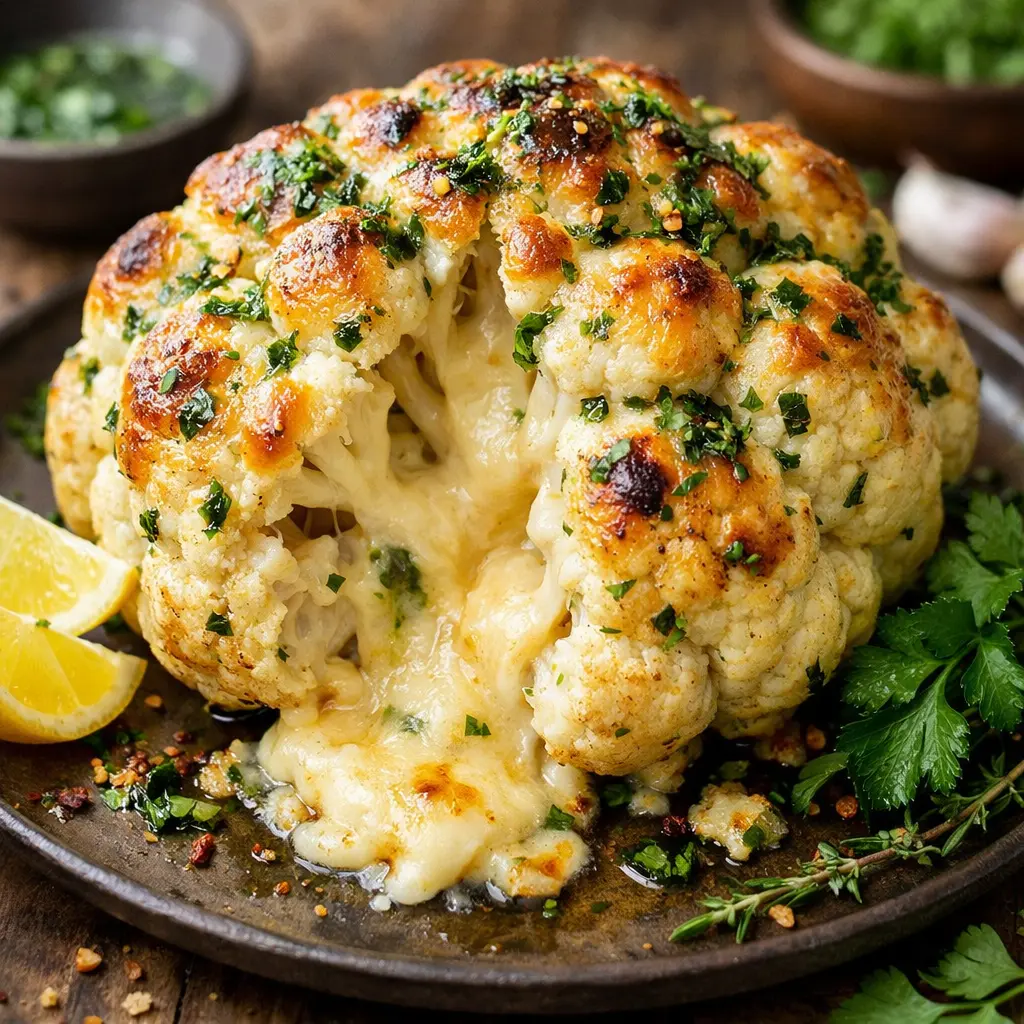
Transform an ordinary head of cauliflower into an extraordinary centerpiece with this Cheesy Stuffed Cauliflower Head with Herb Butter recipe. This impressive dish combines tender roasted cauliflower with rich cheese filling and aromatic herb butter, creating a memorable meal that looks as spectacular as it tastes. Whether you’re searching for an elegant side dish or a satisfying vegetarian main course, this cheesy stuffed cauliflower delivers on flavor, nutrition, and presentation.
The beauty of this dish lies in its simplicity and versatility. You’ll discover that preparing a whole stuffed cauliflower head is surprisingly manageable, requiring just a few key techniques and readily available ingredients.
What Makes This Dish Special
A cheesy stuffed cauliflower head with herb butter stands apart from typical vegetable preparations. The whole roasted presentation creates an impressive visual impact that elevates any dining table. Unlike chopped or mashed cauliflower dishes, this recipe maintains the vegetable’s natural structure while infusing it with layers of flavor.
The combination of melted cheese tucked between florets and herb-infused butter coating creates textural contrast. Each bite delivers crispy exterior, tender cauliflower, and gooey cheese pockets. This preparation method also allows the cauliflower to remain moist throughout cooking while developing a golden-brown crust.
The dish works equally well as a show-stopping centerpiece for holiday gatherings or as a weeknight dinner option. Its versatility makes it suitable for various dietary preferences, from vegetarians seeking hearty mains to those looking for low-carb alternatives to traditional comfort foods.
Health Benefits of Cauliflower
Cauliflower ranks among the most nutritious vegetables you can incorporate into your diet. One cup of cauliflower provides over 75% of your daily vitamin C requirement, essential for DNA repair, collagen production, and immune system support. This cruciferous vegetable contains only 25 calories per serving while delivering substantial nutritional value.
The fiber content in cauliflower supports digestive health by promoting beneficial gut bacteria growth. Research shows that adequate fiber intake reduces inflammation and lowers the risk of heart disease, dementia, and obesity. Cauliflower’s 92% water content also contributes to hydration while filling you up with minimal calories.
Beyond vitamins C and K, cauliflower provides folate, which supports cell growth and proves especially important during pregnancy. The vegetable also contains choline, crucial for sleep quality, memory, learning, and muscle function. These health-promoting compounds make the cheesy stuffed cauliflower head a nutritious choice despite its indulgent cheese and butter components.
Studies reveal that cooking methods significantly impact cauliflower’s nutritional retention. Boiling reduces glucosinolate, polyphenol, and flavonoid content compared to steaming or gentle sautéing. Roasting, the primary method for this cheesy stuffed cauliflower recipe, helps preserve nutrients while developing rich, caramelized flavors.
Essential Ingredients Breakdown
Creating the perfect cheesy stuffed cauliflower head with herb butter requires quality ingredients that work together harmoniously. Each component plays a specific role in building flavor, texture, and visual appeal.
For the Cauliflower:
-
One large, firm cauliflower head (approximately 2-3 pounds)
-
Kosher salt for boiling water
-
Black pepper for seasoning
For the Cheese Filling:
-
Mozzarella cheese (string cheese or shredded)
-
Parmesan cheese for sharp, savory notes
-
Muenster or Gruyere for extra creaminess (optional)
For the Herb Butter:
-
Unsalted butter (½ to ¾ cup, softened)
-
Fresh parsley (2-3 tablespoons, finely chopped)
-
Fresh thyme (1-2 tablespoons, finely chopped)
-
Fresh chives or basil (1 tablespoon)
-
Minced garlic (2-3 cloves)
-
Salt and freshly cracked black pepper
Additional Components:
-
Breadcrumbs (panko preferred) for crispy topping
-
Extra Parmesan for breadcrumb mixture
-
Fresh herbs for garnish
The herb butter serves as both a flavor enhancer and moisture barrier during roasting. Combining multiple fresh herbs creates depth that single-herb preparations cannot match. Garlic adds aromatic complexity that complements both the cheese and cauliflower beautifully.
How to Select the Perfect Cauliflower
Choosing the right cauliflower head makes a significant difference in your final dish. Look for heads with tightly packed, creamy white florets without brown spots or discoloration. The leaves should appear fresh and green, not wilted or yellowed.
Size matters when preparing a stuffed cauliflower head. Select a large, heavy head weighing between 2 and 3 pounds. Larger heads provide more space between florets for stuffing while offering better structural integrity during cooking. The stem should feel firm and solid when gently squeezed.
Check the cauliflower’s underside where the florets meet the stem. This area should be compact without gaps or separation. Loose florets indicate age and may fall apart during the boiling and stuffing process. Fresh cauliflower feels dense for its size, signaling moisture content and peak freshness.
Avoid heads with fuzzy patches or soft spots, which indicate decay. Small black specks on florets are harmless but may affect presentation. Store your cauliflower in the refrigerator and use it within five days of purchase for best results.
Preparing Your Cauliflower Head
Proper preparation ensures your cheesy stuffed cauliflower head holds together beautifully while allowing maximum cheese insertion. Start by removing the outer leaves and trimming the stem flush with the base. Be careful not to cut into the florets themselves, as this compromises structural integrity.
Bring a large pot of heavily salted water to a rolling boil. The water should taste salty, even more than typical cooking water. This seasoning step infuses flavor throughout the cauliflower from the inside out. Make sure your pot is deep enough to fully submerge the cauliflower head.
Carefully lower the cauliflower into the boiling water, stem-side down. Boil for 8 to 10 minutes until the florets become tender when pierced with a fork, but not mushy. Overcooking at this stage causes the head to fall apart during stuffing. You want the cauliflower just tender enough to work with while maintaining its shape.
Remove the cauliflower from the water using a slotted spoon or tongs. Place it upside down on a clean kitchen towel or paper towels to drain thoroughly. Allow it to cool for 10 to 15 minutes until comfortable to handle. Excess water will steam out, preventing a soggy final dish.
Once cooled, gently separate the florets using your fingers to create pockets for the cheese. Start from the bottom and work upward, being careful not to break off entire florets. These gaps will hold the melted cheese, creating pockets of gooey deliciousness throughout.
Making the Herb Butter
Fresh herb butter transforms this dish from simple to sensational. The butter acts as a flavor vehicle while helping create the golden-brown crust that makes the cheesy stuffed cauliflower head visually stunning. Making compound butter takes just minutes and delivers restaurant-quality results.
Start with softened, not melted, unsalted butter at room temperature. Place one cup of butter in a medium bowl. Add two tablespoons of finely chopped fresh parsley, one tablespoon each of fresh thyme and chives, and two to three minced garlic cloves. Season with three-quarters teaspoon of kosher salt and one-quarter teaspoon of freshly cracked black pepper.
Mix all ingredients thoroughly using a fork or spatula until the herbs distribute evenly throughout the butter. The mixture should appear uniformly green-speckled with no large butter chunks remaining. Fresh herbs provide significantly more flavor than dried alternatives, making them worth the extra effort.
For the cheesy stuffed cauliflower head, you’ll use the herb butter in two applications. First, reserve a portion for coating the cauliflower before baking. Then, mix the remaining butter with breadcrumbs and extra Parmesan to create the crispy topping. This dual application ensures herb flavor permeates every element of the dish.
You can customize your herb butter based on what you have available. Rosemary and sage create an earthier profile, while basil and oregano offer Mediterranean flair. Tarragon or dill provide unique aromatic qualities that pair beautifully with cauliflower’s mild flavor.
Cheese Selection and Stuffing Techniques
Cheese selection dramatically impacts both flavor and texture in your stuffed cauliflower head. Mozzarella provides the signature stretch and mild creaminess that complements rather than overwhelms the cauliflower. String cheese works particularly well because its shape fits perfectly between florets.
For enhanced flavor complexity, combine mozzarella with sharper cheeses. Parmesan adds nutty, salty depth, while Muenster contributes extra creaminess. Gruyere offers sophisticated flavor for special occasions. A three-cheese combination creates the most balanced and interesting result.
The stuffing technique requires patience and gentle handling. After pre-cooking and cooling your cauliflower, turn it stem-side up and begin inserting cheese pieces. If using string cheese, cut sticks into shorter lengths that fit comfortably between floret stalks. For shredded cheese, compact small handfuls before tucking them into openings.
Work systematically from the bottom center outward, filling every accessible gap. Some openings will be larger than others, so adjust cheese amounts accordingly. Don’t worry about perfect distribution – natural variation adds to the dish’s rustic charm. Any cheese that doesn’t fit inside can be placed around the base in your baking dish.
For an even cheesier result, prepare a filling mixture that pipes between florets. Combine beaten eggs, cream, shredded cheese, and seasonings in a bowl. Transfer to a piping bag or large zip-top bag with a corner cut off. Insert the tip between florets and squeeze gently until filling emerges from neighboring gaps. This method ensures cheese reaches every crevice.
Step-by-Step Cooking Instructions
Creating this cheesy stuffed cauliflower head with herb butter follows a logical sequence that builds flavor at each stage. Preheat your oven to 400°F while you prepare the components. This temperature provides the perfect balance between cooking the interior and developing exterior crispness.
Step 1: Boil the Cauliflower
Fill a large pot with heavily salted water and bring to a boil. Remove cauliflower leaves and trim the stem without cutting into florets. Lower the head into the water and boil for 8 to 10 minutes until fork-tender but still firm. Remove carefully and drain upside down on towels.
Step 2: Prepare Herb Butter
While the cauliflower cools, combine softened butter with chopped fresh herbs, minced garlic, salt, and pepper. Mix until all ingredients distribute evenly throughout the butter. The butter should be spreadable but not melted.
Step 3: Stuff with Cheese
Once the cauliflower is cool enough to handle, gently create gaps between florets. Insert mozzarella sticks or packed cheese handfuls into every opening you can access. Don’t be shy – the more cheese you add, the better the final result. Place any extra cheese at the bottom of your baking dish.
Step 4: Season and Coat
Season the entire cauliflower head generously with salt and pepper. Place it stem-side down in a small oven-safe dish or baking pan. The dish should fit the cauliflower snugly to prevent tipping during cooking.
Step 5: Apply Herb Butter Topping
Mix about half of your herb butter with panko breadcrumbs and extra grated Parmesan. This creates a paste-like consistency. Spread the remaining plain herb butter over the entire cauliflower head, then top with the breadcrumb mixture. Press gently to help it adhere, especially on the sides.
Step 6: Roast Until Golden
Place the baking dish in the preheated oven and roast for 20 to 25 minutes. The cauliflower is ready when the topping turns deep golden brown and cheese bubbles around the base. For extra crispness, broil for the final 2 to 3 minutes while watching carefully to prevent burning.
Step 7: Rest and Serve
Remove from the oven and let the cheesy stuffed cauliflower head rest for 10 minutes before cutting. This allows the cheese to set slightly, making slicing easier. Garnish with fresh parsley and serve immediately while still hot and gooey.
Baking Tips for Perfect Results
Achieving the ideal cheesy stuffed cauliflower head requires attention to several key factors during baking. Temperature consistency ensures even cooking throughout the head while developing that coveted golden crust. Position your oven rack in the center for optimal heat circulation.
Using an oven-safe dish that fits your cauliflower snugly prevents it from rolling or tipping during cooking. Cast iron skillets work beautifully, as do ceramic baking dishes approximately 8 inches in diameter. The dish’s sides help support the cauliflower while catching any cheese that melts out during baking.
Monitor the breadcrumb topping’s color throughout baking. If it browns too quickly before the cauliflower finishes cooking, tent loosely with aluminum foil. This allows the interior to continue cooking without burning the exterior. Conversely, if the topping hasn’t browned sufficiently after 20 minutes, switch to broil for the final few minutes.
The cauliflower’s internal temperature should reach approximately 200°F for optimal tenderness. However, visual cues work equally well – florets should pierce easily with a fork and cheese should bubble visibly around the base. The combination of proper boiling and roasting ensures perfectly cooked cauliflower throughout.
Don’t skip the resting period after removing your dish from the oven. These 10 minutes allow the cheese to firm up slightly, making slicing and serving significantly easier. The cauliflower will remain hot enough to serve during this time.
Serving Suggestions and Presentation
Presenting your cheesy stuffed cauliflower head with herb butter makes a memorable impression. Serve it whole at the table, allowing guests to see the full effect before slicing. Use a sharp knife to cut through the head into wedges, similar to cutting a cake. Each wedge should reveal the cheese-filled interior for maximum visual impact.
This dish works beautifully as either a substantial side or a vegetarian main course. As a side, it pairs excellently with roasted chicken, grilled steak, or baked fish. The rich, cheesy flavors complement simply prepared proteins without competing for attention. One cauliflower head typically serves 4 to 6 people as a side dish or 2 to 3 as a main course.
For a complete vegetarian meal, serve wedges alongside a fresh green salad with vinaigrette dressing. The salad’s acidity and crunch contrast nicely with the rich, creamy cauliflower. Roasted carrots, green beans, or Brussels sprouts make excellent vegetable companions that echo the roasted flavors.
Consider garnishing the platter with fresh herb sprigs matching those in your butter – parsley, thyme, or chives. A light dusting of additional Parmesan cheese adds visual interest and extra savory notes. Serve immediately while the cheese remains melted and gooey for the best experience.
This dish also works wonderfully for holiday gatherings or special occasions. Its impressive appearance makes it suitable for Thanksgiving, Christmas dinner, or Easter celebrations. The recipe scales easily if you want to prepare multiple heads for larger crowds.
Storage and Reheating Guidelines
Proper storage extends the life of your cheesy stuffed cauliflower head while maintaining quality. Allow leftovers to cool completely at room temperature before refrigerating. Transfer to an airtight container or wrap tightly with plastic wrap and aluminum foil. Stored correctly, the dish keeps for 3 to 4 days in the refrigerator.
Reheating requires care to prevent the cauliflower from becoming mushy while ensuring the cheese melts properly. The oven method yields the best results. Preheat to 350°F and place cauliflower wedges in a baking dish. Cover loosely with foil and heat for 15 to 20 minutes until warmed through. Remove the foil for the last 5 minutes to re-crisp the topping.
Microwave reheating works when you’re pressed for time, though results are less optimal. Place a wedge on a microwave-safe plate and heat in 30-second intervals at 50% power. This gentler approach prevents the cauliflower from becoming watery. The topping won’t regain its original crispness, but the flavors remain delicious.
Freezing is not recommended for this dish. The high moisture content in cauliflower causes texture degradation upon thawing, resulting in a mushy, waterlogged consistency. The cheese also separates and becomes grainy after freezing. For best quality, prepare only what you’ll consume within a few days.
Leftover herb butter stores excellently. Roll it into a log shape using plastic wrap or parchment paper, then refrigerate for up to two weeks or freeze for up to three months. Having herb butter on hand makes future preparations quicker and provides a delicious addition to other vegetables, bread, or proteins.
Recipe Variations and Substitutions
The basic cheesy stuffed cauliflower head with herb butter serves as a versatile foundation for numerous variations. Dietary needs, ingredient availability, and personal preferences can all inspire creative adaptations while maintaining the dish’s essential appeal.
Cheese Variations:
Swap mozzarella for fontina, provolone, or Gouda for different flavor profiles. Blue cheese crumbles mixed with cream cheese create a bold, tangy version. For dairy-free diets, use plant-based mozzarella and nutritional yeast mixed with cashew cream for a comparable texture and umami flavor.
Herb Combinations:
Mediterranean herbs like oregano, basil, and marjoram pair beautifully with tomato-based additions. An autumn version features sage, rosemary, and thyme for earthier notes. Experiment with tarragon and dill for a French-inspired profile, or cilantro and lime zest for unexpected brightness.
Additional Fillings:
Beyond cheese alone, incorporate sautéed mushrooms, spinach, or kale into the filling mixture for added nutrition and complexity. Crispy crumbled bacon provides smoky richness, though omit for vegetarian versions. Sun-dried tomatoes and basil create Italian flair that complements the cheese beautifully.
Topping Alternatives:
Replace traditional breadcrumbs with crushed nuts like almonds or pecans for added crunch and nutrients. Gluten-free breadcrumbs or crushed rice crackers accommodate gluten sensitivities. A mixture of seeds – pumpkin, sunflower, and sesame – offers nutritious crunch with interesting texture.
Spice Additions:
Red pepper flakes add gentle heat that enhances rather than overwhelms. Smoked paprika contributes depth and visual appeal with its rich color. Curry powder mixed into the herb butter creates an unexpected fusion that works surprisingly well with cauliflower’s mild flavor.
These variations demonstrate the recipe’s flexibility while respecting its core concept. Experiment with combinations that appeal to your taste preferences or dietary requirements while maintaining the impressive whole-cauliflower presentation.
Common Mistakes to Avoid
Success with cheesy stuffed cauliflower head depends on avoiding several common pitfalls. Learning from these mistakes ensures your dish turns out perfectly on the first attempt.
Overcooking During Boiling:
The most frequent error involves boiling the cauliflower too long. Overly soft cauliflower falls apart when you attempt to stuff it or during final baking. The head should be fork-tender but still firm enough to maintain structure. Test with a fork at 8 minutes and remove immediately when just tender.
Using Melted Butter:
Adding melted rather than softened butter to your herb mixture creates problems. Melted butter runs off the cauliflower instead of adhering, taking your herbs with it. Softened butter at room temperature spreads easily while staying in place. Let butter sit out for 30 to 45 minutes before mixing.
Insufficient Seasoning:
Cauliflower’s mild flavor requires assertive seasoning to shine. Under-salting the boiling water and the cauliflower itself results in bland results despite the cheese and herb butter. Salt the boiling water generously and season the cauliflower directly before adding toppings.
Skipping the Resting Period:
Cutting into the cauliflower immediately after removing it from the oven causes cheese to run out excessively. The 10-minute rest allows cheese to set slightly while the cauliflower remains hot. This patience pays off with cleaner slices and better presentation.
Wrong Pan Size:
Baking in an oversized dish allows the cauliflower to tip over during cooking, while too small creates steaming rather than roasting. Choose a dish that fits the cauliflower snugly with about an inch of space around the perimeter. This size supports the head while allowing hot air circulation.
Not Draining Properly:
Failing to drain the boiled cauliflower thoroughly introduces excess moisture that steams during baking. This prevents the exterior from crisping properly and dilutes the herb butter flavor. Always drain upside down on towels for at least 10 minutes.
Frequently Asked Questions
Can I prepare this dish ahead of time?
Yes, you can assemble the cheesy stuffed cauliflower head several hours before baking. Complete all steps through the stuffing and topping application, then cover tightly and refrigerate. Add 5 to 10 minutes to the baking time when cooking from cold. This makes it perfect for entertaining when you want to minimize last-minute cooking.
What’s the best way to cut and serve a whole cauliflower head?
Use a large, sharp knife to cut the cauliflower into wedges from top to bottom, similar to slicing a cake. Start by cutting the head in half, then cut each half into 2 or 3 wedges depending on size. A serrated knife can help if the breadcrumb crust resists cutting. Serve each wedge flat on its side to showcase the cheese-filled interior.
Can I use frozen cauliflower for this recipe?
Fresh cauliflower is essential for this preparation. Frozen cauliflower lacks the structural integrity needed to stuff and roast as a whole head. The freezing process breaks down cell walls, causing the florets to become too soft and fall apart. Always use a fresh, firm cauliflower head for best results.
How do I know when the cauliflower is done baking?
Look for multiple visual cues indicating doneness. The breadcrumb topping should be deep golden brown, and cheese should bubble visibly around the base of the dish. The cauliflower itself should pierce easily with a fork. The entire cooking process typically takes 20 to 25 minutes at 400°F, though larger heads may require slightly longer.
What sides pair well with cheesy stuffed cauliflower?
This dish pairs beautifully with simply prepared proteins and fresh vegetables. Roasted chicken, grilled steak, or baked fish provide complementary flavors without competing. For all-vegetarian meals, serve with quinoa pilaf, roasted root vegetables, or a crisp green salad. The rich, cheesy cauliflower benefits from lighter, fresher accompaniments that provide contrast.
Can I make this recipe dairy-free?
Absolutely, though some adjustments are necessary. Replace regular cheese with plant-based mozzarella and use dairy-free butter alternatives. Nutritional yeast mixed into cashew cream provides umami flavor that mimics Parmesan. The result won’t taste identical to the dairy version but still delivers satisfying flavor and impressive presentation.
Conclusion
The Cheesy Stuffed Cauliflower Head with Herb Butter transforms humble cauliflower into an extraordinary dish that delights both eyes and palate. This recipe combines simple techniques with quality ingredients to create restaurant-worthy results at home. The tender, roasted cauliflower filled with melted cheese and coated in aromatic herb butter offers comfort food appeal with surprising nutritional benefits.
Whether you’re preparing a special occasion centerpiece or elevating your weeknight dinner routine, this cheesy stuffed cauliflower head delivers impressive presentation with manageable preparation. The recipe’s flexibility allows endless variations to suit your taste preferences while the whole-head presentation guarantees compliments from family and guests.
Start with a fresh, firm cauliflower head, take care during boiling and stuffing, and don’t skimp on the herb butter for best results. Your perfectly golden, cheese-filled creation will prove that vegetables can absolutely steal the show. Try this Cheesy Stuffed Cauliflower Head with Herb Butter soon and discover your new favorite way to enjoy this nutritious cruciferous vegetable.
Print
Cheesy Stuffed Cauliflower Head with Herb Butter
- Total Time: 1 hour 10 minutes
- Yield: 4 1x
Ingredients
For the cauliflower
1 large whole cauliflower (leaves removed, stem trimmed flat)
Salt, to taste
Cheese filling
1 cup shredded mozzarella
½ cup shredded cheddar or Gruyère
¼ cup grated Parmesan
2 tablespoons cream cheese (optional, for extra creaminess)
Black pepper, to taste
Herb butter
4 tablespoons unsalted butter, melted
2 garlic cloves, minced
1 tablespoon fresh parsley, finely chopped
1 teaspoon fresh thyme or rosemary (or ½ tsp dried)
½ teaspoon paprika (optional)
Instructions
-
Parboil the cauliflower:
Bring a large pot of salted water to a boil. Add whole cauliflower and cook for 8–10 minutes until slightly tender but still firm. Drain well and let steam-dry for 5 minutes. -
Prepare cheese stuffing:
In a bowl, mix mozzarella, cheddar (or Gruyère), Parmesan, cream cheese (if using), and black pepper. -
Stuff the cauliflower:
Gently pull apart florets and push cheese mixture deep between them, working all around the head. -
Make herb butter:
Mix melted butter with garlic, parsley, thyme/rosemary, paprika, and a pinch of salt. -
Bake:
Place stuffed cauliflower in a baking dish. Brush generously with herb butter, letting it drip into crevices.
Cover loosely with foil and bake at 190°C / 375°F for 30 minutes. -
Finish uncovered:
Remove foil and bake another 15–20 minutes until golden, bubbling, and lightly crispy on top. -
Rest & serve:
Let rest 5 minutes before slicing. Spoon buttery pan juices over the top.
Notes
Make it crispier: Broil for 2–3 minutes at the end.
Cheese swaps: Use feta + mozzarella for a Mediterranean twist or smoked cheese for deeper flavor.
Add-ins: Finely chopped spinach or sun-dried tomatoes mix beautifully into the cheese.
Serving ideas: Great as a holiday centerpiece, vegetarian main, or rich side dish.
- Prep Time: 15
- Cook Time: 55
Nutrition
- Calories: 360