How to Make Ice Cream Cake
Ice cream cakes are the perfect blend of dessert decadence—combining the sweet, creamy delight of ice cream with the classic appeal of a cake. They’re versatile, making them ideal for birthdays, celebrations, or even just a refreshing summer treat. This article will walk you through every step, from understanding the basics to crafting your personalized masterpiece. By the end, you’ll be ready to wow your friends and family with a homemade creation that rivals store-bought versions.
Introduction
Ice cream cakes are more than just desserts; they’re a celebration in every slice. Combining layers of rich cake, creamy ice cream, and indulgent fillings, these desserts are a crowd-pleaser for all ages. What makes them so appealing is their adaptability—you can tweak the flavors, textures, and designs to fit any occasion.
Ever wondered how to create an ice cream cake from scratch without it melting into a puddle? This article breaks it all down, offering a foolproof guide with easy-to-follow steps. Whether you’re a seasoned baker or a first-timer, you’ll find everything you need here. Plus, we’ll sprinkle in some creative tips and ideas to take your dessert game to the next level.
Ready to dive in? Let’s explore this delicious world.
Understanding Ice Cream Cakes
What Is an Ice Cream Cake?
At its core, an ice cream cake is a dreamy fusion of cake and ice cream, layered together to create a refreshing and satisfying treat. The basic components often include a cake base, one or more layers of ice cream, and optional fillings like fudge, fruit, or cookie crumbles. The final touch? A delicious topping, such as whipped cream, chocolate drizzle, or colorful sprinkles.
What sets an ice cream cake apart is its versatility. From a rich chocolate brownie base to a light sponge cake or even a crumbly cookie crust, the options are endless. Similarly, the ice cream layers can range from classic vanilla to more adventurous flavors like salted caramel or mint chocolate chip. The result? A dessert that feels indulgent yet playful.
History and Popularity
Ice cream cakes have a rich history that dates back to the Renaissance, where wealthy Europeans combined ice cream and sponge cake to impress guests. Fast-forward to modern times, and these cakes have become a staple at birthdays, graduations, and special events worldwide. Their popularity surged in the mid-20th century when ice cream parlors began offering customizable versions.
Today, the appeal of ice cream cakes remains timeless. They’re perfect for warm-weather celebrations, thanks to their cool and refreshing texture. Plus, with so many flavor combinations to experiment with, they cater to every palate. Whether you’re indulging in a nostalgic favorite or trying something new.
With this understanding, you’re ready to gather the essentials. Next, we’ll dive into the ingredients and tools that will set you up for success. Stay tuned!
Ingredients and Equipment
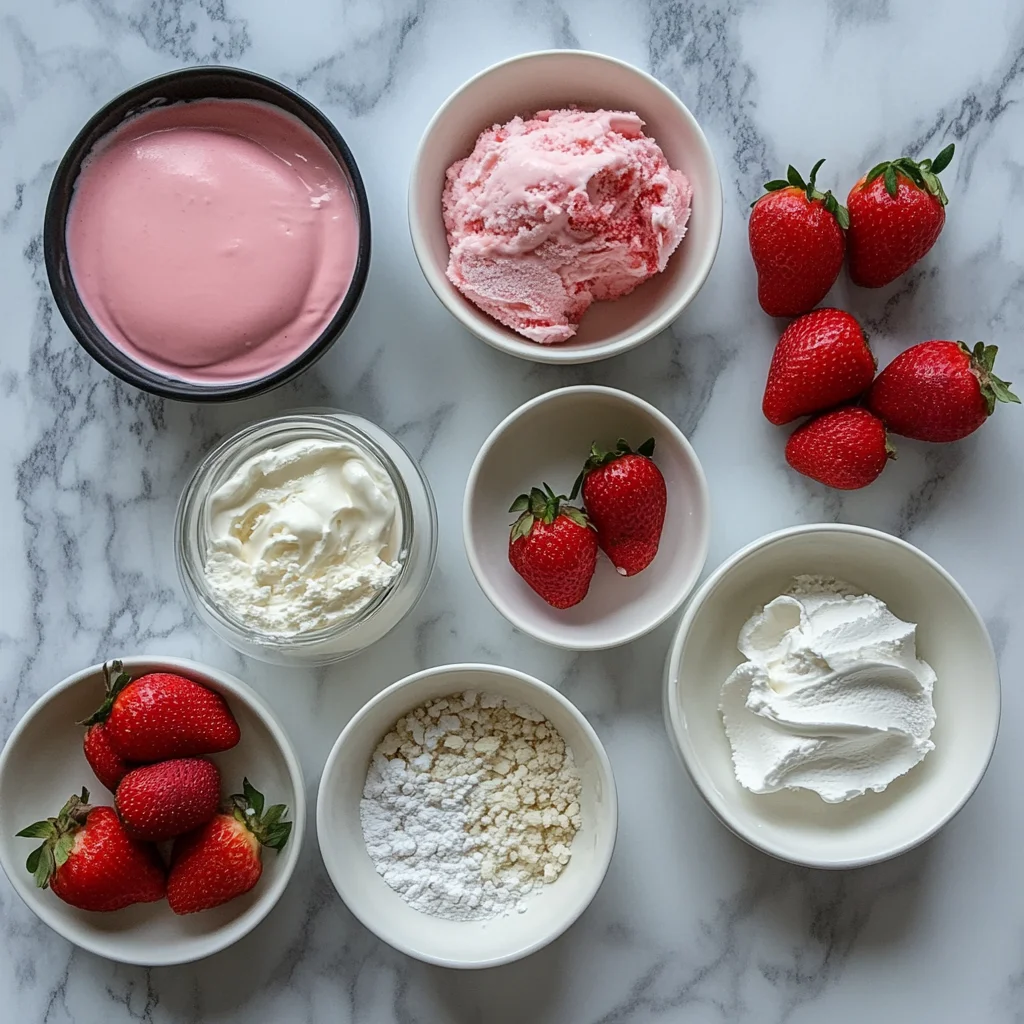
Creating a mouthwatering ice cream cake begins with gathering the right ingredients and tools. A well-prepared kitchen ensures your dessert comes together seamlessly, so let’s break down what you’ll need.
Essential Ingredients
To craft the perfect ice cream cake, you’ll need these key components:
- Cake Base: Choose a foundation that complements your ice cream. Options include:
- Sponge cake for a light texture.
- Fudgy brownies for a rich, chocolatey base.
- Crumbly cookie crusts for a no-bake option.
- Ice Cream: Select flavors that balance well with your chosen base. Classics like vanilla or chocolate are great, but don’t shy away from bold options like mango or coffee.
- Fillings: Add a burst of flavor with fillings like:
- Hot fudge or caramel sauce.
- Fresh fruit compote.
- Crushed cookies or candy pieces.
- Toppings: The final flourish brings your cake to life. Consider:
- Whipped cream for a light and airy finish.
- Sprinkles, nuts, or chocolate shavings for texture.
- Drizzles of syrup or fruit coulis for elegance.
Necessary Equipment
Having the right tools makes assembly easier and ensures professional results. Here’s what you’ll need:
- Springform Pan: Essential for shaping and releasing your cake without damage.
- Mixing Bowls: Use for preparing fillings and toppings.
- Spatula: A silicone spatula helps with spreading layers smoothly.
- Electric Mixer: Perfect for whipping cream or preparing other toppings.
- Freezer: A reliable freezer is non-negotiable to keep your cake firm during and after assembly.
Optional but handy tools include a cake leveler for even layers and piping bags for decorative touches.
With everything in place, you’re ready to begin crafting your ice cream cake. Next, we’ll guide you through preparing the components that form the building blocks of this delightful dessert.
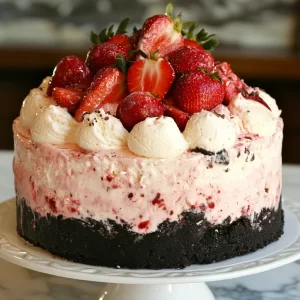
Decorating the Ice Cream Cake
Decorating an ice cream cake is where creativity takes the wheel. From minimalist elegance to bold, vibrant designs, this step lets you put your personal touch on the dessert. Here’s how to make your cake look as fabulous as it tastes.
Applying the Final Coating
To achieve a polished look:
- Whipped Cream Frosting:
- Whip heavy cream with a touch of powdered sugar and vanilla extract until soft peaks form.
- Spread the whipped cream evenly over the top and sides of the frozen cake using a spatula.
- Chocolate Ganache:
- Pour warm ganache over the top, letting it drip down the sides for a dramatic effect.
- Chill in the freezer for 10 minutes to set the ganache.
- Crushed Toppings:
- Gently press crushed cookies, nuts, or sprinkles onto the sides for added texture and visual appeal.
Tip: Work quickly to prevent the frosting or ganache from melting during application.
Creative Decoration Ideas
Your options are endless when it comes to decorating:
- Sprinkles and Candies: Scatter colorful sprinkles or arrange small candies in fun patterns.
- Fruit Garnishes: Use fresh fruit like strawberries, raspberries, or sliced kiwi for a natural pop of color.
- Chocolate Shavings: Grate a chocolate bar directly over the cake for a sophisticated touch.
Want to add a bit of flair? Pipe frosting in swirls or rosettes around the edges using a piping bag and star tip.
Tips for Professional-Looking Decorations
- Smooth Finish: To ensure an ultra-smooth surface, chill the cake between decorating steps.
- Decorative Borders: Pipe borders around the base or top of the cake for a clean, defined look.
- Layered Accents: Add layers of decoration (e.g., sprinkles on the ganache, followed by piped frosting) for depth.
Pro Tip: If you’re planning to transport the cake, complete all decorations while the cake is in its pan to protect the sides.
With these techniques, your ice cream cake will not only taste amazing but also become the centerpiece of any celebration. Up next, learn how to serve and store your creation to keep it looking and tasting its best!
Serving and Storing Ice Cream Cake
The grand finale of making an ice cream cake is serving it to impress and savor. Proper storage also ensures you can enjoy the leftovers (if there are any!) without losing that fresh, delightful taste and texture.
Proper Serving Techniques
Slicing an ice cream cake can be a bit tricky due to its frozen layers. Follow these steps for neat and clean slices:
- Warm the Knife:
- Dip a sharp knife in warm water and dry it with a towel before slicing. The heat helps glide through the frozen layers without cracking them.
- Cut Strategically:
- Start by cutting through the middle, dividing the cake into manageable sections. Then, cut each section into slices.
- Serve Quickly:
- Serve slices immediately to prevent melting. For an elegant touch, garnish individual servings with whipped cream, fruit, or a drizzle of sauce.
Pro Tip: Keep a glass of warm water nearby to reheat the knife between cuts.
Storage Guidelines
If you’re not devouring the entire cake in one go, storing it properly is crucial.
- Wrap it Well:
- Cover the cake tightly with plastic wrap or aluminum foil to keep out air and prevent freezer burn.
- Use an Airtight Container:
- For an extra layer of protection, place the wrapped cake in an airtight container before freezing.
- Label and Date:
- Mark the storage date on the container to keep track of freshness.
Shelf Life
An ice cream cake stays fresh for up to 7 days in the freezer. Beyond that, the flavors may begin to dull, and the texture can change.
Serving Suggestions for Special Occasions
- Birthday Parties: Pair with candles and a side of chocolate sauce.
- Summer Picnics: Serve with fresh berries and lemonade for a refreshing treat.
- Holiday Celebrations: Add a dusting of crushed peppermint or edible glitter for seasonal flair.
With these serving and storage tips, your ice cream cake will be as delightful the second time as it was the first. Ready to experiment with flavors and styles? Stay tuned for exciting customizations and variations!
Variations and Customizations
While the classic ice cream cake is already a crowd-pleaser, there’s so much room for creativity! From different flavor combinations to dietary adaptations, the possibilities are endless. Let’s dive into some fun variations and customizations to make your ice cream cake stand out.
Flavor Combinations
The beauty of making an ice cream cake lies in the ability to experiment with endless flavor combinations. Here are some popular pairings:
- Chocolate and Vanilla: A timeless duo! Layer rich chocolate cake with creamy vanilla ice cream, and you can’t go wrong. Add a chocolate ganache topping for extra decadence.
- Mint Chocolate Chip and Fudge: Refreshing mint ice cream layered with a decadent fudge filling makes for a perfect combination. Top with chocolate shavings for a crunchy contrast.
- Strawberry and Cheesecake: For a fruity twist, use strawberry ice cream with a cheesecake-flavored layer in between. Add fresh strawberries as a topping for added texture and sweetness.
- Peanut Butter and Chocolate: If you’re a peanut butter lover, this combination is divine. Use a peanut butter ice cream base and layer with chocolate cake and a sprinkle of crushed peanuts.
Incorporating Different Fillings and Toppings
The fillings and toppings can completely change the flavor and texture of your ice cream cake. Here are some fun ideas:
- Fruit Fillings: Try using a fruit compote or fresh berries between layers for a refreshing and slightly tart contrast to the sweetness of the cake and ice cream.
- Cookie Crumbles: Adding crushed cookies, such as Oreos or graham crackers, provides a satisfying crunch. Layer these between the cake and ice cream for an extra treat in every bite.
- Caramel or Butterscotch: Drizzle caramel sauce between the layers for a rich and buttery flavor. You can even swirl it through the ice cream for a marbled effect.
Dietary Modifications
No one should miss out on a delicious ice cream cake! Here are a few ways to make your cake suit different dietary needs:
- Gluten-Free Ice Cream Cake: Simply swap the cake base for a gluten-free option, such as a flourless chocolate cake or a gluten-free cookie crust. Be sure to check that the ice cream is also gluten-free.
- Vegan Ice Cream Cake: Use dairy-free ice cream and a vegan cake base. Coconut milk-based ice cream is a fantastic option for a creamy texture that’s completely plant-based.
- Low-Sugar or Sugar-Free: For those cutting down on sugar, try using sugar-free ice cream and a low-carb cake base. You can also make your own sugar-free fudge filling.
Customizing your ice cream cake opens up a world of flavor, texture, and dietary possibilities. Whether you’re catering to specific tastes or experimenting with bold new ideas, your creation will be one of a kind!
Ready to move on to the most common questions people have when making ice cream cakes? Let’s go to the next section!