
How to Make Perfect Rice-A-Roni
When it comes to quick, tasty, and comforting meals, Rice-A-Roni is a fan favorite. From its unique blend of rice, pasta, and seasonings to the versatility it offers in everyday cooking, this dish has found a permanent spot in kitchens worldwide. Whether you’re a beginner or a seasoned cook, mastering the art of preparing the perfect Rice-A-Roni requires some know-how. In this article, we’ll dive into the history, ingredients, and step-by-step methods for creating a flavorful, fluffy dish every time.
Introduction to Rice-A-Roni
What Is Rice-A-Roni?
Rice-A-Roni is a delicious boxed side dish that combines rice and pasta with a seasoning packet to create a flavorful and easy-to-make meal. Known as the “San Francisco treat,” it has been a go-to comfort food for generations. This dish is beloved for its quick preparation time and endless customization options, making it a staple in busy households.
The dish features a mix of long-grain rice and broken pasta (often vermicelli) that’s sautéed in butter before simmering with liquid and seasonings. The result? A rich, savory side dish that complements a wide variety of main courses, from roasted chicken to steamed vegetables.
History and Origin
Rice-A-Roni traces its roots back to 1958 in San Francisco. It was created by the DeDomenico family, inspired by an Armenian family friend who taught them a traditional pilaf recipe. This unique mix of rice, pasta, and seasonings quickly gained popularity, earning its place as a kitchen classic. Its affordability and versatility made it an instant hit with families looking for a convenient yet delicious meal option.
Over the decades, Rice-A-Roni evolved into various flavors, catering to diverse tastes while maintaining its original charm. From humble beginnings to an international favorite, it has become a cultural icon in the world of boxed side dishes.
Link to: Never Screw Up White Rice Again With This Simple Trick by All Recipes
Want to learn how to elevate your Rice-A-Roni game? Before diving into cooking tips, understanding the core ingredients will set the foundation for a flawless dish. Let’s explore that in Part 2!
Understanding the Ingredients
When aiming to make perfect Rice-A-Roni, knowing the components is half the battle. Each ingredient plays a crucial role in delivering the dish’s signature flavor and texture. Here, we’ll break down the essential elements, giving you a deeper appreciation for what goes into this crowd-pleaser.
Core Components
Rice
Rice is the star of the show! Typically, long-grain white rice is used in Rice-A-Roni for its light and fluffy texture. The grains stay separate, ensuring that every bite is tender yet firm. Other types, such as basmati or jasmine, can work too, though they may alter the flavor profile. Avoid short-grain varieties as they tend to become sticky and clumpy.
Pasta
The addition of pasta—usually broken vermicelli or thin spaghetti—sets Rice-A-Roni apart from other rice dishes. Sautéing the pasta with rice in butter not only adds flavor but also creates a slightly nutty aroma. The pasta also gives the dish its signature texture, balancing the fluffiness of the rice with a subtle bite.
Seasonings
The seasoning packet included in boxed Rice-A-Roni contains a blend of herbs, spices, and sometimes powdered broth. It’s designed to deliver bold, savory flavors that pair well with the dish’s simplicity. If making your own seasoning mix, try using a combination of garlic powder, onion powder, parsley, paprika, and a dash of salt and pepper.
Nutritional Information
Rice-A-Roni is undoubtedly a comforting treat, but it’s important to be mindful of its nutritional content.
- Calories: A standard serving contains around 190–250 calories.
- Sodium: The seasoning packet can be high in sodium, often exceeding 700 mg per serving. For a healthier twist, consider making your own low-sodium seasoning blend.
- Carbohydrates: With its rice and pasta base, Rice-A-Roni is carb-heavy, providing energy and fullness.
- Protein: While the dish itself is low in protein, pairing it with lean meats or beans can turn it into a more balanced meal.
By understanding the components, you’ll be better equipped to customize the dish to suit your preferences or dietary needs.
Now that we’ve broken down the ingredients, it’s time to get into the nitty-gritty of preparing the perfect dish. From choosing the right tools to properly measuring ingredients, Part 3 will ensure you’re ready to cook like a pro!
Preparing to Cook Rice-A-Roni
Making perfect Rice-A-Roni starts long before you light the stove. Proper preparation ensures you’re set up for success and avoids unnecessary hiccups in the cooking process. Here’s everything you need to know about getting ready to cook.
Necessary Equipment
Having the right tools makes all the difference in achieving consistency and flavor. You don’t need fancy gadgets—just a few kitchen basics:
- Nonstick Skillet or Saucepan: A wide, heavy-bottomed skillet ensures even heat distribution and prevents sticking.
- Wooden Spoon or Silicone Spatula: Ideal for sautéing the rice and pasta without damaging your pan.
- Measuring Cups and Spoons: Precise measurements matter, especially when adding liquid.
- Lid: A snug-fitting lid helps trap steam for perfectly cooked rice.
- Small Mixing Bowl (optional): Useful for preparing homemade seasoning blends.
Ingredient Preparation
Before you dive into cooking, a little prep work can save you time and stress.
Measure Everything First
- Measure your rice, pasta, and liquid (typically water or broth). A common ratio is 1 part rice to 2 parts liquid, though this may vary slightly depending on the recipe.
- If you’re creating your own seasoning mix, blend the spices in a small bowl for easy access during cooking.
Chop Any Add-Ins
Planning to enhance your dish with vegetables, herbs, or proteins? Chop them in advance. Popular add-ins include diced bell peppers, peas, carrots, or shredded chicken.
Heat Your Broth or Water
For quicker cooking, warm your broth or water in a separate pot or microwave. Adding warm liquid prevents drastic temperature changes, allowing the rice and pasta to cook more evenly.
The Importance of Mise en Place
Ever heard the phrase mise en place? It’s French for “everything in its place,” and it’s a principle every cook should follow. Before you turn on the heat, ensure all your ingredients are prepped, measured, and within arm’s reach. This avoids scrambling mid-recipe and helps you focus on executing each step perfectly.
With your tools and ingredients prepped, you’re ready to move on to the fun part—cooking! In Part 4, we’ll guide you through the step-by-step process to make Rice-A-Roni that’s flavorful, fluffy, and absolutely irresistible.
Step-by-Step Cooking Instructions
Now that you’re prepped and ready, let’s dive into the process of cooking perfect Rice-A-Roni. Following these steps carefully will ensure a flavorful and fluffy dish that’s sure to impress.
Sautéing the Rice and Pasta
Sautéing is the first and arguably most important step in making perfect Rice-A-Roni. It develops a nutty, rich flavor that forms the base of the dish.
- Heat the Pan: Place your skillet or saucepan over medium heat and add a tablespoon of butter or oil. Let it melt completely before proceeding.
- Add the Rice and Pasta: Toss in the dry rice and pasta, stirring frequently to coat them evenly in the fat.
- Toast to Perfection: Cook, stirring often, until the rice and pasta turn golden brown. This step enhances the flavor, so don’t rush it. You’re looking for a warm, toasty aroma and a lightly browned color.
Pro Tip: Don’t let the heat get too high, as it can burn the rice and pasta before they’re evenly toasted.
Adding Liquid and Seasonings
Once your rice and pasta are beautifully toasted, it’s time to add the liquid and seasonings. This step requires precision to ensure perfect texture and flavor.
- Carefully Add Warm Liquid: Slowly pour in the warm water or broth. Be cautious, as the hot pan can cause the liquid to splatter.
- Mix in the Seasonings: Stir in the seasoning packet or your homemade blend until fully dissolved. This ensures even flavor throughout the dish.
- Bring to a Boil: Increase the heat to high and bring the mixture to a rolling boil.
Simmering to Perfection
The final step is simmering, where the rice absorbs the liquid and all the flavors meld together.
- Lower the Heat: Once boiling, reduce the heat to low. Cover the pan with a lid to trap the steam.
- Let It Cook: Simmer for about 15–20 minutes, or until the liquid is fully absorbed. Avoid lifting the lid frequently, as this releases steam and slows cooking.
- Check the Texture: After the cooking time, test the rice. It should be tender but not mushy. If it’s undercooked, add a splash of water and continue simmering for a few minutes.
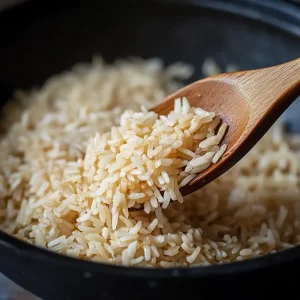
- Fluff with a Fork: Once done, remove the pan from the heat and let it rest for 5 minutes. Fluff the rice gently with a fork to separate the grains.
- Quick Tip: For an extra boost of flavor, sprinkle fresh herbs like parsley or cilantro over the finished dish before serving.
Now that you’ve mastered the basics, you’re well on your way to making consistently delicious Rice-A-Roni. In Part 5, we’ll share expert tips and tricks to take your dish to the next level, including how to avoid common mistakes and enhance the flavor profile.
Tips and Tricks for Perfect Rice-A-Roni
While following the recipe is crucial, a few insider tips can make a world of difference in achieving perfect Rice-A-Roni. Let’s explore some tricks to avoid common pitfalls and take your dish from good to spectacular.
Avoiding Common Mistakes
Mistakes happen, but these simple strategies will help you sidestep them for consistently great results:
- Prevent Mushiness: Too much liquid or overcooking can result in soggy rice. Stick to the recommended liquid-to-rice ratio and avoid excessive stirring during cooking.
- Even Browning: When sautéing the rice and pasta, stir frequently to ensure even browning. Unevenly toasted grains can lead to inconsistent texture and flavor.
- Proper Heat Control: Don’t simmer at high heat—it can cause the liquid to evaporate too quickly, leaving the rice undercooked. Keep the heat low and steady.
Enhancing Flavor
Rice-A-Roni is delicious as is, but a few simple tweaks can elevate its taste to gourmet levels:
- Use Broth Instead of Water: Swap water for chicken, beef, or vegetable broth to add depth and richness to the flavor.
- Add Aromatics: Toss in minced garlic, diced onions, or a pinch of red pepper flakes during the sautéing step for extra flavor.
- Incorporate Fresh Herbs: Stir in chopped parsley, cilantro, or dill just before serving for a fresh, vibrant finish.
Pro Tip: Try adding a squeeze of lemon juice or a sprinkle of grated Parmesan cheese to give your Rice-A-Roni a zesty twist.
Creative Add-Ins
Make your Rice-A-Roni a complete meal by incorporating proteins and vegetables:
- Lean Proteins: Stir in cooked chicken, shrimp, or turkey for a protein boost.
- Colorful Vegetables: Add frozen peas, sautéed mushrooms, or diced bell peppers to enhance both nutrition and visual appeal.
- Nuts and Dried Fruits: For a Mediterranean vibe, toss in slivered almonds, raisins, or chopped apricots.
By keeping these tips in mind, you’ll ensure every batch of Rice-A-Roni is not only flavorful but also beautifully textured. In the next section, we’ll explore creative variations and customizations, including how to craft your own homemade Rice-A-Roni from scratch. Stay tuned!
Variations and Customizations
Rice-A-Roni is versatile enough to adapt to different tastes, dietary needs, and creative inspirations. From homemade options to dietary tweaks, here’s how you can tailor this dish to fit your preferences.
Homemade Rice-A-Roni
Making Rice-A-Roni from scratch is simpler than you might think, and it gives you complete control over the ingredients.
- Ingredients:
- 1 cup of long-grain white rice
- ½ cup of broken vermicelli or thin spaghetti
- 2 tablespoons of butter
- 2 cups of chicken or vegetable broth
- Your choice of seasonings: garlic powder, onion powder, paprika, and a pinch of salt
- Instructions:
- Sauté the rice and pasta in melted butter until golden brown.
- Add your broth and seasonings, stir, and bring to a boil.
- Reduce the heat to low, cover, and simmer until the liquid is absorbed.
Homemade Rice-A-Roni tastes fresher and allows for endless flavor possibilities. Plus, it’s an excellent choice for those wanting to avoid packaged options.
Dietary Modifications
For those with specific dietary needs, Rice-A-Roni can be customized to align with your goals:
- Gluten-Free Version: Use gluten-free pasta and ensure your broth is labeled gluten-free.
- Low-Sodium Option: Replace the seasoning packet or use a homemade blend with minimal salt. Opt for low-sodium broth or water as the liquid base.
- Dairy-Free Alternative: Substitute butter with olive oil or a plant-based butter alternative.
Flavor Variations
Get creative with these regional or themed twists:
- Mexican-Inspired: Add cumin, chili powder, and diced tomatoes. Top with fresh cilantro and lime juice for a zesty kick.
- Mediterranean Style: Use olive oil, oregano, and lemon zest. Stir in olives, sun-dried tomatoes, and feta cheese for a vibrant dish.
- Asian Fusion: Swap butter for sesame oil, add a dash of soy sauce, and stir in cooked peas and carrots for a fried rice-inspired twist.
Pro Tip: Experiment with seasoning blends like Italian seasoning, Cajun spices, or curry powder to create your own signature flavor.
Customizing Rice-A-Roni opens up endless possibilities for creative home cooking. Whether you’re aiming for a healthier option, exploring global flavors, or making it from scratch, this dish can easily be tailored to your liking. Next, we’ll dive into serving suggestions and presentation tips to make your Rice-A-Roni meal shine!
Serving Suggestions
Once your Rice-A-Roni is perfectly cooked, the next step is serving it up in a way that’s not only delicious but visually appealing. Whether you’re pairing it with proteins, vegetables, or other sides, here’s how to take your Rice-A-Roni to the next level.
Pairing with Main Dishes
Rice-A-Roni is a versatile side dish that pairs well with many main courses, from meat to plant-based options. Here are some classic pairings:
- Grilled Chicken or Turkey: The savory flavors of Rice-A-Roni complement the mild, juicy profile of grilled poultry. Add a side of roasted vegetables to complete the meal.
- Beef Stew or Meatloaf: The heartiness of a beef stew or a rich meatloaf pairs wonderfully with the fluffy rice and pasta, soaking up the savory juices.
- Fish Fillets: Light fish like salmon or tilapia offers a perfect contrast to the comforting texture of Rice-A-Roni. Try lemon or dill for added freshness.
- Vegetarian Options: Pair with roasted vegetables, sautéed greens, or a chickpea stew for a wholesome, plant-based meal.
Presentation Tips
Presentation can elevate your meal and make it more visually inviting. Here are a few simple ideas for plating your Rice-A-Roni beautifully:
- Layered Look: Serve your Rice-A-Roni in a neat mound, garnished with chopped herbs like parsley or cilantro.
- Color Contrast: If you’ve added vegetables, arrange them around the Rice-A-Roni for a vibrant pop of color.
- Serving in Bowls: For a cozy, family-style meal, serve Rice-A-Roni in deep bowls with your main dish on the side.
- Garnish: Consider garnishing with freshly grated Parmesan cheese for an extra layer of flavor and elegance.
Tip: A sprinkle of freshly cracked black pepper or a drizzle of extra virgin olive oil can add a touch of finesse to your presentation.
By pairing Rice-A-Roni with complementary dishes and using simple plating techniques, you can create a balanced and visually stunning meal. This side dish is perfect for both casual dinners and special occasions, ensuring your meal is as delightful to look at as it is to eat. Up next, we’ll answer some frequently asked questions to clear up any remaining doubts.
Frequently Asked Questions (FAQs)
As you dive into the world of Rice-A-Roni, questions may arise about how to perfect your dish. In this section, we’ll answer some of the most common queries to ensure that you have all the tools and tips you need for a flawless Rice-A-Roni every time.
How Can I Prevent My Rice-A-Roni from Becoming Mushy?
A common challenge with Rice-A-Roni is achieving the perfect texture. To avoid mushiness, here are a few key tips:
- Don’t Overcook the Rice: Stick to the cooking times indicated on the package. Overcooking can lead to soft, mushy rice.
- Use the Right Amount of Liquid: The correct ratio of liquid to rice is crucial. If you’re adding broth or water, be sure to follow the package instructions closely to prevent excess moisture.
- Let it Rest: After cooking, let your Rice-A-Roni sit covered for a few minutes. This allows the steam to finish cooking the rice without over-softening it.
By keeping a close eye on your cooking time and liquid levels, you can maintain a fluffy, well-textured Rice-A-Roni.
Can I Cook Rice-A-Roni in a Rice Cooker?
Absolutely! While Rice-A-Roni is typically made on the stovetop, you can easily cook it in a rice cooker for a hands-off approach. Here’s how to adapt the process:
- Use the Sauté Function: If your rice cooker has a sauté option, use it to brown the rice and pasta first. If not, sauté them separately in a pan.
- Add Liquid and Seasoning: After sautéing, transfer the mixture to the rice cooker, add your liquid (broth or water), and seasonings.
- Cook as Usual: Allow the rice cooker to cook the dish according to its white rice setting. It should be ready in about the same amount of time.
Rice cookers can produce a deliciously cooked Rice-A-Roni with minimal effort, making them an excellent choice for busy weeknights.
What Are Some Popular Homemade Rice-A-Roni Recipes?
If you’re looking to go beyond the boxed version, there are plenty of ways to create your own homemade Rice-A-Roni. Here’s a simple recipe to try:
Homemade Rice-A-Roni Recipe
- Ingredients:
- 1 cup rice (long grain or jasmine works well)
- ½ cup broken spaghetti
- 2 tbsp butter
- 2 cups chicken broth (or vegetable broth for a vegetarian version)
- 1 small onion, finely chopped
- 1 tsp garlic powder
- 1 tsp parsley flakes
- Salt and pepper to taste
- Instructions:
- In a large skillet, melt butter over medium heat. Add the broken spaghetti and rice. Sauté for about 5 minutes until the pasta is golden brown.
- Add the chopped onion and cook for another 2 minutes.
- Stir in the garlic powder, parsley, salt, and pepper.
- Pour in the chicken broth and bring to a boil.
- Reduce heat, cover, and simmer for 15-20 minutes, or until the liquid is absorbed and the rice is tender.
This homemade version allows for customization of the seasonings and gives you a fresher, more personalized dish.
Is Rice-A-Roni Gluten-Free?
Traditional Rice-A-Roni contains pasta, which means it is not gluten-free. However, there are gluten-free versions available on the market, made with gluten-free pasta instead. Be sure to check the label when purchasing if you need a gluten-free option.
Alternatively, you can create a gluten-free homemade Rice-A-Roni by using gluten-free pasta and adjusting the seasonings as you like.
How Long Does Leftover Rice-A-Roni Last?
Leftover Rice-A-Roni can last up to 4-5 days when stored properly in an airtight container in the refrigerator. For longer storage, you can freeze Rice-A-Roni for up to 1 month.
To reheat, simply microwave it with a splash of broth or water to restore moisture, or reheat it in a skillet over low heat, stirring occasionally.
These answers to some of the most common questions will ensure your Rice-A-Roni comes out perfectly every time. Whether you’re making it on the stovetop, in a rice cooker, or crafting your own homemade version, these tips will guide you to success. Ready to dive into part 9 and wrap up our journey with Rice-A-Roni?