
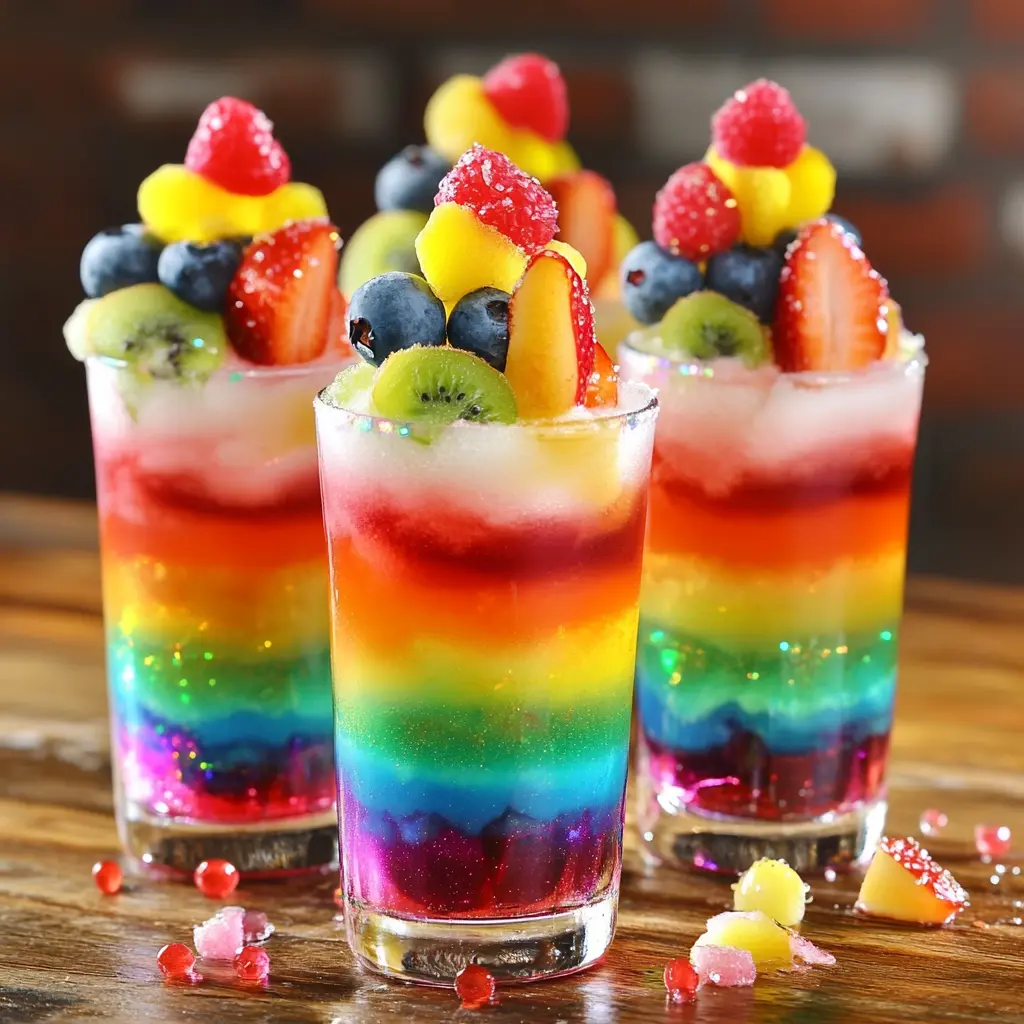
Rainbow Melt Shots: A Guide to Creating Stunning, Shimmery Layered Shots
Have you ever wanted to impress guests with a drink that doesn’t just taste fantastic but also looks like a work of art? Enter the Rainbow Melt Shot — a colorful, layered cocktail that captures the beauty of a summer sunset or the wonder of a prism. The Rainbow Melt Shot is a drink that can quickly become the highlight of any gathering, making every toast a memorable moment. Its luminous layers of bold fruit liqueurs and shimmering edible dust create a mesmerizing effect that feels almost magical.
In this article, we’ll explore the making of the Rainbow Melt Shot in meticulous detail, breaking down every step from choosing the right ingredients to mastering the technique for seamless layers. We’ll also cover why this shot is so captivating, how it delivers both visual and flavor appeal, and ways you can adjust or adapt the recipe for your personal taste.
With over 1,500 words dedicated to making and understanding this cocktail, this guide aims to help you create a drink that will delight your guests long after the glasses have been drained.
The Allure of the Rainbow Melt Shot
Modern mixology isn’t just about creating delicious drinks — it’s about crafting an experience. The Rainbow Melt Shot delivers in both areas. The beauty of its multi-layered structure, combined with the shimmer that catches every glint of light, makes this one of the most captivating shots you can serve.
Each component plays a role:
-
Grenadine (red): The base of the shot, providing both a rich red color and a sweet, pomegranate-like flavor.
-
Peach Schnapps (orange): This layer introduces a soft fruitiness and a mild sweetness that bridges the boldness of the grenadine and the tropical flair of the next layers.
-
Midori (green): The electric green of Midori melon liqueur adds vibrancy and a crisp, fresh melon flavor.
-
Blue Curaçao (blue): The blue layer evokes tropical skies and delivers a citrusy kick that balances the sweetness of the lower layers.
-
Vodka with edible shimmer dust: The finishing touch that captures the magical essence of this shot. The shimmer dust creates a translucent, swirling effect that gives the drink its unique “melt” appearance.
The interplay between these layers doesn’t just result in an attractive drink — it creates a symphony of complementary flavors. The sweetness of the grenadine and peach schnapps plays off the crisp, tropical freshness of Midori and blue curaçao, making every sip an intriguing journey across the palate.
The Importance of Technique
While the Rainbow Melt Shot is a relatively simple cocktail in terms of ingredients, achieving its beautiful layered effect takes precision and patience. The secret lies in understanding the densities of each liquid and pouring technique.
Each component has a specific sugar and alcohol content, making some ingredients naturally sink to the bottom while others rise. The general rule of layered drinks applies here:
-
Heavier, higher-sugar liquids sink to the bottom.
-
Lighter, higher-alcohol liquids float to the top.
To achieve crisp, distinct layers:
-
Use a Bar Spoon: The rounded back of a bar spoon is the best tool for creating clean, sharp layers. Pouring over the back of a spoon disperses the liquid’s force, allowing it to rest atop the previous layer rather than breaking through it.
-
Chill All Ingredients: Temperature impacts the density and fluidity of liquids. Keeping your liqueurs cold ensures that they settle in layers more easily.
-
Pour Slowly and Steadily: A slow, deliberate pour gives each layer the chance to settle naturally, making the lines between layers sharp and well-defined.
Ingredients and Equipment You Will Need
Here’s the list of ingredients required for approximately six Rainbow Melt Shots:
-
1/4 cup Grenadine (red): Provides a rich, deep-red base.
-
1/4 cup Peach Schnapps (orange): A sweet, fragrant layer.
-
1/4 cup Midori (green): A bright, crisp melon-flavored liqueur.
-
1/4 cup Blue Curaçao (blue): A vivid blue, citrus-flavored liqueur.
-
1/2 cup Vodka (optional): If you’d like a stronger version of the shot.
-
1 tsp Edible Shimmer Dust (silver or pearl): To create the magical “shimmer cloud” effect.
-
Ice Cubes: To chill your ingredients.
Equipment:
-
Shot glasses (2–3 oz.)
-
Bar spoon
-
Small mixing glass
-
Small funnel (optional)
The Step-by-Step Recipe
1. Chill the Ingredients
Prior to assembling the shots, it’s crucial to chill your liqueurs and vodka. Put your grenadine, peach schnapps, Midori, and blue curaçao in the refrigerator for at least an hour. This step will help maintain clean separation between layers and make pouring smoother.
2. Build the Layers
Step 1: Begin by pouring a tiny amount of grenadine into the base of each shot glass — roughly 1–2 tsp per glass.
Step 2: Position a bar spoon just above the surface of the grenadine, and slowly pour the peach schnapps over the back of the spoon. This allows the schnapps to rest gently on top, creating a distinct separation between the layers.
Step 3: Repeat this process for the Midori. Its green color creates a vivid middle layer, making your shot resemble a tropical paradise.
Step 4: Finish by pouring the blue curaçao over the spoon, ensuring the blue rests gracefully atop the green.
Each step requires a slow, patient hand — this is what separates a sloppy shot from a work of liquid art.
3. Add the Shimmer
In a separate glass, mix the vodka with edible shimmer dust until the dust is fully incorporated. The shimmer doesn’t just add visual flair — it creates a unique texture and experience. Slowly pour this shimmering vodka over the top layer, allowing it to float and mingle slightly with the blue curaçao, creating an otherworldly “cloud” effect.
If you’re making a non-alcoholic version, you can skip the vodka and shimmer or use a shimmer dust-friendly soda or clear mixer.
Why These Shots Are Special
At first glance, the Rainbow Melt Shot might seem like a fancy party drink, but it’s more than just a beautiful shot. Here’s why it stands out:
A Feast for the Eyes
The Rainbow Melt Shot is visually captivating. Its layered colors create a gradient effect that mimics a tropical sunset, making it an ideal conversation piece. The shimmer dust adds a hint of magic, making the shot ideal for special occasions — from birthday celebrations and wedding toasts to New Year’s Eve countdowns.
Balanced Flavor Profile
Each liqueur provides a distinct flavor:
-
The grenadine delivers sweetness with a hint of tartness.
-
The peach schnapps adds a warm, fruity richness.
-
The Midori offers crisp melon freshness.
-
The blue curaçao finishes with a sharp citrus kick.
Altogether, this creates a balanced and satisfying tasting experience.
Pure Theatrical Delight
Each step of making the Rainbow Melt Shot can be performed right in front of guests, making it a spectacle as well as a drink. The mesmerizing interplay of colors and the shimmer of the top layer draw attention, making it an experience worth repeating.
Tips for Perfecting the Rainbow Melt Shot
Pour Slowly: The slower you pour, the cleaner and more defined your layers will be.
Use a Bar Spoon: Never pour directly from the bottle when layering — always use a bar spoon for precision.
Adjust Proportions: Depending on the size of your shot glasses, adjust the quantity of each liqueur to maintain a balanced layered effect.
Experiment with Flavors: Swap Midori for another green liqueur or blue curaçao for another blue-colored option for a new flavor profile.
Try Under a Spotlight: These shots truly come alive under party lighting. The shimmer dust reflects and refracts light, making the shot shimmer and glow.
Make It a Cocktail: You can transform the Rainbow Melt Shot into a larger cocktail version for special events. Use a martini or coupe glass and adjust the proportions accordingly.
Frequently Asked Questions
Q: Can I make these shots in advance?
A: It’s best to make Rainbow Melt Shots just before serving. The layers can mix over time, and the shimmer dust may settle.
Q: Is there a non-alcoholic version?
A: Absolutely! Replace the liqueurs with fruit syrups or sodas (like melon soda, blue raspberry soda, and fruit punch), and skip the vodka for the shimmer cloud.
Q: Will the shimmer dust affect the flavor?
A: No. The shimmer dust is flavorless and doesn’t alter the taste of the drink.
Q: Do I need special equipment?
A: Not necessarily, but a bar spoon and a steady hand are highly recommended.
Final Thoughts
The Rainbow Melt Shot is more than a drink — it’s an experience. Its colorful layers, captivating shimmer, and harmonious flavors create a memorable moment every time it’s served.
With a bit of patience and precision, you can transform this simple shot into a showstopper that delights both the eyes and the palate. Whether you’re making it for an intimate gathering or a lively party, the Rainbow Melt Shot delivers a one-of-a-kind spectacle and a delicious treat for your guests.
Give this recipe a try, hone your pouring technique, and watch as your friends and family marvel at the beauty and craftsmanship of a perfectly made Rainbow Melt Shot. Enjoy!
Rainbow Melt Shots
Description
🌈 Rainbow Melt Shots
Layered fruit liqueurs topped with shimmer cloud
Ingredients (makes ~6 shots):
-
1/4 cup grenadine (red)
-
1/4 cup peach schnapps (orange)
-
1/4 cup Midori (green)
-
1/4 cup blue curaçao (blue)
-
1/2 cup vodka (optional, for strength)
-
1 tsp edible shimmer dust (silver or pearl)
-
Ice cubes
Instructions:
-
Chill ingredients: Keep your liqueurs cold for cleaner layering.
-
Pour the base: Add a tiny amount of grenadine (red) to the bottom of each shot glass.
-
Build the layers: Slowly pour the peach schnapps over the back of a spoon to create an orange layer, followed by Midori (green), and then blue curaçao (blue).
-
Add shimmer: Stir a tiny pinch of edible shimmer dust into the vodka, then slowly pour it over the top for a “shimmer cloud” effect.
-
Serve immediately for the best layered and shimmering look.
Tips:
✅ Pour each layer slowly over the back of a spoon to maintain separation.
✅ Adjust the proportions based on your shot glass size.
✅ Try under a spotlight or party lights to make the shimmer really pop!