
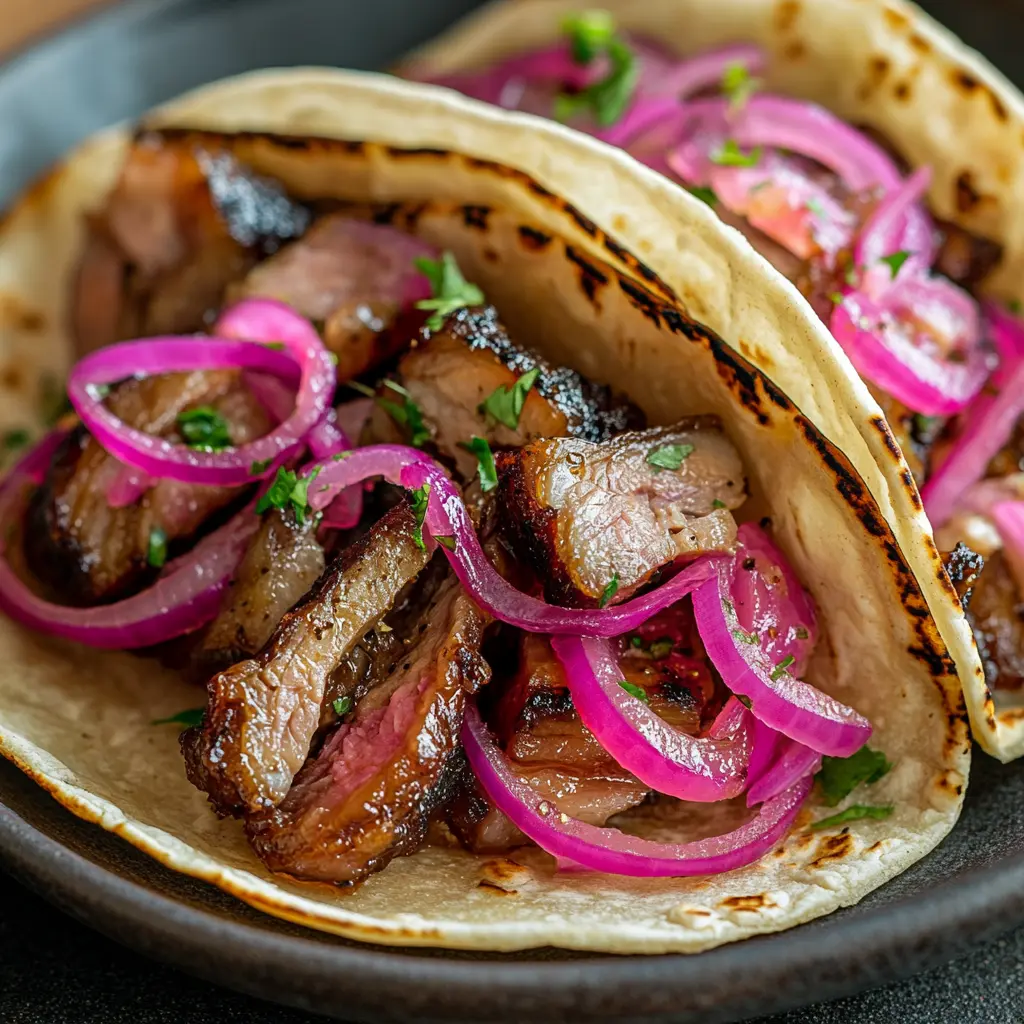
Get ready to embark on a culinary adventure that will absolutely transform your taco Tuesday—or any day of the week, for that matter! This isn’t just another recipe; it’s a deep dive into creating the most mind-blowing, flavor-packed Pork Belly Tacos with Pickled Red Onion you’ll ever make at home. We’re talking about a symphony of textures and tastes: impossibly crispy pork belly that gives way to melt-in-your-mouth tenderness, all perfectly balanced by the sweet, tangy crunch of quick-pickled red onions. Wrapped in a warm tortilla and finished with cool, creamy garnishes, this dish is a true celebration of contrast. So, buckle up! We’re going to guide you through every single step, from selecting the perfect slab of pork belly to mastering the quick-pickle, ensuring your taco game is nothing short of legendary.
Introduction & The Star Ingredients
The Ultimate Pork Belly Tacos with Pickled Red Onion: A Symphony of Texture and Flavor
Picture this: a soft, warm tortilla cradling a piece of succulent, crispy pork belly that crackles with the first bite. Suddenly, a burst of bright, tangy pickled red onion cuts through the rich fat, while a drizzle of cool crema and a fresh cilantro leaf bring everything together in perfect harmony. Honestly, it’s a life-changing experience in a single bite! This particular combination isn’t just popular by accident; it’s a meticulously crafted balance of umami, acid, fat, and crunch that keeps people coming back for more. Consequently, this guide is designed to be your ultimate resource, transforming you from a taco enthusiast into a bona fide pork belly maestro. We’ll leave no stone unturned, ensuring your homemade version rivals any you’d find in a gourmet restaurant.
Why This Pork Belly Taco Recipe Will Become Your Favorite
Let’s be real, pork belly has taken the culinary world by storm, and for good reason. Its incredible versatility and unmatched flavor profile make it a favorite among chefs and home cooks alike. When braised or roasted low and slow, it becomes unbelievably tender; however, when you give it a final blast of high heat, the fat renders and the skin puffs up into this magical, crispy crackling that is simply to die for.
Now, pair that rich, savory goodness with the sharp, sweet tang of quick-pickled onions, and you’ve got a match made in heaven. The acidity acts like a palate cleanser, cutting through the fat and ensuring each bite is exciting and not the least bit heavy. Furthermore, this taco recipe is incredibly versatile. Believe it or not, with a little prep, it can be a stunning weeknight dinner. Alternatively, it’s also an absolute showstopper for feeding a crowd on game day or at your next party. In the following sections, we’ll not only provide a detailed recipe but also explore the science behind the perfect cook, offer pro tips for meal prep, and answer all your burning questions. Ultimately, our goal is to arm you with everything you need for taco perfection.
Deconstructing the Dish: A Focus on Core Components
The Anatomy of a Perfect Pork Belly Taco
Creating a truly unforgettable taco is a lot like building a house; you need a solid foundation and well-constructed layers to make it stand tall. Firstly, you have the base: a pliable, warm corn tortilla (or flour, if you prefer) that provides a soft, sturdy vehicle for the goodness above. Secondly, the star of the show: the gloriously rich and crispy pork belly, offering a powerful punch of savory, umami flavor. Thirdly, the crucial counterbalance: the vibrant, quick-pickled red onions that cut through the fat with their sharp, acidic tang. After that, a creamy element like a cilantro lime crema or avocado adds a cooling, luxurious texture. Finally, fresh garnishes like chopped cilantro, a sprinkle of cotija cheese, and a squeeze of lime juice provide the finishing touches, brightening every single bite. Consequently, when these components work in harmony, the result is nothing short of magical.
Pork Belly: Understanding Your Main Attraction
So, what exactly is this magical cut of meat? Essentially, pork belly is a boneless, fatty cut that comes from, you guessed it, the belly of the pig. It’s actually the very same cut that bacon is made from! However, unlike bacon, it’s not cured or smoked, giving you a blank canvas for your own flavor creations. Its high fat content is the key to its superpower: when cooked properly, that fat renders slowly, basting the meat from within and resulting in an incredibly juicy and tender final product.
When you’re at the butcher counter or supermarket, you’ll likely have a choice. You can often find it with the skin on or off. For the ultimate crispy pork belly experience, skin-on is the way to go. The skin, when scored and roasted, transforms into that famous, bubbly crackling we all crave. Alternatively, look for a piece with a good balance of meat and fat—not a solid white block, but a nice marbling of pink meat throughout. A fresh, pink color and a clean smell are your best indicators of quality.
Pickled Red Onions: The Tangy Game-Changer
Now, let’s talk about the secret weapon, the humble condiment that elevates these tacos from great to extraordinary: the pickled red onion. Honestly, don’t even think about skipping this step! Raw red onion can be overwhelmingly sharp and pungent, often overpowering other flavors. Pickling, however, completely transforms it. The process tames its fierceness, mellows its flavor, and imbues it with a delightful sweet-and-sour tanginess that complements rich dishes perfectly.
The transformation isn’t just about taste; it’s also about texture. The quick-pickling process keeps the onion remarkably crunchy, providing an essential textural contrast to the soft tortilla and tender pork. The best part? The basic formula is incredibly simple, requiring little more than vinegar, water, sugar, and salt. As the onions sit in this acidic bath, they also take on a stunning, vibrant fuchsia hue that makes your final dish look as beautiful as it tastes. It’s a simple step with a huge payoff.
The Recipes – Part 1 (The Pickle & The Prep)
Crafting Your Quick-Pickled Red Onions
Alright, let’s get started with the easiest part of this entire recipe—the onions! You can whip these up in mere minutes, and honestly, you’ll want to put them on everything once you taste them. The beauty of a quick-pickle is that it doesn’t require any fancy canning equipment or a long waiting period. Essentially, you’re just creating a simple, hot brine and letting the onions soften and marinate in it. Consequently, they’ll be ready to provide that crucial acidic kick by the time your pork belly is done roasting.
Ingredients for Quick-Pickled Red Onions
Gathering your ingredients is the first step. You’ll need:
-
1 large red onion, thinly sliced
-
¾ cup apple cider vinegar (white vinegar works great too!)
-
¼ cup water
-
2 tablespoons sugar
-
1½ teaspoons kosher salt
-
Optional flavor boosters: 1 jalapeño (thinly sliced), 1 clove garlic (smashed), 5-10 peppercorns, or a pinch of dried oregano.
Step-by-Step Pickling Instructions
Now, for the fun part—transforming those sharp onions into a tangy topping.
-
Prepare the Jar and Pack the Onions: First, grab a clean glass jar or bowl with a lid. Then, thinly slice your red onion. A mandoline is fantastic for getting perfectly even slices, but a sharp knife works just fine. After that, pack the sliced onions (and any optional add-ins like jalapeño or garlic) into your container.
-
Create the Brine: Next, combine the vinegar, water, sugar, and salt in a small saucepan. Heat this mixture over medium heat, stirring occasionally. Your goal is to just bring it to a gentle simmer, ensuring the sugar and salt fully dissolve. This should only take about 2-3 minutes; you don’t need to boil it vigorously.
-
Pour the Hot Brine Over the Onions: Carefully pour the hot liquid over the onions in the jar, making sure they are completely submerged. You might need to push them down with a spoon to get them all under the brine. This step is crucial for even pickling!
-
Cool and Refrigerate: Finally, let the jar cool down to room temperature on your counter. Once it’s no longer warm, seal it with a lid and pop it into the refrigerator. Believe it or not, they’ll be nicely pickled in about 30 minutes. However, for the best flavor, let them sit for at least an hour, or ideally, make them a day ahead. According to the fundamental science of safe pickling, this quick method is perfect for short-term storage.
Preparing the Pork Belly: Scoring and Seasoning
Before we even think about turning on the oven, we need to prep our main attraction. Proper preparation is the absolute, non-negotiable secret to achieving that legendary crispy skin and deeply seasoned meat. This process is simple, but every step is vital.
Step-by-Step Prep Guide
Follow these steps for a perfectly prepped piece of pork.
-
Pat Dry: First, unwrap your pork belly and place it on a cutting board, skin-side up. Then, take several paper towels and pat the skin and all sides of the meat completely dry. This is perhaps the most important step! Any moisture on the surface will steam the skin instead of letting it get crispy.
-
Score the Skin: Using a very sharp knife or even a utility blade (be careful!), make shallow cuts into the skin and fat layer in a cross-hatch (diamond) pattern. Try to space the cuts about about an inch apart. Your goal is to cut through the skin and into the fat, but not deep enough to reach the meat itself. This scoring helps the fat render out during cooking and allows any seasonings to penetrate deeper.
-
Season Aggressively: Now, generously season every side of the belly with kosher salt and freshly ground black pepper. Don’t be shy! You can also rub on your favorite spices at this point—think smoked paprika, cumin, or chili powder. Make sure to work the seasoning into all the nooks, crannies, and scores you just made. This step ensures every single bite is packed with flavor.
The Recipes – Part 2 (Cooking the Pork Belly)
Method 1: The Low and Slow Roast (For Maximum Crispness)
Alright, let’s get down to the main event: cooking that gorgeous slab of pork belly. This first method is our top recommendation for achieving the ultimate textural contrast—incredibly tender meat beneath an unbelievably crispy, puffed-up skin. It’s a classic two-stage process that requires a little patience but delivers absolutely jaw-dropping results. Essentially, you’re slowly rendering out the fat to tenderize the meat before finishing it with a blast of high heat to crisp up the exterior.
Ingredients and Equipment
For this method, you won’t need much beyond the pork itself and your seasonings. However, the right equipment is key.
-
Ingredients: Your pre-scored and seasoned pork belly, plus any additional dry rub spices you desire (e.g., garlic powder, cumin, or smoked paprika).
-
Equipment: A roasting pan fitted with a wire rack is absolutely essential. This allows hot air to circulate around the entire piece of meat, ensuring it cooks evenly and doesn’t sit in its own rendered fat. You’ll also need aluminum foil.
Cooking Instructions
Follow these steps carefully for pork belly perfection.
-
Low and Slow Roast: First, preheat your oven to a low 275°F (135°C). Then, place the prepped pork belly on the wire rack in your roasting pan, skin-side up. Slide it into the oven and let it roast, undisturbed, for about 2.5 to 3 hours. You’ll know it’s ready when the meat is tender enough to be easily pierced with a fork. At this stage, the skin will be tough and leathery, not crispy—that’s totally normal!
-
The High-Heat Finish: Now, here’s where the magic happens. Remove the pan from the oven. Carefully transfer the pork belly to a clean cutting board. Then, increase your oven temperature to a high broil (around 450°F / 230°C). While it’s heating up, line your roasting pan with fresh aluminum foil for easy cleanup and place the wire rack back on top. Return the pork belly to the rack. Finally, place it back under the broiler, watching it like a hawk for 5 to 10 minutes. The skin will bubble and puff up into perfect crackling. Turn the pan if needed for even coloring.
-
Rest and Slice: Once the skin is perfectly crisp and golden, take it out immediately. Let the pork rest for at least 10 minutes before slicing it into small cubes or strips. This allows the juices to redistribute, ensuring your crispy pork belly is also incredibly juicy.
Method 2: The Braise and Sear Technique (For Fall-Apart Tenderness)
If your priority is melt-in-your-mouth, fall-apart tenderness with a sticky, caramelized exterior, then this is the method for you. Braising is a fantastic cooking method for tougher cuts, as the slow, moist heat breaks down connective tissue beautifully. You can use a flavorful liquid like citrus juice, stock, or even cola to infuse the meat with extra depth. Afterward, a quick sear is all you need to create a delicious crust.
Ingredients and Equipment
This method incorporates more flavors directly into the cooking process.
-
Ingredients: Your pre-scored and seasoned pork belly, 1 tbsp oil for searing, and about 2-3 cups of braising liquid (e.g., a mix of chicken stock, orange juice, and a splash of soy sauce).
-
Equipment: A heavy-bottomed pot or Dutch oven with a tight-fitting lid is perfect for this.
Cooking Instructions
This technique builds layers of flavor from the very beginning.
-
Sear the Pork: First, preheat your oven to 325°F (160°C). Then, pat your pork belly dry one more time. Heat the oil in your Dutch oven over medium-high heat. Once the oil is shimmering, carefully add the pork, skin-side down. Sear it for about 4-5 minutes until it develops a golden-brown crust. Don’t move it around! Flip it and sear the other sides for a few minutes each. Remove the pork and set it aside momentarily.
-
Braise to Tenderness: Next, pour your chosen braising liquid into the pot, scraping up any delicious browned bits from the bottom. These bits are packed with flavor! Now, return the pork to the pot, skin-side up. The liquid should come about halfway up the sides of the meat; add more water or stock if needed. Bring the liquid to a gentle simmer, then cover the pot with the lid. Transfer it to the preheated oven and braise for 1.5 to 2 hours, or until the pork is fork-tender.
-
Crisp and Glaze: Finally, remove the pot from the oven. Carefully transfer the braised pork belly to a cutting board. If you want to create a glaze, strain the braising liquid and simmer it in a saucepan until it reduces and thickens. Meanwhile, to crisp up the exterior, heat a tablespoon of oil in a skillet over medium-high heat. Place the whole piece of pork in the skillet, skin-side down, and sear for a few minutes until crispy. Alternatively, you can dice the pork first and then pan-sear the cubes for more surface area. Brush with the reduced glaze for extra flavor before serving.
Assembly, Toppings, and Serving
Bringing It All Together: Taco Assembly
The finish line is in sight, and it’s smelling incredible! However, don’t fumble at the last hurdle. Taco assembly might seem straightforward, but a few small details make a massive difference in the final experience. First and foremost, you must treat your tortillas with respect. A cold, stiff tortilla straight from the package can ruin the entire carefully crafted texture of your pork belly tacos. Conversely, a warm, pliable tortilla is the perfect, welcoming blanket for your flavorful fillings.
Warming the Tortillas
This step is non-negotiable and takes just a few minutes. You have a few excellent options:
-
Over an Open Flame: If you have a gas stove, this is the best method. Simply use tongs to hold a corn tortilla directly over the medium flame for 15-30 seconds per side, until it gets slightly charred and soft.
-
In a Skillet: Heat a dry, heavy skillet (cast iron is perfect) over medium-high heat. Warm the tortillas one at a time for about 30 seconds per side until they are soft and have a few brown spots.
-
In the Oven: For a crowd, preheat your oven to 350°F (175°C). Wrap a stack of tortillas in aluminum foil and warm them for 10-15 minutes. You can also wrap them in a slightly damp kitchen towel before the foil to steam them slightly.
Keep your warmed tortillas wrapped in a clean kitchen towel inside a tortilla warmer or a bowl until you’re ready to serve. This will trap the heat and steam, keeping them soft and flexible.
Beyond the Onion: Additional Toppings and Sauces
While the pork belly and pickled onions are the stars, the supporting cast of toppings elevates the entire production. Offering a variety allows everyone to customize their perfect bite. Here are some fantastic options to consider:
Creamy Elements
A cool, creamy sauce is essential for balancing the rich pork and tangy onion.
-
Cilantro Lime Crema: Simply blend Mexican crema (or sour cream thinned with a bit of milk) with fresh cilantro, lime juice, and a pinch of salt.
-
Avocado Cream: For an even richer option, blend a ripe avocado with the crema, lime juice, and cilantro until smooth.
-
Simple Options: A dollop of plain sour cream or crumbled cotija cheese also provides a wonderful creamy, salty contrast.
Fresh Garnishes
Fresh herbs and vegetables add a crucial final layer of brightness and texture.
-
Fresh Cilantro: A sprinkle of chopped leaves is a classic for a reason.
-
Diced White Onion: For those who want an extra sharp, crunchy bite.
-
Sliced Radishes: Their peppery crunch is a fantastic addition.
-
Lime Wedges: Absolutely essential! Serve plenty on the side for that final, bright squeeze.
Extra Heat and Salsa
For the heat-seekers, provide some spicy options.
-
Salsa Verde: The tangy, herbal notes of a green tomatillo salsa pair beautifully.
-
Roasted Tomato Salsa: A smoky, red salsa is always a crowd-pleaser.
-
Sliced Jalapeños: Offer both fresh and pickled versions for different types of heat.
Now, all that’s left to do is set everything out and let your friends and family build their own masterpiece!
Pro Tips, Variations, and FAQs
Expert Tips for the Best Pork Belly Tacos Ever
You’ve got the recipe down, but these next-level pro tips are what will separate a good taco from a truly legendary one. These are the little secrets, born from experience, that guarantee success every single time.
The Dryness Secret
Let’s talk about this one more time because it’s just that important. Patting the pork belly skin completely dry is the single most critical step for achieving crackling. Any moisture left on the surface will create steam, which is the mortal enemy of crispness. You want direct, dry heat to hit that scored skin. For an even drier surface, some chefs even leave the uncovered pork belly on a rack in the fridge overnight after scoring and salting it. This air-dries the skin further, practically guaranteeing a puffy, crispy result.
The Resting Period
I know, I know—it’s tempting to slice into that beautiful, crispy pork belly the second it comes out of the oven. But you must resist! Letting the pork rest for at least 10 minutes before slicing is non-negotiable. Why? When meat is cooked, all its juices are pushed to the center by the heat. If you slice it immediately, those precious juices will just run out all over your cutting board, leaving the meat drier. Allowing it to rest gives the muscle fibers time to relax and reabsorb all that flavorful liquid, ensuring your crispy pork belly is also unbelievably juicy and tender on the inside.
Make-Ahead Magic
Think this is too much work for a weeknight? Think again! This dish is a meal-prepper’s dream.
-
The Pickled Onions: These can be made up to two weeks in advance. In fact, their flavor gets better and more rounded after a day or two in the fridge.
-
The Pork Belly: You can fully cook the pork belly through the slow-roasting phase (the first stage of Method 1) up to two days ahead. Let it cool, cover it, and refrigerate. When you’re ready to serve, simply bring it to room temperature for 30 minutes, then proceed with the final broiling step to crisp up the skin. It works perfectly!
Delicious Variations to Try
Once you’ve mastered the classic, the world is your taco! Don’t be afraid to play with different global flavor profiles.
Global Fusion
-
Korean-Inspired: Swap the spice rub for a mix of gochujang (Korean chili paste), soy sauce, sesame oil, and a bit of brown sugar. After crisping, garnish with the pickled red onions, a drizzle of the gochujang glaze, and some quick-pickled cucumbers for a fantastic Korean BBQ taco fusion.
-
Asian-Style: Marinate the pork belly in a blend of hoisin sauce, five-spice powder, and garlic. Serve in steamed bao buns or tortillas with scallions and a sprinkle of sesame seeds.
Spice Level
The level of heat is completely customizable to your taste.
-
Milder: Simply omit fresh chilies from the pickle and any spicy rubs on the pork.
-
Spicier: Add a chopped chipotle pepper in adobo sauce to your braising liquid (for Method 2), or mix some of the adobo sauce into your crema for a smoky, spicy kick.
Frequently Asked Questions (FAQs)
Can I make pork belly tacos with skinless pork belly?
Absolutely. You won’t get the same crackling effect, but you will still get delicious, tender, flavorful meat. The fat cap will still render and become wonderfully crispy on the outside when cooked properly. The key is to still score the fat layer to help the rendering process.
How long do quick-pickled red onions last in the fridge?
Stored in their brine in an airtight container, they will keep well for 2-3 weeks. They might slowly lose their vibrant pink color and some crunch over time, but they will remain perfectly safe and tasty to eat.
What’s the best way to reheat leftover cooked pork belly?
To maintain crispness, reheat in an air fryer, toaster oven, or under the broiler for a few minutes. These methods use dry, circulating heat that will re-crisp the exterior. Avoid the microwave, as it will steam the meat and make the skin soft and chewy.
What can I use instead of apple cider vinegar for pickling?
White vinegar, rice vinegar, or even red wine vinegar are excellent substitutes. The flavor profile will change slightly but will still be delicious. Rice vinegar will yield a milder, slightly sweeter pickle, while white vinegar will be more sharp and straightforward.
Conclusion
Your Taco Masterpiece Awaits
And there you have it—your comprehensive roadmap to taco glory! From selecting the perfect slab of pork belly to mastering the quick-pickle and achieving that divine, crispy skin, you’re now equipped with all the knowledge and pro tips you need. This journey through layers of flavor and texture proves that the best meals aren’t just about following a recipe; they’re about understanding the why behind each step. The magnificent contrast between the rich, savory pork and the vibrant, tangy onion is what makes this dish an unforgettable experience.
So, what are you waiting for? Gather your ingredients, fire up that oven, and trust the process. Don’t just make tacos; create a memorable feast that will have everyone asking for your secret. Remember, the most delicious dishes are often born from a bit of experimentation, so make this recipe your own. Now, go forth, create some taco magic, and most importantly, enjoy every single bite
Pork Belly Tacos with Pickled Red Onion
Description
🌮 Pork Belly Tacos with Pickled Red Onion
Ingredients:
For the Pork Belly:
-
2 lbs pork belly, skin removed
-
2 tbsp olive oil
-
2 tsp smoked paprika
-
1 tsp chili powder
-
1 tsp garlic powder
-
1 tsp cumin
-
1 tsp salt
-
½ tsp black pepper
-
½ tsp cayenne pepper (optional for heat)
-
½ cup chicken stock or beer
For the Pickled Red Onion:
-
1 large red onion, thinly sliced
-
1 cup apple cider vinegar
-
½ cup water
-
2 tbsp sugar
-
1 tbsp salt
For Serving:
-
Warm corn or flour tortillas
-
Fresh cilantro leaves
-
Lime wedges
-
Cotija cheese or queso fresco (optional)
-
Avocado slices (optional)
Instructions:
1. Pickle the Red Onions
-
In a saucepan, combine vinegar, water, sugar, and salt. Bring to a simmer until sugar dissolves.
-
Place sliced red onion in a jar and pour the hot liquid over.
-
Let sit at room temperature for 30 minutes (or refrigerate up to 2 weeks).
2. Cook the Pork Belly
-
Preheat oven to 300°F (150°C).
-
Rub pork belly with olive oil, paprika, chili powder, garlic powder, cumin, salt, pepper, and cayenne.
-
Place in a roasting pan with chicken stock or beer. Cover with foil.
-
Roast for 2½–3 hours until tender.
-
Increase oven temp to 425°F (220°C), remove foil, and roast 15–20 minutes until pork belly is crispy.
-
Slice into small bite-sized pieces.
3. Assemble the Tacos
-
Warm tortillas on a skillet.
-
Layer with crispy pork belly, pickled red onion, fresh cilantro, and optional cheese or avocado.
-
Squeeze lime over the top and serve hot.