
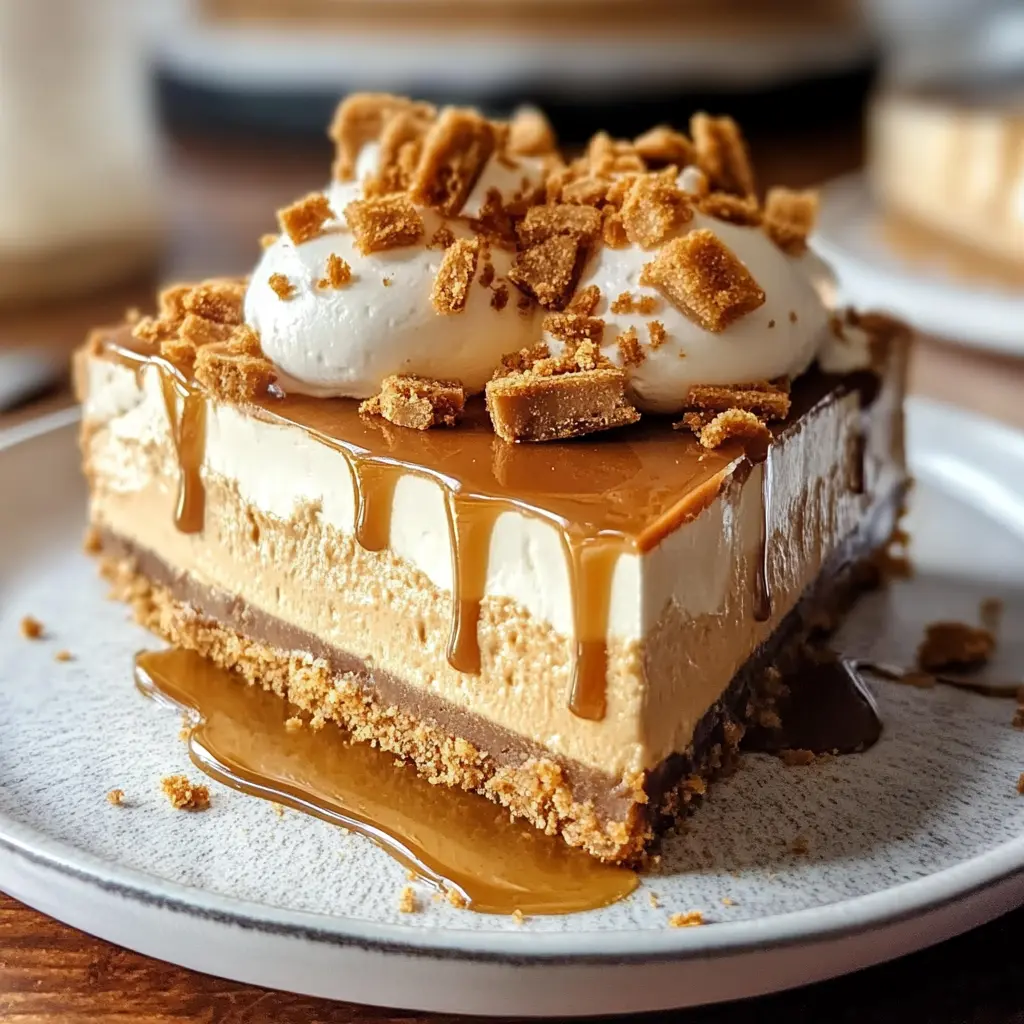
Prepare to embark on a delicious journey into the world of one of the most beloved desserts of our time. This article is your ultimate guide to creating the perfect Biscoff cheesecake, a no-bake dessert that masterfully combines a spiced, crunchy crust with an impossibly creamy, rich filling. We’ll delve deep into the magic of its ingredients, walk you through a foolproof, step-by-step recipe, and unlock a treasure trove of professional tips and creative variations. Furthermore, we’ll answer all your burning questions to ensure your creation is nothing short of spectacular. So, get ready to discover why this indulgent treat has captivated taste buds across the globe.
The Irresistible Magic of Biscoff Cheesecake
Why This Decadent No-Bake Dessert is Everyone’s Favorite
Picture this: a velvety, spiced filling that melts on your tongue, perched upon a robust, crunchy crust that whispers of cinnamon and caramel. Now, imagine that every single bite requires exactly zero oven time. Believe it or not, this isn’t a fantasy; it’s the sheer, unadulterated joy of a perfectly executed Biscoff cheesecake. Honestly, this dessert has taken the world by storm, and it’s not hard to see why!
Firstly, let’s talk about the star of the show: the Lotus Biscoff phenomenon. Originally, those little brown speculoos cookies were just a delightful accompaniment to your airline coffee. However, their unique flavor—a warm blend of cinnamon, nutmeg, and brown sugar—sparked a global obsession. Consequently, the genius creation of cookie butter spread transformed them from a humble snack into a baking superstar. Suddenly, a whole new world of decadent desserts opened up.
Meanwhile, the classic no-bake cheesecake was already a hero in its own right. For countless home bakers, it’s the go-to showstopper dessert for summer gatherings, busy weeknights, or any occasion that calls for something impressively delicious yet surprisingly simple. Without a doubt, its brilliance lies in its accessibility; it bypasses the common fears of water baths, cracking, and over-baking that often accompany its traditional baked cousin.
So, what happens when you combine these two titans of taste? Well, you get a match made in heaven, that’s what! The deep, caramelized warmth of the Biscoff product perfectly cuts through the rich, tangy creaminess of the cheesecake filling. Ultimately, this creates a complex flavor profile that is, frankly, irresistible. Moreover, the textural contrast between the silky filling and the gritty, buttery base is nothing short of a masterpiece.
In the following sections, we’ll pull back the curtain on this culinary wizardry. Therefore, you will learn not only the precise step-by-step guide to building your own but also the science behind why each ingredient is non-negotiable. Additionally, we’ll explore fantastic variations, tackle dietary adaptations, and answer all your FAQs. Essentially, consider this your all-access pass to cheesecake mastery. Ready to begin? Let’s start with the building blocks of flavor.
Deconstructing the Biscoff Cheesecake: Your Shopping List
Why Each Ingredient is Crucial for Perfection
Alright, let’s get down to the nitty-gritty! Before you even think about whipping out your mixer, it’s absolutely vital to understand the role each component plays. Honestly, using the right ingredients isn’t just a suggestion; it’s the fundamental secret to a cheesecake that’s gloriously firm, luxuriously creamy, and packed with that iconic speculoos spice. Think of this list as your treasure map—each item is a key that unlocks a part of the final, delicious prize.
The Star of the Show: Lotus Biscoff
First and foremost, we have the headliners. Using anything else here would be, well, a culinary crime!
-
Biscoff Cookies (for the crust): These aren’t just any cookie; they are the non-negotiable foundation of your entire creation. When crushed, they create a uniquely spiced, sandy, and sturdy base that holds its own against the creamy filling. Their distinct caramelized flavor is what sets this dessert apart from any other cheesecake. Pro tip: you can find them in most major supermarkets now, usually in the cookie aisle or the international section.
-
Lotus Biscoff Spread (a.k.a. Cookie Butter): This is the magic potion! This smooth, spreadable gold is what infuses the filling with its deep, warm, and unmistakable taste. For a supremely silky texture in the filling, I cannot recommend the smooth version enough. It blends seamlessly into the cream cheese, creating a homogeneous, velvety mixture. However, by all means, keep a jar of the crunchy version on hand for decorating—it adds a fantastic textural pop as a topping!
The Creamy Foundation: Cheesecake Components
Next up, the supporting cast that creates the classic cheesecake experience. Do not compromise here!
-
Cream Cheese: This is the main event, the heart of the filling. You must, and I repeat, must, use full-fat, brick-style cream cheese. Why? Because it’s structurally solid and designed for baking (or no-baking!). The soft, spreadable kind that comes in a tub contains more water and stabilizers, which will inevitably lead to a sad, runny filling that never properly sets. For the best results, always let it come to room temperature; this ensures a lump-free, perfectly smooth blend.
-
Heavy Cream (or Double Cream): This ingredient is the workhorse that provides structure and airiness. When you whip it to stiff peaks, you’re essentially building a light, fluffy scaffold that holds the rich filling together. This step is what gives a no-bake dessert its stability without relying on gelatin. Lower-fat alternatives simply will not whip up properly, so go for the good stuff!
-
Confectioners’ Sugar (Icing Sugar): We use this instead of granulated sugar for a brilliantly simple reason: it dissolves instantly. This guarantees a flawlessly smooth filling without a single grain of grittiness. Additionally, the small amount of cornstarch in it helps to slightly thicken the mixture.
The Supporting Cast
Finally, these humble ingredients are the unsung heroes that elevate your cheesecake from great to extraordinary.
-
Butter: Unsalted butter is your best friend for the crust. It acts as the glue, binding those delicious Biscoff crumbs into a solid, press-in base. Using unsalted allows you to control the overall flavor profile perfectly.
-
Vanilla Extract & Salt: Don’t you dare forget these! Pure vanilla extract adds a warm, sweet undertone that complements the spices in the cookie butter beautifully. Meanwhile, a pinch of salt is absolutely crucial—it cuts through the sweetness and enhances all the other flavors, making them truly pop on your palate.
Now that your pantry is perfectly prepped, let’s make sure your toolbox is just as ready.
Gearing Up for Success: Tools You’ll Need
Having the Right Equipment Makes the Process Effortless
Alright, team, we’ve got our ingredients lined up and ready for action. Now, let’s talk hardware. Honestly, you don’t need a kitchen full of fancy gadgets, but a few key pieces of equipment will transform this process from a potential fiasco into a complete breeze. Think of it this way: using the right tool for the job isn’t just about efficiency; it’s about guaranteeing a spectacular final product without any of the usual stress.
First and foremost, the springform pan is the undisputed MVP for this recipe. Unlike a standard cake pan, its clever removable collar is your absolute best friend when it’s time to serve. It allows you to release the cheesecake seamlessly without damaging those perfectly straight sides you worked so hard to create. For this recipe, an 8 or 9-inch pan is ideal. Conversely, using a regular pan would be a disastrous choice, leading to a frustrating and messy serving process.
Next up, let’s talk about achieving the perfect base. While you could crush your Biscoff cookies by placing them in a zip-top bag and whacking them with a rolling pin, a food processor is a total game-changer. In mere seconds, it will pulverize those cookies into beautifully fine, even crumbs. This consistency is secretly vital for a crust that holds together firmly and cuts cleanly. Therefore, if you have one, now is the time to use it!
Now, for the filling. To achieve that dreamily light and airy texture, you need to incorporate volume. This is where an electric mixer—either a hand mixer or a stand mixer—becomes non-negotiable. Whipping the heavy cream to those perfect stiff peaks by hand is a Herculean task that could take forever and likely won’t yield the same results. Your trusty mixer will do the heavy lifting for you, ensuring a flawlessly whipped and stable cream base.
Of course, we can’t forget the basics! You’ll also need:
-
Spatulas (both rubber and offset) for scraping every last bit of that delicious filling out of the bowl and for smoothing the top.
-
Measuring cups and spoons for accuracy.
-
A small saucepan for melting the butter for the crust.
A Quick Word on Preparation
Before you dive in, here are two pro tips that make a world of difference. Firstly, for the quickest and fluffiest whipped cream, pop your mixing bowl and beaters into the freezer for about 15 minutes beforehand. A chilled bowl helps the cream whip up faster and higher. Secondly, and I cannot stress this enough, ensure your cream cheese is at room temperature. Cold cream cheese will inevitably leave you with a lumpy filling, no matter how long you mix it. Planning ahead here is the ultimate key to success!
Now that we’re fully equipped, let’s get to the best part: making the magic happen.
The Ultimate No-Bake Biscoff Cheesecake Recipe
Follow These Detailed Steps for a Flawless Dessert
Okay, the moment has finally arrived! It’s time to roll up our sleeves and transform those incredible ingredients into the decadent dessert of your dreams. Now, don’t be fooled by its sophisticated looks—this no-bake cheesecake is surprisingly simple to make. However, the secret lies in the method. So, follow these steps carefully, and you’ll be a bona fide cheesecake hero in no time. Trust me, your future self (and everyone you serve this to) will thank you!
Step 1: Crafting the Perfect Biscoff Crust
First things first, we need to build a solid foundation. This crust is more than just a base; it’s a flavorful, textural contrast that makes every bite interesting.
-
Crush the Cookies: Grab your food processor and pulse the entire packet of Biscoff cookies until they resemble fine, sandy crumbs. Alternatively, if you’re going the manual route, place the cookies in a sturdy zip-top bag, seal it tightly, and use a rolling pin to crush them until no large pieces remain. You should have about 2 cups of crumbs.
-
Combine with Butter: In a medium bowl, combine the cookie crumbs with the melted unsalted butter. Mix it thoroughly until every single crumb is moistened and the mixture looks like wet sand. It should hold together when you pinch it.
-
Press and Set: Transfer the buttery crumb mixture into your prepared springform pan. Using the back of a spoon or a flat-bottomed glass, press the crumbs down firmly and evenly across the base and slightly up the sides. This compact pressure is crucial—it prevents a crumbly, falling-apart crust later. Once done, pop the base into the refrigerator to chill and set while you make the filling.
Step 2: Creating the Luxurious Cookie Butter Filling
This is where the real magic happens! The goal here is a filling that’s ultra-smooth, light, and packed with flavor.
-
Beat the Cream Cheese: In a large mixing bowl, beat the room-temperature cream cheese with an electric mixer on medium speed until it is completely smooth and lump-free. This should take about 2 minutes. Scrape down the sides of the bowl to ensure everything is incorporated.
-
Incorporate Flavors: Add the smooth Biscoff spread, confectioners’ sugar, vanilla extract, and a pinch of salt to the creamy cheese. Beat again on medium speed until all the ingredients are perfectly blended and the mixture is uniform. It will be quite thick at this stage—that’s totally normal!
-
Whip the Cream: Now, in a separate, clean, chilled bowl, pour in the heavy cream. Whip it on medium-high speed until it forms stiff peaks. This means when you lift the beaters out, the cream should stand straight up without drooping. Be careful not to over-whip it into butter!
-
The Key Technique: Folding: Here’s the most important step! Using a large rubber spatula, add about one-third of the whipped cream to the Biscoff-cheese mixture. Gently fold it in to lighten the thick base. Now, carefully fold in the remaining whipped cream until no white streaks remain. Remember, be gentle! You want to preserve all that lovely air you just whipped in.
Step 3: Assembling and Chilling to Set
Patience is the final, and most critical, ingredient!
-
Pour and Smooth: Retrieve your chilled crust from the fridge. Pour the beautiful, creamy filling onto the crust and spread it out evenly. Use your offset spatula to smooth the top into a beautiful, swirly peak or a perfectly flat surface—your choice!
-
The Most Important Step: This is non-negotiable. Cover the pan loosely with plastic wrap or foil and place it in the refrigerator to set. You must let it chill for a minimum of 6 hours, but honestly, overnight is ideal. This long, uninterrupted chill allows the filling to firm up completely, making it sliceable and ensuring every flavor has time to meld together beautifully.
Step 4: The Grand Finale – Decorating and Serving
The finish line is in sight! Let’s make this dessert as stunning as it is delicious.
-
Release the Pan: Carefully run a thin, sharp knife around the very edge of the cheesecake to loosen it from the pan. Then, unclasp and gently remove the springform ring.
-
Get Creative: Now for the fun part! Gently warm a few tablespoons of Biscoff spread in the microwave until it’s runny, then drizzle it artistically over the top. Add dollops of extra whipped cream, sprinkle over some crushed Biscoff cookies, or even artfully place whole cookies on top.
-
Slice Like a Pro: For picture-perfect slices, dip a sharp knife in hot water, wipe it dry, and then make a cut. Repeat this process for every single slice—it ensures clean, smooth edges without any messy dragging.
Congratulations! You’ve just created a masterpiece. But wait, there’s more to learn if you want to truly master the art.
Mastering the Art: Pro Tips and Creative Twists
Elevate Your Cheesecake and Make It Your Own
Alright, you’ve mastered the fundamental recipe—fantastic! But what separates a good baker from a great one is the ability to troubleshoot, adapt, and innovate. So, whether your first attempt was pure perfection or you hit a couple of snags, this section is your secret weapon. We’re diving into the nitty-gritty of problem-solving and exploring some mouth-watering variations that will keep this dessert exciting every single time you make it.
Guaranteed Success: Troubleshooting and Tips
Even the best of us encounter a kitchen hiccup now and then. Here’s how to identify and fix common issues:
-
Avoid a Crumbly Crust: Did your base fall apart when you tried to slice it? This usually boils down to two things: not using enough butter to properly moisten all the crumbs, or not pressing the mixture into the pan firmly enough. Next time, make sure your mixture resembles wet sand and really pack it down with some muscle!
-
Avoid a Lumpy Filling: There’s nothing worse than a grainy texture in your smooth dessert. The prime suspect is almost always cold cream cheese. Always ensure your cream cheese has had enough time to truly come to room temperature. If you’re in a pinch, you can cut it into small cubes to help it soften faster.
-
Why is my filling runny? Oh no! A soupy filling typically means the whipped cream was under-whipped or, conversely, over-whipped until it broke. It could also mean the cheesecake simply didn’t chill long enough. Remember, those 6 hours (or better yet, overnight) are crucial for the structure to set properly. Patience is key!
Delicious Variations to Try
Once you’re comfortable, why not play with the formula? Here are some wildly popular twists:
-
Baked Biscoff Cheesecake: Craving that classic dense, rich texture? For a baked version, you’d typically add a few eggs to the filling mixture and bake it in a water bath in a low oven (around 325°F or 160°C) for about an hour. This method gives a different but equally delicious result!
-
Biscoff Cheesecake Bars: Want a more casual, portable option? Simply press the crust into a 9×13 inch pan, add the filling, and chill. You’ll get delicious, easy-to-serve bars that are perfect for parties and picnics.
-
Chocolate-Biscoff Swirl: For the chocoholics, this one’s for you. Melt some high-quality dark chocolate, let it cool slightly, and then dollop it over the filled cheesecake. Use a knife or skewer to swirl it beautifully into the top layer of the filling before chilling.
-
Salted Caramel Biscoff: Drizzle a layer of store-bought or homemade salted caramel sauce over the chilled crust before adding the cheesecake filling. The sweet-salty-caramel combination with the spiced cookie butter is absolutely divine.
Dietary Adaptations (Gluten-Free, Vegan)
Good news! Everyone can enjoy this wonder. With a few smart swaps, you can accommodate various dietary needs.
-
Gluten-Free Version: Thankfully, this is incredibly easy. Several brands, like Schär, make excellent gluten-free speculoos cookies that work perfectly for the crust. Secondly, you must double-check that your Lotus Biscoff spread is labeled gluten-free, as some versions are!
-
Vegan Version: Yes, it’s possible! Start by using a vegan butter alternative for the crust. For the filling, use a high-quality vegan cream cheese (the kind that comes in a tub, meant for spreading). Furthermore, you can whip chilled full-fat coconut cream instead of dairy heavy cream. Finally, always confirm your cookie butter is vegan—many are, as they are naturally nut-free and dairy-free.
Feeling inspired? Wonderful! But you might still have a question or two buzzing around. Luckily, we’ve anticipated them.
Biscoff Cheesecake FAQs: Your Questions Answered
Everything Else You Need to Know
Even with the most detailed recipe, a few questions always pop up. It’s only natural! After all, you’ve invested time and love into creating this masterpiece, and you want it to be perfect. So, let’s tackle those lingering curiosities head-on. I’ve compiled the most common queries from bakers just like you, providing clear, confident answers to ensure your Biscoff cheesecake journey is smooth from start to finish.
Q1: Can I freeze Biscoff cheesecake?
A: Absolutely! In fact, it freezes exceptionally well, making it a fantastic make-ahead dessert. To do it properly, first ensure your cheesecake is completely set in the refrigerator. Then, wrap it tightly in a layer of cling film, followed by a layer of heavy-duty aluminum foil. This double layer prevents freezer burn and protects the flavor. When you’re ready to enjoy it, simply transfer it to the refrigerator and let it thaw overnight. I don’t recommend thawing it at room temperature, as it can make the texture a bit soft.
Q2: How long does no-bake Biscoff cheesecake last in the fridge?
A: When stored correctly in an airtight container—or carefully wrapped—your cheesecake will stay fresh and delicious for up to 5 days. Honestly, it rarely lasts that long! The flavor even deepens a little after a day or two. Just be sure to keep it covered to prevent it from absorbing any other odors from your refrigerator.
Q3: Can I use a different type of cookie for the crust?
A: While Biscoff cookies are ideal for maximum flavor, you can certainly experiment. Digestive biscuitsor graham crackers are the most common substitutes. Be aware, however, that the spice profile will be completely different. A graham cracker crust will give you a more traditional, honeyed flavor that will still pair nicely with the speculoos-spiced filling, even if it’s not quite the same iconic match.
Q4: Why is my cheesecake filling not setting?
A: This is the most common worry! Usually, it boils down to two main issues. First, the heavy creammay not have been whipped to truly stiff peaks. If it’s under-whipped, it doesn’t have the structural integrity to hold up the filling. Secondly, and this is the big one, it likely didn’t chill long enough. The minimum 6-hour chill is not a suggestion; it’s a requirement for the fats to firm up. If you’re in a warm kitchen, it might need even longer. Always err on the side of more chilling time.
Q5: Is Biscoff spread the same as peanut butter?
A: This is a great question, especially for those with allergies! No, they are not the same at all. Biscoff spread is made from crushed speculoos cookies (wheat flour, sugar, and plant-based oils and spices). It is completely nut-free, which actually makes it a brilliant and safe alternative for school events or parties where nut allergies are a concern. Its flavor is all about warm caramel and spice, not nuts.
Biscoff Cheesecake
Description
🍪 Biscoff Cheesecake
Ingredients
Crust:
-
2 cups Biscoff cookies, finely crushed
-
6 tbsp unsalted butter, melted
-
2 tbsp brown sugar (optional, for extra sweetness)
Cheesecake Filling:
-
24 oz cream cheese, softened (3 blocks)
-
1 cup granulated sugar
-
1 cup Biscoff cookie butter (melted slightly for easy mixing)
-
3 large eggs, room temperature
-
1 tsp vanilla extract
-
½ cup sour cream
-
½ cup heavy cream
Topping:
-
½ cup Biscoff cookie butter, melted
-
Extra crushed Biscoff cookies (for garnish)
-
Whipped cream (optional)
Instructions
1. Make the Crust
-
Preheat oven to 325°F (160°C).
-
Mix crushed Biscoff cookies with melted butter and sugar.
-
Press mixture firmly into the bottom of a 9-inch springform pan.
-
Bake for 10 minutes, then set aside to cool.
2. Make the Cheesecake Filling
-
In a large bowl, beat cream cheese and sugar until smooth and creamy.
-
Add cookie butter and vanilla, mixing until fully incorporated.
-
Add eggs one at a time, mixing gently after each.
-
Stir in sour cream and heavy cream until smooth.
-
Pour filling over the cooled crust.
3. Bake the Cheesecake
-
Place springform pan in a larger roasting pan. Fill roasting pan with hot water halfway up the sides (water bath helps prevent cracks).
-
Bake for 60–70 minutes, until edges are set but center is slightly wobbly.
-
Turn off oven, crack door, and let cheesecake rest inside for 1 hour.
-
Remove, cool to room temperature, then refrigerate at least 6 hours (preferably overnight).
4. Add the Topping
-
Once chilled, spread melted Biscoff cookie butter over the top.
-
Sprinkle crushed Biscoff cookies around the edges.
-
Pipe whipped cream swirls if desired.