
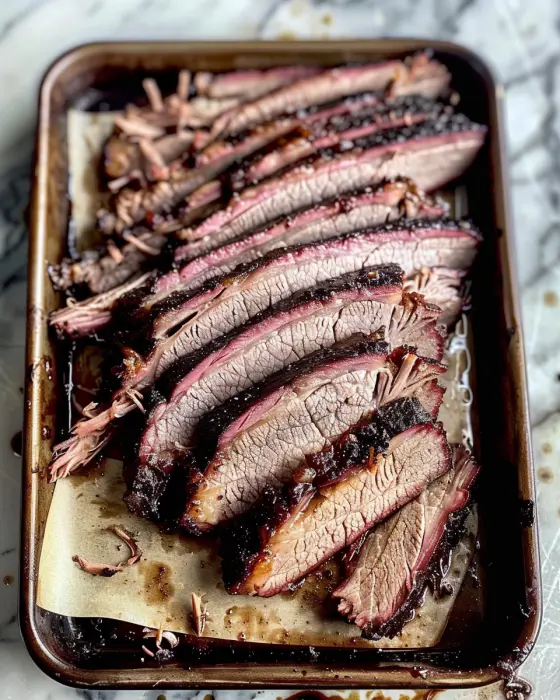
Ah, the holy grail of smoked meats: Authentic Texas Barbecue Smoked Brisket. It’s more than just a meal; it’s a pilgrimage, a testament to patience, and a symphony of smoke, salt, and beef that has captured the hearts (and stomachs) of food lovers worldwide. Frankly, achieving that perfect bark, that legendary smoke ring, and that melt-in-your-mouth tenderness can feel like a guarded secret. But fear not! This ultimate guide is your personal pitmaster, demystifying the entire process from selecting the right cut to that final, glorious slice. We’re diving deep into the history, the science, and the soul of this iconic dish. So, pull up a chair, and let’s get into the low and slow world of true Texas brisket.
The Soul of Texas: Your Ultimate Guide to Authentic Smoked Brisket
Welcome, fellow barbecue enthusiast! You’re not just learning a recipe; you’re embracing a piece of Texas culture. This guide is your all-access pass to mastering the art of smoked brisket, a journey that will transform your backyard cookouts into legendary events. Consequently, we’ll walk through every single step together, from the history behind this iconic dish to the precise moment you know it’s perfectly done. Moreover, we’ll tackle common pitfalls and answer all your burning questions. Ultimately, by the end of this, you’ll be armed with the knowledge and confidence to produce a brisket that would make any Central Texas pitmaster nod in respect.
What Makes Texas Brisket “Authentic”?
So, what’s the big deal? Why is Texas barbecue brisket so famous? Well, it isn’t about a complex list of ingredients; in fact, it’s quite the opposite.
A Philosophy of Simplicity
First and foremost, the heart of authentic Texas brisket is a stunningly simple ethos. Forget sugary, complicated rubs with a dozen spices. The true Central Texas style, often called the Dalmatian rub, uses just two ingredients: coarse kosher salt and coarse ground black pepper. That’s it! This minimalist approach isn’t a lack of effort; however, it’s a profound respect for the main ingredient. The goal is to enhance the natural, rich flavor of the beef, not mask it.
Low and Slow is the Law
Furthermore, the cooking method is non-negotiable. Authentic brisket isn’t grilled or roasted; it’s smoked. This means cooking with indirect heat at a low temperature—typically between 225°F and 275°F—for a painfully long time. This “low and slow” method is absolutely crucial because it gently breaks down the tough connective tissues in the brisket, transforming them into unbelievable gelatinous goodness. Rushing this process is the number one mistake beginners make; therefore, patience isn’t just a virtue here—it’s the main ingredient.
The Holy Trinity: Wood, Meat, and Time
Finally, you can’t talk about this style without its holy trinity. The wood? Primarily post oak, which provides a clean, sweet smoke that doesn’t overpower the beef. The meat? A full, untrimmed packer brisket. The time? However long it takes for the meat to become perfectly tender. Together, these three elements create a harmony that is greater than the sum of its parts.
A Brief History of Texas Barbecue Brisket
Believe it or not, the story of this iconic dish begins with European immigrants. In the mid-1800s, German and Czech butchers settled in Central Texas, bringing their meat-smoking traditions with them. Initially, they often worked with lesser cuts of meat, like brisket, which required long, slow cooking to become edible.
These butchers would smoke meats in their shops, and eventually, this practice evolved into dedicated community barbecue halls. Consequently, towns like Lockhart became the undisputed capitals of this style. Legendary spots like Kreuz Market and Smitty’s didn’t just serve food; they codified a tradition. In modern times, places like Franklin Barbecue in Austin have achieved mythical status, drawing lines around the block and introducing this authentic craft to a new generation. Ultimately, when you smoke a brisket today, you’re participating in a rich, delicious piece of history. For a deeper dive into this fascinating history, check out Texas Monthly’s renowned BBQ coverage.
Selecting and Preparing Your Brisket
Alright, let’s get down to business! You can’t build a masterpiece without the right materials, and for Texas brisket, that means choosing the perfect cut of meat. This step, frankly, is where many trips to BBQ glory are won or lost before the fire is even lit.
Choosing the Right Cut: The Packer Brisket Primer
First things first, you need a full packer cut brisket. Do not—I repeat, do not—settle for a pre-trimmed “flat” from the supermarket. It’s a rookie mistake that almost always leads to dry, disappointing results. Why? Because the packer is the whole, untrimmed breast section of the cow, and it contains two distinct muscles working in delicious harmony.
Understanding the Anatomy: The Flat vs. The Point
Visualize this: the brisket flat is the thinner, leaner, and more uniform section. It’s what you typically see sliced for sandwiches. Then, lying snugly on top of it, is the brisket point. This glorious hunk of meat is thicker, marbled with incredible amounts of fat, and is essentially your ticket to flavor town. When you cook a whole packer, the fat from the point slowly renders, basting the leaner flat throughout the long cook. This self-basting is the secret weapon you give up if you only cook a flat. Separating them before cooking is culinary malpractice in the world of authentic Texas barbecue.
What to Look For When Buying
Now, how do you pick a winner? Head to a real butcher or a well-stocked warehouse store. Here’s your checklist:
-
Flexibility: A good brisket should bend easily when you pick it up. A stiff one is a sign of too much internal fat and less marbling.
-
Thick Flat: Look for a packer with a flat that’s at least 1 to 1.5 inches thick. A flat that tapers to a paper-thin edge will burn and dry out.
-
Marbling: You want those beautiful, thin white streaks of intramuscular fat weaving through the red meat. This is what melts and creates incredible juiciness. For the best marbling, spring for USDA Prime if you can find it; otherwise, a well-marbled Choice grade will do just fine. Understanding the USDA beef grading guidelines can help you make an informed choice.
The Art of Trimming: Shaping Your Brisket for Success
Grab a sharp boning knife and channel your inner sculptor. Trimming isn’t just cosmetic; it’s critical for even cooking and bark formation.
Why Trim?
Basically, you’re removing the hard, unwieldy fat that won’t render down during the cook. Leaving it on creates a barrier against smoke and rub penetration. Conversely, you want to leave about a 1/4 inch of the soft, white fat cap—this will render into the meat, keeping it moist and forming that incredible barkwe all crave.
Step-by-Step Trimming Guide
-
Start Cold: A cold brisket is much firmer and easier to trim. Pull it from the fridge right before you start.
-
Attack the Hard Fat: Locate the thick, hard fat on the fat cap and the side opposite (the deckle). Remove these large, hard chunks completely.
-
Shape and Smooth: Now, round off any sharp corners or thin flaps of meat. These will burn to a crisp long before the rest of the brisket is done. Your goal is a smooth, aerodynamic, and evenly shaped piece of meat. It might feel wasteful, but trust me, it’s essential.
The Rub: Keeping It Simple
Here’s where you must resist the urge to get fancy. For authentic Texas smoked brisket, the rub is a mere accent, not the main event. Generously coat the entire brisket—every single inch—with a 50/50 mix by volume of coarse kosher salt and coarse ground black pepper. The coarse grind provides fantastic texture and flavor bursts. This simple salt and pepper rub is the hallmark of the style, allowing the pure flavor of the beef and smoke to shine through without competition from sugars or other spices.
The Smoking Process: Fire, Smoke, and Patience
This is it—the main event. Fire management is the pitmaster’s true test; it’s a dance between heat, oxygen, and smoke. Don’t worry, though; with a little focus, you’ll get the hang of it.
Setting Up Your Smoker for a Perfect Cook
Your equipment matters, but perfection is possible on more than just a giant offset smoker.
The Preferred Pit: Offset Smokers
The traditional gold standard for authentic Texas barbecue is the offset smoker, or “stick burner.” Why? Because it uses logs for fuel, providing the cleanest, purest smoke flavor and the most control for a seasoned pitmaster. The firebox is separate, so you’re cooking with indirect heat, and the smoke swirls around the meat before exiting the chimney.
Using Other Smokers (Weber, Pellet, etc.)
Fortunately, you can achieve fantastic results on other setups! A Weber Kettle with a slow ‘n sear attachment, a ceramic Kamado-style cooker, or even a modern pellet grill can all produce award-winning brisket. The principles remain identical: maintain a steady, low temperature for indirect heat and manage your smoke. Each grill has its own quirks, so learn yours! The key is temperature stability.
The King of Woods: Why Post Oak Reigns Supreme
In Central Texas, post oak is the undisputed champion. It burns clean and hot, providing a mild, slightly sweet smoke that complements beef without overpowering it. It’s the secret behind that classic flavor profile. If you can’t find post oak, white oak or pecan are excellent substitutes. Hickory can be used, but it’s stronger, so use it sparingly. Mesquite? Forget it for a long cook—it’s far too pungent and will make your brisket taste bitter.
The Cook: Managing Temperature and The Stall
Light your fire and bring your smoker to a steady 250°F. Once you have thin, blue smoke (not thick, white smoke), place your brisket on the grates, fat side up, close the lid, and walk away. No peeking! Every time you open the lid, you release heat and smoke, adding significant time to your cook.
Target Temperature: 225-250°F
Consistency is everything. Wild temperature swings will ruin the texture of your meat. Use a reliable digital thermometer to monitor the chamber temp near the meat, not the built-in lid thermometer, which is often inaccurate.
The Infamous “Stall” Explained
Around 150-170°F, something frustrating will happen: your brisket’s internal temperature will suddenly stop rising. It might even drop! Don’t panic. This is the “stall,” and it’s completely normal. It occurs due to evaporative cooling—the moisture on the surface of the meat is evaporating, effectively sweating and cooling the brisket just like human sweat cools us. This phase can last for hours. This is where patience is not just a virtue; it’s the only option.
To Wrap or Not to Wrap? The Texas Crutch
To power through the stall, many pitmasters employ the “Texas Crutch,” which involves wrapping the brisket. This traps the steam and accelerates the cooking process.
-
Butcher Paper: The preferred method for many. It breathes slightly, allowing some steam to escape while protecting the meat. This results in a more firm, traditional bark.
-
Foil (a.k.a. the Hot & Fast): Foil traps all the steam, braising the meat. It makes the tenderizing process much faster and is very forgiving, but it can soften your beautiful bark into a more pot-roast-like texture.
-
The Purist Route: You can simply not wrap at all. This takes the most time and fuel and requires the most skill to avoid a dry result, but some swear it produces the best bark.
How to Tell When Your Brisket is Done
This is the most critical skill to learn. Your brisket is done when it’s probe tender, not just when it hits a specific temperature. Start checking around 195°F. Insert a thermometer probe or a wooden skewer into the thickest part of the flat. If it slides in with little to no resistance, like pushing into room-temperature butter, your brisket is ready. If it feels tough or tight, let it keep cooking. The final temp will usually land between 200°F and 205°F, but always, always trust the feel over the number.
Resting, Slicing, and Serving
Congratulations! You’ve survived the long cook. Now, for the love of all that is holy, do not slice into that brisket right away. The final steps are just as important as the smoking itself.
The Most Important Step You Can’t Skip: Resting
If you think you’re done cooking, think again. Resting the brisket is non-negotiable. Imagine the muscle fibers are like overstretched elastic bands. They are tight and have pushed all the moisture to the center. During the rest, those fibers relax and reabsorb all those incredible juices throughout the entire cut.
How do you do it? Simply take the wrapped brisket and place it in an empty, pre-warmed cooler (a “faux cambro”), or in your oven (turned off). Then, just let it sit. For a minimum of 2 hours. Ideally, 4 to 6 hours. Yes, you read that right. A brisket will stay piping hot for hours when rested this way. Slicing too early will cause all those precious juices to simply flood onto the cutting board, leaving you with a dry brisket. Patience, once again, is rewarded.
Slicing Your Masterpiece: A Step-by-Step Guide
You’ve waited all this time; don’t ruin it with bad slicing technique! You’ll need a long, sharp slicing knife.
Separate the Point and the Flat
First, locate the thick layer of fat that separates the point from the flat. Slide your knife through this seam to separate the two muscles. You now have two pieces of meat to slice.
Slicing the Flat: Against the Grain
This is the golden rule of slicing meat for tenderness. Look closely at the flat; you’ll see the long muscle fibers running in one direction (the “grain”). You must slice perpendicular to these fibers. This shortens the muscle fibers, making each bite incredibly tender. If you slice with the grain, you’ll end up with long, stringy, and tough pieces of meat, undoing all your hard work. Start with the thinner end of the flat and slice across into pencil-width slices.
Slicing the Point: For Burnt Ends or More Slices
You have two delicious options for the point. You can simply slice it against the grain, just like the flat, for incredibly rich and juicy slices. Or, you can make the legendary “burnt ends.” Cube the point into 1-inch chunks, toss them in a little more rub or a light amount of sauce, and return them to the smoker for another hour or two until they caramelize into sticky, crispy, meaty candy.
The Authentic Texas Way to Serve Smoked Brisket
Presentation is simple and purposeful. Traditionally, Texas barbecue is served on butcher paper. Place a few slices of that beautiful smoked brisket right on the paper. On the side, offer slices of plain white bread (the cheap, fluffy kind), raw white onion slices, dill pickle chips, and pickled jalapeños. The bread is for making little meat sandwiches or sopping up juices, and the sharp, acidic pickles and onions cut through the rich fat of the brisket. Sauce? Well, it’s usually available on the side, but it’s often considered optional, if not unnecessary, for a truly great brisket. The meat should stand proudly on its own.
FAQs and Conclusion
You’ve got questions; we’ve got answers. Here are the most common head-scratchers for aspiring brisket masters.
Frequently Asked Questions (FAQs) About Texas Smoked Brisket
What is the best wood for smoking Texas brisket?
Without a doubt, post oak is the traditional and best choice. It provides a clean, mild, and slightly sweet smoke flavor that perfectly complements beef without being overpowering. It’s the signature wood of the Texas Hill Country.
How long does it take to smoke a brisket?
Ah, the classic question! The honest answer is: as long as it takes. A general rule of thumb is 60 to 90 minutes per pound at 250°F, but this is wildly unreliable due to the stall. A 12-pound packer could take 12 hours, or it could take 18 hours. Your best bet is to start early and plan for a long rest. It’s better for the brisket to wait for your guests than the other way around.
What internal temperature is brisket done?
While temperature is a good guide, feel is king. The brisket is typically probe tender and ready to rest when the internal temperature in the thickest part of the flat reaches between 195°F and 205°F. Always use the “like butter” probe test as your final indicator, not just the temp.
Should I use a water pan in my smoker?
Using a water pan is a common practice and can be very helpful, especially in smaller smokers like a Weber Kettle or a bullet smoker. The water adds humidity to the cooking chamber, which can help stabilize temperature and potentially improve bark formation by slowing the evaporation of moisture from the meat’s surface. In large offset smokers, it’s less common but still not a bad idea. It’s a useful tool for maintaining a stable cooking environment. For more on the science behind cooking meat, you can explore resources from the Meat Science Association.
Conclusion: You’ve Earned Your Place at the Table
And there you have it. You’ve journeyed from a simple packer cut to a profound understanding of authentic Texas barbecue smoked brisket. Remember, the pillars are simple: a quality full packer, a simple salt and pepper rub, clean smoke, unwavering patience, and a proper, lengthy rest.
Your first brisket might not be perfect, and that’s okay! Each one is a learning experience. Embrace the process, take notes, and most importantly, share the results with friends and family. The art of barbecue is about community and tradition as much as it is about food. Now, go fire up that smoker—your place at the table is waiting.
Print
Authentic Texas Barbecue Smoked Brisket
Description
Authentic Texas Barbecue Smoked Brisket
Ingredients
-
1 whole beef brisket (10–12 lbs, packer cut with flat + point)
-
1/4 cup coarse kosher salt
-
1/4 cup coarse black pepper
-
2 tbsp garlic powder (optional, but common)
-
Wood chunks (oak, mesquite, or hickory are Texas favorites)
Instructions
-
Trim brisket: Leave about 1/4 inch of fat cap on the brisket. This keeps it moist during smoking.
-
Season: Mix salt, pepper, and garlic powder. Coat brisket generously on all sides. Texas-style is all about simple seasoning and letting the beef + smoke shine.
-
Prepare smoker: Preheat smoker to 225°F (107°C). Add wood chunks for a steady smoke.
-
Smoke: Place brisket fat-side up on the smoker grates. Smoke for 6–8 hours, spritzing with water or apple cider vinegar every 1–2 hours to keep it moist.
-
Texas Crutch (optional): When the brisket hits the “stall” (around 160°F / 71°C), wrap it tightly in butcher paper or foil to help push through and keep it juicy.
-
Finish: Continue smoking until internal temp reaches 195–203°F (90–95°C). This is the sweet spot for tender brisket.
-
Rest: Remove from smoker and let rest (still wrapped) in a cooler or warm oven for 1–2 hours. This redistributes juices.
-
Slice & serve: Slice against the grain, starting with the flat, then separate the point and slice or cube for burnt ends. Serve with pickles, onions, white bread, and classic Texas BBQ sauce on the side.