
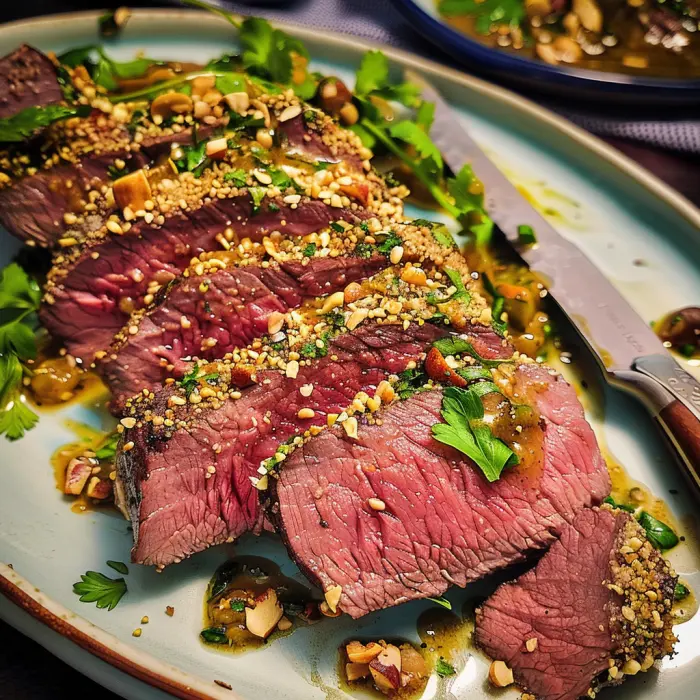
The Ultimate Guide to Beef Tenderloin with Peanut-Sesame Crust: A Gourmet Dinner Made Easy
Picture this: a magnificent centerpiece of roast beef, impossibly tender and juicy, encased in a spectacularly crunchy, savory, and aromatic crust of peanuts and sesame seeds. This isn’t a dish from a five-star restaurant’s secret menu; oh no, this is a show-stopping Beef Tenderloin with Peanut-Sesame Crust that you can absolutely master in your own kitchen. Get ready to embark on a culinary adventure that will transform your special occasion dinners forever. This guide is your ultimate companion, walking you through every single step—from selecting the perfect cut of beef to understanding the magic of that nutty crust. We’ll cover expert techniques, avoid common pitfalls, and unlock the secrets to a flawlessly cooked roast that will have everyone begging for your recipe. So, tie on your apron, and let’s turn the ordinary into the extraordinary.
Introduction & The Star Ingredient
Introduction: Elevate Your Dinner Game
Let’s be honest, we’ve all faced that moment of panic before a big dinner party or holiday meal. What on earth do you make that feels luxurious, tastes incredible, and doesn’t keep you chained to the stove all day? Well, fret no more! The search for that unforgettable gourmet beef recipe ends right here. Imagine slicing into a perfectly roasted cut of beef to reveal a blush-pink, melt-in-your-mouth interior, all surrounded by a crackling, flavor-packed crust. This Asian-inspired beef tenderloin is not just a meal; it’s a full-blown experience. Surprisingly, however, achieving this culinary masterpiece is far easier than you might think. This article will be your trusted guide, proving that creating a restaurant-quality main dish is well within your reach, promising a result that is as rewarding to make as it is to devour.
Why Beef Tenderloin? Understanding the Cut
What is Beef Tenderloin?
Before we dive into the peanut-sesame crust, let’s get to know our star player. The beef tenderloin is a long, slender cut of beef that comes from the loin of the cow. Now, here’s the key: because this muscle does very little work, it is consistently the most tender cut of beef you can buy. Its texture is buttery and its flavor is subtly mild, making it a true luxury on the plate. Often, there’s a bit of confusion between the terms. Essentially, a whole beef tenderloin can be cut into smaller steaks, and those steaks are what we call filet mignon. So, for this recipe, we’re working with a large, center-cut portion of the whole tenderloin to create one magnificent roast.
Why It Works with a Crust
You might wonder, “If it’s so perfect, why cover it up?” Ah, that’s the genius of this easy beef tenderloin recipe! Firstly, while incredibly tender, the tenderloin’s mild flavor acts as a flawless canvas for bold, exciting ingredients. Secondly, and just as importantly, that delectable peanut-sesame crust provides a crucial textural contrast. Think about it—the interior is phenomenally soft and juicy, while the exterior offers a satisfying, nutty crunch. Furthermore, the crust itself acts as a protective barrier, sealing in those precious juices and ensuring the meat underneath doesn’t dry out during roasting. Consequently, this combination isn’t just good; it’s a match made in culinary heaven.
Preparation: Your Key to Success
Gathering Your Ingredients: A Shopping Guide
Alright, let’s talk ingredients! Gathering everything beforehand is the first secret to a stress-free cooking experience. Trust me, you don’t want to be frantically searching for toasted sesame oil while your seared beef is cooling.
For the Beef:
-
The Main Event: A 2-3 lb. center-cut beef tenderloin, trimmed and tied. Getting your butcher to do this heavy lifting is a brilliant time-saver!
-
Oil: A neutral, high-heat oil like avocado or grapeseed oil is perfect for searing meat without smoking out your kitchen.
-
Seasoning: Good old kosher salt and freshly ground black pepper are all you need here.
For the Peanut-Sesame Crust:
-
The Crunch Factor: Dry-roasted, unsalted peanuts are the way to go; this lets you control the salt level. For the seeds, using both white and black sesame seeds looks stunning and adds depth.
-
The Binder: Panko breadcrumbs create an airy, ultra-crispy texture. For a gluten-free main course, simply swap for a certified GF alternative.
-
The Flavor Boost: Garlic powder, onion powder, and a pinch of red pepper flake for a subtle kick.
For the Flavor-Packed Glaze:
-
The Umami Base: Low-sodium soy sauce (or tamari) provides that deep, savory flavor.
-
Sweetness & Shine: Honey adds a touch of sweetness and helps the crust caramelize beautifully.
-
The Aromatic Punch: Fresh ginger and garlic, finely grated, are non-negotiable for that incredible fragrance.
-
The Finisher: A drizzle of toasted sesame oil at the end ties the whole glaze together.
Essential Tools and Equipment
You don’t need a kitchen full of fancy gadgets, but a few key tools will make your life infinitely easier.
-
A Heavy, Oven-Safe Skillet: A cast-iron skillet is the undisputed champion here. It sears like a dream and transitions seamlessly from stovetop to oven.
-
A Rimmed Baking Sheet & Wire Rack: This dynamic duo is crucial for the final roast, allowing hot air to circulate and preventing the bottom of your gorgeous crust from getting soggy.
-
The Truth-Teller: A digital instant-read thermometer is your best friend. It removes all the guesswork from hitting the perfect doneness, making sure your expensive roast is cooked exactly how you like it.
-
The Helper: A food processor makes quick work of turning nuts into the perfect crust consistency.
The Recipe: Step-by-Step Instructions
Crafting the Perfect Peanut-Sesame Crust
This is where the magic starts! Making the crust is straightforward, but a few pro tips will take it from good to legendary.
First, grab your skillet. Toss in the peanuts and sesame seeds and toast them over medium heat for 3-5 minutes. Keep them moving! You’re looking for a golden color and a gorgeous, nutty aroma—be careful not to burn them. Afterwards, let them cool slightly. Next, pulse the toasted mixture in your food processor until it resembles a coarse meal. Seriously, don’t overdo it; you want texture, not peanut butter! Finally, transfer it to a bowl and stir in the Panko and your dried seasonings. Set this glorious mixture aside for its big moment.
Creating the Flavor-Packed Glaze
While those nuts are cooling, whip up the glaze. This sticky, savory sauce is what will make the crust adhere to the beef. Simply combine the soy sauce, honey, grated ginger, and grated garlic in a small bowl, then whisk until it’s smooth. Right before you use it, whisk in the sesame oil. Voilà! You’ve just created an umami flavor bomb that will make your taste buds sing.
The Cooking Process: Searing, Crusting, and Roasting
This is it—the main event. Take a deep breath; you’ve got this.
Step 1: Bringing the Beef to Temperature
About 30 to 60 minutes before you plan to cook, take the beef out of the fridge. Pat it completely dry with paper towels—this is critical for a good sear—and then season it generously with salt and pepper. Letting it sit on the counter is a crucial step; a room temperature roast cooks much more evenly than an ice-cold one straight from the refrigerator.
Step 2: Searing to Perfection
Preheat your oven to 400°F (200°C). Now, place your heavy skillet over medium-high heat and add a tablespoon of oil. Once the oil is shimmering hot, carefully place the tenderloin in the pan. You should hear a confident sizzle! Resist the urge to move it around. Sear it on all sides, including the ends, until a beautiful, brown crust forms. This process, called the Maillard reaction, builds a foundation of deep, rich flavor. This should take about 8-10 minutes total. Then, remove the beef from the skillet and place it on a clean plate to cool for a few minutes.
Step 3: Applying the Crust
Now for the fun part! Using a pastry brush, slather the entire seared roast with your prepared glaze. You want every single surface covered. Then, carefully roll and press the roast into your bowl of peanut-sesame crust mixture. Pat it firmly so a thick, even layer of that crunchy goodness sticks to the glaze. Don’t be shy—really pack it on there!
Step 4: The Final Roast in the Oven
Transfer the crusted roast to a wire rack set on a rimmed baking sheet. This setup is the secret to an all-around crispy crust. Place it in the preheated oven and roast until the interior reaches your desired doneness. This is where your thermometer is essential!
| Doneness | Final Temperature (after resting) |
|---|---|
| Rare | 120-125°F (49-52°C) |
| Medium-Rare | 130-135°F (54-57°C) |
| Medium | 140-145°F (60-63°C) |
-
Pro Tip: Remove the roast from the oven when it is about 5°F below your target temperature. The residual heat will carry it over as it rests.
Step 5: The Critical Resting Period
This might be the hardest step of all: waiting. Once out of the oven, tent the beef loosely with foil and let it rest for a full 15-20 minutes. Why is this so important? Well, during cooking, the juices are driven to the center of the meat. Resting allows those juices to redistribute throughout the entire roast. If you slice it immediately, all those incredible juices will just run out onto the cutting board, leaving you with drier meat. Trust the process!
Serving, Pairing, and Advanced Tips
Carving and Presenting Your Masterpiece
The wait is over! First, carefully remove the kitchen twine with a pair of scissors. Then, using a long, sharp slicing knife, cut the roast into ½-inch to 1-inch thick medallions. Each slice will reveal the beautiful pink interior perfectly framed by that golden, nutty crust. To serve, arrange the slices on a warm platter, slightly overlapping them. Drizzle any accumulated juices from the cutting board over the top for an extra boost of flavor and shine.
Sauce and Side Dish Recommendations
While this roast is a superstar on its own, the right supporting cast makes it a full meal.
Sauces:
-
A simple creamy ginger sauce made with Greek yogurt, lime juice, and fresh ginger is a cool, tangy contrast.
-
A quick soy-sesame dipping sauce with a hint of chili is always a crowd-pleaser.
Side Dishes:
-
Asian-inspired: Fluffy coconut jasmine rice, quick stir-fried garlic greens like bok choy, or a bright Asian slaw with a rice vinegar dressing.
-
Classic: Creamy garlic mashed potatoes or simply roasted asparagus and carrots always work beautifully.
Pro Tips and Common Mistakes to Avoid
Let’s make sure your dish is flawless by avoiding these common pitfalls:
-
Don’t skip the sear. That brown crust is pure flavor. You can’t get it back once the roast is in the oven.
-
Don’t blend the crust into a paste. Pulse, don’t puree! Texture is what we’re after.
-
Don’t guess the doneness. Rely on your digital thermometer, not the clock. Every oven and every roast is different.
-
Don’t skip the rest. I know, I’m a broken record, but it’s that important!
-
Make-ahead tips: You can prep the crust mixture and the glaze the day before and store them separately in the fridge. You can also trim and tie the roast a day ahead.
FAQs, Conclusion, and External Resources
Frequently Asked Questions (FAQs)
Can I use a different cut of beef for this recipe?
While you can use individual filet mignon steaks, the cooking time will be much, much shorter. A whole tenderloin is ideal for this specific roasting method as it creates a stunning centerpiece. For more on different options, this official guide to beef cuts is a fantastic resource.
How do I make this recipe gluten-free?
It’s incredibly easy! Simply ensure you use certified gluten-free tamari instead of soy sauce and use gluten-free Panko-style breadcrumbs. Most major grocery stores carry these options now.
Can I make the peanut-sesame crust ahead of time?
Absolutely! In fact, it’s a great time-saver. You can prepare the crust mixture and store it in an airtight container in the refrigerator for up to 3 days. This allows the flavors to meld even more.
What are the best leftovers ideas for beef tenderloin?
Leftovers are a delicious bonus! Slice it cold and layer it into sandwiches with arugula and a spicy mayo, or chop it up and toss it into a hearty salad for a high-protein lunch. You can even gently warm slices and serve them over noodles for a quick meal.
Conclusion: Your Gourmet Achievement
And there you have it! You’ve just navigated the path to creating a truly spectacular, restaurant-worthy meal in your own kitchen. This Beef Tenderloin with Peanut-Sesame Crust is more than just food; it’s a conversation starter, a celebration, and proof of your culinary skills. The stunning contrast of textures and the explosion of savory, nutty flavors is an achievement worth being proud of. So gather your friends and family, slice into that beautiful roast, and soak up the compliments. You’ve earned them.
For those interested in the perfect techniques for other cuts, the science behind perfect pan-searing is a fascinating read that applies to many recipes. And if you’re planning a full menu, a comprehensive guide to pairing wine with beef can offer helpful insights for your guests.
Print
Beef Tenderloin with Peanut-Sesame Crust
Description
Beef Tenderloin with Peanut-Sesame Crust
Ingredients (4–6 servings)
-
2–3 lb (900g–1.4 kg) beef tenderloin, trimmed
-
Salt and black pepper, to taste
-
2 tbsp olive oil
For the crust:
-
½ cup roasted peanuts, finely chopped
-
2 tbsp sesame seeds (toasted if desired)
-
2 cloves garlic, minced
-
1 tbsp fresh ginger, grated
-
2 tbsp soy sauce
-
1 tbsp honey
-
1 tsp chili flakes (optional, for heat)
Instructions
-
Prep tenderloin:
Pat beef dry, season generously with salt and black pepper. Let it sit at room temperature for 30 minutes. -
Sear beef:
Preheat oven to 400°F (200°C). Heat olive oil in an oven-safe skillet over medium-high heat. Sear beef 2–3 minutes per side until browned. Remove from heat. -
Prepare crust:
In a small bowl, mix chopped peanuts, sesame seeds, garlic, ginger, soy sauce, honey, and chili flakes into a paste-like mixture. -
Apply crust:
Press peanut-sesame mixture evenly over the top and sides of the seared tenderloin. -
Roast:
Transfer skillet to the oven. Roast for 15–25 minutes, depending on thickness and desired doneness:-
Rare: 120–125°F (49–52°C)
-
Medium-rare: 130–135°F (54–57°C)
-
Medium: 140–145°F (60–63°C)
Use a meat thermometer for accuracy.
-
-
Rest & slice:
Remove from oven, cover loosely with foil, and let rest 10 minutes. Slice against the grain and serve.