
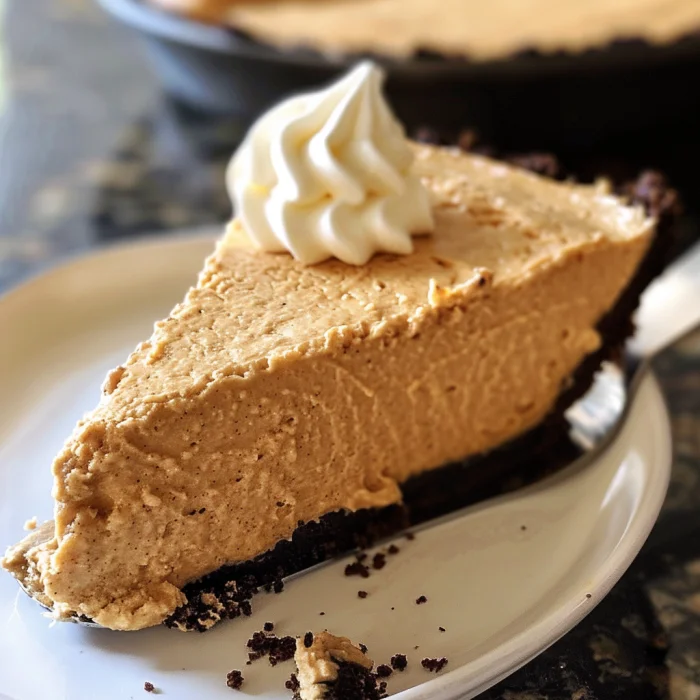
Ah, the crisp air, the cozy sweaters, and the undeniable craving for all things pumpkin. But who says capturing the essence of fall in a dessert means sweating over a hot oven? Absolutely not you! This guide is your passport to the creamiest, most flavorful, and downright easiest No Bake Pumpkin Cheesecake you’ll ever make. We’re diving deep into the “why” and the “how,” unraveling the secrets to a perfect crust and a flawlessly set filling, all without ever turning on your oven. So, get ready to whip up a show-stopping dessert that’s sure to become your new seasonal obsession.
The Ultimate No-Bake Pumpkin Cheesecake: Your Easy, Fail-Proof Recipe for Fall
Introduction: Why This is the Only No-Bake Pumpkin Cheesecake Recipe You’ll Ever Need
Can you smell that? It’s the scent of autumn magic weaving through the air—a mix of cinnamon, nutmeg, and sweet pumpkin. Traditionally, harnessing this flavor meant committing to a lengthy baking session, nervously peering through the oven door to check for dreaded cracks. Well, frankly, forget all that! This no-bake pumpkin cheesecake is about to revolutionize your fall dessert game.
Imagine, if you will, a velvety-smooth filling bursting with warm spice, all nestled into a buttery, crunchy graham cracker crust. The best part? This stunning creation comes together without any of the typical baking fuss. Consequently, you can say goodbye to water baths, temperature worries, and cracked tops forever. This recipe is your ultimate guide to a foolproof, incredibly delicious no bake dessert that’s perfect for Thanksgiving, potlucks, or just a cozy weeknight treat. Ultimately, it’s the only recipe you’ll need.
Why Choose a No-Bake Pumpkin Cheesecake?
The Advantages Over Baked Cheesecake
Let’s be real, baked cheesecakes can be divas. They demand precision, a steady oven, and often a complicated water bath to prevent them from throwing a fit (read: cracking). A no-bake cheesecake, on the other hand, is the chill, reliable friend we all need. Firstly, it’s effortlessly simple, making it a truly beginner-friendly recipe. Secondly, since it sets in the fridge, the risk of a sunken, cracked center is absolutely zero. Furthermore, you save a tremendous amount of time and energy—a huge win during the busy holiday season when oven space is prime real estate. The result? An unbelievably creamy and lush texture that’s denser than its baked cousin, yet somehow lighter on the palate.
Perfect for Any Occasion
Versatility is the name of the game here. This make-ahead dessert is the superstar of Thanksgiving desserts, effortlessly fitting into your feast prep schedule. Need a show-stopper for a potluck? Simply pop the springform pan into a carrier, and you’re good to go—no sloshing or last-minute baking required. Honestly, it’s the perfect solution for any autumn gathering where you want to impress without the stress.
Understanding the Key Ingredients & Their Roles
The Science of Setting: Cream Cheese, Cream, and More
Believe it or not, there’s a little kitchen science behind this easy no bake cheesecake. Each ingredient plays a critical role in achieving that perfect, sliceable consistency.
-
Full-Fat Cream Cheese: This is the non-negotiable foundation. Its richness and structure are vital. Using a reduced-fat version might seem like a good idea, but it often contains more water and stabilizers, which can lead to a softer, sometimes gummy filling that may not set properly.
-
Canned Pumpkin Puree: Here’s a pro tip: you must use pure pumpkin puree, not pumpkin pie filling, which is pre-sweetened and spiced. For the best results, place your puree in a fine-mesh strainer or on a few paper towels for about 15 minutes to drain excess liquid. This simple step prevents a watery filling and ensures your pumpkin cheesecake no bake is firm and flavorful.
-
Heavy Whipping Cream: When whipped, this magical ingredient incorporates thousands of tiny air bubbles. These bubbles lighten the cream cheese base and, once chilled, firm up to provide the structural integrity that holds the whole dessert together. It’s our primary setting agent.
The Flavor Builders: Spices and Sweeteners
The filling is a symphony of warm, autumnal flavors. Pumpkin pie spice is the quintessential blend, but feel free to adjust the ratios of cinnamon, ginger, nutmeg, and cloves to your taste. Using brown sugarinstead of white granulated sugar is a game-changer; its deep molasses notes complement the pumpkin perfectly, adding a layer of caramel-like warmth. Finally, never underestimate the power of pure vanilla extract and a pinch of salt—they are the essential flavor enhancers that make all the other ingredients sing in harmony.
How to Make No-Bake Pumpkin Cheesecake: A Step-By-Step Guide
Equipment You’ll Need
Gathering your tools beforehand makes the process seamless. You’ll need:
-
A 9-inch springform pan (for clean slices) or a deep-dish pie plate.
-
An electric hand mixer or stand mixer. (You can whisk by hand, but it’s a serious arm workout!).
-
Mixing bowls.
-
A spatula.
-
A food processor for the crust (optional, but easy).
Ingredient List (Exact Measurements)
For the Graham Cracker Crust:
-
1 ½ cups graham cracker crumbs (about 10-12 full sheets)
-
⅓ cup granulated sugar
-
6 tablespoons unsalted butter, melted
For the Pumpkin Cheesecake Filling:
-
2 (8-ounce) blocks full-fat cream cheese, softened to room temperature
-
1 (15-ounce) can pure pumpkin puree, drained if watery
-
1 cup powdered sugar (or ¾ cup packed brown sugar)
-
1 tablespoon pumpkin pie spice
-
1 teaspoon pure vanilla extract
-
¼ teaspoon salt
-
2 cups heavy whipping cream, cold
Step 1: Preparing the Perfect No-Bake Crust
First, combine the graham cracker crumbs and sugar in a medium bowl. Then, pour in the melted butter and stir until the mixture resembles wet sand and holds together when pinched. Transfer it to your springform pan and press it down firmly and evenly into the bottom and slightly up the sides. Why so firm? A well-compacted crust won’t crumble when you slice your masterpiece. Afterwards, pop it in the refrigerator to chill and set while you make the filling.
Step 2: Crafting the Luxurious Pumpkin Filling
Now, for the main event! Using your mixer, beat the softened cream cheese on medium-high speed until it’s completely smooth and lump-free—this is crucial! Next, add the drained pumpkin puree, powdered sugar, pumpkin pie spice, vanilla, and salt. Beat this mixture until everything is perfectly combined and smooth. Pause to scrape down the sides of the bowl to ensure no hidden pockets of cream cheese remain.
In a separate, clean, cold bowl, pour in the heavy whipping cream. Whip it on high speed until stiff peaks form. This means when you lift the beaters, the cream stands straight up without drooping. Now, here’s the secret technique: gently fold the whipped cream into the pumpkin mixture. Use a spatula and cut through the center, folding over the top in a slow, deliberate motion. This maintains all those precious air bubbles you just whipped in.
Step 3: Assembling and Chilling for Perfection
Retrieve your chilled crust from the fridge. Pour the glorious pumpkin filling into the crust and smooth the top with your spatula. Cover the pan tightly with plastic wrap. This is the most challenging part: patience. You must refrigerate your no bake dessert for at least 6-8 hours, but preferably overnight. This isn’t a suggestion; it’s a requirement for the filling to set up properly and develop its full, incredible flavor.
Pro Tips, Variations, and Presentation
Pro Tips for a Flawless No-Bake Cheesecake
-
How to Prevent a Soggy Crust: Ensure your butter is fully melted and mixed thoroughly to create a seal against the moist filling.
-
Ensuring Your Filling Sets Perfectly: Use cold cream for whipping and make sure your cream cheese is truly soft. Conversely, lumpy, cold cream cheese won’t incorporate well, leading to an uneven texture.
-
Troubleshooting: If your filling seems too soft after chilling, it might not have whipped long enough or it needs more time in the fridge. Don’t panic—just give it a few more hours!
Delicious Variations & Dietary Adaptations
-
Flavor Twists: Try a ginger snap crust for a spicy kick! Swirl in a ribbon of salted caramel or maple syrup before chilling for a decadent surprise.
-
Dietary Substitutions: For a gluten-free version, use certified gluten-free graham crackers or blended oats. To make it vegan, swap in your favorite plant-based cream cheese and coconut cream, using a stabilizer like agar-agar.
How to Serve and Garnish Your Masterpiece
Run a thin knife under hot water, dry it, and then slide it around the edge of the springform pan to release the crust. Then, carefully unlock the pan. For slicing, dip your knife in hot water and wipe it clean between each cut for stunningly clean slices. Top with fresh whipped cream, a sprinkle of cinnamon, candied pecans, and a generous drizzle of caramel sauce. Wow, what a presentation!
Storing, FAQs, and Conclusion
Storing and Making-Ahead Instructions
This chilled cheesecake keeps beautifully covered in the refrigerator for 4-5 days. It’s also a fantastic make-ahead dessert for holidays. You can also freeze it for up to 3 months; just thaw it overnight in the fridge before serving. For more details on best practices, you can always check the official food safety guidelines for storing dairy-based desserts.
Frequently Asked Questions (FAQs)
Can I use fresh pumpkin puree instead of canned?
Yes, you can! However, it must be cooked, pureed until completely smooth, and, most importantly, thoroughly drained to remove excess moisture. Canned puree often provides a more consistent texture and flavor.
Why didn’t my cheesecake set?
The most common culprits are not whipping the cream to stiff peaks, not chilling it long enough, or using ingredients that weren’t the right temperature. Ensure everything is cold for whipping and be patient with the chilling time!
How far in advance can I make this?
It’s actually better when made in advance! The flavors meld and intensify. 1 to 2 days ahead is perfect.
What’s the difference between no-bake and baked pumpkin cheesecake?
The difference lies in texture and technique. Baked versions use eggs for structure and have a denser, firmer, cakier texture. No-bake cheesecakes are creamier, lighter, and set by chilling.
Can I make this without a springform pan?
Absolutely! A 9×9 square dish or a deep-dish pie plate will work just fine. Your slices might just be a little less perfect, but they’ll taste just as amazing.
Conclusion: Your New Go-To Dessert
And there you have it! You’re now armed with everything you need to create an unforgettable No Bake Pumpkin Cheesecake. This recipe isn’t just a list of instructions; it’s your ticket to stress-free, celebratory baking. So embrace the ease, relish the creamy texture, and bask in the warm flavors of fall. This dessert is sure to earn a permanent spot in your recipe box, delighting friends and family for seasons to come. Now, go forth and create!
Print
No Bake Pumpkin Cheesecake
Description
🎃🍰 No Bake Pumpkin Cheesecake
Ingredients:
Crust:
-
2 cups graham cracker crumbs (or crushed Biscoff/gingersnap cookies for extra flavor)
-
½ cup unsalted butter, melted
-
2 tbsp brown sugar
Filling:
-
16 oz (450 g) cream cheese, softened
-
1 cup canned pumpkin puree
-
1 cup powdered sugar
-
1 cup heavy whipping cream, whipped to stiff peaks
-
1 tsp vanilla extract
-
1 tsp ground cinnamon
-
½ tsp ground nutmeg
-
½ tsp ground ginger
-
Pinch of cloves (optional)
Topping (optional):
-
Whipped cream
-
Caramel drizzle
-
Crushed gingersnaps or pecans
Instructions:
-
Make crust: In a bowl, mix graham cracker crumbs, melted butter, and brown sugar. Press mixture firmly into the bottom of a springform pan or pie dish. Refrigerate while preparing filling.
-
Make filling: Beat cream cheese until smooth. Add pumpkin puree, powdered sugar, vanilla, and spices. Mix until creamy.
-
Fold in whipped cream: Gently fold whipped cream into the pumpkin mixture until fully combined and fluffy.
-
Assemble: Spread filling evenly over chilled crust. Smooth the top with a spatula.
-
Chill: Refrigerate for at least 4 hours (overnight is best) to set.
-
Serve: Top with whipped cream, caramel drizzle, and crushed cookies or pecans before slicing.