
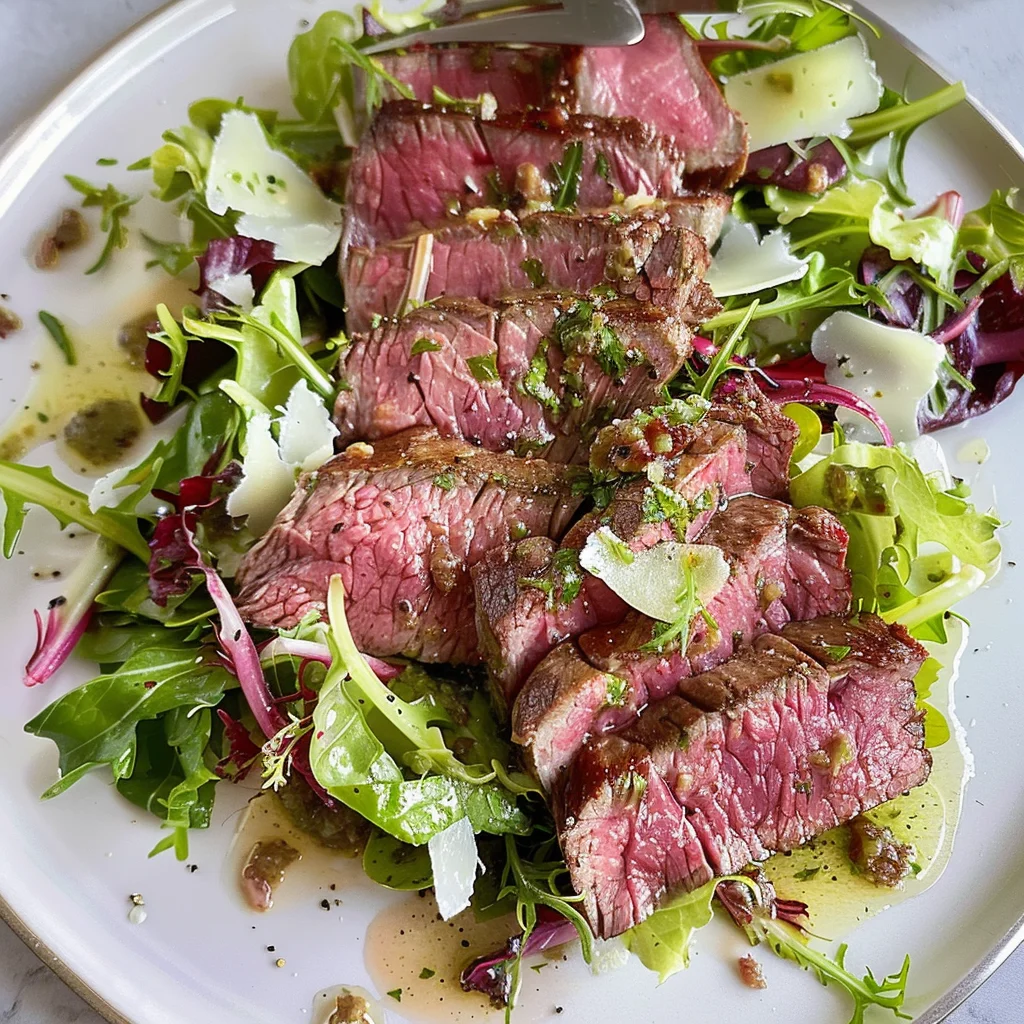
Picture this: a stunning platter arrives at your table. Upon it rests a magnificently seared tri-tip, its crust dark and crackling like ancient leather, promising a juicy, tender interior. Beside it, a tangle of whimsical, pale green frisée salad waits, studded with crispy, salty lardons and lightly dressed in a sophisticated sherry vinaigrette that ties everything together with a sweet, tangy bow. This isn’t a scene from a pricey steakhouse; oh no, this is a masterpiece you can absolutely create in your own kitchen. This guide is your personal passport to that culinary destination, transforming a humble, flavorful cut into a show-stopping meal that’s equal parts rustic charm and gourmet flair. We’ll walk through every single step, from selecting the perfect piece of beef to mastering the sizzle of the sear and whisking together a perfectly emulsified dressing. So, tie on your apron—let’s turn dinner into an event.
Introduction & The Star Ingredient (Tri-Tip)
The Ultimate Seared Tri-Tip with Frisée Salad and Sherry Vinaigrette
Alright, let’s get right to it. Imagine carving into a steak that’s utterly perfect on the inside—a blushing, juicy medium-rare that’s so tender you barely need a knife. Now, imagine that every single bite is contrasted with a sharp, crisp, and slightly bitter salad that cuts through the richness like a dream. That, in a nutshell, is the magic of this seared tri-tip with frisée salad and sherry vinaigrette. Frankly, it’s a restaurant-quality dish that’s deceptively simple to pull off at home, and it’s guaranteed to impress anyone lucky enough to get a seat at your table. This comprehensive guide? Well, it’s designed to be your ultimate resource, holding your hand from the butcher counter all the way to a beautiful, plated dinner. We’re talking about unlocking the secrets to a killer crust, a balanced salad, and a vinaigrette you’ll want to put on everything.
Why Tri-Tip Steak is a Chef’s Secret for a Crowd-Pleasing Meal
So, why choose tri-tip, you ask? Well, for the initiated, this cut is something of a hidden gem, a beloved secret on the West Coast that deserves a spot in every meat-lover’s repertoire nationwide. It’s the ultimate crowd-pleaser, offering incredible flavor without the premium price tag of a ribeye or strip steak.
What Exactly is a Tri-Tip Cut?
Let’s break it down, literally. The tri-tip is a triangular muscle (hence the name) cut from the bottom sirloin of the cow. It’s a lean cut, but don’t let that fool you—it boasts just enough marbling to keep it wonderfully moist and packed with a robust, beefy flavor that stands up beautifully to bold seasonings and a hard sear. Often hailed as the cornerstone of Santa Maria-style barbecue out in California, this tri-tip roast is incredibly versatile. It can be grilled, roasted, or, as we’re doing today, perfectly seared in a scorching hot pan to create an unforgettable crust. For a deeper dive into its origins, you can learn more about the tri-tip cut from the Beef Checkoff.
Flavor and Texture Profile
Now, let’s talk about taste and texture. Compared to more expensive cuts, tri-tip is a bit more robust and beefy, less buttery than a ribeye but far more flavorful than a lean tenderloin. When cooked correctly—and we absolutely will—it’s incredibly tender and juicy. Its unique grain structure, which actually changes direction midway through the cut, is the only tricky part. But don’t you worry; we’ll cover exactly how to slice it later to ensure every piece is melt-in-your-mouth tender.
Why it’s Perfect for Searing
Here’s the real kicker: this cut is an absolute dream for searing. Its relatively flat, triangular shape provides a fantastic amount of surface area. More surface area, of course, means more real estate for that beautiful, flavorful, dark brown crust to form—a process known as the Maillard reaction. Consequently, you get a steak that’s gloriously crispy and caramelized on the outside while remaining succulently pink and tender on the inside. It’s a win-win situation, offering the best of both worlds in every single bite.
Preparation is Key: Your Tri-Tip & Mise en Place
Selecting and Preparing Your Tri-Tip for the Perfect Sear
Listen, the journey to a flawless seared tri-tip begins long before the steak hits the pan. In fact, proper preparation is arguably the most critical step; it separates a good meal from a truly great one. Rushing this stage is a surefire way to end up with a steamed, grey piece of meat instead of that gorgeous crust we’re after.
How to Choose the Best Tri-Tip at the Butcher Counter
Walking up to the meat counter can feel intimidating, but it doesn’t have to be. First, look for a piece that’s a bright, cherry-red color—that’s a sign of freshness. Next, give it a quick visual scan for marbling. You don’t need huge streaks of fat, but you do want some thin, creamy white veins running through the meat; that’s your insurance policy for a juicy result. Finally, the tri-tip should feel firm to the touch, not soft or slimy. A size between 1.5 and 2.5 pounds is ideal for most families, easily serving four to six people.
The Essential Step: Patting Dry and Bringing to Room Temperature
Here’s a pro tip you simply cannot skip: pat that steak bone-dry with a wad of paper towels. I mean, really get in there. Moisture is the ultimate enemy of browning; instead of searing, it steams. Furthermore, take the chilled meat out of the fridge about 30 to 45 minutes before you plan to cook it. Letting it come to room temperature might seem like a small thing, but it ensures the tri-tip steak cooks evenly from edge to center, preventing a burnt outside and a cold, raw inside.
A Simple, Flavorful Herb Rub
Now, for the seasoning! Honestly, you don’t need a complicated mix of twenty spices. The beefy flavor of the tri-tip is the star. A classic, simple rub is all you need to enhance it without overpowering it. Generously coat the entire surface with coarse kosher salt and freshly cracked black pepper. Then, for an extra layer of flavor, add a dusting of garlic powder and a hint of smoked paprika. That’s it! This combination creates a beautiful, savory crust that complements the meat perfectly.
Gathering Your Salad Components: Frisée and Beyond
While the steak is coming to temperature, let’s talk about the supporting cast. This frisée salad is far from an afterthought; it’s a crucial element that provides texture, freshness, and a punch of acidity to balance the rich beef.
Understanding Frisée: The Curly, Peppery Green
Frisée, sometimes called curly endive, is a member of the chicory family. It looks like a head of unruly, pale green lettuce with delicate, frizzy leaves. Its flavor profile is uniquely mildly bitter and peppery, which makes it the perfect counterpart to fatty meats. If your local store doesn’t carry frisée, don’t panic! A great substitute is a mix of radicchio for color and bitterness and Belgian endive for that crisp, refreshing crunch.
The Supporting Cast: Bacon, Herbs, and Alliums
What takes this salad from good to “where has this been all my life?” is the addition of a few key players. First, thick-cut bacon, cut into small pieces called lardons, which we’ll render until they’re irresistibly crispy. Next, a shallot, finely minced, adds a subtle, sweet onion flavor that’s less aggressive than a regular onion. Finally, a generous handful of fresh chives, with their mild, oniony kick, will be sprinkled over the top for a fresh finish. Each component builds upon the last, creating a symphony of flavors and textures.
The Art of the Sear & The Vinaigrette
Mastering the Pan Sear: Your Guide to a Perfect Crust
This is it—the moment of truth. Searing isn’t just cooking; it’s alchemy. It’s about transforming the surface of the meat into something deeply flavorful and textured. And guess what? With the right technique, it’s incredibly easy. For a true deep dive into the methodology, check out the science behind the perfect sear, as explained by Serious Eats.
Choosing Your Weapon: Cast Iron vs. Stainless Steel Skillet
Your choice of pan is your first crucial decision. Without a doubt, a heavy cast-iron skillet is the champion here. Why? Because it retains heat like nobody’s business, ensuring the pan temperature doesn’t plummet when you add the cold steak. This guarantees a consistent, fierce sear. However, a heavy-bottomed stainless steel pan is also an excellent choice, especially for developing those wonderful browned bits (fond) at the bottom that will later enrich our vinaigrette.
The Searing Process Step-by-Step
-
Get it Hot: Place your dry, empty skillet over medium-high to high heat and let it get screaming hot. You should see wisps of smoke starting to rise—that’s your signal.
-
Add the Oil: Now, add a tablespoon or two of a high-smoke-point oil like avocado, grapeseed, or refined olive oil. Swirl it around; it should shimmer and thin out immediately.
-
Lay it Down: Carefully place your seasoned tri-tip into the hot oil, laying it away from you to avoid any splatter. Here’s the hard part: DON’T move it! Let it cook undisturbed for a solid 4-6 minutes to build that foundational crust.
-
Sear the Sides: Using tongs, sear the edges of the tri-tip, especially the fat cap, for a minute or two each. This renders the fat and crisps up every surface.
The Finishing Touch: Butter Basting (Optional)
For an extra layer of decadent flavor, you can baste your steak. When you’ve flipped the tri-tip for the final time, add a few tablespoons of butter, a couple of crushed garlic cloves, and a sprig of thyme or rosemary to the pan. As the butter melts and foams, tilt the pan and use a spoon to continuously pour the hot, fragrant butter over the steak for the last minute of cooking. This flavors the meat incredibly and adds a beautiful sheen.
Doneness and Resting: The Non-Negotiable Steps
You’ve built a beautiful crust; now, don’t ruin it by guessing!
Using a Meat Thermometer for Perfect Results
Poking and prodding is for amateurs. To achieve the perfect internal temperature every single time, you need a digital instant-read thermometer. This is the most important tool in your kitchen for cooking meat. For a perfect medium-rare, which is ideal for tri-tip, pull the steak from the pan when the thermometer reads 130-135°F (54-57°C). Remember, the temperature will continue to climb another 5 degrees or so as it rests—a phenomenon called carryover cooking.
Why Resting Your Meat is Crucial
Speaking of resting, this might be the most overlooked step in home cooking. As soon as your steak hits its target temperature, transfer it to a cutting board and—walk away! Let it rest for a full 10 minutes, tented loosely with foil. Why? Because the intense heat causes the muscle fibers to tighten and push the juices to the center. Resting allows those fibers to relax and reabsorb all those delicious juices throughout the entire steak. If you slice it immediately, all those precious juices will simply flood onto your cutting board, leaving you with a drier piece of meat.
Crafting the Perfect Sherry Vinaigrette
While your magnificent tri-tip is resting, it’s the perfect time to whip up the dressing. This homemade sherry vinaigrette is so much better than anything from a store-bought bottle; it’s bright, complex, and beautifully emulsified.
The Simple Ratio for a Balanced Vinaigrette
The classic, never-fail ratio for any vinaigrette is three parts oil to one part acid. For this recipe, that translates to about ¾ cup of good extra virgin olive oil and ¼ cup of sherry vinegar. Sherry vinegar is key here; it’s less harsh than red wine vinegar and has a wonderful nutty, sweet complexity that pairs magically with the beef and the bitter greens.
Emulsification: Making Your Dressing Creamy and Cohesive
Nobody wants a dressing that separates instantly. The secret to a creamy, cohesive vinaigrette that clings to the greens is emulsification. To do this, start by whisking your sherry vinegar together with a heaping teaspoon of Dijon mustard and a pinch of salt and pepper. The mustard isn’t just for flavor; it acts as an emulsifier. Then, while whisking constantly, slowly drizzle in the olive oil. This slow incorporation forces the oil and vinegar to bind together into a temporarily stable mixture. Alternatively, you can shake everything vigorously in a sealed jar. To truly master this fundamental technique, you can master the fundamentals of vinaigrette emulsion with MasterClass.
Balancing Flavors: Sweetness, Acidity, and Umami
Always taste your dressing! It should make your taste buds stand at attention. Is it too sharp? A tiny pinch of sugar or a teaspoon of honey can round out the acidity perfectly. Need more depth? A dash of Worcestershire sauce adds a wonderful umami kick. Adjust until it sings.
Assembly, Presentation, and Pairing
Building the Frisée Salad with Lardons
Now, let’s bring our salad components together into something spectacular.
Cooking the Bacon Lardons to Crispy Perfection
Place your diced bacon in a cold skillet. Then, turn the heat to medium. Starting cold allows the fat to render out slowly, leaving you with crispy bacon bits without any burned bits. Cook, stirring occasionally, until the lardons are golden brown and crisp. Use a slotted spoon to remove them, leaving the glorious rendered bacon fat in the pan.
The Warm Dressing Trick
Here’s a fantastic chef’s trick: you can use that warm bacon fat to your advantage. Carefully pour about a tablespoon of the warm fat into your prepared sherry vinaigrette and whisk it in. This slightly wilts the frisée when you dress it, mimicking the classic French bistro dish Frisée aux Lardons, and makes the salad taste incredibly rich and cohesive.
Gently Tossing the Salad
In a large bowl, combine the frisée, the crispy bacon lardons, your minced shallot, and most of the fresh chives. Drizzle with about half of the vinaigrette and toss gently with your hands or salad tongs to coat. You can always add more dressing, but you can’t take it away, so start conservatively.
The Grand Finale: Plating and Presentation
The final act! First, you must locate the direction of the muscle grain on your rested tri-tip. Look for the long lines of muscle fibers running across the meat. Now, this is vital: slice against the grain. This means cutting perpendicular to those lines, which shortens the muscle fibers and makes the meat incredibly tender. If you slice with the grain, you’ll end up with a chewy, stringy mess.
Arrange a generous portion of the dressed frisée salad on each plate. Then, artfully drape the thin slices of seared tri-tip over and around the salad. Drizzle a little extra vinaigrette around the plate for good measure, and finish with a final sprinkle of the remaining fresh chives. Present it with confidence—you’ve earned it!
Perfect Pairings: What to Serve with Seared Tri-Tip
This dish is a complete meal, but a few well-chosen sides can turn it into a feast.
Side Dish Ideas
You’ll want something to soak up the incredible juices and vinaigrette. A side of creamy, buttery mashed potatoes is a classic, comforting choice. Alternatively, crispy roasted potatoes or even a simple slice of crusty, grilled bread would be absolutely divine. A simple side of roasted carrots or asparagus would also work beautifully.
FAQs, Conclusion, and Pro Tips
Frequently Asked Questions (FAQs)
Can I use a different cut of beef if I can’t find tri-tip?
Absolutely! While tri-tip is unique, other great budget-friendly steak cuts like flank steak or skirt steak work wonderfully with this method and salad. Just be mindful that they are thinner, so your cooking time will be significantly shorter to avoid overcooking.
How can I make this recipe ahead of time?
You can be a meal-prep hero with this dish. The sherry vinaigrette can be made and stored in the fridge for up to a week. The tri-tip can be cooked, rested, and sliced, then stored in the fridge. Serve it cold or at room temperature on the salad for a fantastic next-day lunch or easy dinner. The flavors meld together beautifully.
My vinaigrette separated. How can I fix it?
Don’t fret! Separation is completely natural for vinaigrettes. Simply give it a good, vigorous shake in its jar or re-whisk it right before you dress the salad. It will come right back together.
What’s the best way to reheat tri-tip without overcooking it?
The goal is to warm it without continuing to cook it. The best method is to gently warm the slices in a low oven (around 275°F / 135°C) for about 10-15 minutes. You can also briefly warm them in a non-stick pan over very low heat. Avoid the microwave at all costs, as it will quickly turn
Print
Seared Tri-Tip with Frisée Salad and Sherry Vinaigrette
Description
🌿 Seared Tri-Tip with Frisée Salad and Sherry Vinaigrette
Ingredients (4 servings):
For the tri-tip:
-
2–2 ½ lb tri-tip roast
-
2 tbsp olive oil
-
2 cloves garlic, minced
-
1 tsp smoked paprika
-
1 tsp fresh rosemary, chopped (or thyme)
-
Salt & freshly cracked black pepper
For the frisée salad:
-
1 head frisée lettuce, torn into bite-size pieces
-
1 cup cherry tomatoes, halved
-
½ small red onion, thinly sliced
-
½ cup toasted walnuts (or almonds)
-
½ cup shaved Manchego (or Parmesan) cheese
For the sherry vinaigrette:
-
3 tbsp sherry vinegar
-
1 tsp Dijon mustard
-
1 tsp honey
-
¼ cup olive oil
-
Salt & pepper, to taste
Instructions:
-
Prep the tri-tip: Rub with olive oil, garlic, paprika, rosemary, salt, and pepper. Let sit at room temp 30 minutes.
-
Sear & cook:
-
Heat cast-iron skillet or grill to high.
-
Sear tri-tip on all sides until deeply browned (about 2–3 minutes per side).
-
Lower heat to medium (or move to cooler grill zone) and cook until internal temp reaches 130°F (54°C) for medium-rare, about 20–25 minutes.
-
Rest 10 minutes before slicing thinly against the grain.
-
-
Make vinaigrette: Whisk sherry vinegar, Dijon, honey, olive oil, salt, and pepper until emulsified.
-
Build salad: Toss frisée, tomatoes, onion, and walnuts with vinaigrette. Top with shaved cheese.
-
Assemble & serve: Plate sliced tri-tip with frisée salad on the side (or arrange salad under beef slices for bistro-style presentation).