
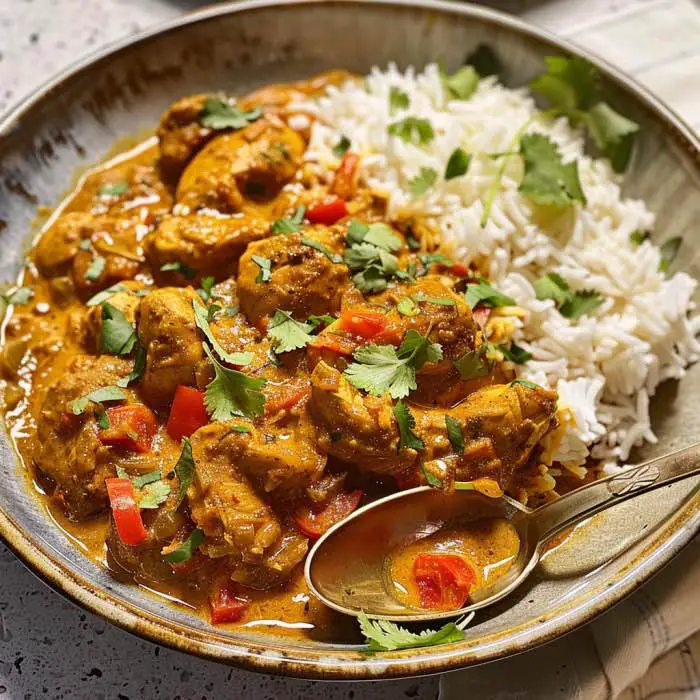
Slow Cooker Coconut Chicken Curry
Introduction
Imagine coming home to the intoxicating aroma of Slow Cooker Coconut Chicken Curry filling your kitchen. This dish combines tender chicken, creamy coconut milk, and aromatic spices into one spectacular meal. Moreover, using a slow cooker makes this recipe incredibly hands-off and perfect for busy schedules.
This comforting curry delivers restaurant-quality flavors without the fuss. Additionally, the slow cooking process allows the spices to meld beautifully while the chicken becomes melt-in-your-mouth tender. Whether you’re new to curry or a seasoned pro, this recipe will become a family favorite.
The best part? You can prep everything in the morning and return to a ready-made dinner. Furthermore, this recipe is family-friendly and packed with nutrition. Let’s dive into creating this delicious slow cooker masterpiece.
Why You’ll Love This Slow Cooker Coconut Chicken Curry
Effortless Preparation
This recipe requires minimal hands-on time. Simply combine the ingredients in your slow cooker and let it work its magic. Consequently, you’ll have more time for other activities throughout the day.
The slow cooking method ensures deep flavor development. Additionally, the low and slow approach prevents overcooking and keeps the chicken incredibly juicy. You’ll achieve professional results with almost zero effort.
Budget-Friendly and Nutritious
Chicken thighs are affordable and become exceptionally tender when slow-cooked. Moreover, this dish uses pantry staples and everyday ingredients that won’t break the bank. One batch can feed a family of four to six people generously.
The coconut milk provides healthy fats while the spices offer anti-inflammatory benefits. Furthermore, you can easily add extra vegetables to boost the nutritional profile. This meal is both satisfying and nourishing.
Customizable and Versatile
You can adjust the spice level to suit your preferences. Therefore, this recipe works for mild curry lovers and spice enthusiasts alike. The base recipe is incredibly flexible and welcomes variations.
Try different vegetables, protein options, or spice combinations. Additionally, leftovers taste even better the next day as flavors continue to develop. This curry is perfect for meal prep and batch cooking.
Essential Ingredients for Coconut Chicken Curry
Main Protein
Chicken thighs are the star of this dish. They remain moist and tender during long cooking times. Boneless, skinless thighs work best for easy serving and eating.
You can substitute chicken breasts if preferred. However, thighs offer superior flavor and texture. Plan for approximately 2 to 2.5 pounds for six servings.
Aromatic Base
Onions provide sweetness and depth to the curry base. Yellow or white onions work equally well. Dice them into medium-sized pieces for even cooking.
Garlic adds pungent, savory notes that enhance the overall flavor. Fresh garlic is strongly recommended over powdered versions. Use at least four to six cloves for robust taste.
Ginger brings warmth and a subtle spicy-sweet element. Fresh ginger root is ideal for the brightest flavor. Grate or mince it finely for even distribution.
Coconut Milk
Full-fat coconut milk creates the signature creamy texture. This ingredient is non-negotiable for authentic flavor and consistency. Use canned coconut milk rather than coconut cream or beverage varieties.
Look for brands without additives or stabilizers. Quality coconut milk makes a noticeable difference in the final dish. One 13.5-ounce can is typically sufficient for this recipe.
Curry Spices and Seasonings
Curry powder forms the flavor foundation. Yellow curry powder is most common, but red or green work too. Use at least two tablespoons for pronounced curry flavor.
Cumin adds earthy, warm notes that complement the curry powder. Ground cumin integrates easily into the sauce. One to two teaspoons provides the right balance.
Turmeric contributes golden color and subtle earthiness. This anti-inflammatory spice is essential for authentic curry. Use one teaspoon for vibrant color without bitterness.
Coriander offers citrusy, slightly sweet undertones. Ground coriander pairs beautifully with other curry spices. Add one teaspoon to round out the flavor profile.
Paprika provides mild sweetness and additional red color. Sweet paprika works best for this recipe. One teaspoon enhances the visual appeal.
Salt and pepper season the dish appropriately. Sea salt or kosher salt are preferred options. Always taste and adjust before serving.
Additional Flavor Enhancers
Tomato paste adds umami richness and helps thicken the sauce. Two tablespoons create depth without overwhelming other flavors. This ingredient also contributes subtle acidity.
Chicken broth thins the sauce to the perfect consistency. Low-sodium broth allows better control over saltiness. Use approximately one cup for ideal texture.
Brown sugar or honey balances the spices with gentle sweetness. One to two tablespoons is sufficient for most palates. Natural sweeteners work better than refined white sugar.
Lime juice brightens the finished curry with citrus notes. Fresh lime juice is far superior to bottled versions. Add it at the end to preserve its vibrant flavor.
Vegetables
Bell peppers add color, crunch, and sweetness. Red, yellow, or orange peppers work beautifully in this curry. Cut them into strips or chunks.
Potatoes make the curry more substantial and filling. Yukon Gold or red potatoes hold their shape well. Dice them into bite-sized pieces for even cooking.
Carrots contribute natural sweetness and nutrition. They also add beautiful orange color to the dish. Slice them into rounds or half-moons.
Spinach or kale can be stirred in at the end. These leafy greens add nutrition and vibrant color. They wilt quickly in the hot curry.
Kitchen Tools and Equipment You’ll Need
Slow Cooker Basics
A 6-quart slow cooker is ideal for this recipe. This size accommodates all ingredients comfortably without overcrowding. Smaller models may require recipe adjustments.
Ensure your slow cooker has both low and high settings. Additionally, a removable ceramic insert makes cleanup easier. Check that the lid fits securely to retain heat and moisture.
Preparation Tools
A sharp chef’s knife is essential for efficient prep work. You’ll be chopping onions, garlic, ginger, and vegetables. Keep your knife sharp for safety and precision.
A sturdy cutting board protects your countertops during prep. Wooden or plastic boards work equally well. Consider having separate boards for vegetables and raw chicken.
Measuring cups and spoons ensure accurate ingredient proportions. Standard measuring tools help achieve consistent results. Metal or plastic options both work fine.
Optional But Helpful
A microplane grater makes quick work of fresh ginger. This tool creates fine, uniform pieces that distribute evenly. It’s also perfect for zesting citrus fruits.
Kitchen tongs help turn and move chicken pieces safely. They’re especially useful when browning chicken beforehand. Silicone-tipped tongs protect your cookware.
A ladle serves the curry neatly into bowls. Choose one with a comfortable handle for easy pouring. A 6 to 8-ounce ladle is the perfect size.
Step-by-Step Instructions
Preparation Phase
Step 1: Gather all your ingredients and measure everything out. This mise en place approach makes cooking smoother and more enjoyable. Place ingredients in small bowls for easy access.
Step 2: Pat the chicken thighs dry with paper towels. Subsequently, season them generously with salt and pepper on both sides. This step ensures well-seasoned meat throughout.
Step 3: Dice the onions into medium pieces, roughly half-inch squares. Then, mince the garlic cloves finely or push them through a press. Grate the fresh ginger using a microplane or fine grater.
Step 4: Chop your chosen vegetables into uniform, bite-sized pieces. Consistency in size ensures even cooking throughout the curry. Set vegetables aside in separate bowls if using different types.
Optional Browning Step
Step 5: Heat a large skillet over medium-high heat with a tablespoon of oil. Brown the chicken thighs in batches, about 3 minutes per side. This step adds extra flavor but is entirely optional.
Browning creates fond on the pan bottom that enhances taste. However, you can skip this step for even easier preparation. The curry will still taste amazing without browning.
Slow Cooker Assembly
Step 6: Add the diced onions to the bottom of your slow cooker. Layer the minced garlic and grated ginger over the onions. These aromatics form the flavor foundation of your curry.
Step 7: Sprinkle the curry powder, cumin, turmeric, coriander, and paprika over the aromatics. Mix everything together briefly to distribute the spices evenly. This helps prevent clumping and ensures balanced flavor.
Step 8: Add the tomato paste to the slow cooker and stir it in. Then, pour in the coconut milk and chicken broth gradually. Stir until everything is well combined and smooth.
Step 9: Add the brown sugar or honey and stir to dissolve. Season the sauce with salt and pepper to taste. Remember, you can adjust seasoning at the end too.
Step 10: Place the chicken thighs into the slow cooker, submerging them in the sauce. Nestle harder vegetables like potatoes and carrots around the chicken. They’ll cook down beautifully over several hours.
Cooking Process
Step 11: Cover the slow cooker with its lid securely. Set it to low heat for 6 to 8 hours or high for 3 to 4 hours. Low and slow yields the most tender results.
Resist the temptation to lift the lid during cooking. Each time you open it, you release heat and extend cooking time. Trust the process and let it work.
Step 12: About 30 minutes before serving, add softer vegetables like bell peppers. These cook quickly and maintain better texture with shorter cooking times. Stir them gently into the curry.
Step 13: Check the chicken for doneness using a meat thermometer. It should reach an internal temperature of 165°F (74°C). The meat should be incredibly tender and easy to shred.
Final Touches
Step 14: Taste the curry and adjust seasoning as needed. Add more salt, pepper, or curry powder if desired. This is your chance to customize the flavor perfectly.
Step 15: Stir in fresh lime juice just before serving. This brightens all the flavors and adds a fresh citrus note. One to two tablespoons is usually perfect.
Step 16: If adding leafy greens like spinach, stir them in now. The residual heat will wilt them perfectly in just a few minutes. They add beautiful color and nutrition.
Step 17: Let the curry rest for 5 to 10 minutes before serving. This allows the sauce to thicken slightly and flavors to settle. The wait is absolutely worth it.
Tips for the Best Slow Cooker Curry
Spice Level Adjustments
Start with the recommended amount of curry powder and adjust from there. Different brands vary significantly in heat intensity. Therefore, taste-testing is your best guide.
Add red pepper flakes or cayenne for extra heat if desired. Conversely, reduce curry powder for milder versions that kids will enjoy. You can also serve hot sauce on the side.
Consider fresh chili peppers for natural heat and flavor. Jalapeños, serranos, or Thai chilies work wonderfully in this curry. Remove seeds for less heat or leave them in for fire.
Texture Considerations
If you prefer thicker curry, remove the lid during the last 30 minutes. This allows excess liquid to evaporate and concentrates flavors. Alternatively, create a cornstarch slurry to thicken the sauce quickly.
For a thinner consistency, add more chicken broth gradually. Coconut milk can also thin the curry while maintaining creaminess. Adjust liquids to your personal preference.
Some people prefer to shred the chicken before serving. This creates a more uniform texture throughout the dish. Use two forks to pull the tender meat apart easily.
Flavor Boosting Techniques
Toast your spices in a dry pan before adding them. This simple step enhances their aromatic qualities significantly. Heat them for 1 to 2 minutes until fragrant.
Use fresh curry paste instead of powder for more complex flavor. Thai curry pastes work particularly well in coconut-based curries. Start with two to three tablespoons and adjust to taste.
Add a splash of fish sauce for umami depth. This ingredient adds savory complexity without tasting fishy. One tablespoon is sufficient for most recipes.
Finish with fresh herbs like cilantro or Thai basil. These bright garnishes elevate the presentation and add fresh flavor. Chop them roughly and sprinkle generously over each serving.
Make-Ahead Strategy
Prep all vegetables and measure spices the night before. Store everything in separate containers in the refrigerator. Morning assembly takes just minutes with this approach.
You can also freeze the assembled ingredients in a freezer bag. When ready to cook, thaw overnight and dump into the slow cooker. This makes meal planning incredibly convenient.
Cooked curry freezes beautifully for up to three months. Cool it completely before transferring to freezer-safe containers. Leave some headspace for expansion during freezing.
Variations and Customizations
Protein Alternatives
Chicken breasts work if you prefer white meat. However, reduce cooking time to prevent drying out. Check for doneness after 4 to 5 hours on low.
Shrimp creates a quick-cooking seafood version. Add them during the last 30 minutes of cooking time. They cook rapidly and can become rubbery if overdone.
Chickpeas make this recipe vegetarian and equally delicious. Use two 15-ounce cans, drained and rinsed thoroughly. Add them at the beginning with other ingredients.
Tofu offers another plant-based protein option. Use extra-firm tofu, pressed and cubed into bite-sized pieces. Add it halfway through cooking to maintain texture.
Vegetable Options
Sweet potatoes provide natural sweetness and vibrant color. Dice them similarly to regular potatoes for even cooking. They pair wonderfully with coconut curry flavors.
Cauliflower absorbs the curry sauce beautifully while maintaining structure. Cut it into medium florets for best results. Add it at the beginning of cooking time.
Green beans contribute color and a slight crunch. Trim them and cut into 2-inch pieces before adding. Include them during the last 45 minutes of cooking.
Zucchini cooks quickly and adds fresh flavor. Cut it into half-moons or rounds for visual appeal. Add it during the final 30 minutes to prevent mushiness.
Mushrooms bring earthy, umami flavors to the curry. Button, cremini, or shiitake mushrooms all work wonderfully. Slice them and add at the beginning of cooking.
Regional Variations
Thai-style curry uses Thai red or green curry paste. Replace the curry powder with 3 to 4 tablespoons of paste. Add lemongrass, kaffir lime leaves, and Thai basil for authenticity.
Indian-style curry incorporates garam masala and fenugreek. Add one tablespoon of garam masala during the last hour of cooking. This creates deeper, more complex spice notes.
Caribbean-style curry includes allspice and Scotch bonnet peppers. Add one teaspoon of allspice with other spices initially. Be cautious with Scotch bonnets as they’re extremely hot.
Dietary Modifications
Low-carb version skips potatoes and increases non-starchy vegetables. Cauliflower florets make an excellent potato substitute. The curry remains satisfying without the extra carbohydrates.
Dairy-free is already achieved since this recipe contains no dairy. Coconut milk naturally provides the creamy texture without any dairy products. This makes it suitable for lactose-intolerant individuals.
Gluten-free requires checking your curry powder and broth labels. Most pure spices are naturally gluten-free. However, some brands may contain wheat-based anti-caking agents.
Paleo-friendly is easily achieved by using honey instead of sugar. Ensure your curry powder contains no additives or fillers. This version fits perfectly into paleo meal plans.
What to Serve with Coconut Chicken Curry
Rice Options
Basmati rice is the classic accompaniment to curry. Its long grains and subtle nutty flavor complement the creamy sauce perfectly. Cook it according to package directions for fluffy results.
Jasmine rice offers a slightly sticky texture and floral aroma. This Thai rice variety pairs beautifully with coconut-based curries. It’s also slightly sweeter than basmati rice.
Brown rice provides a healthier whole-grain alternative. It has a nuttier flavor and chewier texture than white rice. Note that brown rice takes longer to cook.
Cauliflower rice creates a low-carb, grain-free option. Simply pulse cauliflower florets in a food processor until rice-sized. Sauté it briefly with a little oil before serving.
Coconut rice enhances the coconut flavor throughout the meal. Cook white rice in a mixture of water and coconut milk. Add a pinch of salt and sugar for extra flavor.

Bread Accompaniments
Naan bread is perfect for soaking up the delicious curry sauce. You can buy it fresh from grocery stores or make it at home. Brush it with garlic butter for extra flavor.
Roti offers a lighter, whole wheat alternative to naan. These unleavened flatbreads are simple to make at home. They’re also healthier than fried breads.
Pita bread works in a pinch when other options aren’t available. Warm it slightly before serving for better texture. Cut it into wedges for easy dipping.
Side Dishes and Salads
Cucumber raita provides cooling contrast to spicy curry. Mix diced cucumbers with coconut yogurt, mint, and cumin. This refreshing side balances heat beautifully.
Mango chutney adds sweet and tangy flavors to the meal. The fruity sweetness complements the savory curry wonderfully.
Simple green salad offers freshness and crunch. Dress it lightly with lemon juice and olive oil. Add sliced cucumbers and tomatoes for extra vegetables.
Roasted vegetables create a substantial side dish. Try roasted Brussels sprouts, broccoli, or asparagus with Indian spices. These add variety to your meal.
Pappadums are crispy lentil crackers that add textural interest. You can fry or microwave them quickly before serving. They’re fun for scooping up curry sauce.
Storage and Reheating Instructions
Refrigerator Storage
Cool the curry completely before transferring to storage containers. Leaving it at room temperature too long promotes bacterial growth. Divide it into smaller portions for faster cooling.
Store curry in airtight containers in the refrigerator. Glass containers with tight-fitting lids work best for preventing odor transfer. Label containers with the date for easy tracking.
Properly stored curry lasts 3 to 4 days in the refrigerator. The flavors often improve after a day as everything melds together. Check for any off odors before reheating and consuming.
Store rice separately from the curry for best results. Rice can become mushy when stored with sauce for extended periods. Keep it in its own airtight container.
Freezer Storage
Freeze curry in freezer-safe containers or heavy-duty freezer bags. Leave about one inch of headspace for expansion during freezing. Remove as much air as possible from bags.
Frozen curry maintains quality for up to 3 months. Beyond this, it’s still safe but flavors may diminish slightly. Label everything clearly with contents and date frozen.
Consider freezing curry in individual portions for easy meal prep. Single servings thaw and reheat much faster than large batches. This also prevents waste from reheating more than needed.
Avoid freezing curries containing potatoes if possible. Potatoes often become grainy and mealy after freezing and thawing. Other vegetables freeze and reheat beautifully.
Reheating Methods
Stovetop reheating provides the best results for texture and flavor. Transfer curry to a saucepan over medium-low heat. Stir occasionally and heat until steaming throughout.
Add a splash of broth or coconut milk if the curry seems too thick. Reheating can cause sauces to reduce and thicken further. Adjust consistency to your preference while warming.
Microwave reheating offers convenience for quick meals. Transfer curry to a microwave-safe bowl with a cover. Heat in 1-minute intervals, stirring between each, until hot.
Cover the bowl loosely to prevent splattering while allowing steam to escape. Full coverage can cause pressure buildup and messy explosions. Stir thoroughly before eating to distribute heat evenly.
Slow cooker reheating works well for large quantities. Transfer frozen or refrigerated curry to the slow cooker. Set it on low for 2 to 3 hours until heated through.
This method is perfect for potluck dinners or meal prep Sundays. The curry stays warm for hours without drying out. Just give it an occasional stir for even heating.
Nutritional Information
Macronutrient Breakdown
One serving of this curry contains approximately 350 to 400 calories. The exact amount varies based on portion size and specific ingredients used. This makes it a reasonable option for most dietary plans.
Protein content ranges from 25 to 30 grams per serving. Chicken provides high-quality, complete protein for muscle maintenance and growth. This substantial protein content keeps you satisfied longer.
Fat content is approximately 20 to 25 grams per serving. Most fat comes from the coconut milk, which contains medium-chain triglycerides. These healthy fats are more easily metabolized than other fat types.
Carbohydrate content depends heavily on serving choices and added vegetables. Without rice or potatoes, carbs stay around 15 to 20 grams. Adding rice significantly increases the carbohydrate content.
Micronutrient Highlights
This curry is rich in vitamin C from bell peppers and tomatoes. This important antioxidant supports immune function and skin health. One serving provides a significant portion of daily needs.
Iron comes from chicken and various spices used in the curry. This mineral is essential for oxygen transport throughout the body. The vitamin C present helps improve iron absorption.
Potassium from coconut milk and vegetables supports heart health. This electrolyte helps regulate blood pressure and fluid balance. Adequate potassium intake benefits overall cardiovascular function.
B vitamins from chicken support energy metabolism and brain function. These water-soluble vitamins are essential for converting food into energy. Chicken thighs are particularly rich in B vitamins.
Health Benefits
Turmeric contains curcumin, a powerful anti-inflammatory compound. This may help reduce inflammation throughout the body. Regular consumption supports joint health and overall wellness.
Coconut milk provides lauric acid, which has antimicrobial properties. This fatty acid may support immune system function naturally. It’s also beneficial for gut health.
Ginger aids digestion and may help reduce nausea. This root has been used medicinally for thousands of years. It also has anti-inflammatory properties similar to turmeric.
Garlic supports cardiovascular health and immune function. It contains compounds that may help lower blood pressure naturally. Fresh garlic provides the most health benefits.
Common Mistakes to Avoid
Overcooking the Chicken
While slow cookers are forgiving, excessive cooking can dry out the meat. Even chicken thighs can become stringy if cooked too long. Follow recommended cooking times closely for best results.
Check the chicken periodically if you’re unsure about timing. It should be tender but still hold together when lifted. Overcooked chicken falls apart completely and loses texture.
Using Low-Fat Coconut Milk
Low-fat or “lite” coconut milk produces watery, less flavorful curry. The fat content is essential for proper texture and richness. Full-fat coconut milk is worth the extra calories.
Some low-fat versions also contain additives and stabilizers. These can affect the overall taste and mouthfeel negatively. Always choose quality, full-fat coconut milk for best results.
Not Layering Ingredients Properly
Placing chicken directly on the bottom can cause uneven cooking. The bottom of the slow cooker is the hottest area. Start with aromatics and vegetables to protect the protein.
This layering also ensures vegetables cook properly while chicken stays moist. Hard vegetables should be placed lower than delicate ones. This simple technique dramatically improves results.
Opening the Lid Too Often
Every time you lift the lid, heat escapes and cooking time increases. This also disrupts the cooking process and temperature consistency. Trust your slow cooker and resist peeking.
If you must check progress, do so quickly and replace the lid immediately. Each peek can add 15 to 20 minutes to cooking time. Patience yields the best results with slow cooking.
Skipping the Browning Step
While optional, browning chicken adds significant flavor depth. The caramelization creates complex savory notes throughout the curry. This extra step takes only minutes but makes a noticeable difference.
Browning also renders some fat from the chicken skin if using skin-on thighs. This reduces greasiness in the final dish. Consider this step if you have the extra time.
Adding Delicate Vegetables Too Early
Tender vegetables like bell peppers and spinach cook very quickly. Adding them at the beginning results in mushy, overcooked vegetables. Time your vegetable additions based on cooking time needed.
Bell peppers need only 30 to 45 minutes to become tender. Leafy greens require just a few minutes in hot liquid. Protect their texture and color by adding them near the end.
Forgetting to Adjust Seasoning
Slow cooking can mute flavors as they meld together. What tastes perfectly seasoned at the start may need adjustment later. Always taste and adjust before serving.
Add salt, pepper, lime juice, or additional spices as needed. This final seasoning brightens the dish and balances all flavors. Don’t skip this crucial step.
Frequently Asked Questions
Can I make Slow Cooker Coconut Chicken Curry ahead of time?
Yes, this curry is excellent for meal prep and make-ahead cooking. Prepare it completely, cool it quickly, and refrigerate for up to 4 days. The flavors actually improve after sitting overnight as spices continue to develop.
You can also prep all ingredients in advance without cooking. Chop vegetables, measure spices, and cut chicken the night before. Store everything separately in the refrigerator until ready to assemble and cook.
What type of coconut milk should I use?
Always use full-fat canned coconut milk for this recipe. Light or reduced-fat versions produce thin, watery curry without proper richness. Look for brands that list only coconut and water as ingredients.
Shake the can well before opening to mix the cream and liquid. Some brands separate naturally during storage and shipping. Room temperature cans are easier to pour than chilled ones.
How can I make this curry spicier?
Add cayenne pepper, red pepper flakes, or fresh chili peppers to increase heat. Start with small amounts and taste as you go. You can always add more heat but can’t remove it once added.
Consider serving hot sauce or chili oil on the side. This allows each person to customize their spice level. Sriracha, sambal oelek, or chili garlic sauce all work wonderfully.
Can I use frozen chicken for this recipe?
Fresh or thawed chicken works best for food safety and even cooking. Frozen chicken releases excess water as it thaws in the slow cooker. This dilutes the sauce and affects the final consistency.
If using frozen chicken is unavoidable, increase cooking time by 1 to 2 hours. Check the internal temperature carefully to ensure proper cooking. The chicken must reach 165°F (74°C) throughout.
What’s the best way to thicken the curry if it’s too thin?
Create a cornstarch slurry by mixing equal parts cornstarch and cold water. Stir this into the curry during the last 30 minutes of cooking. The curry will thicken as it continues to heat.
Alternatively, remove the lid during the final hour of cooking. This allows excess liquid to evaporate naturally while concentrating flavors. You can also mash some of the cooked potatoes to naturally thicken the sauce.
Can I double this recipe?
Yes, but ensure your slow cooker is large enough to accommodate everything. Don’t fill your slow cooker more than two-thirds full for proper heat circulation. You may need an 8-quart model for doubled recipes.
Cooking time remains the same when doubling most slow cooker recipes. However, the curry may take slightly longer to come to temperature initially. Check doneness before serving regardless of recipe size.
How do I prevent the coconut milk from curdling?
Use full-fat coconut milk and avoid extremely high temperatures. Add it to the slow cooker at the beginning with other liquids. The gradual heating prevents curdling or separation.
Don’t use the high heat setting if your curry contains acidic ingredients like tomatoes. The combination of high heat and acid can cause separation. Low and slow prevents this problem entirely.
Is Slow Cooker Coconut Chicken Curry freezer-friendly?
Absolutely, this curry freezes beautifully for up to 3 months. Cool it completely before transferring to freezer-safe containers or bags. Remove as much air as possible to prevent freezer burn.
Thaw frozen curry overnight in the refrigerator before reheating. This ensures even, safe reheating without hot spots. You can also reheat from frozen using the stovetop or slow cooker method with extended time.
Conclusion
Slow Cooker Coconut Chicken Curry transforms simple ingredients into an extraordinary meal. This hands-off recipe delivers complex flavors without requiring constant attention. The combination of tender chicken, creamy coconut milk, and aromatic spices creates pure comfort in a bowl.
Whether you’re a busy professional, meal-prep enthusiast, or home cook seeking easy dinner solutions, this curry fits perfectly. The flexibility to customize spices, proteins, and vegetables means it never gets boring. Furthermore, the recipe welcomes everyone to the table.
The slow cooker method ensures foolproof results every single time. You’ll love returning home to the incredible aroma filling your kitchen. Additionally, leftovers taste even better, making this ideal for weekly meal planning.
This Slow Cooker Coconut Chicken Curry proves that delicious, restaurant-quality meals can be effortless. With minimal prep work and maximum flavor payoff, it’s destined to become your new favorite recipe. Start your slow cooker tomorrow morning and enjoy an amazing dinner tonight.

Slow Cooker Coconut Chicken Curry
Description
Slow Cooker Coconut Chicken Curry
Ingredients
-
2 lbs (900 g) boneless, skinless chicken thighs or breasts, cut into chunks
-
1 large onion, diced
-
3 cloves garlic, minced
-
1 tablespoon fresh ginger, grated
-
2 tablespoons curry powder
-
1 teaspoon turmeric
-
1 teaspoon paprika
-
1 can (14 oz / 400 ml) coconut milk
-
1 can (14 oz / 400 g) diced tomatoes
-
1 red bell pepper, sliced
-
1 carrot, sliced
-
1 cup frozen peas
-
Salt and pepper, to taste
-
2 tablespoons lime juice
-
Fresh cilantro, chopped, for garnish
-
Cooked rice or naan, for serving
Instructions
-
Prep the Slow Cooker
In the slow cooker, combine onion, garlic, ginger, curry powder, turmeric, and paprika. Stir to coat the aromatics with spices. -
Add Chicken and Veggies
Place chicken chunks on top, then add bell pepper, carrot, diced tomatoes, and coconut milk. Season with salt and pepper. -
Cook Low and Slow
Cover and cook on low for 6–7 hours or high for 3–4 hours, until chicken is tender and flavors are melded. -
Add Finishing Touches
Stir in frozen peas and lime juice, and cook an additional 5–10 minutes until heated through. -
Serve
Garnish with fresh cilantro and serve over steamed rice or with warm naan.