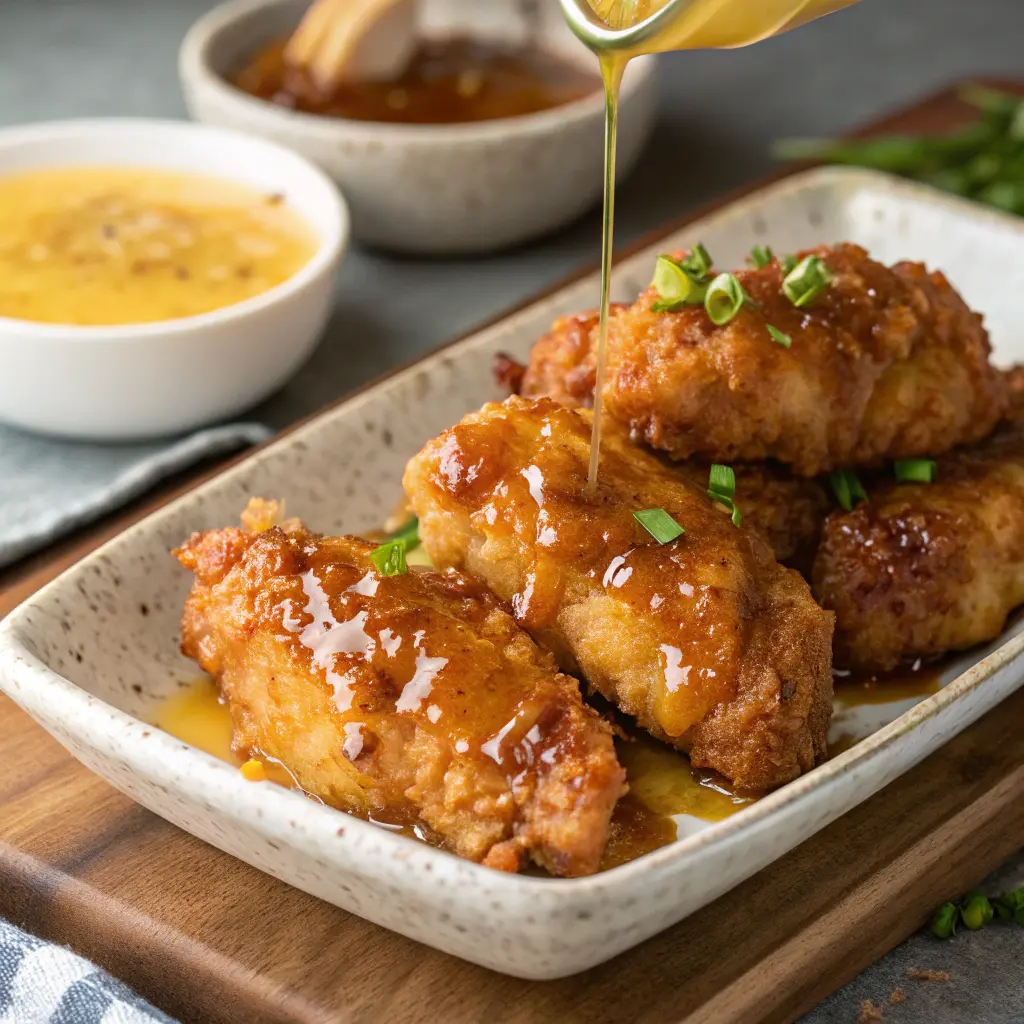
Honey Butter Chicken Tenders: The Ultimate Crispy, Sweet, and Savory Recipe
If you’re craving restaurant-quality chicken at home, Honey Butter Chicken Tenders deliver the perfect balance of crispy coating, juicy meat, and irresistible sweet-savory glaze. This family-friendly recipe combines golden-brown breaded chicken with a luscious honey butter sauce that transforms simple tenders into a crowd-pleasing meal. Whether you’re feeding picky eaters or hosting a casual dinner party, these tender, flavorful bites satisfy every time.
What Makes Honey Butter Chicken Tenders Special
Honey butter chicken tenders stand out from ordinary breaded chicken because they combine two beloved flavor profiles. First, the crispy exterior provides satisfying crunch with every bite. Second, the honey butter glaze adds a sweet richness that complements the savory seasoned coating perfectly.
The texture contrast creates an addictive eating experience. Meanwhile, the natural sweetness from honey balances the buttery richness without overwhelming your palate. This combination works wonderfully for both kids and adults.
Additionally, these tenders cook faster than whole chicken breasts. Therefore, busy home cooks appreciate the quick preparation time. The recipe also allows for customization based on your family’s preferences.
Why This Recipe Works
The success of honey butter chicken tenders relies on several key factors. First, using chicken tenderloins ensures even cooking throughout. Second, the double-coating technique creates maximum crispiness. Finally, finishing with warm honey butter sauce adds restaurant-quality polish.
The honey butter glaze penetrates the crispy coating slightly. As a result, you get sweet-savory flavor in every bite. The butter helps the honey cling to the chicken surface beautifully.
Furthermore, this recipe uses simple pantry ingredients. Therefore, you won’t need specialty items from gourmet stores. Everything comes together with basic seasonings and quality chicken.
Essential Ingredients for Perfect Tenders
For the Chicken
The foundation of exceptional honey butter chicken tenders starts with quality protein. Choose fresh, never-frozen chicken tenderloins when possible. Each piece should look plump and moist without any gray discoloration.
-
2 pounds chicken tenderloins – The most tender cut naturally
-
1 cup buttermilk – Tenderizes meat and adds tang
-
2 large eggs – Helps coating adhere properly
-
2 cups all-purpose flour – Creates crispy base layer
-
1½ cups panko breadcrumbs – Provides extra crunch
-
2 teaspoons garlic powder – Adds savory depth
-
2 teaspoons onion powder – Enhances overall flavor
-
1½ teaspoons paprika – Contributes color and mild spice
-
1 teaspoon dried thyme – Brings herbaceous notes
-
1 teaspoon salt – Essential for seasoning
-
½ teaspoon black pepper – Adds gentle heat
-
Vegetable oil for frying – Choose high smoke-point oil
For the Honey Butter Sauce
The signature glaze transforms good chicken into great chicken. Use real butter rather than margarine for authentic flavor. Similarly, choose pure honey instead of honey-flavored syrup.
-
6 tablespoons unsalted butter – Provides rich base
-
⅓ cup pure honey – Adds natural sweetness
-
1 tablespoon fresh lemon juice – Brightens overall flavor
-
¼ teaspoon salt – Balances sweetness perfectly
Ingredient Selection Tips
Quality ingredients make a noticeable difference in your final results. First, select organic chicken when your budget allows. The flavor tends to be cleaner and more pronounced.
For honey, consider varieties like clover or wildflower. These mild options won’t overpower the dish. However, avoid strongly flavored honeys like buckwheat.
Fresh eggs work better than older ones for coating. The proteins bind more effectively to create better adhesion. Check dates before purchasing at your grocery store.
Kitchen Tools You’ll Need
Essential Equipment
Having the right tools ensures smooth preparation. First, gather everything before you start cooking. This professional approach saves time and reduces stress.
-
Large mixing bowls (3) – One each for flour, egg wash, and breadcrumbs
-
Shallow dishes – Easier than deep bowls for dredging
-
Wire cooling rack – Keeps coating crispy after frying
-
Deep heavy-bottomed skillet or Dutch oven – Maintains steady temperature
-
Cooking thermometer – Ensures proper oil temperature
-
Tongs – For safe handling during frying
-
Paper towels – Absorbs excess oil
-
Small saucepan – For making honey butter sauce
-
Whisk – Combines sauce ingredients smoothly
-
Basting brush – Applies glaze evenly
Optional but Helpful
Some additional tools make the process even easier. Therefore, consider adding these to your collection over time.
-
Deep fryer – Provides consistent temperature control
-
Splatter screen – Reduces mess during frying
-
Meat thermometer – Verifies internal temperature reaches 165°F
-
Kitchen timer – Prevents overcooking
Check out our guide on [insert link: Essential Kitchen Tools for Home Cooks] for more equipment recommendations.
Step-by-Step Preparation Guide
Preparing the Chicken
Success begins with proper preparation. First, remove chicken tenderloins from packaging and pat completely dry. Moisture prevents coating from adhering properly.
Next, trim any excess fat or connective tissue. This step ensures even cooking and better texture. Place trimmed tenders in a large bowl.
Pour buttermilk over chicken pieces. Make sure each piece gets coated completely. Cover the bowl and refrigerate for 30 minutes minimum. This marination tenderizes the meat while adding subtle tang.
Setting Up Your Breading Station
Organization makes the coating process efficient. Set up three shallow dishes in assembly-line fashion. This classic technique comes from professional kitchens.
Station 1 – Seasoned Flour:
Combine 2 cups flour with garlic powder, onion powder, paprika, thyme, salt, and pepper. Mix thoroughly using a fork. The seasonings should distribute evenly throughout.
Station 2 – Egg Wash:
Beat 2 eggs with 2 tablespoons water. Whisk until completely smooth with no streaks. The water thins the eggs slightly for better coating.
Station 3 – Breadcrumb Mixture:
Pour panko breadcrumbs into the third dish. Consider mixing in ½ cup additional flour for extra adhesion. The flour helps create a better seal.
The Perfect Coating Technique
Proper breading technique ensures maximum crispiness. Follow this sequence carefully for best results.
First, remove chicken from buttermilk. Let excess liquid drip back into the bowl. Then, dredge each tender in seasoned flour. Press gently so flour adheres to all surfaces.
Next, dip the floured tender into egg wash. Turn to coat completely. Allow excess egg to drip off briefly.
Finally, press the tender into panko breadcrumbs. Use your hands to press crumbs firmly onto the surface. Ensure complete coverage with no bare spots.
Place coated tenders on a clean plate. Repeat until all pieces are breaded. Let them rest for 10 minutes before frying. This resting period helps the coating adhere better.
Frying to Golden Perfection
Temperature control determines the difference between soggy and crispy chicken. Pour vegetable oil into your skillet to a depth of ½ inch. Heat over medium-high heat until it reaches 350°F.
Test the temperature by dropping a small piece of bread into the oil. It should sizzle immediately and brown within 60 seconds. Alternatively, use a cooking thermometer for accuracy.
Carefully lower 3-4 tenders into the hot oil. Avoid overcrowding, which lowers temperature and causes steaming. The pieces shouldn’t touch each other.
Fry for 3-4 minutes on the first side. The coating should turn deep golden brown. Then, flip carefully using tongs. Cook for another 3-4 minutes on the second side.
Remove chicken when it reaches an internal temperature of 165°F. Place on a wire rack over paper towels. The rack allows air circulation to maintain crispiness.
Making the Honey Butter Sauce
While chicken drains, prepare the signature glaze. This simple sauce comes together in minutes.
Melt butter in a small saucepan over medium-low heat. Once fully melted, remove from heat immediately. Overheating butter can cause it to separate.
Add honey and lemon juice to the melted butter. Whisk continuously until the mixture becomes smooth and glossy. The lemon juice adds brightness that balances the sweetness.
Stir in salt to enhance all flavors. Taste and adjust seasoning if needed. Some prefer slightly sweeter or more buttery versions.
Keep the sauce warm but not hot. If it cools, gently rewarm over low heat. Never boil honey butter sauce, as this changes its texture.
Final Assembly
Transfer hot chicken tenders to a serving platter. Using a basting brush, generously coat each piece with honey butter sauce. Work quickly while the chicken is still hot.
The warm chicken helps the sauce adhere beautifully. Moreover, the heat allows the honey butter to penetrate slightly into the crispy coating. This creates layers of flavor in every bite.
Reserve some sauce for serving alongside the tenders. Diners appreciate having extra for dipping. Pour remaining sauce into a small serving bowl.
Garnish with fresh chopped parsley if desired. However, the honey butter chicken tenders look appealing on their own. The golden-brown color needs no enhancement.
Pro Tips for Extra Crispy Results
Temperature Management
Maintaining consistent oil temperature produces the crispiest coating. First, avoid frying too many pieces at once. Overcrowding drops the temperature significantly.
Second, allow oil to return to 350°F between batches. Wait 1-2 minutes after removing chicken before adding more. This patience pays off with better results.
Consider using a deep-fry thermometer that clips to your pan. This tool helps you monitor temperature without constant testing. Adjust heat as needed throughout cooking.
Coating Adhesion Secrets
Professional chefs use several tricks for coating that stays put. First, ensure chicken is completely dry before breading. Pat with paper towels thoroughly.
Second, press breadcrumbs firmly onto the surface. Don’t just dip and shake off excess. The pressure creates better adhesion between layers.
Third, let breaded chicken rest before frying. This 10-minute wait allows the coating to set. The layers bond together more effectively.
Preventing Soggy Bottoms
Nothing disappoints like soggy-bottomed fried chicken. Several techniques prevent this common problem.
Never place fried chicken directly on paper towels. The trapped steam softens the coating underneath. Instead, use a wire rack elevated above the towels.
Additionally, avoid stacking hot tenders on top of each other. Each piece needs air circulation on all sides. Serve on a flat platter in a single layer.
Finally, apply honey butter sauce just before serving. Adding it too early can soften the coating. The key is timing the glaze application perfectly.
Buttermilk Substitutes
If you don’t have buttermilk, create a simple substitute. Mix 1 cup regular milk with 1 tablespoon lemon juice. Let it sit for 5 minutes before using.
This homemade version works nearly as well. The acid in lemon juice mimics buttermilk’s tenderizing properties. However, real buttermilk provides slightly better flavor.
Alternatively, use plain yogurt thinned with milk. Mix ¾ cup yogurt with ¼ cup milk. This option adds extra tang and tenderness.
Flavor Variations to Try
Spicy Honey Butter Chicken Tenders
Heat lovers can easily amplify the flavor profile. Add ½ teaspoon cayenne pepper to the flour mixture. This creates pleasant background heat.
Alternatively, mix 1 teaspoon hot sauce into the honey butter sauce. The combination of sweet and spicy becomes addictive. Start with less heat and adjust upward.
For maximum spice, try adding red pepper flakes to the breadcrumb mixture. About ¼ teaspoon provides noticeable kick without overwhelming diners.
Herb-Infused Version
Fresh herbs transform honey butter chicken tenders into something special. Add 2 tablespoons minced fresh rosemary to the flour mixture. The piney aroma complements the honey beautifully.
Similarly, try mixing fresh thyme leaves into the breadcrumbs. Use about 1 tablespoon for subtle herbaceous notes. Dried herbs work too but provide less vibrant flavor.
For the sauce, stir in 1 teaspoon chopped fresh sage. This earthy herb pairs wonderfully with butter and honey. The combination tastes sophisticated yet approachable.
Asian-Inspired Twist
Create an international variation using pantry staples. Replace half the honey with pure maple syrup. Add 1 tablespoon soy sauce to the honey butter mixture.
Include ½ teaspoon ground ginger in the flour coating. This warm spice adds complexity without overwhelming other flavors. A pinch of five-spice powder works wonderfully too.
Garnish finished tenders with toasted sesame seeds. The nutty flavor and crunchy texture provide pleasant contrast. Serve with stir-fried vegetables for a complete meal.
Lemon Pepper Style
Brighten the flavor profile with extra citrus notes. Add 2 teaspoons lemon zest to the flour mixture. The oils in the zest provide intense lemon flavor.
Increase black pepper to 1 teaspoon for more pronounced spice. Some cooks prefer coarsely ground pepper for texture. The combination creates a classic steakhouse-style taste.
Finish with extra lemon juice in the honey butter sauce. Use up to 2 tablespoons total for assertive tang. Balance the acidity by adding slightly more honey if needed.
Best Side Dishes to Serve
Classic Comfort Sides
Honey butter chicken tenders pair beautifully with traditional accompaniments. First, consider creamy mashed potatoes for ultimate comfort food appeal. The smooth texture complements crispy chicken perfectly.
Mac and cheese offers another crowd-pleasing option. The creamy pasta echoes the richness of the honey butter sauce. Kids especially appreciate this combination.
Coleslaw provides refreshing crunch and acidity. The cool, tangy slaw cuts through the rich chicken. Moreover, the contrast in temperatures enhances the overall meal experience.
Vegetable Options
Balance the indulgent chicken with nutritious vegetables. Roasted green beans with garlic make an excellent choice. The slight char adds smoky depth to the plate.
Honey-glazed carrots echo the sweet notes in the chicken. Simply roast baby carrots with a touch of honey and butter. The flavors complement each other naturally.
A fresh garden salad offers light contrast. Use mixed greens, cherry tomatoes, and cucumber. Dress simply with vinaigrette to avoid competing flavors.
Starch Selections
Rice dishes work wonderfully with honey butter chicken tenders. Try fluffy jasmine rice or aromatic basmati. The neutral grain soaks up the honey butter sauce deliciously.
Roasted potatoes provide hearty satisfaction. Cut them into wedges and season with herbs. The crispy edges mirror the chicken’s texture appealingly.
Warm dinner rolls complete the comfort food experience. Serve with additional honey butter for spreading. This simple addition makes the meal feel special.
Storage and Reheating Instructions
Proper Storage Methods
Store leftover honey butter chicken tenders correctly to maintain quality. First, allow them to cool completely at room temperature. However, don’t leave them out longer than 2 hours.
Place cooled tenders in an airtight container. Separate layers with parchment paper to prevent sticking. This technique preserves the coating better than stacking directly.
Refrigerate promptly for up to 3 days. The chicken remains safe and relatively crispy during this period. Beyond three days, quality deteriorates noticeably.
Store leftover honey butter sauce separately in a sealed container. Refrigerate for up to 1 week. The butter may solidify but will melt when reheated.
Freezing for Later
Freeze cooked honey butter chicken tenders for longer storage. First, cool them completely as described above. Then, arrange in a single layer on a baking sheet.
Freeze uncovered for 2 hours until solid. This prevents the pieces from sticking together. Once frozen solid, transfer to freezer bags or containers.
Label with the date and contents clearly. Frozen chicken tenders maintain quality for up to 3 months. Beyond this, freezer burn may affect texture and flavor.
Don’t freeze the honey butter sauce. The emulsion breaks when frozen and reheated. Instead, make fresh sauce when serving frozen tenders.
Reheating for Best Results
Never microwave fried chicken if you want crispy results. The microwave steams the coating, making it soggy. Instead, use your oven for superior texture.
Preheat your oven to 375°F. Arrange tenders on a wire rack over a baking sheet. The elevation allows hot air to circulate completely.
Heat refrigerated tenders for 10-12 minutes until warmed through. Frozen tenders need 20-25 minutes without thawing first. The chicken should reach 165°F internally.
For extra crispiness, finish under the broiler for 1-2 minutes. Watch carefully to prevent burning. The high heat re-crisps the coating beautifully.
Warm the honey butter sauce gently in a small saucepan. Stir frequently over low heat until melted and smooth. Brush onto reheated chicken just before serving.
Nutritional Information
Understanding the Nutrition
Honey butter chicken tenders provide substantial protein in each serving. A typical portion of 4-5 tenders contains approximately:
-
Calories: 520-580 per serving
-
Protein: 42-48 grams
-
Carbohydrates: 38-42 grams
-
Fat: 22-26 grams
-
Fiber: 1-2 grams
-
Sugar: 12-14 grams (primarily from honey)
-
Sodium: 680-720 milligrams
These values vary based on exact portion sizes and preparation methods. Deep frying increases fat content compared to baking. Similarly, extra sauce adds more calories and sugar.
Making Healthier Modifications
Several simple swaps reduce calories without sacrificing flavor. First, bake instead of frying the chicken tenders. Spray breaded chicken with cooking spray and bake at 425°F.
Second, reduce the honey butter sauce by half. You’ll still get great flavor with fewer calories. Brush lightly rather than coating heavily.
Third, use whole wheat flour and breadcrumbs. This increases fiber content slightly. The nutty flavor complements the honey nicely too.
Finally, serve with plenty of vegetables. Fill half your plate with colorful produce. This automatically reduces the proportion of fried food consumed.
Dietary Considerations
Honey butter chicken tenders contain several common allergens. The recipe includes gluten from wheat flour and breadcrumbs. Eggs also appear in the coating mixture.
Dairy-sensitive individuals should note the butter in the sauce. However, you can substitute with coconut oil or vegan butter. The flavor differs slightly but remains delicious.
For gluten-free versions, use gluten-free flour and breadcrumbs. Many stores now carry excellent gluten-free panko. The texture closely mimics regular breadcrumbs.
The recipe naturally contains no nuts. This makes it safer for those with nut allergies. Always verify that your breadcrumbs don’t contain nut products.
Frequently Asked Questions
Can I bake honey butter chicken tenders instead of frying?
Yes, baking produces excellent results with less oil. Preheat your oven to 425°F and line a baking sheet with parchment paper. Place a wire rack on the sheet.
Arrange breaded tenders on the rack without touching. Spray generously with cooking spray on all sides. Bake for 20-25 minutes, flipping halfway through cooking.
The tenders should reach an internal temperature of 165°F. They won’t be quite as crispy as fried versions. However, they remain delicious and healthier.
How do I prevent the coating from falling off?
Several factors help coating adhesion. First, ensure chicken is completely dry before breading. Pat thoroughly with paper towels to remove all moisture.
Second, press the breadcrumbs firmly onto each piece. Don’t just dip lightly. The pressure creates better bonding between layers.
Third, let breaded chicken rest for 10 minutes before cooking. This allows the coating to set properly. Finally, avoid moving the chicken too much during cooking.
What’s the best oil for frying chicken tenders?
Choose oils with high smoke points for frying. Vegetable oil, canola oil, and peanut oil all work excellently. These options remain stable at 350°F without breaking down.
Avoid olive oil for deep frying chicken. Its lower smoke point creates off flavors and potentially harmful compounds. Save olive oil for dressings and low-heat cooking.
Refined coconut oil provides another good choice. However, some brands impart coconut flavor. Choose refined versions labeled as flavorless for neutral taste.
Can I make the honey butter sauce ahead of time?
Absolutely, preparing sauce in advance saves time. Make it up to 3 days before serving. Store in an airtight container in the refrigerator.
The butter will solidify when cold. This is completely normal and doesn’t affect quality. Simply reheat gently in a saucepan over low heat.
Stir frequently while reheating to recombine the ingredients. Never microwave honey butter sauce. The uneven heating can cause separation or scorching.
How can I tell when the chicken is fully cooked?
The most reliable method uses an instant-read thermometer. Insert it into the thickest part of the tender. The internal temperature should reach 165°F.
Visual cues help too. The coating should be deep golden brown. Clear juices should run out when you pierce the chicken. Pink meat indicates undercooking.
Cooking time varies based on tender thickness. Thicker pieces need 8-10 minutes total. Thinner ones cook in 6-7 minutes. Always verify with a thermometer for safety.
What if my honey butter sauce is too thick?
Thin overly thick sauce with small amounts of liquid. Add warm water or fresh lemon juice one teaspoon at a time. Whisk thoroughly between additions.
The sauce should flow smoothly off a spoon. However, it shouldn’t be runny like syrup. Find the balance between coating ability and easy application.
If the sauce becomes too thin, add more honey gradually. Warm the mixture to help ingredients combine properly. Taste and adjust seasoning as needed.
Conclusion
Honey butter chicken tenders deliver restaurant-quality results in your home kitchen. The combination of crispy coating, tender juicy chicken, and sweet-savory glaze creates an irresistible meal. Moreover, the recipe uses simple ingredients you likely have on hand.
Whether you fry or bake, these tenders satisfy every time. The versatility allows endless customization based on preferences. Try different spice blends, herbs, or sauce variations to keep meals interesting.
Most importantly, honey butter chicken tenders bring family and friends together. The universal appeal makes them perfect for any occasion. From weeknight dinners to casual gatherings, this recipe becomes a reliable favorite.