
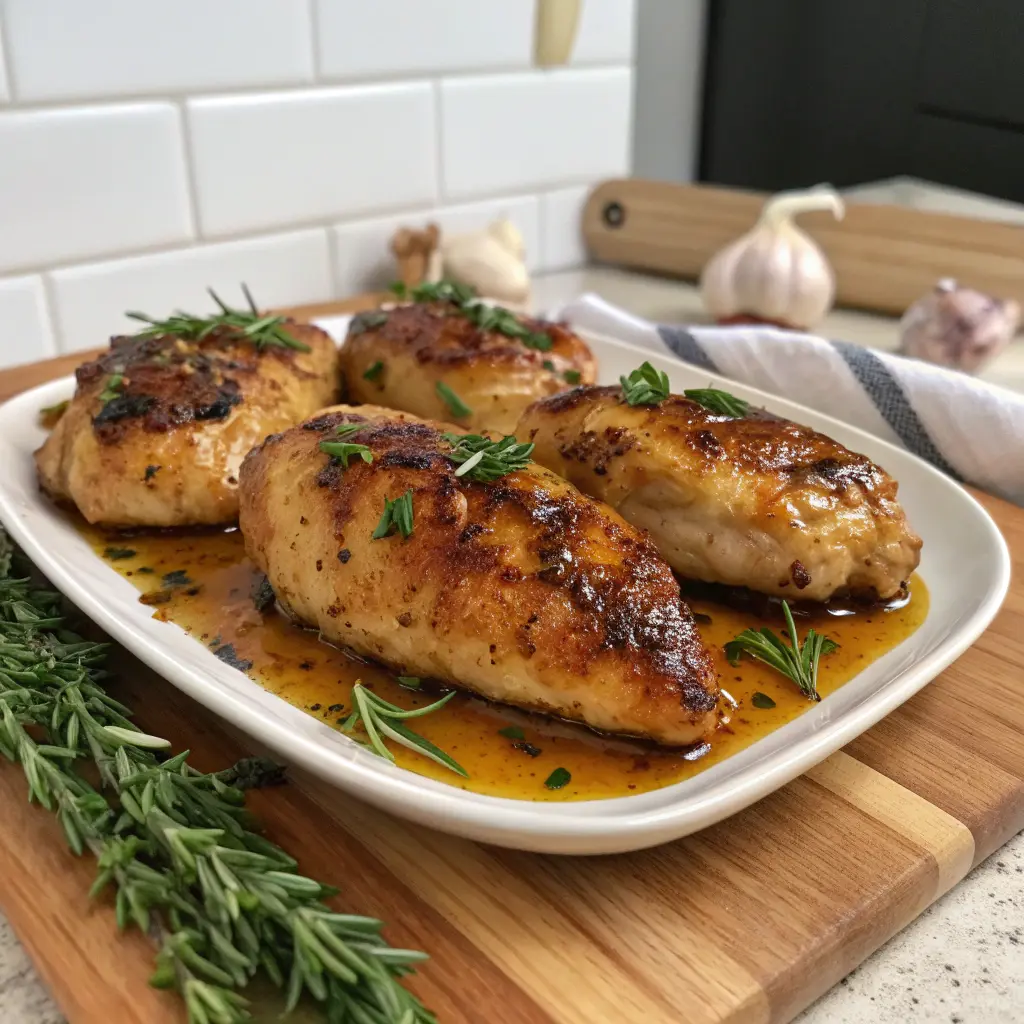
Baked Honey Garlic Chicken Breasts: The Ultimate Easy Weeknight Dinner
Imagine pulling a pan of golden, caramelized chicken from the oven—each breast glazed with sticky honey garlic sauce that smells absolutely incredible. Baked Honey Garlic Chicken Breastsdeliver restaurant-quality flavor with minimal effort, making them perfect for busy weeknights or meal prep Sunday. This simple recipe transforms basic ingredients into a sweet and savory masterpiece that your whole family will request again and again. Best of all, you’ll have dinner on the table in under 40 minutes with just one pan to clean.
Why Baked Honey Garlic Chicken Breasts Are a Game-Changer
This recipe solves the common problem of dry, flavorless chicken breasts. The honey garlic glaze creates a protective coating that locks in moisture while adding incredible flavor. Additionally, baking rather than pan-frying reduces mess and allows you to prepare side dishes simultaneously.
The Perfect Balance of Sweet and Savory
The combination of honey’s natural sweetness with pungent garlic creates an irresistible flavor profile. Moreover, this balance appeals to both adults and children, making it an ideal family dinner option. The sauce caramelizes beautifully in the oven, creating that coveted sticky glaze.
Budget-Friendly and Accessible
Chicken breasts remain one of the most affordable protein options available. Furthermore, the remaining ingredients are pantry staples you likely already have. Consequently, you can create an impressive meal without breaking the bank.
Versatile for Any Occasion
Whether you’re hosting dinner guests or doing weekly meal prep, baked honey garlic chicken breasts fit seamlessly into your plans. In fact, the recipe scales easily for larger gatherings. You can also customize the flavor profile to match different cuisines.
Essential Ingredients for Perfect Results
Gathering quality ingredients ensures the best outcome. Therefore, let’s break down what you’ll need and why each component matters.
Main Ingredients
-
Boneless, skinless chicken breasts (4 pieces, about 6-8 oz each): Choose breasts of similar size for even cooking
-
Honey (1/3 cup): Use pure honey rather than artificial sweeteners for authentic flavor
-
Garlic (6 cloves, minced): Fresh garlic provides the most robust flavor
-
Soy sauce (3 tablespoons): Adds umami depth and saltiness
-
Olive oil (2 tablespoons): Helps the glaze coat the chicken evenly
-
Rice vinegar (1 tablespoon): Balances sweetness with subtle tang
-
Dried oregano (1 teaspoon): Contributes herbal notes
-
Red pepper flakes (1/4 teaspoon): Optional for gentle heat
-
Salt and black pepper: Season to taste
Optional Garnishes
-
Fresh parsley or cilantro, chopped
-
Sesame seeds
-
Green onions, sliced thin
-
Lemon wedges
Ingredient Substitutions
Running low on certain items? Here are viable alternatives:
-
For honey: Maple syrup or agave nectar work well
-
For soy sauce: Coconut aminos or tamari (for gluten-free)
-
For rice vinegar: Apple cider vinegar or lemon juice
-
For fresh garlic: Garlic powder (1 teaspoon = 1 clove)
Kitchen Tools You’ll Need
Having the right equipment makes preparation smooth and efficient. Therefore, gather these items before starting:
Essential Equipment
-
Baking dish (9×13 inch): Glass or ceramic works best for even heat distribution
-
Mixing bowl: For preparing the honey garlic sauce
-
Whisk or fork: To blend sauce ingredients thoroughly
-
Meat thermometer: Ensures perfectly cooked chicken every time
-
Aluminum foil: Optional for easier cleanup
Helpful But Optional
-
Garlic press for easier mincing
-
Basting brush for applying glaze
-
Sharp knife for trimming chicken
-
Cutting board designated for raw poultry
Step-by-Step Instructions
Follow these detailed instructions for foolproof baked honey garlic chicken breasts every single time.
Preparation Phase
Step 1: Preheat Your Oven
Set your oven to 400°F (200°C). This temperature ensures chicken cooks through while allowing the glaze to caramelize. Meanwhile, position the oven rack in the center for optimal heat circulation.
Step 2: Prepare the Chicken
Pat chicken breasts completely dry with paper towels. Next, season both sides generously with salt and black pepper. Additionally, if your chicken breasts are very thick (over 1 inch), consider butterflying them for more even cooking.
Step 3: Make the Honey Garlic Sauce
In a medium mixing bowl, combine honey, minced garlic, soy sauce, olive oil, rice vinegar, oregano, and red pepper flakes. Whisk vigorously until fully incorporated. The mixture should look smooth and glossy.
Cooking Process
Step 4: Arrange Chicken in Baking Dish
Lightly grease your baking dish with cooking spray or olive oil. Then, place chicken breasts in a single layer with space between each piece. This spacing allows hot air to circulate properly.
Step 5: Apply the Glaze
Pour half the honey garlic sauce over the chicken breasts. Use a basting brush or spoon to coat each piece thoroughly. Reserve the remaining sauce for later.
Step 6: Initial Baking
Place the dish in the preheated oven. Bake for 15 minutes without opening the door. This initial period allows the glaze to begin caramelizing.
Step 7: Baste and Continue Baking
Remove the dish from the oven carefully. Spoon the reserved sauce over the chicken breasts. Return to the oven and bake for another 10-15 minutes.
Step 8: Check for Doneness
Insert a meat thermometer into the thickest part of a chicken breast. The internal temperature should reach 165°F (74°C). If not quite there, continue baking in 3-minute increments.
Finishing Touches
Step 9: Rest Before Serving
Once fully cooked, remove the dish from the oven. Let chicken rest for 5 minutes before slicing. This resting period allows juices to redistribute throughout the meat.
Step 10: Garnish and Serve
Transfer chicken to a serving platter. Drizzle pan juices over the top. Sprinkle with fresh herbs, sesame seeds, or sliced green onions for visual appeal and extra flavor.
Pro Tips for Juicy, Flavorful Chicken
Mastering these techniques elevates your baked honey garlic chicken breasts from good to exceptional.
Preventing Dry Chicken
Avoid Overcooking: Use a meat thermometer rather than guessing. Chicken continues cooking slightly after removal from the oven. Therefore, pull it at exactly 165°F.
Pound for Even Thickness: Place chicken between plastic wrap and gently pound with a meat mallet. This creates uniform thickness, ensuring even cooking throughout.
Don’t Skip the Rest: Those 5 minutes of resting are crucial. Cutting immediately causes all the juices to run out onto the cutting board.
Maximizing Flavor
Marinate for Deeper Taste: Mix the sauce ahead of time and marinate chicken for 2-4 hours in the refrigerator. This allows flavors to penetrate the meat.
Use Fresh Garlic: Pre-minced garlic from jars lacks the pungency and complexity of fresh cloves. Invest the extra minute for superior results.
Adjust Sweetness: If you prefer less sweet, reduce honey to 1/4 cup. Conversely, honey lovers can increase to 1/2 cup.
Achieving Perfect Caramelization
High Heat Helps: The 400°F temperature is ideal for caramelizing without burning. Lower temperatures won’t create that sticky glaze.
Broil at the End: For extra caramelization, switch to broil for the final 2-3 minutes. Watch carefully to prevent burning.
Reduce Extra Sauce: After removing chicken, pour pan juices into a small saucepan. Simmer over medium heat for 3-5 minutes until thickened. This creates an intensified sauce for drizzling.
Nutritional Information
Understanding the nutritional profile helps with meal planning and dietary tracking.
Per Serving (One Chicken Breast)
-
Calories: 285
-
Protein: 38g
-
Carbohydrates: 18g
-
Sugars: 16g
-
Fat: 6g
-
Saturated Fat: 1g
-
Cholesterol: 95mg
-
Sodium: 520mg
-
Fiber: 0g
Health Benefits
High-Quality Protein: Chicken breast provides lean protein essential for muscle maintenance and repair. Each serving delivers nearly 40 grams.
Natural Sweetener: Honey contains antioxidants and trace minerals. Unlike refined sugar, it offers some nutritional value.
Garlic’s Advantages: This aromatic ingredient supports immune function and cardiovascular health. Additionally, it adds flavor without extra calories.
Dietary Considerations
-
Gluten-Free: Use tamari instead of regular soy sauce
-
Lower Sodium: Reduce soy sauce to 2 tablespoons or use low-sodium variety
-
Keto-Friendly: Substitute honey with sugar-free sweetener (note: texture will differ)
-
Paleo: Use coconut aminos instead of soy sauce
Serving Suggestions and Side Dishes
Pairing baked honey garlic chicken breasts with complementary sides creates a complete, satisfying meal.
Best Side Dish Options
Rice-Based Sides
-
Jasmine Rice: The fluffy texture soaks up the honey garlic sauce beautifully
-
Brown Rice: Adds nutty flavor and extra fiber
-
Cauliflower Rice: Perfect for low-carb diets
-
Fried Rice: Turn leftover rice into a flavorful accompaniment
Vegetable Sides
-
Roasted Broccoli: Season with garlic and olive oil, roast alongside chicken
-
Green Beans: Sauté with almonds for crunch
-
Roasted Carrots: Natural sweetness complements the honey glaze
-
Brussels Sprouts: Caramelize them for depth
Starchy Sides
-
Mashed Potatoes: Creamy texture contrasts with glazed chicken
-
Sweet Potato Wedges: Enhance the sweet flavor profile
-
Garlic Bread: Mop up every drop of sauce
-
Quinoa Pilaf: Adds protein and interesting texture
Complete Meal Ideas
Family Dinner: Serve with steamed rice, roasted broccoli, and dinner rolls. This combination satisfies everyone at the table.
Meal Prep Bowls: Slice chicken over quinoa with roasted vegetables and a side of hummus. Pack in containers for grab-and-go lunches.
Casual Entertaining: Arrange on a platter with colorful roasted vegetables and fresh herbs. The presentation impresses guests without extra effort.
Storage and Meal Prep Guidelines
Proper storage maintains quality and food safety while maximizing convenience.
Refrigeration
Cooling: Allow chicken to cool to room temperature within 2 hours of cooking. Never leave at room temperature longer.
Storage Container: Transfer to airtight containers. Glass containers work best as they don’t absorb odors.
Duration: Refrigerate for up to 4 days. Label containers with the date for easy tracking.
Reheating: Warm in the microwave at 50% power to prevent drying. Alternatively, reheat covered in a 350°F oven for 15 minutes.
Freezing Instructions
Pre-Freeze Prep: Cool completely before freezing. Slice chicken if desired for easier portioning.
Packaging: Wrap individual portions in plastic wrap, then place in freezer bags. Remove excess air to prevent freezer burn.
Freezer Life: Maintains quality for up to 3 months. After this, texture may deteriorate.
Thawing: Defrost overnight in the refrigerator. Never thaw at room temperature.
Meal Prep Strategy
Sunday Prep: Bake a double batch on Sunday. Portion into containers with sides for weekday lunches.
Sauce Separately: Store extra sauce in a small jar. Drizzle over reheated chicken for fresh flavor.
Mix and Match: Pair with different sides throughout the week to prevent meal fatigue.
Popular Variations to Try
Once you master the basic recipe, experiment with these creative twists on baked honey garlic chicken breasts.
International Flavor Profiles
Asian-Inspired: Add 1 tablespoon fresh grated ginger and 1 teaspoon sesame oil. Garnish with sesame seeds and green onions.
Mediterranean Style: Replace oregano with rosemary. Add lemon zest to the glaze. Serve with tzatziki sauce on the side.
Cajun Fusion: Mix 1 tablespoon Cajun seasoning into the honey garlic sauce. Increases heat and complexity.
Thai Twist: Add 2 tablespoons lime juice and 1 tablespoon fish sauce. Garnish with fresh cilantro and crushed peanuts.
Sauce Modifications
Spicy Version: Increase red pepper flakes to 1 teaspoon. Add sriracha for extra kick.
Citrus Enhancement: Include zest and juice from one orange. The brightness cuts through sweetness.
Herb Garden: Add fresh thyme, basil, or cilantro to the sauce. Fresh herbs provide vibrant flavor.
Mustard Addition: Whisk in 1 tablespoon Dijon mustard for tangy depth. This creates a more complex sauce.
Cooking Method Alternatives
Slow Cooker: Place chicken and sauce in slow cooker. Cook on low for 4 hours or high for 2 hours.
Instant Pot: Pressure cook on high for 8 minutes with quick release. Thicken sauce afterward on sauté mode.
Grill Method: Brush chicken with sauce and grill over medium heat. Baste frequently for caramelized exterior.
Air Fryer: Cook at 380°F for 18-20 minutes, basting halfway through. Results in extra crispy edges.
Frequently Asked Questions
How do I keep baked chicken breasts from drying out?
The honey garlic glaze creates a protective barrier that seals in moisture. Additionally, avoid overcooking by using a meat thermometer. Pull chicken at exactly 165°F internal temperature. Finally, let it rest for 5 minutes before slicing.
Can I use bone-in chicken breasts instead?
Absolutely! Bone-in breasts take longer to cook, approximately 35-40 minutes. Increase the oven temperature to 425°F for crispy skin. Check internal temperature near the bone for accuracy.
What if I don’t have honey?
Maple syrup makes an excellent substitute with slightly different flavor notes. Agave nectar also works well. Brown sugar dissolved in a bit of water creates similar sweetness and caramelization.
How can I make this recipe less sweet?
Reduce honey to 3 tablespoons instead of 1/3 cup. Increase soy sauce by 1 tablespoon to balance flavors. You can also add a squeeze of fresh lemon juice for brightness.
Is this recipe suitable for meal prep?
Yes! Baked honey garlic chicken breasts store beautifully for 4 days refrigerated. Portion with your favorite sides into containers. Reheat gently to maintain moisture.
Can I double the recipe for a crowd?
Certainly! Use two 9×13 inch baking dishes or one large roasting pan. Ensure chicken pieces aren’t crowded for proper cooking. You may need to add 5 minutes to cooking time.
What’s the best way to mince garlic quickly?
A garlic press produces fine, uniform pieces in seconds. Alternatively, chop garlic roughly, sprinkle with salt, and mash with the side of your knife. The salt helps break down the garlic.
How do I know when chicken is fully cooked without a thermometer?
Cut into the thickest part of the breast. Juices should run clear, not pink. The meat should appear white throughout with no translucent areas. However, a thermometer provides the most reliable results.
Final Thoughts
Baked Honey Garlic Chicken Breasts transform ordinary weeknight dinners into something special without demanding hours in the kitchen. The simple combination of honey, garlic, and soy sauce creates a glaze that rivals restaurant versions. Moreover, the hands-off baking method frees you to prepare sides or spend time with family.
This versatile recipe adapts easily to different tastes and dietary needs. Whether you’re cooking for picky eaters or adventurous foodies, the balanced sweet-savory flavor profile appeals universally. Furthermore, the meal prep potential makes healthy eating throughout the week effortless.
Start with the basic recipe, then experiment with variations that excite your palate. Soon, you’ll have perfected your signature version of this crowd-pleasing dish.
Print
Baked Honey Garlic Chicken Breasts
Description
Baked Honey Garlic Chicken Breasts
Ingredients:
-
4 boneless, skinless chicken breasts
-
1/2 teaspoon salt
-
1/2 teaspoon black pepper
-
1/2 teaspoon garlic powder
-
3 tablespoons olive oil or melted butter
For the Honey Garlic Sauce:
-
1/3 cup honey
-
3 cloves garlic, minced
-
2 tablespoons soy sauce
-
1 tablespoon apple cider vinegar (or lemon juice)
-
1/4 teaspoon red pepper flakes (optional, for a slight kick)
Garnish:
Chopped parsley or sesame seeds
Instructions:
-
Preheat oven:
Preheat your oven to 400°F (200°C). Lightly grease a baking dish. -
Prepare the chicken:
Pat chicken breasts dry. Season both sides with salt, pepper, and garlic powder. Place in the baking dish. -
Make the honey garlic sauce:
In a small bowl, whisk together honey, minced garlic, soy sauce, apple cider vinegar, and red pepper flakes. -
Pour over chicken:
Pour the sauce evenly over the chicken breasts. -
Bake:
Cover the dish with aluminum foil and bake for 20–25 minutes. Remove the foil and bake for an additional 10–15 minutes, or until the chicken is cooked through (internal temperature 165°F / 74°C) and the sauce is bubbly. -
Optional glaze finish:
For a thicker glaze, spoon some of the sauce over the chicken and broil for 2–3 minutes until caramelized. -
Serve:
Garnish with chopped parsley or sesame seeds. Serve hot.