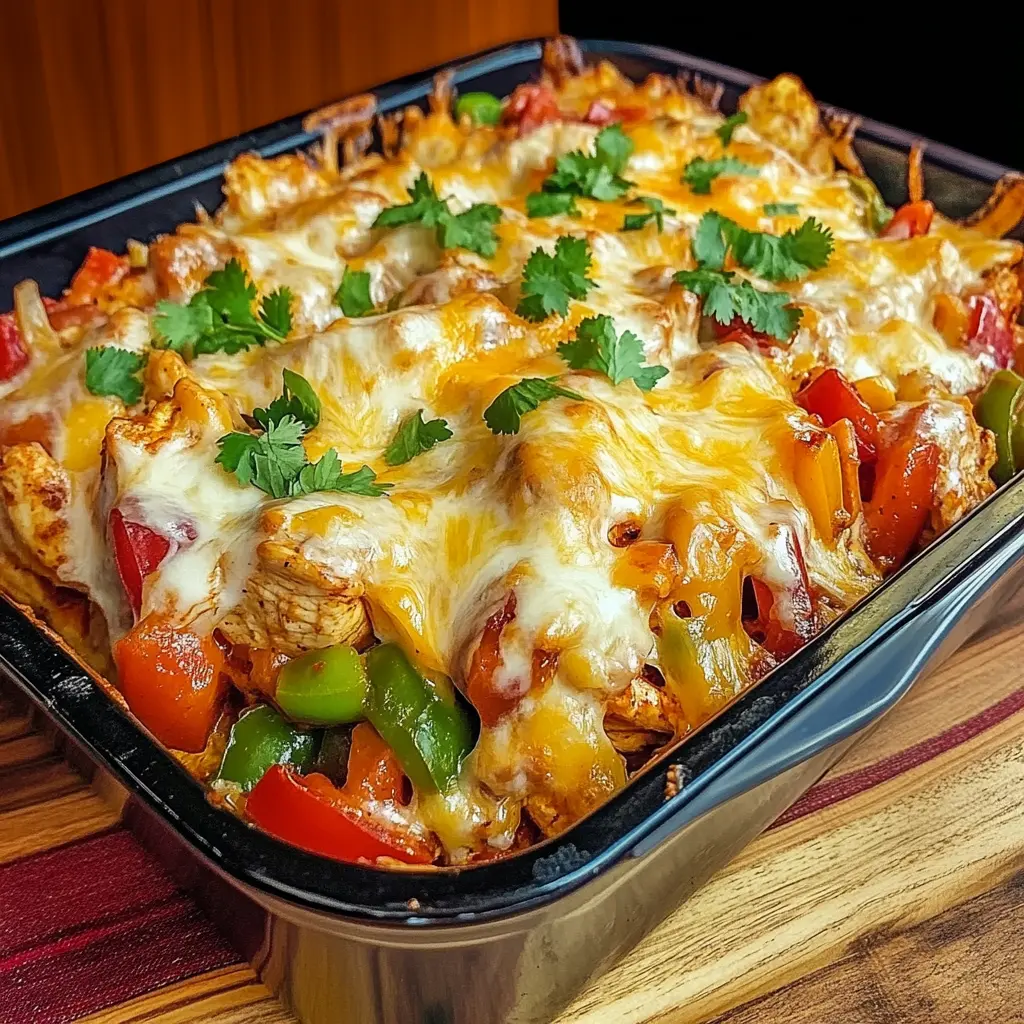
Fajita Chicken Casserole: The Ultimate One-Pan Mexican-Inspired Comfort Meal
If you’re craving bold Mexican flavors without the hassle of multiple pans, Fajita Chicken Casserole is your answer. This hearty, colorful dish combines tender chicken, sweet bell peppers, onions, and a zesty blend of spices—all baked to perfection in one convenient casserole. Perfect for busy weeknights or meal prep, this recipe delivers restaurant-quality taste with minimal cleanup. Let’s dive into everything you need to know to create this family favorite.
What Is Fajita Chicken Casserole?
Fajita Chicken Casserole transforms the classic Tex-Mex fajita into a convenient, baked dish. Instead of grilling meat and vegetables separately, this recipe layers seasoned chicken breast, colorful bell peppers, onions, and cheese in a single baking dish. The result? A bubbling, golden casserole that captures all the smoky, spicy flavors of traditional fajitas.
This dish originated from the desire to simplify fajita preparation. Traditional fajitas require constant monitoring and flipping on a hot griddle. By contrast, this casserole version bakes hands-free in the oven. Moreover, it feeds a crowd easily and keeps well for leftovers.
The beauty of this recipe lies in its versatility. You can adjust spice levels, swap proteins, or add extra vegetables. Additionally, it works equally well for family dinners or potluck gatherings.
Why You’ll Love This Recipe
Time-Saving Convenience
Fajita Chicken Casserole eliminates the need for multiple cooking vessels. Everything bakes together in one dish. Furthermore, prep time typically takes just 15-20 minutes. This efficiency makes it ideal for hectic schedules.
Bold, Authentic Flavors
The combination of cumin, chili powder, and paprika creates that signature fajita taste. Bell peppers add sweetness. Onions provide depth. The cheese melts into a creamy, savory topping. Consequently, every bite delivers a perfect balance of flavors.
Family-Friendly Appeal
Even picky eaters enjoy this casserole. The familiar ingredients and mild spice level appeal to children. Plus, you can easily customize portions for different taste preferences.
Meal Prep Champion
This dish stores beautifully in the refrigerator for up to four days. It also freezes well for future meals. Therefore, you can prepare it ahead and enjoy stress-free dinners all week.
Budget-Conscious Option
Chicken breast remains relatively affordable. Bell peppers and onions cost less than specialty ingredients. As a result, this recipe feeds a family without breaking the bank.
Essential Ingredients for Fajita Chicken Casserole
Protein Base
Boneless, Skinless Chicken Breasts (2 pounds): Choose fresh or thawed chicken. Cut into bite-sized strips or cubes. This ensures even cooking throughout the casserole.
Vegetable Medley
Bell Peppers (3 large): Use a mix of red, yellow, and green for visual appeal. Each color offers slightly different sweetness levels. Slice them into thin strips.
Yellow Onion (1 large): Provides aromatic depth. Slice into half-moons for even distribution. Red onions work as an alternative.
Garlic (4 cloves): Fresh minced garlic adds pungency. Avoid pre-minced versions for best flavor.
Spice Blend
Chili Powder (2 tablespoons): Forms the flavor foundation. Use quality brands for vibrant color and heat.
Cumin (1 tablespoon): Adds earthy, warm notes essential to fajita seasoning.
Paprika (1 teaspoon): Contributes mild sweetness and gorgeous color. Smoked paprika works wonderfully here.
Garlic Powder (1 teaspoon): Reinforces the fresh garlic flavor throughout.
Onion Powder (1 teaspoon): Deepens the savory profile.
Oregano (1 teaspoon): Mexican oregano preferred, but regular works fine.
Salt and Black Pepper: Season generously to taste.
Cayenne Pepper (optional, ¼ teaspoon): Add for extra heat if desired.
Dairy Components
Shredded Mexican Cheese Blend (2 cups): Combines cheddar, Monterey Jack, and other melting cheeses. Provides that essential gooey topping.
Sour Cream (½ cup): Creates creaminess in the sauce. Full-fat works best for richness.
Additional Elements
Olive Oil (2 tablespoons): Helps vegetables caramelize and prevents sticking.
Chicken Broth (½ cup): Keeps the casserole moist during baking. Choose low-sodium varieties to control salt levels.
Lime Juice (2 tablespoons): Brightens flavors with citrus acidity. Always use fresh lime juice.
Tomato Paste (2 tablespoons): Adds umami depth and helps bind the sauce.
Optional Toppings
Fresh cilantro, sliced jalapeños, diced avocado, additional sour cream, and lime wedges enhance presentation and flavor.
Kitchen Tools and Equipment
Essential Items
9×13-inch Baking Dish: Standard size works perfectly. Glass or ceramic both conduct heat well.
Large Mixing Bowl: Needed for combining chicken and vegetables with seasonings.
Sharp Chef’s Knife: Makes vegetable prep efficient and safe.
Cutting Board: Use separate boards for raw chicken and vegetables.
Measuring Cups and Spoons: Ensures accurate seasoning ratios.
Aluminum Foil: Covers the casserole during initial baking.
Optional But Helpful
Large Skillet: If you prefer sautéing vegetables first for deeper caramelization.
Meat Thermometer: Guarantees chicken reaches safe internal temperature (165°F).
Citrus Juicer: Makes extracting lime juice easier.
Step-by-Step Preparation Guide
Phase One: Prep Work
Step 1: Preheat your oven to 375°F (190°C). Position the rack in the center for even heat distribution.
Step 2: Prepare the chicken. Pat dry with paper towels. Cut into uniform ½-inch strips or 1-inch cubes. Consistent sizing ensures even cooking.
Step 3: Slice vegetables. Cut bell peppers into ¼-inch strips. Slice onion into thin half-moons. Mince garlic finely. Keep vegetables separate from raw chicken.
Step 4: Create your spice blend. Combine chili powder, cumin, paprika, garlic powder, onion powder, oregano, salt, and pepper in a small bowl. Mix thoroughly.
Phase Two: Seasoning and Combining
Step 5: In your large mixing bowl, add chicken pieces. Drizzle with 1 tablespoon olive oil. Add half of your prepared spice blend. Toss until chicken is evenly coated. Every piece should have visible seasoning.
Step 6: Add sliced peppers and onions to the same bowl. Drizzle with remaining olive oil. Add the rest of your spice blend. Toss everything together gently. The vegetables should be well-seasoned too.
Step 7: Add minced garlic to the mixture. Toss again to distribute evenly.
Phase Three: Building the Casserole
Step 8: Lightly grease your 9×13-inch baking dish with cooking spray or butter. This prevents sticking.
Step 9: In a small bowl, whisk together chicken broth, lime juice, and tomato paste. This creates your flavorful base liquid.
Step 10: Transfer the chicken and vegetable mixture to your prepared baking dish. Spread evenly in a single layer. Pour the broth mixture over everything.
Step 11: Cover the dish tightly with aluminum foil. Ensure edges are sealed to trap moisture.
Cooking Instructions
Initial Baking Phase
Place the covered casserole in your preheated oven. Bake for 25 minutes. During this time, the chicken will begin cooking through. The vegetables will start softening. The broth will create steam under the foil.
Checking for Doneness
After 25 minutes, carefully remove the foil. The liquid should be bubbling. Chicken should appear white on the outside. Stir the mixture gently to redistribute ingredients.
Check the chicken’s internal temperature using a meat thermometer. It should read at least 165°F at the thickest part. If not quite there, return covered for 5 more minutes.
Adding the Cheese
Once chicken reaches safe temperature, remove from oven. Dollop sour cream across the surface. Spread gently—it doesn’t need to cover completely. Sprinkle the shredded cheese evenly over the entire casserole.
Return to the oven uncovered. Bake an additional 10-12 minutes. The cheese should melt completely and begin bubbling. Some edges may develop golden brown spots.
Final Touches
Remove from oven when cheese is fully melted and bubbly. Let the casserole rest for 5 minutes before serving. This allows the sauce to thicken slightly. It also makes serving easier.
Pro Tips for Perfect Results
Chicken Preparation Secrets
Uniform Cutting: Keep all chicken pieces the same size. This ensures everything finishes cooking simultaneously.
Don’t Overcrowd: If your baking dish seems too full, use a larger size. Overcrowding creates steam instead of allowing proper baking.
Quality Matters: Fresh chicken tastes better than frozen. If using frozen, thaw completely first.
Vegetable Techniques
Pre-Sauté Option: For deeper flavor, sauté peppers and onions in a skillet for 5 minutes before adding to the casserole. This caramelizes natural sugars.
Consistent Slicing: Keep vegetable pieces similar in size. This ensures even cooking and better texture.
Don’t Skip the Garlic: Fresh garlic makes a significant difference compared to powdered versions in the spice mix.
Seasoning Strategies
Taste Your Spice Mix: Before adding to ingredients, taste a tiny pinch. Adjust heat level or salt accordingly.
Layer Flavors: Don’t dump all seasoning on at once. Reserve some for sprinkling on top before baking.
Fresh Lime is Essential: Bottled lime juice lacks the brightness of fresh. Squeeze limes right before using.
Cheese Selection
Avoid Pre-Shredded Cheese: Block cheese you shred yourself melts more smoothly. Pre-shredded contains anti-caking agents.
Mix Cheese Types: Combine sharp cheddar with Monterey Jack for complex flavor and excellent melt.
Add Cheese in Stages: For extra cheesy results, add half the cheese at 15 minutes, remaining at the end.
Avoiding Common Mistakes
Don’t Skip the Rest Period: Letting the casserole sit for 5 minutes prevents a watery serving.
Monitor Oven Temperature: Use an oven thermometer to verify accuracy. Ovens often run hot or cold.
Check Chicken Thoroughly: Always verify temperature in multiple pieces. Undercooked chicken poses health risks.
Flavor Variations and Customizations
Protein Alternatives
Chicken Thighs: Substitute for more flavorful, juicier meat. Adjust cooking time up by 5 minutes.
Ground Turkey: Use 2 pounds browned ground turkey instead of chicken strips. Reduces prep time significantly.
Shrimp Fajita Casserole: Replace chicken with 2 pounds large shrimp. Reduce baking time to 15 minutes total.
Vegetarian Version: Replace chicken with black beans, pinto beans, or extra vegetables like zucchini and mushrooms.
Vegetable Additions
Corn: Add 1 cup frozen or fresh corn kernels for sweetness and texture contrast.
Zucchini: Dice 1 medium zucchini and add with other vegetables.
Mushrooms: Sliced baby bellas add earthiness and meaty texture.
Poblano Peppers: Replace one bell pepper with roasted poblanos for smoky depth.
Heat Level Adjustments
Mild Version: Reduce chili powder to 1 tablespoon. Omit cayenne pepper completely. Use all sweet bell peppers.
Spicy Upgrade: Double cayenne pepper. Add diced jalapeños or serrano peppers. Use hot chili powder instead of regular.
Extra Hot: Mix in 1-2 tablespoons of your favorite hot sauce. Top with sliced fresh jalapeños before final baking.
Sauce Enhancements
Creamy Variation: Increase sour cream to 1 cup and add ½ cup cream cheese.
Salsa Addition: Mix in 1 cup of your favorite salsa (check our guide on [homemade salsa]) with the chicken broth.
Smoky Depth: Add 1 teaspoon liquid smoke to the broth mixture.
Carb Options
Rice Base: Layer 2 cups cooked rice on the bottom before adding chicken mixture.
Quinoa Foundation: Use cooked quinoa instead of rice for higher protein.
Low-Carb Version: Add extra vegetables and skip any grain additions.
Serving Suggestions and Pairings
Traditional Accompaniments
Warm Tortillas: Flour or corn tortillas let diners create their own fajita wraps. Heat them wrapped in foil during the last 5 minutes of baking.
Spanish Rice: The classic side dish absorbs extra casserole juices beautifully. Learn more from The Spruce Eats’ Mexican Rice Guide.
Refried Beans: Creamy, protein-rich beans complement the casserole perfectly. Black beans work equally well.
Fresh Salad: A crisp green salad with lime vinaigrette balances the richness. Include romaine, tomatoes, and avocado.
Topping Bar
Set up a self-serve station with these options:
-
Sour cream
-
Guacamole or diced avocado
-
Pico de gallo
-
Shredded lettuce
-
Diced tomatoes
-
Sliced black olives
-
Pickled jalapeños
-
Fresh cilantro
-
Lime wedges
-
Crumbled cotija cheese
This approach lets everyone customize their portions according to preferences.
Beverage Pairings
Agua Fresca: Refreshing fruit waters like watermelon or cucumber complement spicy flavors.
Limeade: Homemade or store-bought limeade cuts through richness.
Iced Tea: Unsweetened or lightly sweetened tea provides a neutral palate cleanser.
Sparkling Water: Add lime and mint for a festive, refreshing option.
Complete Meal Ideas
Weeknight Dinner: Serve with tortilla chips and store-bought guacamole for minimal prep.
Game Day Spread: Make a double batch and serve with all the toppings for easy entertaining.
Meal Prep Lunch: Portion into containers with rice and beans for ready-made workweek lunches.
Storage and Reheating Guidelines
Refrigerator Storage
Cool the casserole completely before storing. Transfer to an airtight container or cover the baking dish tightly with plastic wrap. Properly stored, Fajita Chicken Casserole lasts 3-4 days in the refrigerator.
For best quality, divide into individual portions. This allows you to reheat only what you need. Label containers with the date to track freshness.
Freezing Instructions
This casserole freezes exceptionally well. Cool completely first. Wrap the entire baking dish in plastic wrap, then aluminum foil. Alternatively, portion into freezer-safe containers.
Frozen properly, it maintains quality for up to 3 months. For best results, freeze before adding cheese. Add fresh cheese when reheating instead.
Reheating Methods
Oven Method (Best for Large Portions): Thaw overnight in refrigerator if frozen. Cover with foil and bake at 350°F for 20-25 minutes. Remove foil for the last 5 minutes to re-crisp the cheese.
Microwave Method (Quick Single Servings): Place portion in microwave-safe dish. Cover with damp paper towel. Heat on 70% power for 2-3 minutes, stirring halfway through.
Stovetop Method: Add a splash of chicken broth to a skillet. Add casserole portion and heat over medium-low, stirring occasionally, until warmed through.
Quality Maintenance
Add fresh toppings after reheating. Cilantro, avocado, and sour cream taste better when added just before eating. This approach maintains the fresh flavor profile.
Avoid reheating multiple times. Each cycle degrades texture and flavor. Only reheat what you plan to consume immediately.
Nutritional Information
Per Serving (Based on 8 Servings)
-
Calories: 340
-
Total Fat: 16g
-
Saturated Fat: 7g
-
Cholesterol: 95mg
-
Sodium: 520mg
-
Total Carbohydrates: 12g
-
Dietary Fiber: 3g
-
Sugars: 6g
-
Protein: 36g
Nutritional Highlights
High Protein Content: With 36 grams per serving, this casserole supports muscle maintenance and keeps you satisfied longer.
Vitamin-Rich Vegetables: Bell peppers provide excellent vitamin C and antioxidants. They support immune function and skin health.
Moderate Calorie Count: At 340 calories per serving, it fits easily into most daily meal plans.
Good Calcium Source: The cheese provides calcium for bone health.
Making It Healthier
Reduce Fat: Use low-fat cheese and Greek yogurt instead of sour cream. This cuts saturated fat significantly.
Increase Fiber: Add black beans or serve over brown rice. Both additions boost dietary fiber content.
Lower Sodium: Use low-sodium chicken broth and reduce added salt. Season with extra herbs instead.
More Vegetables: Add extra peppers, onions, and other vegetables. This increases nutrient density without many calories.
Frequently Asked Questions
Can I make Fajita Chicken Casserole ahead of time?
Yes, absolutely. Prepare the entire casserole up to the cheese-topping stage. Cover tightly and refrigerate for up to 24 hours. When ready to bake, add 5-10 minutes to the cooking time since it starts cold. This makes it perfect for entertaining or busy schedules.
What’s the best way to prevent the casserole from getting watery?
Ensure you don’t overcrowd the baking dish. Use chicken that’s been patted completely dry. Don’t add too much liquid initially—½ cup broth is sufficient. Finally, let the casserole rest for 5 minutes after baking. This allows excess moisture to absorb.
Can I use frozen chicken for this recipe?
While fresh chicken yields better texture, you can use frozen. However, thaw it completely first. Never start with frozen chicken pieces, as they release too much moisture during cooking. This creates a soupy casserole. Additionally, frozen chicken takes longer to reach safe temperature.
How do I know when the chicken is fully cooked?
Use an instant-read meat thermometer. Insert it into the thickest part of several chicken pieces. The temperature must reach 165°F for food safety. Visual cues include white (not pink) flesh and clear juices. When in doubt, always verify with a thermometer.
What can I substitute for sour cream?
Greek yogurt works excellently as a healthier alternative. Use full-fat for best results. Plain yogurt also works. For dairy-free options, try cashew cream or coconut cream. These provide similar richness without dairy products.
Is this recipe gluten-free?
Yes, naturally. All ingredients are gluten-free. However, always verify spice blends don’t contain fillers. Check that your chicken broth is certified gluten-free. The cheese and vegetables pose no gluten concerns.
Can I double this recipe?
Certainly. Double all ingredients and use two 9×13-inch baking dishes. Alternatively, use one very large roasting pan. Keep baking time the same—the thickness remains similar. Just ensure your oven has space for the larger dish.
What’s the difference between fajita seasoning and taco seasoning?
Fajita seasoning typically contains more smoky elements and less thickeners. It emphasizes peppers and onions. Taco seasoning often includes more cumin and may contain cornstarch. For this recipe, fajita seasoning provides more authentic flavor. However, taco seasoning works in a pinch.
Conclusion
Fajita Chicken Casserole delivers everything you love about traditional fajitas in one convenient, family-friendly dish. The combination of seasoned chicken, colorful bell peppers, savory onions, and melted cheese creates a meal that satisfies every time. Moreover, its flexibility allows endless customizations to match your preferences.
This recipe excels whether you’re feeding a hungry family on a busy Tuesday or preparing meals for the week ahead. The straightforward preparation requires minimal active cooking time. The one-dish format means less cleanup afterward. Furthermore, the bold flavors appeal to both adults and children alike.
Remember to use quality ingredients and don’t skip the resting period after baking. These simple steps ensure the best possible results. Additionally, experiment with the variations to keep the recipe exciting meal after meal.
Print