
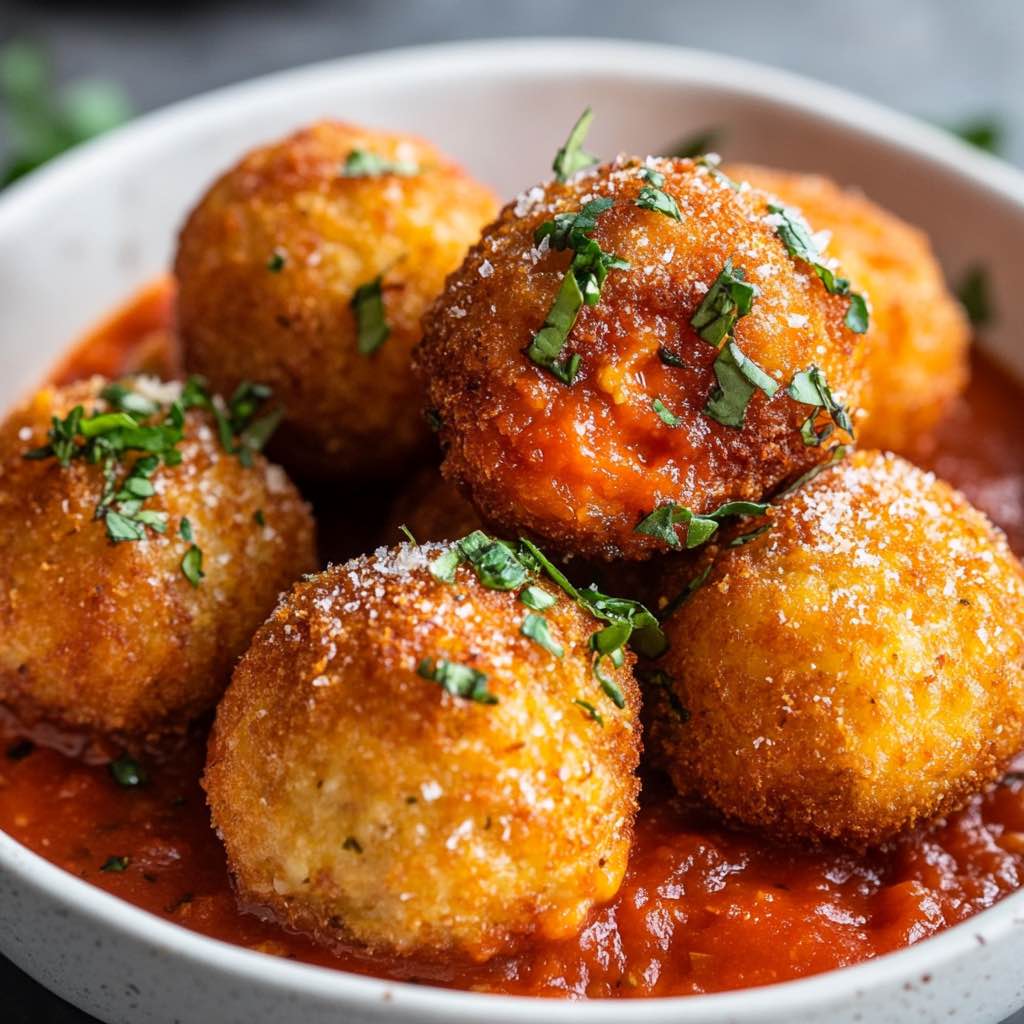
Arancini with Marinara: The Ultimate Guide to Perfect Italian Fried Risotto Balls
What Are Arancini?
Arancini with marinara represent one of Italy’s most beloved comfort foods. These golden, crispy fried risotto balls originated in Sicily and have captivated food lovers worldwide. Furthermore, the name “arancini” comes from the Italian word for “little oranges,” perfectly describing their round, golden appearance.
Traditional arancini transform leftover risotto into something extraordinary. Additionally, they feature a crispy breadcrumb exterior that gives way to a creamy, flavorful center. Most importantly, when paired with rich marinara sauce, these Italian delicacies create the perfect combination of textures and flavors.
Why Arancini Are So Popular
These fried risotto balls have gained international recognition for several reasons. First, they make excellent use of leftover risotto. Second, they’re incredibly versatile and can accommodate various fillings. Moreover, arancini with marinara provide a satisfying meal or appetizer that appeals to all ages.
The popularity of arancini has spread far beyond Italy’s borders. Consequently, many restaurants now feature these crispy spheres on their menus. However, making them at home allows you to control ingredients and customize flavors to your preference.
History and Origins
Sicilian Roots
Arancini originated in 10th-century Sicily during Arab rule. Initially, Arab traders introduced rice cultivation to the island. Subsequently, Sicilian cooks developed creative ways to use leftover rice dishes. As a result, the first arancini were born from practical necessity.
Traditional Sicilian arancini were often filled with ragù, mozzarella, and peas. Furthermore, different regions of Sicily developed their own variations. For instance, arancini from Palermo typically have a round shape, while those from Catania are often cone-shaped.
Evolution Through Time
Over centuries, arancini evolved from simple rice balls to sophisticated creations. Moreover, Italian immigrants brought these recipes to other countries, where they adapted to local tastes. Consequently, modern arancini with marinara have become a global phenomenon.
The addition of marinara sauce as an accompaniment became popular in Italian-American cuisine. Additionally, this pairing highlights the complementary flavors of crispy rice and tangy tomato sauce.
Essential Ingredients
For the Arancini
Creating perfect arancini with marinara requires specific ingredients that work together harmoniously. First and foremost, you’ll need day-old risotto as your base. Additionally, the following ingredients are essential:
Main Components:
-
3 cups cooked risotto (preferably day-old)
-
2 large eggs, beaten
-
1 cup all-purpose flour
-
2 cups fine breadcrumbs
-
1 cup mozzarella cheese, diced small
-
Vegetable oil for deep frying
Seasoning Elements:
-
1 teaspoon salt
-
½ teaspoon black pepper
-
½ teaspoon garlic powder
-
¼ cup fresh parsley, chopped
Choosing the Right Risotto
The foundation of great arancini lies in selecting the proper risotto. Moreover, Arborio rice works best due to its high starch content. Additionally, the risotto should be slightly undercooked initially, as it will cook further during frying.
Day-old risotto is crucial for several reasons. First, it firms up as it cools, making it easier to handle. Second, the flavors have time to meld together. Most importantly, cold risotto holds its shape better when formed into balls.
Breadcrumb Selection
The type of breadcrumb significantly impacts the final texture. Furthermore, fine, dry breadcrumbs create the crispiest exterior. Additionally, you can make homemade breadcrumbs by processing stale bread in a food processor.
Panko breadcrumbs work well too, creating an extra-crunchy coating. However, traditional Italian breadcrumbs provide the most authentic texture for arancini with marinara.
Equipment You’ll Need
Essential Tools
Proper equipment makes the arancini-making process much smoother. Additionally, having the right tools ensures consistent results every time.
Must-Have Equipment:
-
Deep heavy-bottomed pot or deep fryer
-
Candy thermometer
-
Large mixing bowls
-
Ice cream scoop or large spoon
-
Slotted spoon
-
Paper towels
-
Wire cooling rack
Optional but Helpful Tools
While not strictly necessary, these tools can improve your arancini-making experience. Moreover, they help create more professional-looking results.
Additional Equipment:
-
Food processor (for homemade breadcrumbs)
-
Digital kitchen scale
-
Rubber gloves (for handling mixture)
-
Small cookie scoop (for uniform sizing)
Step-by-Step Recipe
Preparing the Risotto Base
Before forming arancini, ensure your risotto is properly prepared and chilled. Additionally, the consistency should be firm enough to hold its shape when rolled.
Step 1: Cool the Risotto
First, spread the cooked risotto on a baking sheet. Then, allow it to cool completely to room temperature. Finally, refrigerate for at least 2 hours or overnight.
Step 2: Season and Mix
Remove the chilled risotto from the refrigerator. Subsequently, taste and adjust seasoning as needed. Moreover, the mixture should be well-seasoned since the breading will dilute flavors.
Forming the Arancini
The shaping process requires patience and technique. Furthermore, wet hands prevent sticking and create smoother balls.
Step 3: Shape the Balls
Using damp hands, scoop approximately ¼ cup of risotto mixture. Next, flatten it in your palm and add a small cube of mozzarella in the center. Then, carefully wrap the risotto around the cheese, forming a tight ball.
Step 4: Repeat Process
Continue this process until all risotto is used. Additionally, place finished balls on a parchment-lined tray. Moreover, ensure each ball is tightly packed to prevent breaking during frying.
Breading Station Setup
Efficient breading requires proper organization. Furthermore, having all components ready streamlines the process significantly.
Step 5: Prepare Breading Station
Set up three shallow dishes in order: flour, beaten eggs, and breadcrumbs. Additionally, season the flour with salt and pepper for extra flavor.
Step 6: Bread the Arancini
Roll each ball first in flour, then egg, and finally breadcrumbs. Moreover, ensure complete coverage at each stage. Additionally, press breadcrumbs gently to help them adhere.
Frying Process
Proper frying technique is crucial for perfect arancini with marinara. Furthermore, maintaining correct oil temperature ensures crispy exteriors and properly heated centers.
Step 7: Heat the Oil
In a deep pot, heat oil to 350°F (175°C). Additionally, use enough oil to fully submerge the arancini. Moreover, a candy thermometer helps maintain consistent temperature.
Step 8: Fry the Arancini
Carefully lower 3-4 balls into hot oil using a slotted spoon. Then, fry for 3-4 minutes until golden brown and crispy. Finally, transfer to a wire rack to drain.
Step 9: Serve Immediately
Arancini with marinara are best served hot and crispy. Additionally, the contrast between the warm interior and crispy exterior is most pronounced when fresh.
Perfect Marinara Sauce
Classic Marinara Recipe
A well-made marinara sauce elevates arancini from good to exceptional. Moreover, this simple sauce requires just a few quality ingredients.
Ingredients:
-
2 tablespoons olive oil
-
4 cloves garlic, minced
-
1 small onion, finely diced
-
28 oz can crushed tomatoes
-
1 teaspoon dried oregano
-
1 teaspoon dried basil
-
Salt and pepper to taste
-
1 tablespoon fresh basil, chopped
Cooking Method
Step 1: Build the Base
Heat olive oil in a large saucepan over medium heat. Then, add onions and cook until translucent, about 5 minutes. Next, add garlic and cook for another minute.
Step 2: Add Tomatoes
Pour in crushed tomatoes and add dried herbs. Additionally, season with salt and pepper. Moreover, bring the mixture to a gentle simmer.
Step 3: Simmer and Finish
Reduce heat to low and simmer for 20-30 minutes, stirring occasionally. Finally, stir in fresh basil just before serving.
Sauce Variations
While classic marinara is traditional, several variations complement arancini beautifully. Furthermore, these alternatives add variety to your serving options.
Spicy Arrabbiata Style:
Add red pepper flakes and diced jalapeños for heat. Additionally, this version pairs excellently with cheese-filled arancini.
Herb-Heavy Version:
Double the fresh herbs and add chopped parsley. Moreover, this bright version balances the richness of fried arancini.
Expert Tips and Techniques
Temperature Control
Maintaining proper oil temperature is crucial for perfect arancini with marinara. Additionally, temperature fluctuations can result in greasy or undercooked balls.
Oil Temperature Guidelines:
-
Initial heating: 350°F (175°C)
-
During frying: maintain 340-350°F
-
Between batches: allow temperature to recover
Furthermore, frying too many arancini at once drops oil temperature significantly. Therefore, work in small batches for best results.
Achieving Perfect Texture
The ideal arancini has a crispy exterior and creamy interior. Moreover, several techniques help achieve this perfect contrast.
Key Techniques:
-
Use day-old risotto for proper firmness
-
Pack balls tightly to prevent breaking
-
Double-bread for extra crispiness
-
Don’t overcrowd the fryer
Additionally, proper drainage after frying prevents sogginess. Therefore, use a wire rack rather than paper towels alone.
Make-Ahead Strategies
Arancini preparation can be partially done in advance. Furthermore, this approach makes entertaining much easier.
Advance Preparation Options:
-
Form and bread balls up to 4 hours ahead
-
Refrigerate breaded arancini until ready to fry
-
Make marinara sauce up to 3 days in advance
-
Freeze uncooked arancini for up to 1 month
Moreover, frozen arancini can be fried directly from frozen, though they require slightly longer cooking time.
Variations and Fillings
Traditional Sicilian Fillings
Authentic arancini feature various traditional fillings. Additionally, these classic combinations have been perfected over centuries.
Classic Options:
-
Ragù with peas and mozzarella
-
Plain mozzarella (arancini al burro)
-
Ham and mozzarella
-
Spinach and ricotta
Furthermore, each filling requires slight adjustments to the forming technique. However, the basic method remains the same.
Modern Creative Fillings
Contemporary chefs have expanded arancini possibilities significantly. Moreover, these innovative fillings appeal to modern palates while respecting traditional techniques.
Contemporary Ideas:
-
Mushroom and truffle
-
Seafood combinations
-
Vegetarian options with roasted vegetables
-
Sun-dried tomato and basil
Additionally, when creating arancini with marinara using modern fillings, ensure flavors complement rather than compete.
Dietary Adaptations
Arancini can be adapted for various dietary needs. Furthermore, these modifications maintain the dish’s essential character while accommodating restrictions.
Gluten-Free Version:
Replace regular breadcrumbs with gluten-free alternatives. Additionally, ensure all other ingredients are certified gluten-free.
Vegetarian Preparations:
Focus on vegetable-based fillings and vegetable stock in the original risotto. Moreover, these versions are equally satisfying and flavorful.
Serving Suggestions
Presentation Ideas
Proper presentation enhances the arancini with marinara experience. Additionally, thoughtful plating shows respect for this classic dish.
Elegant Presentation:
-
Arrange 3-4 arancini on warmed plates
-
Drizzle marinara artistically around the plate
-
Garnish with fresh basil leaves
-
Add a sprinkle of freshly grated Parmesan
Furthermore, warmed plates help keep arancini hot longer, improving the dining experience.
Complementary Side Dishes
While arancini with marinara make a complete meal, certain sides enhance the experience. Moreover, these additions create a more substantial and varied meal.
Recommended Sides:
-
Simple mixed green salad
-
Garlic breadsticks
-
Roasted vegetables
-
Caesar salad
Additionally, lighter sides balance the richness of fried arancini. Therefore, avoid heavy or competing flavors.
Storage and Reheating
Proper Storage Methods
Leftover arancini require careful storage to maintain quality. Additionally, proper techniques preserve both texture and flavor.
Storage Guidelines:
-
Cool completely before storing
-
Refrigerate in airtight containers
-
Use within 2-3 days for best quality
-
Store marinara sauce separately
Furthermore, storing sauce separately prevents the arancini from becoming soggy.
Reheating Techniques
Several methods can restore crispiness to leftover arancini. Moreover, proper reheating techniques ensure food safety while maintaining quality.
Oven Method (Recommended):
-
Preheat oven to 350°F (175°C)
-
Place arancini on wire rack over baking sheet
-
Heat for 10-15 minutes until crispy
-
Check internal temperature reaches 165°F (74°C)
Air Fryer Method:
Set air fryer to 350°F and heat for 5-7 minutes. Additionally, this method restores crispiness quickly and efficiently.
Freezing Instructions
Arancini freeze well both before and after cooking. Furthermore, freezing provides convenient make-ahead options.
Freezing Uncooked Arancini:
-
Bread completely before freezing
-
Place on baking sheets until solid
-
Transfer to freezer bags
-
Store up to 3 months
Cooking Frozen Arancini:
Fry directly from frozen, adding 1-2 minutes to cooking time. Additionally, ensure internal temperature reaches 165°F (74°C).
Troubleshooting Common Issues
Arancini Breaking Apart
This common problem has several potential causes. Additionally, understanding these causes helps prevent future issues.
Possible Causes and Solutions:
-
Risotto too wet: Add breadcrumbs to absorb excess moisture
-
Not packed tightly enough: Press firmly when shaping
-
Oil temperature too low: Maintain 350°F consistently
-
Overfilled with cheese: Use smaller amounts of filling
Furthermore, practice makes perfect when it comes to shaping technique.
Oil Temperature Problems
Maintaining proper oil temperature challenges many home cooks. Moreover, temperature fluctuations affect both texture and cooking time.
Temperature Troubleshooting:
-
Oil too hot: Arancini brown before centers heat through
-
Oil too cool: Results in greasy, soggy coating
-
Solution: Use reliable thermometer and adjust heat as needed
Additionally, allow oil to recover temperature between batches.
Coating Issues
Problems with breading adherence or texture are common. Furthermore, proper technique prevents most coating problems.
Common Coating Problems:
-
Breadcrumbs falling off: Ensure each layer is complete
-
Uneven browning: Don’t overcrowd fryer
-
Thick, doughy coating: Shake off excess flour and egg
Moreover, pressing breadcrumbs gently helps them adhere better.
Nutritional Information
Caloric Content
Understanding the nutritional profile of arancini with marinara helps with meal planning. Additionally, this information assists those tracking dietary intake.
Approximate Nutrition Per Serving (2 arancini with sauce):
-
Calories: 380-420
-
Protein: 15-18g
-
Carbohydrates: 45-50g
-
Fat: 18-22g
-
Fiber: 3-4g
Furthermore, these values vary based on size, fillings, and preparation methods.
Making Healthier Versions
Several modifications can reduce calories while maintaining flavor. Moreover, these changes accommodate health-conscious diners.
Healthier Preparation Options:
-
Baking instead of frying (reduce calories by 30%)
-
Using whole grain breadcrumbs (increase fiber)
-
Adding vegetables to fillings (increase nutrients)
-
Reducing cheese content (lower saturated fat)
Additionally, baked arancini still provide satisfying texture, though different from traditional fried versions.
Nutritional Benefits
Despite being indulgent, arancini with marinara provide several nutritional benefits. Furthermore, the combination offers balanced macronutrients.
Positive Nutritional Aspects:
-
Carbohydrates for energy
-
Protein from cheese and rice
-
Lycopene from tomato sauce
-
Vitamins from herbs and vegetables
Moreover, using whole grain rice increases fiber and nutrient content significantly.
Frequently Asked Questions
Can I make arancini without day-old risotto?
While freshly made risotto can work, it’s more challenging to handle. Additionally, the mixture may be too soft to hold its shape properly. However, if using fresh risotto, chill it thoroughly and add extra breadcrumbs if needed.
How do I know when arancini are fully cooked?
Properly cooked arancini with marinara are golden brown and crispy outside. Moreover, the internal temperature should reach 165°F (74°C). Additionally, the cheese filling should be completely melted when cut open.
Can arancini be baked instead of fried?
Yes, baking is a healthier alternative that still produces delicious results. Furthermore, brush the breaded arancini with oil and bake at 400°F (200°C) for 20-25 minutes, turning once halfway through.
What’s the best oil for frying arancini?
Neutral oils with high smoke points work best for frying arancini. Additionally, vegetable oil, canola oil, or peanut oil are excellent choices. Moreover, avoid olive oil as it has a lower smoke point and can burn.
How far in advance can I prepare arancini?
You can form and bread arancini up to 4 hours before frying. Additionally, they can be frozen for up to 3 months before cooking. However, fry them just before serving for optimal texture and temperature.
Why do my arancini fall apart during frying?
Several factors cause arancini to break apart during cooking. Furthermore, common causes include overly wet risotto, insufficient packing, or oil temperature that’s too low. Additionally, ensure complete breading coverage to help hold everything together.
Conclusion
Creating perfect arancini with marinara requires attention to detail and proper technique. Moreover, these golden, crispy rice balls represent the best of Italian comfort food tradition. From selecting day-old risotto to achieving the ideal oil temperature, each step contributes to the final result.
The combination of creamy risotto center, crispy breadcrumb exterior, and tangy marinara sauce creates an unforgettable dining experience. Additionally, the versatility of fillings and preparations means you can customize arancini to suit any preference or dietary need.
Whether serving as an appetizer, main course, or party snack, arancini with marinara never fail to impress. Furthermore, with practice, you’ll develop the skills to create restaurant-quality results at home. Most importantly, these Italian delicacies bring families and friends together over delicious, comforting food.

Arancini (Fried Risotto Balls) with Marinara
Description
Ingredients
For the Risotto Base:
-
4 cups pre-made chilled risotto (or make fresh using recipe below)
-
1 large egg
-
1/2 cup grated Parmesan cheese
-
Salt and pepper to taste
For Fresh Risotto (if needed):
-
2 tablespoons extra virgin olive oil
-
1 small yellow onion, finely chopped
-
2 garlic cloves, crushed
-
1 1/2 cups Arborio rice
-
3 cups chicken stock
-
2 tablespoons unsalted butter
-
3 tablespoons finely chopped parsley
For the Filling:
-
4 ounces mozzarella cheese, cut into 1/2-inch cubes
-
3/4 cup thawed peas (optional)
For the Coating:
-
1 cup all-purpose flour
-
3 large eggs, whisked
-
2 cups plain panko breadcrumbs
-
1 teaspoon salt for seasoning coating
-
1/8 teaspoon black pepper
For Frying:
-
2 cups vegetable or grapeseed oil
For Serving:
-
2 cups marinara or pomodoro sauce, warmed
Instructions
Prepare the Risotto (if making fresh):
-
Heat olive oil in a large saucepan over medium heat. Add onion and garlic, cooking until softened and fragrant, about 5 minutes.
-
Add Arborio rice and stir until semi-translucent, about 1 minute. Add stock, salt, pepper, and parsley, bringing to a gentle boil.
-
Reduce heat to low, cover, and simmer until rice is tender and broth is absorbed, 20-25 minutes. Stir in butter and Parmesan cheese, then spread on a baking sheet to cool completely.
Form the Arancini:
-
Cut mozzarella into 18-20 small 1/2-inch cubes and keep chilled. Set up three shallow bowls: seasoned flour in one, whisked eggs in another, and breadcrumbs in the third.
-
Using wet hands to prevent sticking, take 3-4 tablespoons of chilled risotto and flatten in your palm. Place a mozzarella cube (and peas if using) in the center.
-
Cover with 2-3 tablespoons more risotto and form into a golf ball-sized sphere, ensuring cheese is completely enclosed. Repeat to make 18-20 balls.
Bread and Fry:
-
Dredge each ball in seasoned flour, then egg wash, then breadcrumbs, ensuring complete coating at each step. Place on a parchment-lined baking sheet.
-
Heat oil in an 8-inch saucepan to 350°F, or until small bubbles form but oil isn’t smoking. The oil should be about 1/4 full or 1/2-inch deep.
-
Fry arancini in batches of 4-6 balls, gently turning until golden brown all over, about 6-8 minutes. Remove and drain on paper towels.
-
Let cool for 5 minutes before serving with warm marinara sauce for dipping.