
Introduction & Core Concepts
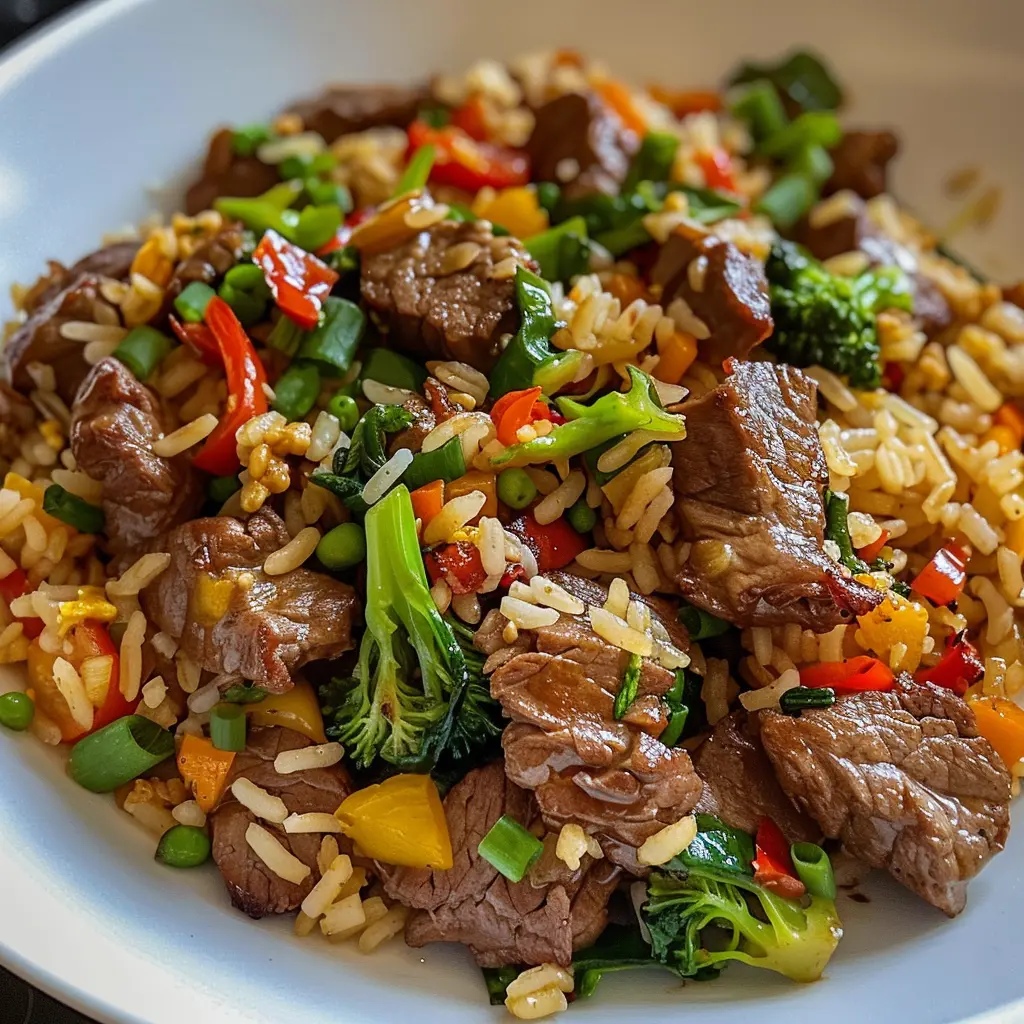
The Ultimate Guide to Beef Stir-Fry with Fried Rice: Mastering the Takeout Classic at Home
Ah, the craving. It hits out of nowhere—a powerful, sudden need for something savory, something sizzling, something utterly satisfying. You’re dreaming of tender strips of beef, vibrant crisp-tender vegetables, and fluffy grains of fried rice, all wrapped up in a glossy, impossibly flavorful sauce. Yeah, we’ve all been there, staring at the takeout menu. But what if I told you that you could create a version of this classic dish right in your own kitchen that’s not just good, but mind-blowingly better than any delivery?
Welcome to your ultimate guide to crafting the perfect Beef Stir-Fry with Fried Rice. This isn’t just a recipe; it’s a deep dive into the art and science of this beloved dish. We’re talking about ditching the soggy vegetables and the greasy, overly salty sauce for a meal you can truly feel good about. Furthermore, we’ll unlock the secrets behind that elusive restaurant-quality magic, from choosing the absolute best cut of beef to mastering the wok-tossed perfection of fried rice. Ultimately, you’ll learn how to create a healthier, more customizable, and incredibly delicious feast that will have you retiring those takeout menus for good. So, let’s fire up the stove and get ready to stir-fry like a pro!
Why This Homemade Version Beats Takeout Every Time
Okay, let’s be real—sometimes you just want someone else to do the cooking. However, whipping up this dish yourself comes with a truckload of benefits that make it more than worth the effort. For starters, you’re in the driver’s seat!
Healthier and Cleaner Ingredients
First and foremost, you have complete control over what goes into your body. Takeout can be a sneaky source of excessive sodium, MSG, and questionable oils. When you cook at home, conversely, you can use low-sodium soy sauce, high-quality cooking oil, and the freshest vegetables you can find. Suddenly, your favorite indulgent meal becomes a nourishing, balanced dinner you can feel great about.
Endless Customization
Another fantastic advantage? You get to call the shots! Got a bunch of bell peppers that need using up? Toss ’em in! Prefer a bit more heat? Add an extra spoonful of chili paste. Moreover, this recipe is a brilliant canvas for dietary needs; easily make it gluten-free with tamari or lower the carbs by serving the stir-fry over cauliflower rice. It’s all about making the dish work for you.
The “Wok Hei” Effect (And How to Get It at Home)
Now, let’s talk about that mysterious, smoky flavor that defines the best restaurant stir-fries—the legendary “wok hei” or “breath of the wok.” Traditionally, this requires a jet-engine-powered burner that most of us don’t have. But fear not! While we might not achieve the exact same result, we can get pretty darn close by using a few simple tricks with a screaming hot pan. We’ll cover all of that later, so get excited!
A Brief History of Two Classics: Stir-Fry and Fried Rice
Before we dive into the how, let’s take a quick peek at the why. Understanding the origins of these dishes adds a whole new layer of appreciation. Interestingly, both stir-frying and fried rice are born from principles of efficiency and resourcefulness.
Stir-frying, or chǎo (炒), is an ancient Chinese cooking technique that’s all about high heat and speed. Consequently, it cooks food quickly, preserving texture and nutrients while using minimal fuel—a genius method for times when resources were scarce. Fried rice, on the other hand, is the ultimate leftover hero dish. It was created as a clever and delicious way to repurpose leftover rice and small bits of meat and vegetables, ensuring nothing went to waste. Naturally, pairing a quick-cooking stir-fry with a resourceful fried rice is a match made in culinary heaven.
The Foundation: Ingredients & Equipment
Deconstructing the Dish: The Anatomy of a Perfect Beef Stir-Fry with Fried Rice
Alright, let’s roll up our sleeves and get down to the nitty-gritty. Think of building this meal like constructing a fantastic building; it all starts with a rock-solid foundation and the right tools. Essentially, our three main pillars are: the beef (our star protein), the fried rice (our hearty base), and the stir-fry sauce (the flavorful glue that holds it all together). Master these elements individually, and you’re golden.
The Heart of the Dish: Choosing and Preparing Your Beef
This is where many folks go wrong, but not you—not after this! Picking the right cut and treating it right is the single biggest secret to a successful stir-fry.
Best Cuts of Beef for Stir-Fry
You want a cut that’s flavorful, relatively lean, and, most importantly, becomes tender when cooked quickly over high heat. Forget about stewing meats; they’ll turn into tough little hockey pucks. Here are your champions:
-
Flank Steak: The undisputed king of beef stir-fry. It’s lean, boasts a robust beefy flavor, and has long fibers that become wonderfully tender when sliced thinly against the grain.
-
Sirloin (Top Sirloin or Tri-Tip): A fantastic, budget-friendly alternative. It’s tender, easy to slice, and soaks up marinades like a dream.
-
Skirt Steak: Similar to flank but with a more loose, open grain. It’s incredibly flavorful but can be a bit chewier if not handled properly.
The Secret to Tender Beef: Velveting
Okay, lean in close because this is the real game-changer. Velveting is a classic Chinese restaurant technique where you marinate the beef in a cornstarch-and-oil mixture. This process creates a protective coating on the outside of the meat that seals in its juices, resulting in impossibly tender, silky-smooth beef. For a deep dive into the chemistry behind this method, check out this explanation of The science behind the Chinese velveting technique. It’s shockingly easy to do at home and makes all the difference in the world.
Slicing Technique: Against the Grain
This is non-negotiable! Look closely at your piece of meat; you’ll see it’s made up of long muscle fibers running in one direction—this is the “grain.” Now, take your sharpest knife and slice perpendicularly (across) those fibers. Why? Because you’re shortening those long, tough fibers, making each piece much easier to chew. It’s the difference between tender bites and chewing on a leather belt.
The Supporting Cast: Vegetables and Aromatics
A great stir-fry is a symphony of textures and colors. Don’t be shy; load up on the veggies! The classics include bell peppers (any color), broccoli florets, sliced carrots, onions, and snap or snow peas. The real flavor powerhouses, however, are the aromatics: fresh garlic, ginger, and scallions. These three are the holy trinity that will make your kitchen smell incredible and form the base flavor of your entire dish.
Pro Tip: Have everything washed, chopped, and measured out before you even think about turning on the heat. This “mise en place” is your secret weapon for a stress-free stir-fry experience.
The Soul of the Stir-Fry: Crafting the Perfect Sauce
The sauce is where the magic happens—it’s what transforms simple ingredients into a cohesive, glorious dish. Forget the pre-made bottles; your homemade version will be fresher and more balanced.
The Core Sauce Components
Your pantry is about to become your best friend. Here’s what you’ll need:
-
Soy Sauce: The salty backbone. Using a combination of light (for saltiness) and dark (for color and a richer, molasses-like flavor) is ideal.
-
Oyster Sauce: This is the secret weapon for depth and umami. It’s thick, savory, and slightly sweet.
-
Toasted Sesame Oil: A finishing oil! It has a low smoke point but an incredible nutty aroma. Just a drizzle at the end is all you need.
-
Cornstarch: This is what thickens your sauce into a glossy, restaurant-style glaze. Always mix it with a cold liquid first to make a “slurry” to avoid lumps.
Recipe for a Basic, Versatile Stir-Fry Sauce
Whisk this together in a bowl before you start cooking:
-
1/4 cup low-sodium soy sauce
-
2 tablespoons oyster sauce
-
1 tablespoon rice vinegar
-
1 teaspoon sugar or honey
-
2 cloves garlic, minced
-
1 teaspoon fresh ginger, grated
-
2 teaspoons cornstarch mixed with 2 tablespoons water (slurry)
The Foundation of Fried Rice: The Rice Itself
This might be the most important rule in this entire guide. Listen up!
The Golden Rule: Use Day-Old, Cold Rice
If you take away only one thing, let it be this. Freshly cooked rice is steamy and hydrated, which means it will clump together and turn into a gummy, mushy mess in your wok. Cold, day-old rice, however, has dried out slightly. Its grains are separate and firm, perfect for frying up into that distinct, slightly chewy texture we all love in fried rice.
Best Types of Rice to Use
Long-grain varieties like Jasmine or Basmati are your best bet. They cook up into fluffy, separate grains that won’t stick together. Short-grain or sushi rice is too sticky for this application.
How to Quick-Cool Fresh Rice (In a Pinch)
Forgot to plan ahead? No worries! Spread your freshly cooked rice in a thin, even layer on a baking sheet. Pop it into the refrigerator for 20-30 minutes, and you’ll have perfectly cooled, dry-enough rice for your quick dinner idea.
Essential Equipment for Stir-Fry Success
You don’t need a professional kitchen, but a few key tools will make your life infinitely easier.
The Ideal Tool: The Wok (Carbon Steel vs. Non-Stick)
A carbon steel wok is the traditional champion. It heats up quickly and evenly and can handle the blistering high heat required for a proper sear. Seasoning it properly creates a natural non-stick surface. Alternatively, a good non-stick wok is foolproof for beginners and makes cleanup a breeze, though it can’t always handle the highest heat settings.
A Great Alternative: The Cast Iron Skillet
Don’t own a wok? Don’t you dare use that as an excuse! A heavy-bottomed cast iron skillet retains heat beautifully and is more than capable of producing a fantastic stir-fry. The key is pre-heating it properly.
Other Key Tools
A sharp chef’s knife for all that slicing and dicing, a sturdy wooden spatula that won’t scratch your pan, and a set of small bowls for your “mise en place” are all you really need.
The Cooking Process: Step-by-Step
Prep Like a Pro: Your Mise en Place Checklist
Alright, it’s go time. Before you even glance at the stove knob, make sure everything is within arm’s reach:
-
Beef is sliced and velveted.
-
Rice is cold and ready.
-
All vegetables are washed and chopped.
-
Aromatics (garlic, ginger) are minced.
-
Sauce is whisked together in its bowl.
-
Eggs for the fried rice are cracked into a separate bowl.
Trust me, this prep work is what separates a chaotic, stressful cooking experience from a smooth, enjoyable one. You’ll be glad you did it!
Mastering the Fried Rice
We’re making the rice first because it can hang out and stay warm while you quickly cook the stir-fry. Besides, a clean wok is a happy wok.
Step 1: Heat the Wok and Add Aromatics.
Place your wok or large skillet over medium-high heat. Add a tablespoon of neutral oil (like avocado or vegetable oil). Once it shimmers, add any hardy aromatics you might be using for the rice (like minced garlic or the white parts of scallions). Stir for just 30 seconds until fragrant.
Step 2: Scramble the Eggs and Push Aside.
Pour in your beaten eggs. Let them set for a few seconds before scrambling them gently with your spatula. Once cooked through, push them to one side of the wok.
Step 3: Add Cold Rice and Break Up Clumps.
Turn the heat up to high. Add your cold rice to the now-empty side of the wok. Use the spatula to press down and break up any clumps, tossing it with the oil. Then, combine it with the cooked eggs.
Step 4: Season and Toss Continuously.
Drizzle soy sauce and a touch of sesame oil over the rice. Now, toss everything together constantly! You’re not just mixing; you’re letting the rice make contact with the hot surface to get a little crispy. Transfer your finished fried rice to a bowl and cover it to keep warm.
Pro Tip: For an extra layer of flavor, you can use a tiny bit of the ancient history of stir-frying technique by letting the rice sit for a moment to develop a slight crust before tossing.
Executing the Beef Stir-Fry
This part is fast and furious. Have your ingredients lined up in the order you’ll add them. No dawdling!
Step 1: High Heat is Non-Negotiable.
Get that wok screaming hot again over the highest heat your stove can muster. You want to see a wisp of smoke from the oil. This high heat is what sears the meat instead of steaming it.
Step 2: Sear the Beef in Batches.
This is crucial—DO NOT overcrowd the pan! Adding too much meat at once will drop the temperature drastically and cause the beef to release its juices and steam. Add your beef in a single layer, let it sear undisturbed for about 60 seconds, then toss until just cooked through. Remove it immediately to a clean bowl. It will not be fully cooked inside, and that’s perfect! It will finish later.
Step 3: Remove Beef and Sauté Aromatics.
Your wok should still be hot. Add a touch more oil if needed, then throw in your ginger and garlic. Swirl them around for literally 15-20 seconds until they smell incredible. Don’t let them burn!
Step 4: Cook Vegetables by Hardness.
Now, add your vegetables, but add them in order of how long they take to cook. Hard veggies like carrots and broccoli go first. After a minute or two, add softer veggies like bell peppers and onions. You want them crisp-tender, not mushy.
Step 5: Create the Sauce and Bring to a Simmer.
Push the vegetables to the side. Give your pre-mixed sauce a quick whisk (the cornstarch settles) and pour it into the center of the wok. It will immediately start to bubble and thicken into a shiny glaze.
Step 6: Add Beef Back In and Coat in Glaze.
Now, return the beef and any accumulated juices back to the wok. Toss everything together vigorously, coating every single piece of meat and vegetable in that glorious sauce. Heat through for just another 30 seconds—just enough to warm the beef and finish cooking it without overcooking.
Pro Tip: For that final restaurant touch, add a fresh drizzle of toasted sesame oil and a big handful of sliced green scallions right at the very end, off the heat.
The Grand Finale: Plating and Serving
Scoop a generous portion of your fluffy fried rice onto a plate or into a bowl. Ladle the sizzling beef stir-fry right over the top, letting that amazing sauce drip down into the rice. Garnish with extra scallions and a sprinkle of sesame seeds. Then, stand back and accept your compliments. You’ve just created a masterpiece.
Advanced Tips, Variations, and FAQs
Troubleshooting Common Mistakes
Even pros run into hiccups. Here’s how to fix the most common stir-fry woes.
Why is My Stir-Fry Soggy?
This is almost always caused by one of three things: overcrowding the pan (which steams the food), not having the heat high enough, or adding vegetables that haven’t been patted dry. Furthermore, adding too much sauce can drown the ingredients. Remember, the sauce should coat everything, not pool at the bottom of the bowl.
Why is My Beef Tough?
You probably either used the wrong cut of meat (like stew meat), didn’t slice it against the grain, or—most commonly—overcooked it. Remember, velveted beef cooks in just minutes! Consequently, searing it in batches and removing it promptly ensures it stays tender.
Why is My Fried Rice Mushy?
I’ll say it one more time for the people in the back: you used warm, freshly cooked rice! It’s the number one mistake. Always, always use cold, day-old rice for the best texture.
Next-Level Flavor: Advanced Techniques
Ready to elevate your game even further? Try these pro tricks.
Infusing Oil with Aromatics
Before you even add your beef, flavor your oil. Add whole cloves of garlic, slices of ginger, or even a piece of star anise to the cold oil. As the oil heats up, it will become infused with their essence. Strain them out before adding your meat for a deeply aromatic base note.
The “Deglaze” for Extra Flavor
After searing your beef and removing it, you might see browned bits stuck to the bottom of the pan. That’s pure flavor gold! Instead of scraping it off, add a small splash of broth or water to the hot pan. It will sizzle and steam, and you can use your spatula to loosen those bits, incorporating that incredible fond into your sauce.
Delicious Variations to Try
Once you’ve mastered the classic, the world is your oyster (sauce)!
Protein Swaps
Not in the mood for beef? This method works with virtually any protein. Try thinly sliced chicken breast, shrimp, pork tenderloin, or extra-firm tofu (pressed well). Adjust the cooking time accordingly.
Cuisine Twists
-
Korean: Swap the sauce for a mix of gochujang (Korean chili paste), soy sauce, sesame oil, and a bit of sugar.
-
Thai: Add a big spoonful of Thai red or green curry paste to your sauce and finish with a handful of fresh basil leaves.
-
Mongolian Beef: Make your sauce sweeter with more brown sugar and add a generous amount of dried red chilies.
Dietary Adaptations
-
Gluten-Free: Use tamari instead of soy sauce and ensure your oyster sauce is a gluten-free brand.
-
Low-Carb: Serve the flavorful beef stir-fry over cauliflower rice instead of traditional fried rice.
-
Low-Sodium: Use low-sodium soy sauce and reduce the amount of oyster sauce, supplementing with a bit more ginger and garlic for flavor.
Storing and Reheating Your Leftovers
Got leftovers? Lucky you! Let the dish cool completely before storing it in an airtight container in the refrigerator. It will keep well for 3-4 days.
The best way to reheat it is in a wok or skillet over medium heat. Adding a tiny splash of water can help loosen the sauce and re-steam the ingredients without making them soggy. Avoid the microwave if you can, as it tends to make the beef rubbery and the rice hard.
Frequently Asked Questions (FAQs)
What is the best cut of beef for beef stir-fry?
Without a doubt, flank steak is the top choice for its perfect balance of flavor and tenderness when sliced correctly. Sirloin and skirt steak are also excellent, budget-friendly alternatives that work wonderfully.
Can I use freshly cooked rice for fried rice?
It’s strongly discouraged. Freshly cooked rice contains too much moisture, which will cause it to steam and become clumpy and gummy in the pan. For the best, separate grains, always use day-old, cold rice that has had time to dry out in the refrigerator.
How do I make my beef stir-fry sauce thicker?
The key is a cornstarch slurry. Simply mix one tablespoon of cornstarch with two tablespoons of cold water or broth until smooth. Stir this into your simmering sauce and it will thicken into a glossy glaze within a minute.
What can I substitute for oyster sauce?
For a vegetarian alternative, hoisin sauce is the closest match, though it is sweeter. You can also specifically seek out vegetarian “mushroom stir-fry sauce.” In a real pinch, a mixture of soy sauce with a tiny bit of sugar can work.
How do I get that authentic smoky “wok hei” flavor at home?
Achieving true wok hei requires a professional high-BTU burner. However, you can approximate it by ensuring your pan is screeching hot before adding ingredients and by cooking in small batches to avoid cooling down the pan. Letting the food sit for a moment before tossing can also create a slight sear and smoky note.
What type of rice is best?
For the best results, use a long-grain variety like Jasmine or Basmati. These types of rice have less starch than shorter-grain varieties, so they stay separate and fluffy when cooked, which is ideal for frying. You can learn more about the different types of rice to find your favorite.
Print
Beef Stir-Fry with Fried Rice
Description
Beef Stir-Fry with Fried Rice
Ingredients
For the Beef Stir-Fry
-
1 lb flank steak (or sirloin), thinly sliced against the grain
-
2 tbsp soy sauce
-
1 tbsp cornstarch
-
1 tbsp oyster sauce
-
1 tbsp hoisin sauce (optional, for sweetness)
-
2 tbsp vegetable oil (divided)
-
1 red bell pepper, sliced
-
1 green bell pepper, sliced
-
1 medium onion, sliced
-
2 cloves garlic, minced
-
1 tsp fresh ginger, grated
-
½ cup beef broth
-
1 tsp sesame oil
-
Pinch of crushed red pepper flakes (optional)
-
Sesame seeds + scallions, for garnish
For the Fried Rice
-
3 cups cold cooked rice (best if made the day before)
-
2 tbsp vegetable oil
-
2 eggs, lightly beaten
-
1 cup frozen peas and carrots (thawed)
-
3 green onions, chopped
-
3 tbsp soy sauce
-
1 tsp sesame oil
Instructions
Step 1: Prep the Beef
-
In a bowl, toss sliced beef with soy sauce and cornstarch. Let marinate 15–20 minutes.
Step 2: Make the Fried Rice
-
Heat 1 tbsp oil in a large wok or skillet. Scramble eggs, then remove and set aside.
-
Add remaining 1 tbsp oil, then toss in peas and carrots. Stir-fry 2 minutes.
-
Add rice, breaking up clumps. Stir-fry 3–4 minutes until heated through.
-
Add soy sauce, sesame oil, scrambled eggs, and green onions. Stir well, then set aside and keep warm.
Step 3: Cook the Beef Stir-Fry
-
Heat 1 tbsp oil in the same wok/skillet over high heat. Stir-fry beef until browned but not fully cooked, about 2 minutes. Remove and set aside.
-
Add remaining oil, then toss in bell peppers, onion, garlic, and ginger. Cook 3–4 minutes until crisp-tender.
-
Return beef to the pan. Stir in oyster sauce, hoisin sauce, beef broth, sesame oil, and red pepper flakes. Cook 2–3 minutes until beef is cooked through and sauce is glossy.
Step 4: Serve
-
Serve beef stir-fry on the side of fried rice for a restaurant-style plate, or spoon stir-fry over the fried rice for a comforting one-bowl meal.
-
Garnish with sesame seeds and scallions.