
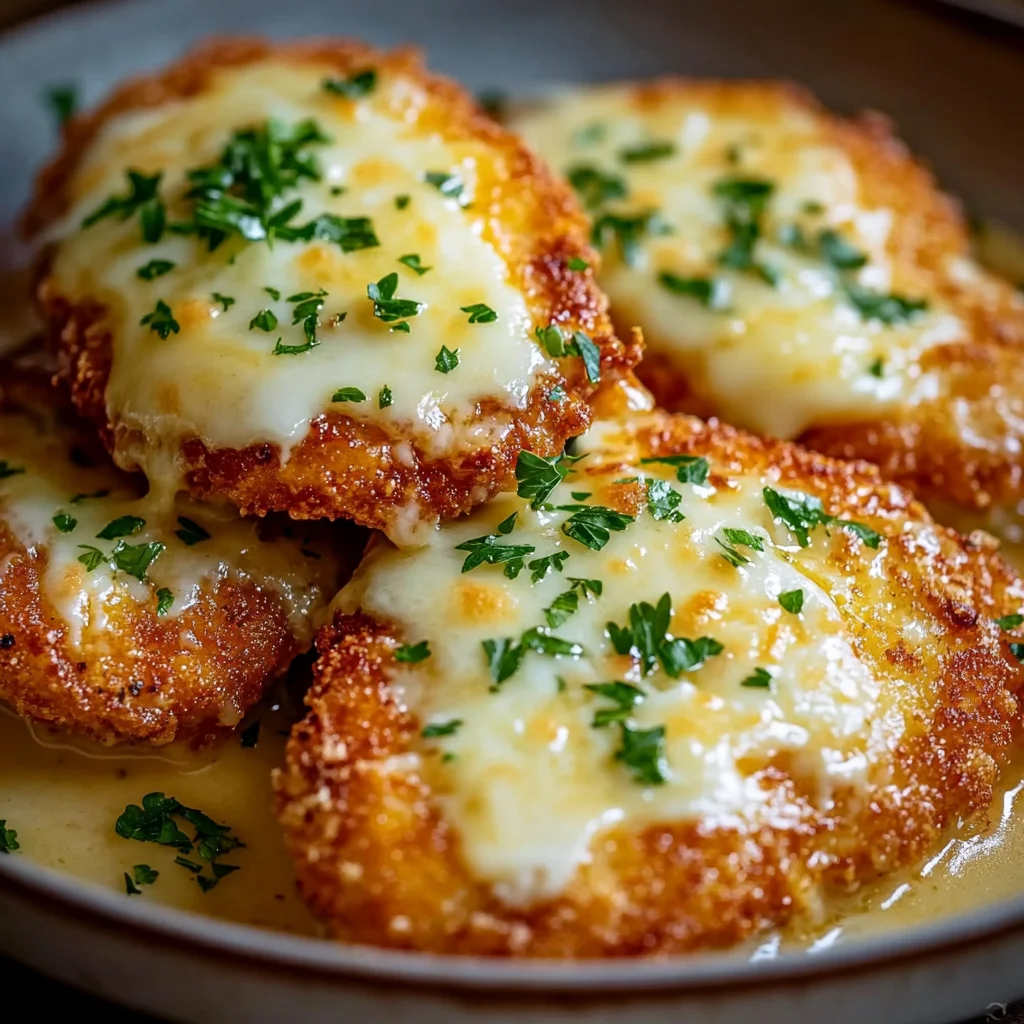
The Ultimate Guide to Breaded Chicken Cutlets with Melted Cheese and Parsley
Ah, the simple chicken cutlet. It’s a blank canvas, a weeknight warrior, and a dish that, when done right, feels like a warm hug. But let’s be honest; sometimes, it can be a bit… well, boring. That’s where we come in! We’re not just making any cutlet; we’re crafting a masterpiece of contrasting textures and flavors. Imagine this: a shatteringly crispy, golden-brown crust giving way to incredibly juicy chicken, all smothered in a blanket of gloriously melted cheese and finished with a confetti of fresh, vibrant parsley. Sounds good, right?
This isn’t just another chicken cutlet recipe; this is your definitive guide to transforming a humble ingredient into a show-stopping meal that’s equally fit for a busy Tuesday or a casual dinner party. We’ll walk you through every single step, from selecting the perfect chicken breast to unlocking the secret for cheese that melts like a dream. So, grab your skillet and let’s get cooking!
Introduction and The Core Concept
Introduction: More Than Just a Chicken Dinner
Let’s set the scene. You hear the gentle sizzle as the breaded chicken meets the hot oil. A fantastic aroma of toasting breadcrumbs and cooking chicken begins to fill your kitchen. Then comes the grand finale: you lay slices of cheese over the golden cutlets, watching with anticipation as they slowly soften, spread, and transform into a perfectly gooey, irresistible layer. Finally, a generous sprinkle of bright green parsley adds that final touch of freshness. Honestly, is there anything more satisfying?
This dish, my friends, is the ultimate culinary chameleon. Furthermore, it’s a cornerstone of comfort food that deserves a prime spot in your recipe repertoire. Whether you’re feeding a hungry family after a long day or impressing guests with your seemingly chef-level skills, these cutlets deliver every single time. In this article, we’re going to dive deep, leaving no stone unturned. From the science behind the perfect breading to choosing the absolute best cheese for the job, consider this your one-stop resource for achieving poultry perfection.
What Are Breaded Chicken Cutlets with Melted Cheese and Parsley?
In essence, this glorious dish is a beautiful symphony of three simple components. First, you have a thin, tenderized chicken breast that serves as the sturdy, protein-packed foundation. Next, a shatteringly crisp, seasoned breadcrumb shell encases it, providing that irresistible textural contrast we all crave. Finally, the pièce de résistance: a luxurious layer of melted cheese, cut through with the earthy, clean note of fresh parsley. It’s simple, yet the result is so much greater than the sum of its parts. It’s pure, unadulterated deliciousness on a plate.
The Anatomy of a Perfect Cutlet
Deconstructing the Dish: The Three Pillars of Perfection
Creating a truly phenomenal cutlet isn’t just about following steps; it’s about understanding the whybehind them. Consequently, let’s break down the three non-negotiable pillars that hold up this delicious creation. Think of it as an architectural blueprint for your dinner!
Pillar 1: The Chicken Cutlet – Choosing and Preparing Your Canvas
You can’t build a great house on a shaky foundation, right? Similarly, your choice and prep of the chicken make all the difference.
Selecting the Right Chicken
Honestly, you’ve got options here. While many stores sell pre-cut chicken cutlets, which are fantastic for saving time, you can absolutely create your own from plump, whole chicken breasts. For the best results, look for breasts that are similar in size to ensure they cook at the same rate. Ultimately, the goal is a uniform, even thickness across the entire piece.
The Art of Pounding
Now, this step is non-negotiable if you want juicy, evenly cooked meat. Pounding the chicken isn’t just about making it thin; it’s about tenderizing it and ensuring no part is undercooked while another turns into rubber. Here’s how to do it: place a breast between two sheets of plastic wrap or inside a sturdy zip-top bag. Then, using the flat side of a meat mallet, a heavy rolling pin, or even the bottom of a sturdy skillet, gently but firmly pound the chicken from the center outward until it’s about a ½-inch thick. Trust me, this little bit of effort pays off massively.
To Brine or Not to Brine?
Want to guarantee juiciness? Then consider a quick brine. Because chicken breast is so lean, it can easily dry out. Soaking it in a simple saltwater solution for even 30 minutes works wonders by allowing the meat to absorb extra moisture. For those wondering, it’s the science behind brining chicken for juiciness that makes it so effective. However, if you’re short on time, just be extra vigilant with your cooking time.
Pillar 2: The Breading Station – Building the Crispy Foundation
This is where the magic—and the crunch—happens! The standard breading procedure is a sacred trifecta: flour, egg, breadcrumbs. Each layer has a specific, crucial job.
The Role of Each Layer
First, the flour. Its job is to soak up any last bit of moisture on the chicken’s surface, creating a dry landscape for the egg wash to grip onto. Next, the egg. This is the ultimate glue, creating a sticky layer that the final coating will cling to for dear life. Finally, the breadcrumbs. These are the star of the show, delivering that iconic, golden, crispy texture we’re after.
Seasoning is Key
Listen closely: you must season every single layer. Otherwise, you’ll end up with a beautifully golden but bland-tasting crust. Therefore, add a pinch of salt, black pepper, garlic powder, and maybe a bit of paprika or onion powder to both your flour and your breadcrumb mixture. This way, every single bite is packed with flavor.
Pillar 3: The Finishing Touches – Cheese and Parsley
The chicken is juicy, the crust is crispy—now for the grand finale! The cheese brings a rich, creamy, decadent element that brings everything together. Meanwhile, the parsley isn’t just a pretty green sprinkle; it provides a vital fresh, slightly peppery note that cuts through the richness, balancing the entire dish perfectly.
Ingredients Deep Dive
Gathering Your Arsenal: A Guide to Ingredients
Using high-quality ingredients is the simplest way to elevate a simple dish into something extraordinary. So, let’s talk about the supporting cast that makes our chicken the star.
The Best Cheese for Melting
Not all cheeses are created equal, especially when it comes to meltability. You want a cheese that transforms into a smooth, creamy blanket, not one that separates into an oily puddle.
Top Choices
-
Mozzarella: The classic choice. It’s milky, mild, and delivers that incredible, stretchy “cheese pull” we all love.
-
Provolone: Slightly more sharp and smoky than mozzarella, it also melts like an absolute dream.
-
Fontina: This is a secret weapon. It’s nutty, buttery, and melts into an unbelievably creamy and luxurious layer.
-
Gruyère: If you want a more complex, slightly sweet and salty flavor, Gruyère is your guy. It melts beautifully.
Cheese Form: Pre-Shredded vs. Freshly Grated
Here’s a pro tip: always grate your own cheese from a block. Why? Pre-shredded bags contain anti-caking agents like potato starch or cellulose to prevent clumping. Unfortunately, these additives also prevent the cheese from melting as smoothly and seamlessly as freshly grated cheese does. The difference is night and day!
Breadcrumbs Showdown: Panko vs. Traditional
This choice will define the texture of your crust.
-
Panko: These are Japanese-style breadcrumbs made from crustless white bread. They’re flakier, lighter, and airier than traditional breadcrumbs. As a result, they create a crust that is incredibly crispy, craggy, and noticeably lighter—almost like a delicate armor.
-
Traditional Breadcrumbs: These are finer and denser. They create a more compact, firm, and classic coating that many associate with traditional Italian cooking.
So, which one should you use? For the ultimate crispy chicken experience, panko is the winner. But for a more authentic, old-school feel, traditional works perfectly.
The Power of Fresh Herbs: Why Parsley?
Specifically, we recommend flat-leaf parsley (also called Italian parsley). It has a more robust, less bitter flavor than its curly cousin. But its role goes beyond taste. Those little green flakes are bursting with nutrients, offering a range of health benefits of fresh parsley, including being rich in vitamins K, C, and A. It’s a garnish that does a job, making your dish both prettier and healthier!
The Step-by-Step Cooking Method
Crafting Perfection: The Step-by-Step Method
Alright, enough theory—let’s get down to business! Follow these steps closely, and you’ll be rewarded with absolute perfection.
Step 1: Prep the Chicken
-
Start by placing your chicken cutlets on a clean cutting board.
-
Crucially, pat them completely dry on both sides using paper towels. This is the single most important step for ensuring the breading actually sticks. Any moisture will create steam and loosen the coating.
-
Season both sides generously with salt and pepper.
Step 2: Set Up Your Breading Station
Get three shallow dishes—pie plates, wide bowls, or even dinner plates work great.
-
Dish 1: All-purpose flour, seasoned with salt, pepper, and your chosen spices.
-
Dish 2: Eggs, beaten with a tablespoon of water or a teaspoon of Dijon mustard (the mustard helps with browning and adds flavor).
-
Dish 3: Your breadcrumbs (panko or traditional), also seasoned well.
Pro Tip: Use one hand for the dry ingredients (flour and breadcrumbs) and the other hand for the wet egg. This will prevent your fingers from becoming a clumpy, breaded mess!
Step 3: The Breading Process
Now, for the fun, messy part!
-
Dredge in flour: Place a chicken cutlet in the flour, coating it thoroughly. Shake off any excess.
-
Dip in egg: Next, drag it through the egg wash, making sure it’s fully submerged. Let the excess drip off.
-
Coat in crumbs: Finally, place it in the breadcrumbs. Press down firmly and sprinkle crumbs over the top to ensure a complete, even seal. Don’t just lay it there—press, press, press! This ensures a solid coating that won’t fall off during cooking.
Step 4: Cooking Techniques: Pan-Frying vs. Baking
Pan-Frying (For Maximum Crispness)
-
This method delivers the gold standard for texture. Fill a large, heavy-bottomed skillet (cast iron is ideal) with about ¼ inch of a neutral, high-smoke-point oil like canola, avocado, or vegetable oil.
-
Heat the oil over medium-high heat. To test if it’s ready, flick a tiny breadcrumb into it—if it sizzles immediately, you’re good to go.
-
Gently lay the cutlets away from you in the hot oil to avoid splashing.
-
Don’t crowd the pan! Cook in batches if necessary. Overcrowding drops the oil temperature and makes the cutlets steam instead of fry, leading to a soggy crust.
-
Fry for 3-4 minutes per side, until the coating is a deep, golden brown and the chicken is cooked through. The USDA recommends a safe internal temperature for chicken of 165°F (74°C). Use an instant-read thermometer to be sure.
Baking (A Lighter Alternative)
-
For a healthier version, baking works well. Preheat your oven to 400°F (200°C).
-
Place a wire rack on a baking sheet and spray it with oil. This allows hot air to circulate all around the cutlet, preventing the bottom from getting soggy.
-
Place the breaded cutlets on the rack, spray their tops lightly with oil, and bake for 15-20 minutes, flipping halfway through, until golden and cooked to 165°F.
Melting, Garnishing, and Serving
The Final Act: Melting and Presentation
The chicken is cooked, but we’re not done yet! It’s time for the cheesy, green finale.
How to Get Perfectly Melted Cheese
-
For Pan-Fried Cutlets: As soon as you flip the cutlet for the last time, top it with your cheese. Then, reduce the heat to low and cover the skillet with a lid. This traps steam and gently melts the cheese in just 1-2 minutes without burning the crust.
-
For Baked Cutlets: Simply sprinkle the cheese on top for the last 2-3 minutes of baking, or switch the oven to broil for the last 30-60 seconds. Watch it like a hawk under the broiler to prevent burning!
Garnishing with Parsley
The moment the cheese is melted and you’ve taken the skillet out of the oven, sprinkle the chopped fresh parsley over everything. The residual heat will slightly wilt the parsley, helping it release its wonderful aroma and stick to the cheese.
Serving Suggestions: Building a Complete Meal
These versatile cutlets can play many roles!
-
The Classic Plate: Serve alongside a simple arugula salad with lemon vinaigrette, garlic mashed potatoes, or roasted asparagus.
-
The Hearty Sandwich: Pile a cutlet onto a toasted ciabatta roll with a smear of mayo, some lettuce, and a tomato slice. Pure bliss.
-
The Italian Way: Serve it over a bed of pasta with a generous ladle of marinara sauce, essentially making a Chicken Parmesan without the breading-baking hassle.
Pro Tips, Variations, and Troubleshooting
Elevating Your Dish: Tips, Twists, and Fixes
You’ve mastered the basics. Now, let’s make you a pro.
Chef’s Secrets for a Flawless Result
-
The Resting Step: After breading, let the cutlets rest on a wire rack for 5-10 minutes before cooking. This allows the coating to set and hydrate slightly, which helps it adhere during cooking.
-
The Thermostat is Your Friend: Stop guessing! An instant-read thermometer is the only way to guarantee perfectly cooked, juicy chicken every single time without overdoing it.
-
Keep It Warm: If cooking in batches, keep finished cutlets warm and crispy on a wire rack set in a 200°F (95°C) oven. This prevents the steam from making the bottom soggy.
Delicious Variations to Try
Don’t be afraid to get creative!
-
Herbaceous Twist: Add dried oregano, thyme, or basil directly into the breadcrumb mixture.
-
Cheesy Crust: Mix a generous handful of grated Parmesan cheese right into the breadcrumbs for an extra savory, cheesy flavor in every bite.
-
Spicy Kick: Add a pinch of cayenne pepper or smoked paprika to the flour, or use pepper jack cheese for a spicy finish.
-
Gluten-Free Version: Use gluten-free panko breadcrumbs or even finely crushed gluten-free crackers for the coating.
Troubleshooting Common Issues
-
Soggy Breading: This is usually caused by oil that isn’t hot enough or overcrowding the pan. Make sure your oil is properly preheated and work in batches.
-
Breading Falling Off: The chicken was likely not dried thoroughly, the crumbs weren’t pressed on firmly enough, or the cutlets didn’t rest after breading. Remember: dry chicken, firm pressure, brief rest.
-
Overcooked Chicken: This happens if the cutlets are pounded too thin or cooked for too long. Use a thermometer and pull the chicken at 165°F—it will carry over to the perfect temp.
FAQs and Conclusion
Frequently Asked Questions (FAQs)
What is the best cheese to use for melting on chicken?
Mozzarella, Provolone, and Fontina are excellent choices due to their high meltability and mild, complementary flavors. For the best results, grate it yourself from a block.
Can I bake the chicken cutlets instead of frying them?
Absolutely! For a healthier version, bake the breaded cutlets on a wire rack at 400°F (200°C) for 15-20 minutes, or until cooked through. Add the cheese for the last few minutes of cooking.
How do I keep the breading from falling off?
The key steps are: 1) Pat the chicken completely dry before breading. 2) Press the breadcrumbs on firmly. 3) Let the breaded cutlets rest for 5-10 minutes before cooking to allow the coating to set.
Can I make these chicken cutlets ahead of time?
You can bread the cutlets and store them layered between parchment paper in the fridge for up to 4 hours before cooking. For best results, cook them fresh. Cooked cutlets reheat well in an oven or air fryer to restore crispness.
Conclusion: Your New Go-To Chicken Masterpiece
And there you have it! From a simple breast to a golden, cheesy, herb-flecked masterpiece, you now possess all the knowledge needed to create the most incredible Breaded Chicken Cutlets with Melted Cheese and Parsley. This dish is a testament to the fact that the best meals often come from mastering the fundamentals: quality ingredients, solid technique, and a little bit of love. So, don your apron, embrace the sizzle, and get ready to receive some serious compliments. Your new favorite easy chicken dinner is waiting.
Print
Breaded Chicken Cutlets with Melted Cheese and Parsley
Description
Breaded Chicken Cutlets with Melted Cheese and Parsley
Ingredients
-
4 boneless, skinless chicken breasts (pounded to ½-inch thickness)
-
1 cup all-purpose flour
-
2 large eggs, beaten
-
1 ½ cups breadcrumbs (Italian-style or plain with added seasoning)
-
½ cup grated Parmesan cheese
-
1 tsp garlic powder
-
1 tsp paprika
-
½ tsp salt
-
½ tsp black pepper
-
2 tbsp olive oil + 2 tbsp butter (for frying)
-
1 cup shredded mozzarella cheese (or provolone, fontina, or Swiss)
-
2 tbsp fresh parsley, finely chopped
-
Lemon wedges, for serving
Instructions
1. Prep the Chicken
-
Pound chicken breasts evenly between plastic wrap for thin cutlets.
-
Season lightly with salt and pepper.
2. Bread the Cutlets
-
Place flour in one shallow dish.
-
Beat eggs in a second dish.
-
In a third dish, mix breadcrumbs, Parmesan, garlic powder, paprika, salt, and pepper.
-
Dredge each cutlet in flour, dip in egg, then coat thoroughly in breadcrumb mixture.
3. Pan-Fry
-
Heat olive oil and butter in a large skillet over medium heat.
-
Cook chicken cutlets 3–4 minutes per side, until golden brown and cooked through (165°F internal temp).
-
Reduce heat to low, sprinkle cheese evenly over each cutlet, and cover skillet with a lid for 1–2 minutes until cheese is melted.
4. Garnish & Serve
-
Transfer to a platter, sprinkle generously with fresh parsley, and serve hot with lemon wedges on the side.