
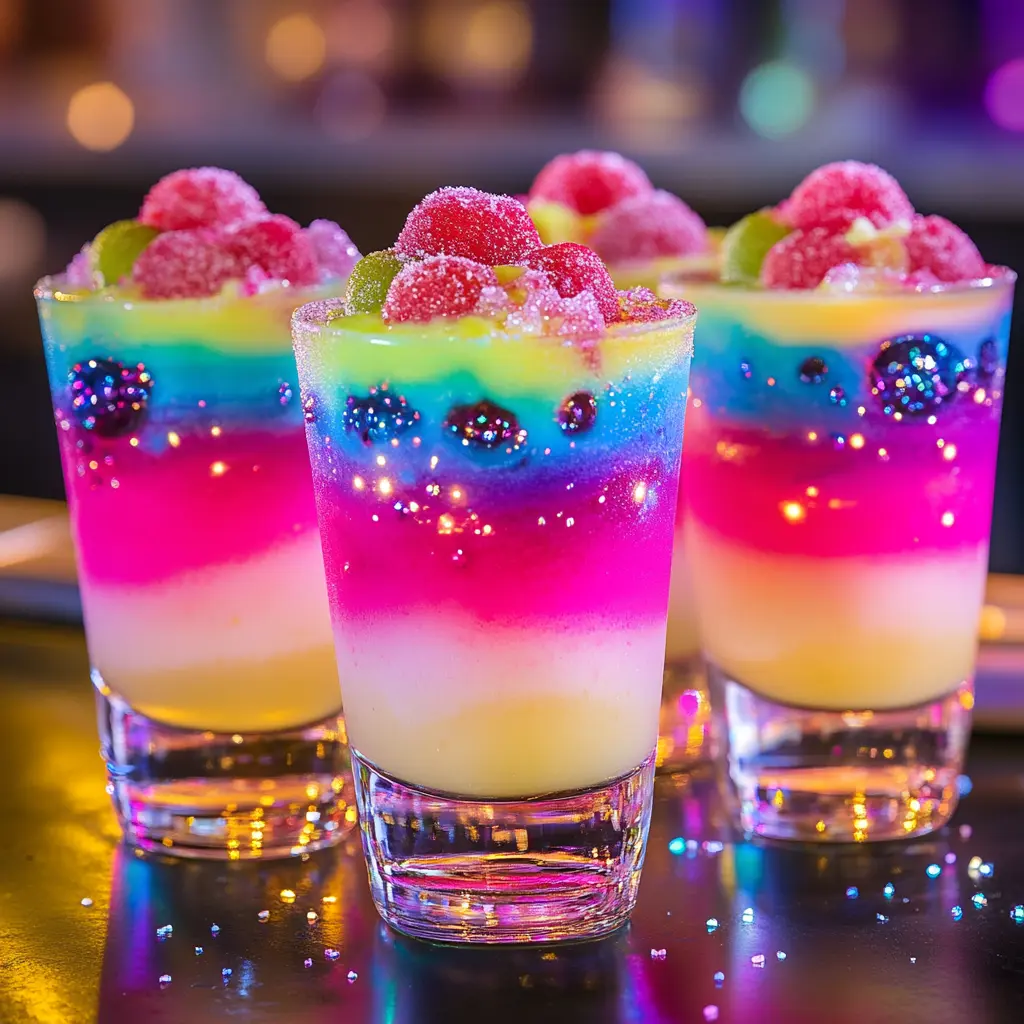
Candy Glow Shots: The Ultimate Layered Treat for Blacklight Magic
Get ready to glow! Whether you’re hosting a neon rave, throwing a glow-in-the-dark birthday bash, or just want to impress your followers with a rainbow masterpiece, these Candy Glow Shots are your new go-to party trick. With glowing layers of fruity flavor and shimmering swirls, these shots are more than just a drink—they’re a performance in a glass.
Crafted with layers of colorful sodas, syrups, juices, and a hint of tonic water for that UV-reactive glow, each Candy Glow Shot is a burst of flavor and visual delight. These layered beauties are perfect for TikToks, Instagram Boomerangs, and jaw-dropping party centerpieces. And yes—they’re customizable for both kids and adults.
Let’s break down how to create these rainbow wonders step-by-step.
What Makes Candy Glow Shots So Special?
Candy Glow Shots aren’t your average party drink. They’re interactive, dazzling, and highly Instagrammable. Here’s why everyone is obsessed:
-
Glowing Layers: Thanks to the UV-reactive tonic water in the yellow and blue layers, these shots literally light up under blacklight.
-
Taste Explosion: Each color represents a different fruity flavor—berry, citrus, tropical, and more. It’s like sipping the rainbow.
-
Visual Appeal: Perfectly poured layers create a stunning gradient effect that mesmerizes everyone who sees (or sips) it.
-
Party-Ready: Serve them chilled, with edible glitter for magical swirls, and watch the crowd go wild.
Candy Glow Shots Ingredients (Layer by Layer)
To make these stunning shots, you’ll prepare each layer separately and pour them one at a time. Here’s everything you need to make them glow and flow beautifully:
Red Layer (Top Layer)
-
1 oz strawberry soda or cherry juice
-
1/2 oz grenadine
-
Optional: A drop of neon red or pink food coloring for extra vibrancy
Flavor Profile: Sweet, fruity, and nostalgic—this top layer is the cherry on top (literally and figuratively). It’s the one that makes your Boomerangs pop.
Orange Layer
-
1 oz orange soda or mango nectar
-
1/2 oz orange liqueur (for adults) or orange syrup (for mocktail version)
Flavor Profile: Tangy and tropical, this layer gives the drink a citrusy kick and adds contrast to the deeper red above it.
Yellow Layer (Glow Base!)
-
1 oz lemon-lime soda (Sprite, 7Up, or similar)
-
1/2 oz tonic water (this makes it glow under blacklight!)
-
Optional: Neon yellow food coloring
Flavor Profile: This is where the magic happens! The tonic water gives it a sharp edge and that iconic glow. This layer is your spotlight moment under UV lighting.
Green Layer
-
1 oz melon liqueur (Midori for adults) or green apple soda for a non-alcoholic version
-
Optional: Neon green food coloring for a radioactive look
Flavor Profile: Bright and juicy with either melon or sour apple notes. It’s the zesty zing right before the cooling blue.
Blue Layer
-
1 oz blue curaçao (or blue raspberry drink for non-alcoholic version)
-
1/2 oz tonic water (to enhance glow!)
Flavor Profile: This is your electric blue showstopper. Sweet and citrusy, and glowing under UV light—it’s always a favorite.
Purple Layer (Bottom Layer)
-
1 oz grape soda or blackberry juice
-
Optional: Add a drop of blue and red food coloring for deeper purple
Flavor Profile: Rich and juicy, this deep purple layer forms the dramatic foundation for your glowing creation.
Optional Add-ins
-
Edible glitter or shimmer dust: For that swirling sparkle effect
-
Crushed ice (or chill each layer): To help keep the layers separate
-
Tall clear shot glasses or mini tumblers: Because presentation is everything
Step-by-Step Instructions
Creating clean, glowing layers is all about patience and precision. Here’s exactly how to build your Candy Glow Shotslike a pro:
1. Prep Each Layer Separately
Use separate cups to mix each colored layer. Add food coloring and edible glitter as desired. Keep them chilled in the fridge until ready to pour—cold liquids layer better and reduce mixing.
2. Start with the Purple Layer
Pour the purple mixture into the bottom of your shot glass or tumbler. Since this is the heaviest (due to its sugar content), it naturally sits at the bottom.
Pro Tip: Add a tiny bit of edible glitter here for a magical base swirl.
3. Carefully Add the Blue Layer
Use the back of a spoon to gently pour the blue mixture over the purple. The spoon diffuses the liquid so it rests on top without disturbing the layer below.
Repeat this technique with each additional color.
4. Add the Green Layer
Slow and steady wins the race. Keep your liquids cold for best results and minimal mixing.
5. Pour the Yellow Layer
This one contains tonic water—your glowing agent. Make sure it’s mixed thoroughly and gently poured to maintain the clean separation between colors.
6. Add the Orange Layer
Almost there! The orange layer brings a tropical warmth and beautiful gradient transition from the cool tones below.
7. Finish with the Red Layer
Your final and most vibrant layer goes on top. This one grabs the most attention in photos and gives that signature “sunset shot” look.
Glow Tips
Want your Candy Glow Shots to look just as jaw-dropping in person as they do on camera? Follow these tips:
-
Use tonic water strategically: Only a little is needed to make layers glow under blacklight. Add it to lighter colors like yellow or blue.
-
Work with chilled liquids: Cold drinks layer better because the density differences are more stable.
-
Add edible shimmer: This makes for amazing swirling effects in your reels or slow-motion videos.
-
Practice pouring over a spoon: It takes a little patience, but your layers will look flawless.
Perfect for Reels, Boomerangs & More
Candy Glow Shots are tailor-made for content creation. Whether you’re building your brand or just want to stun your friends, here’s how to capture the magic:
Reels
Film the pouring process in slow motion to show each color settling in perfectly. Bonus points for close-ups with glitter swirling!
Boomerangs
Tilt the shot glass gently and catch the colors shifting under the blacklight. So hypnotic.
Photos
Use a clear background, shoot under UV lighting, and focus on the glow. Edible glitter will sparkle beautifully with the right lighting.
Best Events to Serve Candy Glow Shots
These shots aren’t just drinks—they’re a centerpiece! Here are some events where Candy Glow Shots steal the show:
-
Glow Raves & UV Parties: That glowing tonic layer will pop under blacklight.
-
Rainbow-Themed Events: Pride, birthdays, or color parties are the perfect stage.
-
Halloween Neon Nights: Serve in spooky glasses with dry ice fog for drama.
-
Birthday Bash for Teens or Tweens: Use all non-alcoholic options and let them make their own!
-
Bachelorette Parties: Add a fun twist with names for each layer (“Flirtini Red,” “Sunset Mango,” etc.).
Customization Ideas
Want to take your Candy Glow Shots to the next level? Try these creative twists:
Candy Garnishes
Top with sour gummy worms, rainbow belts, or Pop Rocks for an edible decoration.
Cocktail Version
Turn this into a large-layered cocktail for adults in a tall glass or even a mason jar. Garnish with rock candy stirrers!
Mocktail Pitcher
Skip the booze and make a family-friendly rainbow punch version with layers pre-mixed into a big, clear pitcher.
Frozen Version
Blend each layer with crushed ice and serve as a frozen glow slushie. Use clear plastic cups to show off the colors.
Final Thoughts
Candy Glow Shots are more than just drinks—they’re a multi-sensory experience. From the glowing tonic water and vibrant fruity flavors to the glittery shimmer and layered reveal, these shots are guaranteed to light up your party—and your social feed.
So next time you’re looking to serve something unforgettable, break out the clear glasses, switch on the blacklight, and let your Candy Glow Shots steal the show.
Shopping Checklist
Before you start layering, make sure you have:
-
Variety of colorful sodas, juices, and optional liqueurs
-
Tonic water for the glow
-
Food coloring and edible glitter
-
Clear shot glasses or tumblers
-
Blacklight (UV lamp)
-
Spoons and a steady hand
Candy Glow Shots
Description
🍬 Candy Glow Shots
Glowing rainbow layers — sweet, fruity, and built for Boomerangs.
💫 Ingredients (Layer by Layer):
Red Layer (Top):
-
1 oz strawberry soda or cherry juice
-
1/2 oz grenadine
-
Optional: Neon pink/red food coloring
Orange Layer:
-
1 oz orange soda or mango nectar
-
1/2 oz orange liqueur or orange syrup
Yellow Layer (Glow Base):
-
1 oz lemon-lime soda
-
1/2 oz tonic water (for UV glow!)
-
Optional: Neon yellow food coloring
Green Layer:
-
1 oz melon liqueur or green apple soda
-
Optional: Neon green coloring
Blue Layer:
-
1 oz blue curaçao or blue raspberry drink
-
1/2 oz tonic water (to boost glow)
Purple Layer (Bottom):
-
1 oz grape soda or blackberry juice
-
Optional: Drop of blue + red food coloring for deep purple
Extras:
-
Edible glitter or shimmer dust (optional for magic swirl)
-
Crushed ice or chill each layer before pouring
-
Tall clear shot glasses or mini tumblers
🪄 Instructions:
-
Prepare each layer in a separate cup, adding glitter if desired.
-
Start with the purple layer in the bottom of your glass.
-
Carefully layer each color upward (blue, green, yellow, orange, red), pouring slowly over the back of a spoon to keep them from mixing.
-
Chill between layers if needed for clean separation.
-
Set under a black light and watch the tonic-infused layers glow like candy magic.
📸 Perfect for:
-
Boomerangs of glitter swirling
-
Slow-pour reels showing off layers
-
Blacklight parties, glow raves, or rainbow-themed events