
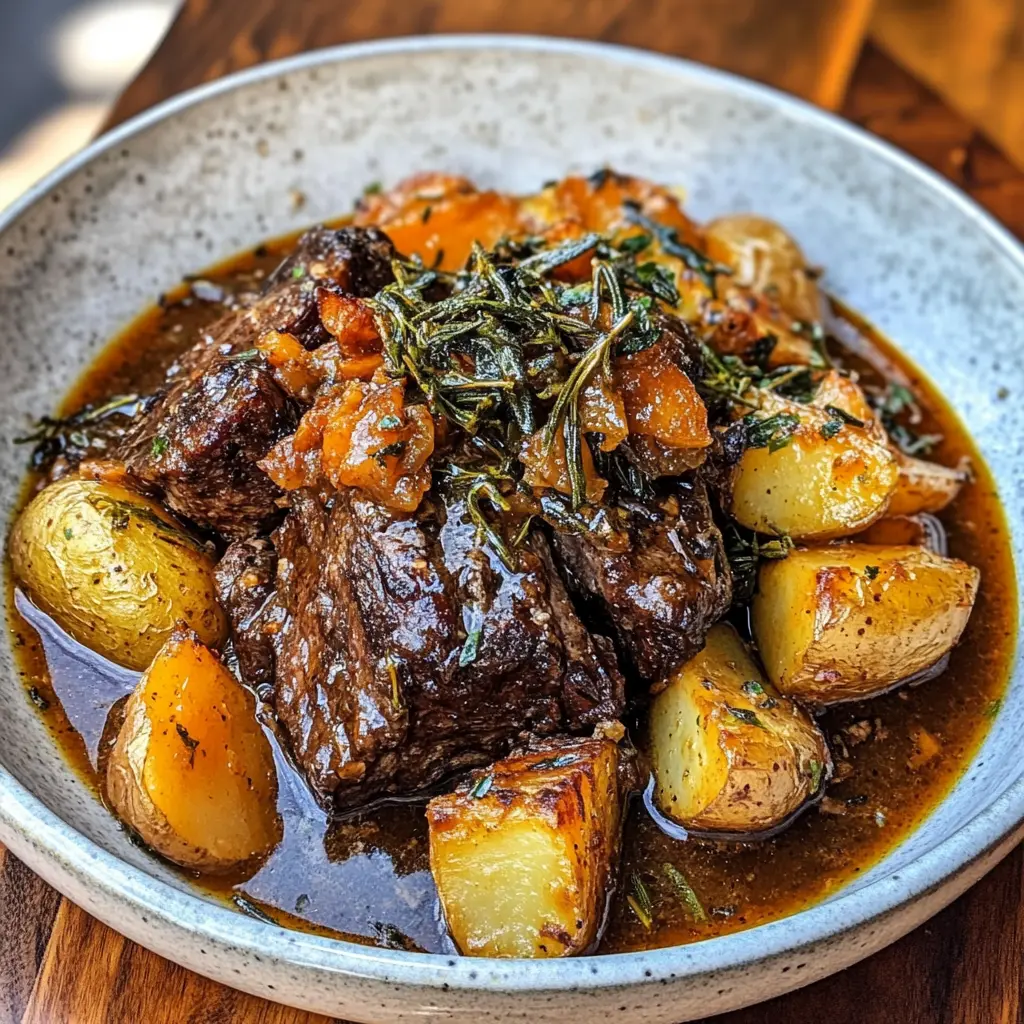
Cider Braised Pot Roast with Crispy Sage Potatoes
Introduction
Cider Braised Pot Roast with Crispy Sage Potatoes transforms humble ingredients into an extraordinary comfort meal that fills your kitchen with irresistible aromas. This dish combines tender, slow-cooked beef with perfectly crispy potatoes, creating a harmony of textures and flavors. The apple cider adds natural sweetness that balances the savory beef, while fresh sage brings earthy notes that elevate every bite. Moreover, this recipe requires minimal hands-on time, making it perfect for busy weeknights or special Sunday dinners.
What Makes Cider Braised Pot Roast Special
Unique Flavor Profile
The combination of apple cider and beef creates a distinctive taste that sets this pot roast apart from traditional versions. The cider adds subtle sweetness and acidity that tenderizes the meat while building complex flavors. Additionally, the braising liquid transforms into a rich, flavorful gravy that complements both the beef and potatoes.
Fall-Inspired Comfort
This recipe captures autumn’s essence with seasonal ingredients like fresh sage and apple cider. The warm, comforting flavors make it ideal for cooler weather. Furthermore, the dish brings families together around the dinner table with its homestyle appeal.
One-Pot Convenience
Cooking everything in a single Dutch oven simplifies both preparation and cleanup. The meat and vegetables cook together, allowing flavors to meld beautifully. Consequently, you save time without sacrificing taste or quality.
Essential Ingredients for Success
For the Pot Roast
The foundation of this recipe starts with quality ingredients. You’ll need a 2.5 to 3-pound beef chuck roast, which provides the perfect balance of meat and fat for braising. The marbling in chuck roast breaks down during slow cooking, creating fork-tender results.
Salt and black pepper form the essential seasoning base. Meanwhile, all-purpose flour helps thicken the braising liquid into a luscious gravy. Two tablespoons of butter add richness when caramelizing the onions.
One large yellow or red onion, thinly sliced, creates a flavorful base. Six to eight garlic cloves infuse the dish with aromatic depth. Fresh herbs, particularly thyme and rosemary, contribute earthy notes that complement the cider.
Braising Liquids
One cup of apple cider serves as the star ingredient, providing natural sweetness and acidity. Two cups of beef broth create the proper liquid ratio for braising. Additionally, one tablespoon of Worcestershire sauce adds umami depth.
For Crispy Sage Potatoes
Two to three pounds of Yukon gold or baby potatoes work best for achieving crispy exteriors. Their creamy texture holds up well during roasting. Fresh sage leaves provide the signature flavor, while butter and olive oil ensure golden-brown crispness.
Choosing the Right Cut of Beef
Why Chuck Roast Works Best
Chuck roast stands as the ideal choice for braised dishes due to its generous marbling and connective tissue. These qualities might seem undesirable initially, but they transform into tenderness through slow cooking. The fat renders throughout the braising process, keeping the meat moist and flavorful.
Other Suitable Cuts
While chuck roast remains the top choice, other cuts can work well. Brisket offers similar results with slightly different texture. Round roast provides a leaner option, though it may turn out less tender. Therefore, stick with chuck roast for the most reliable results.
Selecting Quality Meat
Look for well-marbled roasts with bright red color and firm texture. The meat should have white fat rather than yellow, indicating freshness. Additionally, choose roasts that weigh between 2.5 and 3.5 pounds for optimal cooking time.
The Science Behind Braising
How Braising Tenderizes Tough Cuts
Braising uses moist heat and time to break down collagen in tough meat cuts. The collagen transforms into gelatin, which moistens the meat and creates rich body in the sauce. This process requires temperatures between 275°F and 325°F maintained over several hours.
The Importance of Liquid Levels
Proper liquid levels prove crucial for successful braising. The liquid should reach about halfway up the roast, not covering it completely. This technique allows steam to cook the top portion while the bottom bathes in flavorful liquid. Furthermore, leaving part of the meat exposed enables better browning and deeper flavor development.
Temperature and Timing
Low and slow cooking produces the best results for pot roast. The meat should reach an internal temperature of 200°F to 210°F for fork-tender texture. At this temperature, all connective tissues have broken down completely. Generally, plan for three to four hours of braising time.
Step-by-Step Cooking Instructions
Preparing the Roast
Begin by generously seasoning the chuck roast with salt on all sides. Place it on a rack over a sheet pan and refrigerate uncovered for 12 to 48 hours if time allows. This dry-brining step enhances flavor penetration and creates a better crust.
Before cooking, pat the roast completely dry with paper towels. This step ensures proper browning during searing. Season again with black pepper just before cooking.
Searing for Flavor
Heat one tablespoon of olive oil in a Dutch oven over high heat until it begins to shimmer. Add the roast and sear each side for three to four minutes until deeply golden brown develops. This Maillard reaction creates hundreds of flavor compounds that enrich the final dish.
Remove the seared roast and set aside on a plate. Don’t skip this step – the browned bits on the pan bottom contribute essential flavor.
Building the Flavor Base
Add one tablespoon of butter to the hot Dutch oven along with sliced onions. Cook for five minutes until they begin softening. Pour in half a cup of apple cider and continue cooking another five minutes until the onions turn golden and caramelized.
Add minced garlic and cook for 30 to 45 seconds until fragrant. Be careful not to burn the garlic, as it turns bitter quickly. Then, sprinkle two tablespoons of flour over the onions and stir to coat.
Creating the Braising Liquid
Pour in the remaining apple cider and beef broth, whisking to incorporate the flour and release the browned bits from the pan bottom. Add Worcestershire sauce and Dijon mustard for depth. Nestle fresh thyme and rosemary sprigs into the liquid.
Return the seared roast to the pot, ensuring the liquid reaches halfway up the sides. Bring everything to a gentle simmer on the stovetop.
Braising in the Oven
Cover the Dutch oven with its lid and transfer it to a preheated 325°F oven. Place the pot on a rack in the lower third of the oven for even heat distribution. Braise for 2.5 to 3 hours until the meat becomes fork-tender.
Check the roast after two hours. It should offer little resistance when pierced with a fork. If still firm, continue cooking and check every 30 minutes.
Adding Vegetables
With about 70 minutes remaining in the cooking time, add halved baby potatoes and chopped carrots around the roast. The vegetables will absorb the delicious braising liquid while cooking to perfect tenderness. Quarter one large apple and nestle it among the vegetables for extra sweetness.
Final Roasting Step
Once the meat reaches fork-tender consistency, remove the pot from the oven and increase the temperature to 425°F. Transfer vegetables to a serving platter using a slotted spoon. Return the uncovered pot with the roast to the hot oven for 15 to 20 minutes.
This final high-heat step caramelizes the roast’s surface, creating deeper flavor and appealing color. Watch carefully to prevent burning. The top should develop a rich, mahogany crust.
Making Perfect Crispy Sage Potatoes
Boiling for Fluffy Interiors
Place halved baby potatoes or quartered Yukon golds in a large pot with cold water. Add a generous amount of salt and bring to a boil over high heat. Cook for 10 to 15 minutes until fork-tender but not falling apart.
Drain the potatoes thoroughly and let them sit for five minutes to release excess steam. This drying step proves essential for achieving maximum crispiness. Shake the pot gently to rough up the potato surfaces, creating more edges for browning.
Preheating for Extra Crunch
Place a large baking sheet in the oven while it preheats to 425°F. The hot pan creates immediate contact heat when the potatoes hit the surface. This technique jumpstarts the crisping process and prevents sticking.
Seasoning and Roasting
Transfer the parboiled potatoes to the hot baking sheet carefully. Drizzle generously with olive oil and dot with butter pieces. Add fresh sage leaves, minced garlic, lemon zest, salt, and black pepper.
Roast for 30 to 40 minutes without stirring until the potatoes turn golden brown and crispy. The undisturbed cooking allows maximum surface contact for superior crunch. Flip once at the 20-minute mark if you prefer even browning on multiple sides.
Creating Sage Butter
While potatoes roast, prepare sage butter in a small saucepan. Melt butter over low heat and add fresh sage leaves. The sage will slowly crisp as the butter turns golden brown and develops nutty aromas.
This process takes three to five minutes. Watch carefully, as butter can burn quickly. The sage should turn crispy and the butter should smell toasted and fragrant. Drizzle this mixture over the roasted potatoes just before serving.
Flavor Variations and Substitutions
Different Braising Liquids
While apple cider creates signature flavor, other liquids work well too. Beef stock alone produces a more traditional pot roast taste. Apple juice provides similar sweetness with slightly different character. Additionally, vegetable broth creates a lighter-tasting dish.
Herb Options
Fresh thyme and rosemary form the classic combination, but other herbs shine too. Bay leaves add subtle depth to the braising liquid. Oregano brings Mediterranean flair, while tarragon offers French elegance. Experiment to find your favorite combination.
Vegetable Additions
Beyond potatoes and carrots, many vegetables enhance this dish. Parsnips add sweetness and earthy notes. Celery contributes aromatic flavor to the braising liquid. Rutabaga provides hearty texture and mild sweetness. Add turnips, mushrooms, or pearl onions based on preference.
Potato Varieties
Yukon gold potatoes remain the top choice for their creamy texture and golden color. However, red potatoes work equally well with similar results. Russet potatoes create fluffier interiors but may break apart more easily. Baby potatoes offer convenience and attractive presentation.
Serving Suggestions and Pairings
Plating the Dish
Arrange sliced pot roast on a large serving platter as the centerpiece. Surround it with crispy sage potatoes and roasted vegetables for visual appeal. Spoon the rich braising gravy over the meat, allowing some to pool around the vegetables.
Garnish with fresh thyme or rosemary sprigs for color. A sprinkle of flaky sea salt adds final touch and enhances flavors. Serve family-style, allowing guests to help themselves.
Complementary Side Dishes
While the potatoes provide starch, crusty bread makes an excellent addition for soaking up gravy. A simple green salad with vinaigrette cuts through the richness. Roasted Brussels sprouts or green beans add color and nutrition.
Creamy mashed potatoes work well if you prefer to serve the crispy potatoes separately as an appetizer. Buttered egg noodles offer another classic pairing. Additionally, polenta or grits create Southern-inspired presentations.
Beverage Pairings
The rich, savory flavors pair beautifully with full-bodied beverages. Apple cider makes a thematic choice that echoes the braising liquid. Sparkling water with lemon provides refreshing contrast. Hot tea or coffee complements the meal for cozy evening dining.
Storage and Reheating Tips
Proper Storage Methods
Allow the pot roast to cool to room temperature before refrigerating. Store meat and gravy together in an airtight container to prevent drying. The fat will solidify on top, creating a protective seal that preserves freshness. Properly stored pot roast lasts four to five days in the refrigerator.
Store crispy potatoes separately in a different container. They tend to lose crispness when stored with liquid. However, they still taste delicious reheated, just with softer texture.
Freezing Instructions
Pot roast freezes exceptionally well for up to three months. Portion into meal-sized containers with gravy for convenient future dinners. Label with the date and contents clearly. Thaw overnight in the refrigerator before reheating.
Avoid freezing the crispy potatoes, as they become mushy when thawed. Instead, prepare fresh potatoes when serving frozen pot roast.
Reheating for Best Results
Reheat pot roast gently in a covered Dutch oven or pot on the stovetop over low heat. Add a splash of beef broth if the gravy seems too thick. Alternatively, microwave individual portions in 90-second intervals, stirring between heating cycles.
For potatoes, refresh them in a 400°F oven for 10 to 15 minutes to restore some crispness. Spread them on a baking sheet without crowding for best results. They won’t be quite as crispy as fresh, but they’ll improve significantly.
Troubleshooting Common Issues
Tough or Chewy Meat
If your pot roast turns out tough, it simply hasn’t cooked long enough. Return it to the oven for another 30 to 60 minutes. The meat needs sufficient time for collagen to break down completely. Additionally, ensure your oven maintains proper temperature throughout cooking.
Using too high a temperature causes meat to toughen before it becomes tender. Keep the oven at 325°F or below for best results. Furthermore, choosing the wrong cut of meat leads to poor outcomes regardless of cooking time.
Watery or Thin Gravy
Excessive liquid creates thin, watery gravy. Remember to add liquid only halfway up the roast, not covering it completely. If the gravy turns out too thin despite proper liquid levels, create a thickening slurry.
Mix equal parts softened butter and flour into a paste called beurre manié. Whisk small amounts into the simmering braising liquid until desired thickness develops. Alternatively, remove the meat and vegetables, then simmer the liquid uncovered to reduce it.
Soggy Potatoes
Potatoes turn soggy when they retain too much moisture before roasting. Always drain them thoroughly after boiling and let them steam-dry for five minutes. Shaking the pot to rough up surfaces increases crispiness.
Using insufficient oil or overcrowding the pan also causes soggy results. Give potatoes plenty of space on the baking sheet. Additionally, ensure your oven reaches full temperature before adding potatoes.
Burned Sage or Butter
Sage butter burns easily if the heat is too high or cooking progresses too quickly. Always use low heat when browning butter. The process should take several minutes, allowing gradual color development.
Watch the butter carefully as it approaches golden brown. Remove from heat immediately when it smells nutty and toasted. The butter continues cooking slightly from residual heat even after removing from the burner.
Frequently Asked Questions
Can I make Cider Braised Pot Roast in a slow cooker?
Yes, this recipe adapts well to slow cooker preparation. Sear the meat in a skillet first, then transfer everything to the slow cooker. Cook on low for eight to ten hours or on high for four to six hours. The meat should fall apart easily when done. Add vegetables during the last two hours of cooking to prevent them from becoming mushy.
What’s the best way to slice pot roast?
Always slice pot roast against the grain for maximum tenderness. Look for the direction of the muscle fibers and cut perpendicular to them. Use a sharp knife and cut slices about half an inch thick. The meat should be so tender it nearly falls apart during slicing.
Can I prepare components ahead of time?
Absolutely, advance preparation makes this dish even more convenient. Sear the meat and prepare the braising liquid up to 24 hours ahead. Store covered in the refrigerator, then proceed with braising when ready. Parboil potatoes several hours ahead and store them uncovered in the refrigerator to dry thoroughly.
How do I know when the pot roast is fully cooked?
The roast is done when it reaches an internal temperature of 200°F to 210°F and offers no resistance to a fork. The meat should shred easily when pulled with two forks. If it still feels firm or springs back, continue cooking. Visual cues include the meat pulling away from any bones and deep browning on the surface.
Why did my cider braised pot roast turn out dry?
Dry pot roast usually results from overcooking at too high a temperature or insufficient liquid. Make sure your oven stays at 325°F or below throughout braising. Additionally, use enough liquid to cover the roast halfway. Choosing a well-marbled chuck roast rather than lean cuts prevents dryness.
Can I double this recipe for a crowd?
You can double the recipe, but use two separate Dutch ovens rather than one large pot. Overcrowding prevents proper browning and heat circulation. If you only have one Dutch oven, cook the roasts sequentially rather than simultaneously. The braising liquid can be doubled easily without issues.
Conclusion
Cider Braised Pot Roast with Crispy Sage Potatoes delivers comfort, flavor, and elegance in every bite. The tender, slow-cooked beef paired with golden potatoes creates a complete meal that satisfies both family and guests. This recipe proves that simple ingredients and proper technique produce extraordinary results. The apple cider adds unique sweetness while the sage brings earthy depth that elevates the entire dish. Whether you’re cooking for a special occasion or a cozy Sunday dinner, this pot roast promises to become a beloved tradition in your kitchen.
Try this recipe this weekend and discover why braised pot roast remains a timeless classic. Share your results with family and friends, and don’t forget to save the leftovers for delicious next-day sandwiches. The flavors only improve as they meld together overnight.
Print
Cider Braised Pot Roast with Crispy Sage Potatoes
Description
Cider Braised Pot Roast with Crispy Sage Potatoes
Ingredients
For the Pot Roast:
-
3–4 lb (1.5–2 kg) beef chuck roast
-
Salt and pepper, to taste
-
2 tbsp olive oil
-
2 onions, sliced
-
3–4 garlic cloves, minced
-
3 carrots, cut into chunks
-
2–3 celery stalks, cut into chunks
-
2 cups apple cider
-
1 cup beef broth
-
2 tbsp tomato paste
-
2 tsp fresh thyme or 1 tsp dried
-
2 tsp fresh rosemary or 1 tsp dried
-
2 bay leaves
For the Crispy Sage Potatoes:
-
1 lb (450 g) baby or Yukon gold potatoes, halved
-
2 tbsp olive oil or butter
-
1–2 tsp fresh sage, finely chopped
-
Salt and pepper
Instructions
1. Prepare the Pot Roast
-
Preheat oven to 325°F (160°C).
-
Season beef generously with salt and pepper.
-
Heat olive oil in a large oven-safe pot or Dutch oven over medium-high heat. Sear beef on all sides until browned, about 4–5 minutes per side. Remove and set aside.
2. Build the Braise
-
Add onions, garlic, carrots, and celery to the pot. Sauté 5–6 minutes until slightly softened.
-
Stir in tomato paste and cook 1 minute.
-
Pour in apple cider and beef broth, scraping up browned bits.
-
Return roast to the pot. Add thyme, rosemary, and bay leaves. Bring to a simmer.
3. Braise
-
Cover and place in the oven.
-
Cook 2.5–3 hours, until the beef is fork-tender.
4. Prepare Crispy Sage Potatoes
-
About 45 minutes before the roast is done, preheat oven to 400°F (200°C) (or use a separate baking sheet).
-
Toss potatoes with olive oil, sage, salt, and pepper.
-
Roast for 30–40 minutes, turning halfway, until golden and crispy.
5. Serve
-
Slice or shred the roast. Serve alongside crispy sage potatoes and drizzle with pan juices.