
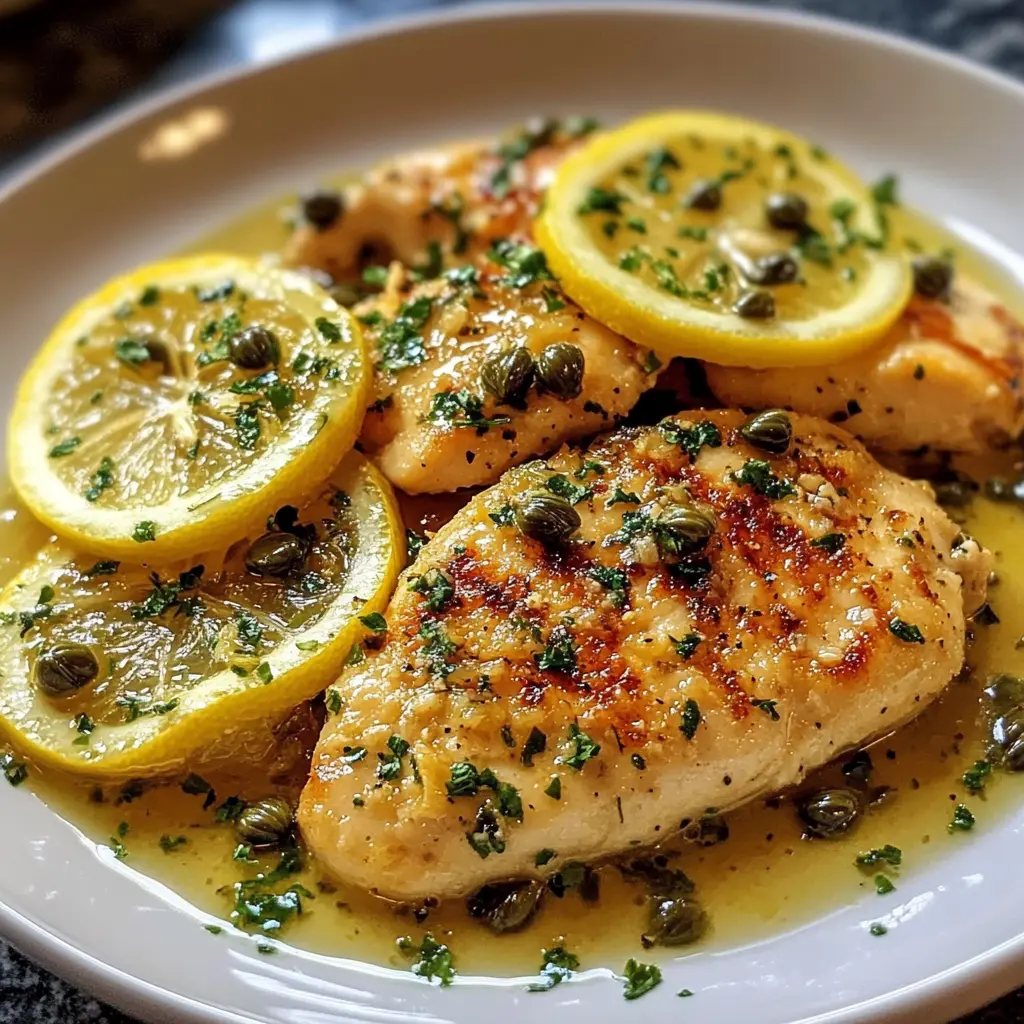
The Ultimate Classic Chicken Piccata with Zesty Lemon Caper Sauce: A Restaurant-Quality Recipe
Craving a dinner that’s both breathtakingly elegant and surprisingly simple to pull off? Well, you’re in for a treat! This article is your ultimate guide to mastering Classic Chicken Piccata, a dish that sings with bright, bold flavors. We’re talking about tender, pan-seared cutlets swimming in a luxuriously tangy lemon caper sauce that’s nothing short of magic.
Forget dry, boring chicken; this recipe is a total game-changer. Honestly, it transforms a few humble ingredients into a show-stopping meal that feels straight from a fancy Italian trattoria. Furthermore, we’ll walk through every single step, from pounding the chicken to perfection to emulsifying that iconic sauce. So, get ready to unlock the secrets behind this beloved Italian-American classic and impress everyone at your dinner table. Let’s dive in!
Introduction & The Allure of the Dish
Introduction: The Bright, Bold Flavors of Chicken Piccata
Picture this: a skillet sizzles on the stove, releasing an irresistible aroma of garlic and fresh lemon. Inside, golden-brown chicken cutlets bask in a vibrant, buttery sauce, dotted with briny capers and a confetti of green parsley. That, right there, is the magic of Classic Chicken Piccata. It’s a dish that doesn’t just feed you; it awakens your senses with its symphony of zesty, savory, and rich flavors.
Essentially, this beloved Italian-American recipe is a masterpiece of simplicity. It proves that you don’t need a pantry full of obscure ingredients to create something truly spectacular. In fact, the magic lies in the perfect balance of a few key components. Conversely, if you’ve ever been disappointed by a bland, one-note version, fear not! This guide will ensure your homemade Chicken Piccata is bursting with flavor and has that perfect, restaurant-quality sauce consistency. Ultimately, it’s about mastering a few simple techniques that make all the difference.
Why This Recipe Works
So, what sets this particular method apart from the rest? For starters, we focus on achieving a perfect balance in every single bite. The sauce isn’t just lip-puckeringly tart; it’s a harmonious blend of bright lemon, rich butter, and savory pan drippings. Moreover, this recipe is incredibly quick and easy, making it a perfect candidate for a busy weeknight that still demands something special. Finally, we’re all about the why behind each step. Understanding the technique—like why we use cold butter or pound the chicken thin—guarantees foolproof success every single time you make it.
Understanding Chicken Piccata & Key Ingredients
What is Chicken Piccata? A Brief Culinary History
Alright, let’s get down to brass tacks: what exactly is piccata? Interestingly, the name offers a big clue. It’s derived from the Italian word “piccato,” which translates to “larded” or “pounded.” This, of course, refers directly to the essential preparation method of the meat! While its roots are firmly planted in Italian cuisine, specifically from the Lombardy region where Veal Piccata is a classic, the chicken version we know and love is a brilliant Italian-American creation.
Therefore, when we talk about Classic Chicken Piccata, we’re referring to a specific formula. It involves thinly pounded chicken cutlets, lightly dredged in flour, and pan-fried to a beautiful golden brown. However, the real star of the show is undoubtedly the sauce—a vibrant, pan-sauce made with lemon juice, broth, and those signature briny capers. It’s a dish that’s both rustic and refined, all at the same time.
The Symphony of Flavors: Deconstructing the Zesty Lemon Caper Sauce
Ever wonder why this dish is so downright addictive? The answer lies in the incredible balance of its sauce. Each ingredient plays a crucial, non-negotiable role in building depth and complexity.
First, the lemon provides the essential bright, acidic backbone that makes your taste buds stand at attention. Secondly, the capers burst onto the scene with their punchy, salty, and briny flavor, cutting through the richness perfectly. Then, we have the aromatics like garlic and shallot, which create a savory foundation that makes the entire sauce smell incredible. Finally, and most importantly, the butteris whisked in to create a rich, velvety, and luxurious emulsion that beautifully balances all the sharp, zesty notes. It’s a true symphony in a skillet!
Gathering Your Ingredients: A Checklist for Success
Believe it or not, the road to perfect piccata starts at the grocery store. Using high-quality, fresh ingredients isn’t just a suggestion; it’s the absolute key to unlocking the best flavor.
The Chicken and Dredge
-
Chicken Breasts: You’ll need two large, boneless, skinless chicken breasts (about 1.5 lbs total). We’ll be butterflying and pounding them, so their starting size isn’t too critical.
-
All-Purpose Flour: This is for the light dredge. It creates a delicate golden crust and, later, helps thicken the sauce just slightly.
-
Kosher Salt and Freshly Ground Black Pepper: Seasoning every layer is non-negotiable for a flavorful dish.
The Aromatics and Sauce
-
Fresh Lemons: Please, I beg you, do not use bottled juice! You need the bright, true flavor of 2-3 fresh lemons, both for their juice and their zest.
-
Capers: Brine-packed capers are most common. Remember to give them a quick rinse to wash away excess salt.
-
Chicken Broth: A good-quality, low-sodium broth is recommended so you can control the seasoning yourself.
-
Shallot & Garlic: One small shallot and two fresh garlic cloves finely minced will create an aromatic base that’s far superior to onions.
-
Unsalted Butter: Using unsalted butter is another way to be the boss of your own salt levels.
-
Fresh Italian Parsley: This is for garnish, adding a necessary fresh, green note right at the end.
The Step-by-Step Cooking Guide
How to Make Classic Chicken Piccata: A Step-by-Step Visual Guide
Alright, enough talk—let’s get cooking! This process moves quickly, so it’s wise to have all your ingredients prepped and within arm’s reach. This is called your mise en place, and it’s a total game-changer for any quick weeknight dinner.
Step 1: Preparing the Chicken Cutlets
This step is the most important one for achieving tender, quick-cooking chicken. Don’t even think about skipping it! First, place one chicken breast on a cutting board and cover it with a piece of plastic wrap. Then, using the flat side of a meat mallet or the bottom of a heavy skillet, gently pound the chicken from the center outward until it’s an even ¼-inch thickness.
Why is this so crucial? Well, an even thickness means the chicken will cook uniformly in the pan. Otherwise, you’ll end up with a dried-out, overcooked thin end and an undercooked, dangerous thick end. Once pounded, pat each cutlet completely dry with paper towels. This is the secret to getting that gorgeous, golden-brown sear instead of a pale steam.
Step 2: The Dredging Station
Next, it’s time for a little coating. On a large plate or shallow dish, combine your flour with a generous amount of salt and pepper. Now, dredge each dried chicken cutlet in the flour mixture, making sure to shake off any and all excess flour. You want a very light, almost invisible dusting.
Here’s a pro tip: a heavy, caky coating of flour will simply sludge up your beautiful sauce later. Conversely, a light dredge will create a delicate crust, help the chicken brown nicely, and act as a slight thickening agent for the sauce. It’s a win-win-win!
Step 3: Pan-Searing to Perfection
Now, for the sizzle! Heat a tablespoon of olive oil and a tablespoon of your unsalted butter in a large skillet (stainless steel or cast iron are perfect) over medium-high heat. Once the butter is foamy, carefully add your chicken cutlets. Importantly, do not overcrowd the pan! Cook them in two batches if you have to.
As the chicken cooks, resist the urge to move it around! Let it cook undisturbed for a full 2-3 minutes on the first side. This allows that perfect, golden-brown crust to form. Peek underneath; if it’s beautifully golden, flip and cook for another 2-3 minutes on the other side until cooked through. Finally, transfer the cooked chicken to a clean plate and tent it with foil to keep warm.
Step 4: Building the Legendary Lemon Caper Sauce
This is where the real magic happens! Your pan will have little browned bits stuck to the bottom. That’s not mess—that’s pure flavor gold called fond. We’re going to use it to create an incredible sauce.
-
Sauté Aromatics: Reduce the heat to medium. Add another tablespoon of butter to the skillet. Then, add your minced shallot and cook until softened, about 1-2 minutes. Add the garlic and cook for just 30 more seconds until fragrant.
-
Deglaze the Pan: This is the most satisfying step. Pour in your chosen liquid (like additional broth) and immediately use a wooden spoon to scrape all those browned bits off the bottom of the pan. Let the liquid simmer and reduce by about half. This step is the foundation of your sauce’s depth; for more on this essential technique, read about the science behind building a perfect pan sauce.
-
Add Broth and Lemon: Now, pour in the chicken broth and your fresh lemon juice. Bring this mixture to a lively simmer and let it cook for a few minutes, allowing it to reduce again by about a third. This concentrates the flavor wonderfully.
-
Mount with Butter: This is the chef’s secret for a glossy, restaurant-style sauce. Reduce the heat to its lowest setting. Then, add the remaining cold butter, one small pat at a time, whisking constantly until each piece is fully melted and incorporated before adding the next. The sauce will transform before your eyes, becoming slightly thicker and incredibly shiny.
-
Final Flavors: Turn off the heat. Stir in the rinsed capers and half of your chopped fresh parsley. Give the sauce a taste—this is your moment! Season with more salt and pepper if it needs it. Sometimes a tiny pinch of sugar can balance out excessive tartness.
Step 5: Bringing It All Together
You’re moments away from glory! Return the cooked chicken cutlets and any accumulated juices from the plate back into the skillet. Spoon that glorious zesty lemon caper sauce all over the chicken, ensuring every nook and cranny is covered. Let it warm through for just a minute over low heat.
To serve, place a chicken cutlet on each plate and drown it in more sauce. Garnish extravagantly with lemon slices, a few extra capers, and the remaining fresh parsley. Serve immediately—this dish waits for no one!
Expert Tips, Variations, and Serving
Chef’s Secrets: Pro Tips for the Best Chicken Piccata
Want to take your dish from great to mind-blowing? Here are some insider tips that make all the difference:
-
The Pan Matters: Always use a heavy-bottomed skillet like stainless steel or cast iron. They distribute heat evenly, preventing hot spots that can burn your sauce or cook the chicken unevenly.
-
Cold Butter is Key: When mounting your sauce (monter au beurre), using cold butter and whisking it in off the direct heat is what creates a smooth, emulsified sauce. Using warm butter or leaving it on the heat will give you a greasy, broken sauce.
-
Taste and Adjust as You Go: Is the sauce too tangy for your liking? A tiny pinch of sugar can work wonders to balance the acidity. Not tangy enough? A little more lemon juice will fix that!
-
Avoid Reactive Pans: Be cautious with aluminum or non-stick skillets. Aluminum can react with the lemon juice and create a metallic flavor, while non-stick pans often don’t develop fond as well.
Delicious Variations and Substitutions
The basic framework of this dish is wonderfully adaptable. Here’s how to mix it up:
-
Protein Swap: This method works beautifully with thin veal scaloppini, turkey cutlets, or even firm white fish like sole or cod (then it becomes Piccata di Pesce!).
-
Creamy Piccata: For a richer, decadent twist, stir in a couple of tablespoons of heavy cream or half-and-half at the very end, after you’ve mounted the sauce with butter.
-
Gluten-Free: Easily make this a gluten-free chicken piccata by using your favorite 1:1 gluten-free flour blend for the dredging step. The result is identical!
What to Serve with Chicken Piccata: The Perfect Pairings
This dish is the star, but it needs a supporting cast! Here are the classic pairings that sop up every last drop of that incredible sauce:
-
Pasta: This is the most traditional route. A bed of angel hair, linguine, or fettuccine is perfect for absorbing the sauce.
-
Vegetables: Keep it light with a side of roasted asparagus, sautéed green beans, broccoli, or a simple arugula salad with a light vinaigrette.
-
Starches: Creamy mashed potatoes or a simple risotto make a fabulous, comforting base that pairs beautifully with the zesty sauce.
-
Bread: Never underestimate the power of a thick slice of crusty bread for wiping your plate clean!
FAQs, Storage, and Conclusion
Frequently Asked Questions (FAQs)
What does “Piccata” mean?
The term “piccata” comes from the Italian word “piccato,” which means “larded” or “pounded.” It directly refers to the technique of pounding the meat thin before cooking, which is essential for this dish.
Can I make Chicken Piccata ahead of time?
This dish is absolutely best served immediately after cooking. However, you can do a lot of prep ahead to make it faster! You can pound the chicken cutlets, store them wrapped in the fridge, and juice your lemons beforehand. Unfortunately, the sauce doesn’t reheat well as the butter can separate.
How do I store and reheat leftovers?
If you do have leftovers, store them in an airtight container in the refrigerator for up to 2 days. To reheat, do so very gently in a skillet over low heat. Adding a tiny splash of broth or water can help re-emulsify the sauce. Avoid the microwave, as it will likely cause the sauce to separate and become oily.
Why is my sauce oily or separated?
This usually happens if the heat was too high when you added the butter, or if the butter wasn’t cold. To fix a broken sauce, remove it from the heat immediately and whisk in a tablespoon of cold broth or water. This can sometimes bring it back together.
Are capers necessary? What can I use instead?
Capers provide the classic salty, briny flavor that defines the dish. If you truly must substitute, chopped green olives (like Castelvetrano) could work in a pinch, but the flavor profile will be different. For a deeper dive into its origins, you can explore traditional Italian veal preparations from Milan.
How to Store and Reheat Leftovers
-
Storage: Cool completely and place in an airtight container. It will keep in the fridge for 1-2 days.
-
Reheating: Gently warm in a skillet over low heat with a splash of water or broth, stirring occasionally until warmed through.
Conclusion: Your New Signature Dish
And there you have it! You’ve just mastered the art of Classic Chicken Piccata with Zesty Lemon Caper Sauce. This isn’t just another recipe; it’s a fundamental technique that will serve you for years to come. It’s elegant enough for a date night yet simple enough for a regular Tuesday. It’s a dish that speaks the universal language of good, honest, and incredibly delicious food.
So, don your apron, grab your skillet, and get ready for the compliments to roll in. You’re not just making dinner; you’re creating a experience. For detailed nutritional information, you can always check the nutritional information for chicken breast at the USDA’s database. Now, go forth and cook with confidence
Classic Chicken Piccata with Zesty Lemon Caper Sauce
Description
🍋 Classic Chicken Piccata with Zesty Lemon Caper Sauce
Ingredients:
-
2 large boneless, skinless chicken breasts (halved horizontally)
-
½ cup all-purpose flour (for dredging)
-
½ tsp salt
-
½ tsp black pepper
-
3 tbsp olive oil
-
3 tbsp unsalted butter (divided)
-
3 cloves garlic, minced
-
½ cup dry white wine (or chicken broth)
-
½ cup chicken broth
-
¼ cup fresh lemon juice (about 2 lemons)
-
3 tbsp capers, drained
-
2 tbsp fresh parsley, chopped
-
Lemon slices, for garnish
Instructions:
-
Prepare the chicken:
-
Slice chicken breasts horizontally to create cutlets.
-
Season with salt and pepper, then dredge lightly in flour, shaking off excess.
-
-
Cook the chicken:
-
Heat olive oil and 2 tbsp butter in a skillet over medium-high heat.
-
Cook chicken 3–4 minutes per side until golden and cooked through (165°F). Remove and keep warm.
-
-
Make the sauce:
-
In the same skillet, add garlic and sauté briefly.
-
Deglaze with white wine, scraping up browned bits. Let reduce by half.
-
Stir in chicken broth, lemon juice, and capers. Simmer for 3–4 minutes.
-
-
Finish:
-
Whisk in the remaining 1 tbsp butter until silky.
-
Return chicken to skillet, spooning sauce over to coat.
-
-
Serve:
-
Garnish with parsley and lemon slices.
-
Serve with pasta, rice, or roasted vegetables.
-