
Introduction & The Allure of the Gourmet Donut
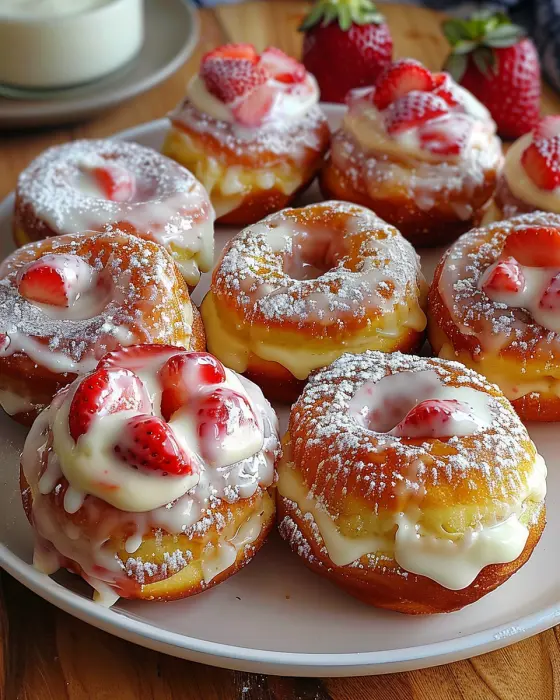
Ah, the humble donut. It’s a classic treat, for sure, but let’s be honest—sometimes that simple glaze just doesn’t cut it. When a serious craving hits, you need something extraordinary; you need a masterpiece. Imagine, if you will, biting into a cloud-like, fluffy yeast donut, its exterior delicately golden and faintly crisp. Now, picture that first bite giving way to an incredible, luscious core of sweet, tangy strawberry cheesecake filling. That, my friends, is the magic we’re creating today. This isn’t just a recipe; it’s a full-blown experience, a project that transforms your kitchen into a gourmet bakery for a day.
Furthermore, while these stuffed donuts might look like they belong behind a fancy glass case, I promise you they are entirely within your reach. This guide will walk you through every single step, from activating your yeast with confidence to mastering the art of the perfect fry. We’ll cover the silky cheesecake filling, the vibrant homemade strawberry compote, and all the pro tips in between. So, roll up your sleeves, and let’s embark on this delicious journey to create the most unforgettable Fluffy Strawberry Cheesecake Stuffed Donuts you’ve ever tasted.
Deconstructing the Dream: What Makes This Donut Special
Before we dive into the mixing bowls, let’s take a moment to appreciate the genius of this creation. Understanding its parts is, believe it or not, the first step to mastering it. This isn’t just a random pile of ingredients; it’s a symphony of textures and flavors, each element playing a crucial role.
First up, the “Fluffy” Factor. The foundation of our masterpiece is a yeast-risen dough. Unlike a denser, cake-like donut that uses baking powder, a yeast dough is alive. It ferments, it proofs, and it expands, creating those beautiful air pockets that result in a phenomenally light and pillowy texture. It’s a patient process, but oh boy, is it worth it. The contrast between the tender, airy crumb and the rich filling is what dreams are made of.
Next, we have the glorious “Cheesecake” Heart. This isn’t just sweetened cream cheese; it’s a proper no-bake cheesecake filling. We’re talking about full-fat cream cheese whipped with sugar and vanilla until it’s impossibly smooth and tangy. This filling is specifically designed to be sturdy enough to stay put inside the warm donut without turning into a messy liquid. It’s the cool, creamy surprise in the center that makes every single bite pure bliss.
Finally, the “Strawberry” Swirl. To cut through the richness, we bring in the vibrant, fruity note of strawberry. Typically, we achieve this in two ways: a homemade strawberry compote swirled directly into the cheesecake filling and, often, a gorgeous pink glaze drizzled on top. Using fresh strawberries, when in season, provides a burst of authentic flavor that simply can’t be beaten. However, a high-quality preserve can work in a pinch for a quicker version! Just remember to always start with properly washing fresh strawberries if that’s the route you take.
Gathering Your Donut-Making Arsenal
Alright, let’s get down to business! Every great artist needs their tools, and today, you are the artist. Gathering everything you need before you start—a French culinary concept called mise en place—is the ultimate secret to a stress-free, enjoyable baking experience. Trust me, you don’t want to be searching for the cornstarch while your oil is overheating.
Ingredient Checklist:
-
For the Donut Dough: Whole milk, granulated sugar, active dry yeast, all-purpose flour, salt, egg yolks, unsalted butter, and a neutral oil for frying (like vegetable or canola).
-
For the Strawberry Compote: Fresh strawberries, granulated sugar, lemon juice, and a pinch of salt.
-
For the Cheesecake Filling: Full-fat block cream cheese (not spreadable tubs), powdered sugar, vanilla extract, and a pinch of salt.
-
For the Glaze (Optional): Powdered sugar, milk or cream, vanilla extract, and a bit of the reserved compote for color and flavor.
Essential Tools of the Trade:
-
A stand mixer fitted with a dough hook makes the kneading process a breeze. (You can absolutely do this by hand, but it will be a workout!)
-
A heavy-bottomed pot or Dutch oven is crucial for maintaining the perfect oil temperature for frying.
-
A candy or deep-fry thermometer. Do not skip this! Guessing the oil’s temperature is the fastest route to greasy, sad donuts.
-
A piping bag fitted with a medium round tip (like a Wilton #12) for stuffing. A ziplock bag with the corner snipped off is a fine backup.
-
A slotted spoon, spider strainer, or even a pair of chopsticks for flipping and removing the donuts from the hot oil.
-
A wire cooling rack set over a baking sheet. This allows air to circulate around the freshly fried donuts, keeping the bottoms from getting soggy.
The Recipe: A Step-by-Step Masterclass
This is it—the main event! Follow these steps carefully, and you’ll be rewarded with nothing short of bakery-quality perfection.
Step 1: Creating the Strawberry Compote
First things first, we need to prepare the star of our show: the strawberry component. This compote is what we’ll swirl into our filling for that gorgeous flavor and color.
Start by hulling and chopping your fresh strawberries into small, relatively even pieces. Consequently, toss them into a small saucepan along with the sugar and a splash of lemon juice. Cook this mixture over medium heat, stirring occasionally. You’ll notice the berries will break down and release their juices, creating a lovely syrup. Let this simmer for about 10-15 minutes until it thickens significantly and coats the back of a spoon. For an even smoother texture, you can mash the berries with a fork or give it a quick blitz with an immersion blender. Remove it from the heat and let it cool completely. This step is non-negotiable; a hot compote will melt your cheesecake filling!
Step 2: Making the Fluffy Yeast Dough
Now, for the foundation. Gently warm the milk until it’s just lukewarm to the touch (about 110°F or 43°C). Importantly, if it’s too hot, it will kill the yeast. Pour it into the bowl of your stand mixer and whisk in a tablespoon of your granulated sugar. Sprinkle the active dry yeast over the top, give it a gentle stir, and then walk away for 5-7 minutes. You’re waiting for it to become foamy and fragrant—this is called “proofing” and it’s your sign that the yeast is alive and active. If nothing happens, your yeast may be old, and you’ll need to start over. For a deeper dive, understanding the science behind activating yeastcan be incredibly helpful.
Once your yeast is foamy, add the remaining sugar, egg yolks, and two cups of flour. Using the dough hook attachment, mix on low until a shaggy dough forms. Then, with the mixer still running, add the softened butter a piece at a time, letting each piece incorporate before adding the next. This might look messy at first, but it will come together! Gradually add the remaining flour and salt until the dough pulls away from the sides of the bowl. It should be soft, slightly tacky, but not sticky. Knead with the machine for another 5-7 minutes until smooth and elastic.
Place this beautiful ball of dough into a greased bowl, turn it over to coat, and cover it with plastic wrap. Find a warm, draft-free spot in your kitchen and let it rise for 1-2 hours, or until it has doubled in size.
Step 3: Shaping, Cutting, and the Second Rise
After the dough has doubled, it’s time to punch it down—gently! This releases the large air bubbles. Turn it out onto a lightly floured surface and roll it out to about a ½-inch thickness. Using a 3-inch round cutter (or a glass), cut out as many donuts as you can. Use a smaller cutter (about 1-inch) for the holes. Carefully transfer the donuts and holes to a parchment-lined baking sheet. Cover them loosely with a clean kitchen towel and let them rise again for another 30-45 minutes. They won’t double this time, but they will look noticeably puffy. When you gently poke one, the indentation should slowly spring back, but not completely.
Step 4: The Art of Frying to Golden Perfection
While the donuts are on their second rise, pour your neutral oil into your heavy-bottomed pot until it’s about 2-3 inches deep. Now, attach your thermometer and heat the oil over medium heat until it reaches a steady 350-370°F (175-185°C). This is the most critical step. Seriously, that thermometer is your best friend here.
Once the oil is ready, carefully lower 2-3 donuts into the pot using a slotted spoon. Don’t crowd them! They need room to swim. They will sink initially and then float to the top. Fry for about 60-90 seconds per side, flipping them once they are a deep golden brown. The holes will cook much faster, so keep a close eye on them! Using your slotted spoon, transfer the finished donuts directly to the wire rack to drain and cool completely before filling.
Step 5: Preparing the Cheesecake Filling
While the donuts are cooling, let’s make the incredible filling. In a medium bowl, beat the room-temperature cream cheese with an electric mixer until it is completely smooth and lump-free. Gradually beat in the powdered sugar, vanilla extract, and a tiny pinch of salt. Now, take about half of your completely cooled strawberry compote and gently fold it into the cheesecake mixture. You want a beautiful marbled, swirled effect, not a fully homogenous pink filling. Cover the bowl and pop it into the fridge to chill and firm up for at least 30 minutes. This makes it infinitely easier to pipe.
Step 6: The Grand Finale: Stuffing the Donuts
The moment of truth! Scoop your chilled filling into a piping bag fitted with a round tip. For each cooled donut, use a small paring knife or a chopstick to poke a hole in the side, wiggling it gently to create a small pocket inside. Insert the piping tip into the hole and gently squeeze the bag, applying steady pressure. You’ll feel the donut get heavier as it fills. Stop when you see the filling just start to peek out of the hole. If you’re glazing, now is the time to do it! Dip the tops of the donuts in a simple vanilla or strawberry glaze and let it set for a few minutes.
Pro Tips, Variations, and Troubleshooting
Even with a perfect recipe, a few insider secrets can make the difference between good and legendary.
Secrets for the Fluffiest Donuts Possible:
-
Weigh Your Flour: For absolute accuracy, use a digital kitchen scale. Volumetric measurements (“cups”) can vary wildly and lead to a dense dough.
-
Patience is a Virtue: Don’t rush the rise times. A warm, draft-free environment is key. If your kitchen is cool, place the dough in your oven with the light on.
-
Temperature Control: Keep that oil steady! Adding cold donuts will cause the temperature to drop, so adjust your burner as needed to keep it in the 350-370°F range.
Flavor Twists and Variations:
-
Different Berries: Swap the strawberries for blueberries, raspberries, or a mix!
-
Chocolate Lover’s Dream: Omit the berry compote and add a tablespoon of cocoa powder to the filling, or fill with a chocolate pastry cream.
-
Baked Option: For a slightly easier method, you can bake the dough in a greased donut pan at 350°F (175°C) for 10-12 minutes. The texture will be more cake-like, but still delicious.
Troubleshooting Common Donut Disasters:
-
Dense Donuts: This is usually due to dead yeast, a too-cold rising environment, or over-kneading the dough.
-
Oily Donuts: The oil temperature was definitely too low. The dough absorbed the oil instead of sealing instantly.
-
Leaking Filling: Your filling was too warm, the donut was still warm, or you might have overfilled it. Ensure everything is cooled and your filling is nicely chilled.
Serving and Storing
These homemade stuffed donuts are truly at their absolute best the day they are made, ideally within a few hours of assembling. The contrast between the tender, fresh dough and the cool, creamy filling is simply magical.
How to Store Leftovers (If You Have Any!):
-
The Fridge: If you must store them, place them in a single layer in an airtight container in the refrigerator for up to 1-2 days. Be aware that the dough will lose some of its fresh, fluffy texture and may become a tad denser.
-
The Freezer: You can freeze the unfilled, fried donuts very successfully. Let them cool completely, then place them in a freezer-safe bag for up to 2 months. Thaw at room temperature and warm slightly in the microwave before filling and serving.
-
Important Warning: Do not freeze filled donuts. The filling will separate and become watery upon thawing, creating a soggy mess.
Frequently Asked Questions (FAQs)
Can I bake these donuts instead of frying them?
Yes, you can! However, the texture will be different. You’ll get a more cake-like donut rather than the classic light and airy yeasted texture. Simply grease a donut pan, place the shaped dough rounds into the wells, let them rise until puffy, and bake at 350°F (175°C) for 10-12 minutes.
How can I make the cheesecake filling thicker?
First, ensure you are using full-fat, brick-style cream cheese. The spreadable kind in tubs has more water and stabilizers. Secondly, make sure you chill the filling thoroughly before attempting to pipe it. If it’s still too soft, you can add a bit more powdered sugar to help thicken it up.
Can I use frozen strawberries for the compote?
Absolutely! Frozen strawberries work wonderfully for compote. There’s no need to thaw them completely beforehand; just add them directly to the pot and add a few extra minutes to the cooking time to break them down.
My yeast didn’t foam. What should I do?
If your yeast mixture didn’t get foamy and fragrant after 10 minutes, the yeast is likely dead. This could be because the liquid was too hot and killed it, or the yeast was too old. Unfortunately, you must start over with a new packet of yeast. Your dough will not rise without active yeast.
How far in advance can I make these?
The components have different lifespans. The strawberry compote can be made 2-3 days ahead and stored in the fridge. The cheesecake filling can be made 1-2 days ahead. The donuts are best fried the day you plan to serve them. For the best quality, assemble (fill and glaze) no more than a few hours before serving.

Fluffy Strawberry Cheesecake Stuffed Donuts
Description
Fluffy Strawberry Cheesecake Stuffed Donuts
Ingredients
For the donuts:
-
3 ½ cups all-purpose flour
-
¼ cup granulated sugar
-
2 ¼ tsp active dry yeast (1 packet)
-
½ tsp salt
-
¾ cup warm milk (110°F)
-
2 tbsp unsalted butter, softened
-
2 large eggs
-
1 tsp vanilla extract
-
Oil, for frying
For the cheesecake filling:
-
8 oz cream cheese, softened
-
½ cup powdered sugar
-
½ cup heavy cream (whipped to stiff peaks)
-
1 tsp vanilla extract
For the strawberry layer:
-
1 cup fresh strawberries, diced
-
2 tbsp sugar
-
1 tsp lemon juice
For rolling:
-
½ cup granulated sugar (or powdered sugar for dusting)
Instructions
-
Make the dough:
-
In a bowl, mix warm milk, yeast, and 1 tbsp sugar. Let it sit 5–10 minutes until foamy.
-
Add in the eggs, butter, remaining sugar, vanilla, and salt. Mix.
-
Gradually add flour and knead until smooth (8–10 minutes by hand or 5 minutes in a stand mixer).
-
Place dough in a greased bowl, cover, and let rise until doubled (about 1–1.5 hours).
-
-
Shape the donuts:
-
Punch down dough and roll out to about ½-inch thick.
-
Cut out rounds using a cookie cutter (about 3 inches wide).
-
Place on parchment-lined trays, cover, and let rise another 30 minutes.
-
-
Fry the donuts:
-
Heat oil in a pot to 350°F (175°C).
-
Fry donuts in batches until golden brown (about 1–2 minutes per side).
-
Drain on paper towels, then roll warm donuts in sugar.
-
-
Make the fillings:
-
For the strawberry layer: In a saucepan, cook strawberries, sugar, and lemon juice until jammy (5–7 minutes). Let cool.
-
For the cheesecake filling: Beat cream cheese and powdered sugar until smooth. Fold in whipped cream and vanilla until fluffy.
-
-
Assemble:
-
Poke a hole in each donut with a skewer or piping tip.
-
Pipe in a bit of cheesecake filling, then a spoonful of strawberry filling.
-
Optionally dust with powdered sugar for extra sweetness.
-