
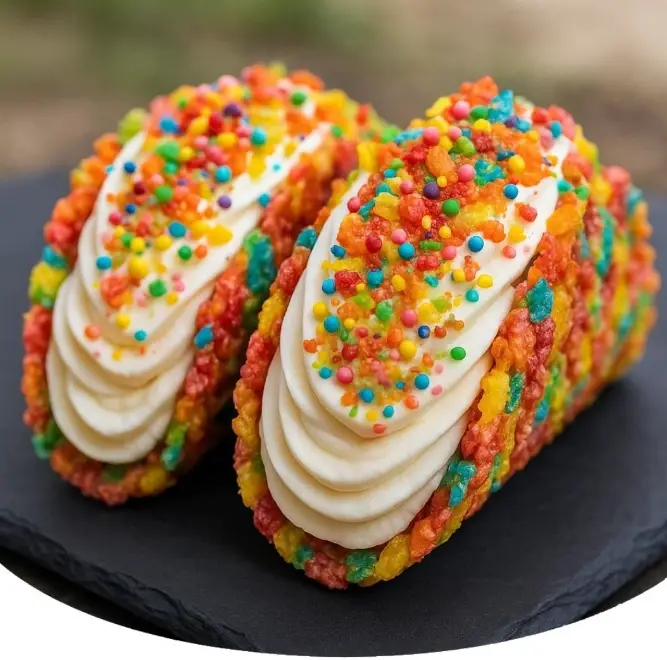
Fruity Pebbles Cheesecake Tacos: The Colorful Dessert That’s Breaking the Internet
If you’re looking for a dessert that’s fun, colorful, and totally unforgettable, let us introduce you to the latest viral treat: Fruity Pebbles Cheesecake Tacos. Imagine crispy cereal taco shells filled with silky no-bake cheesecake filling and topped with whipped cream, sprinkles, and even more Fruity Pebbles.
This recipe is a rainbow dream come true—and it’s not just for kids! Whether you’re planning a birthday bash, baby shower, summer party, or just want to brighten someone’s day, these cheesecake tacos are guaranteed to be the star of the dessert table.
Why You’ll Love Fruity Pebbles Cheesecake Tacos
Here’s why this easy and vibrant dessert is a must-make:
-
Fun to make, fun to eat – Like a taco, but way sweeter.
-
No-bake filling – Light, creamy cheesecake that comes together in minutes.
-
Customizable – Fill them with fresh fruit, drizzle with white chocolate, or add candy toppings.
-
Kid-approved and party-perfect – Bright colors and playful presentation make it an instant crowd-pleaser.
📝 Ingredients You’ll Need
Let’s break down the components of this playful dessert taco:
For the Cereal Taco Shells:
-
2 ½ cups Fruity Pebbles cereal
-
1 (10 oz) bag mini marshmallows
-
3 tbsp unsalted butter
For the Cheesecake Filling:
-
1 (8 oz) block cream cheese, softened
-
½ cup powdered sugar
-
1 tsp vanilla extract
-
1 cup heavy whipping cream
Toppings (Optional but Highly Recommended):
-
Whipped cream
-
Extra Fruity Pebbles
-
Fresh fruit (sliced strawberries, bananas, or blueberries)
-
White chocolate drizzle
-
Rainbow sprinkles
👩🍳 Step-by-Step Instructions
Step 1: Make the Fruity Pebbles Taco Shells
These taco shells are basically Fruity Pebbles cereal treats shaped into taco form.
-
In a large saucepan, melt the butter over medium heat.
-
Add in the mini marshmallows and stir until completely melted and smooth.
-
Remove from heat and quickly stir in the Fruity Pebbles cereal until well combined.
-
While the mixture is still warm and pliable, spoon portions onto a greased surface or parchment paper.
-
Use a rolling pin to flatten each portion into a thin circle (around 4-5 inches).
-
Carefully fold each circle over a wooden spoon handle, rolling pin, or taco mold to shape like a taco shell.
-
Let set for 15–20 minutes, or until firm enough to hold their shape.
💡 Pro Tip: Work quickly—the cereal mixture hardens fast. Grease your hands to prevent sticking!
Step 2: Make the No-Bake Cheesecake Filling
While your taco shells cool, whip up this luscious cheesecake filling.
-
In a mixing bowl, beat softened cream cheese, powdered sugar, and vanilla extract until smooth.
-
In a separate bowl, whip the heavy cream until stiff peaks form.
-
Gently fold the whipped cream into the cream cheese mixture until well combined and fluffy.
-
Transfer the filling into a piping bag (or a zip-top bag with the tip cut off) for easy assembly.
Step 3: Assemble the Cheesecake Tacos
Now the fun part—filling and decorating!
-
Pipe the cheesecake mixture into each taco shell, filling generously.
-
Top with whipped cream, extra Fruity Pebbles, sprinkles, or fresh fruit.
-
Optional: Drizzle with melted white chocolate for extra flair.
Step 4: Serve & Enjoy
These are best enjoyed fresh while the shells are crisp. Serve on a platter with napkins nearby—things might get deliciously messy!
🧊 Storage & Make-Ahead Tips
-
Taco shells: Can be made ahead and stored in an airtight container at room temperature for up to 2 days.
-
Cheesecake filling: Can be stored in the refrigerator for up to 3 days. Assemble tacos just before serving to keep the shells crunchy.
-
Freezing? Not recommended, as the cereal shells can become soggy.
🌈 Creative Variations
Want to put your own spin on this TikTok-famous treat? Here are some creative ideas:
-
Chocolate Pebbles Version – Use Cocoa Pebbles for a chocolate twist.
-
Mini Tacos – Make bite-sized versions for party trays.
-
Dipped Shells – Dip the edges of the cereal shells in melted white chocolate and sprinkles.
-
Fruit-Stuffed – Add sliced strawberries, bananas, or blueberries for a fruity pop.
-
Birthday Bash Edition – Add confetti sprinkles to the filling for a funfetti effect.
🎉 Perfect for Parties & Kids’ Activities
Fruity Pebbles Cheesecake Tacos are the ultimate birthday party dessert or interactive family cooking activity. Kids love helping shape the shells and decorate the tacos with all their favorite toppings. You can even set up a DIY dessert taco bar where guests build their own.
PrintFruity Pebbles Cheesecake Tacos
Ingredients
For the Fruity Pebbles Taco Shells:
- 3 cups Fruity Pebbles cereal
-
4 cups mini marshmallows
-
3 tbsp unsalted butter
-
Non-stick spray or butter (for greasing)
For the No-Bake Cheesecake Filling:
-
8 oz cream cheese, softened
-
1/2 cup powdered sugar
-
1 tsp vanilla extract
-
1 cup heavy whipping cream (cold)
Optional Toppings:
-
Whipped cream
-
Extra Fruity Pebbles
-
White chocolate drizzle
-
Fresh berries
Instructions
Step 1: Make the Fruity Pebbles Taco Shells
These taco shells are basically Fruity Pebbles cereal treats shaped into taco form.
-
In a large saucepan, melt the butter over medium heat.
-
Add in the mini marshmallows and stir until completely melted and smooth.
-
Remove from heat and quickly stir in the Fruity Pebbles cereal until well combined.
-
While the mixture is still warm and pliable, spoon portions onto a greased surface or parchment paper.
-
Use a rolling pin to flatten each portion into a thin circle (around 4-5 inches).
-
Carefully fold each circle over a wooden spoon handle, rolling pin, or taco mold to shape like a taco shell.
-
Let set for 15–20 minutes, or until firm enough to hold their shape.
💡 Pro Tip: Work quickly—the cereal mixture hardens fast. Grease your hands to prevent sticking!
Step 2: Make the No-Bake Cheesecake Filling
While your taco shells cool, whip up this luscious cheesecake filling.
-
In a mixing bowl, beat softened cream cheese, powdered sugar, and vanilla extract until smooth.
-
In a separate bowl, whip the heavy cream until stiff peaks form.
-
Gently fold the whipped cream into the cream cheese mixture until well combined and fluffy.
-
Transfer the filling into a piping bag (or a zip-top bag with the tip cut off) for easy assembly.
Step 3: Assemble the Cheesecake Tacos
Now the fun part—filling and decorating!
-
Pipe the cheesecake mixture into each taco shell, filling generously.
-
Top with whipped cream, extra Fruity Pebbles, sprinkles, or fresh fruit.
-
Optional: Drizzle with melted white chocolate for extra flair.