
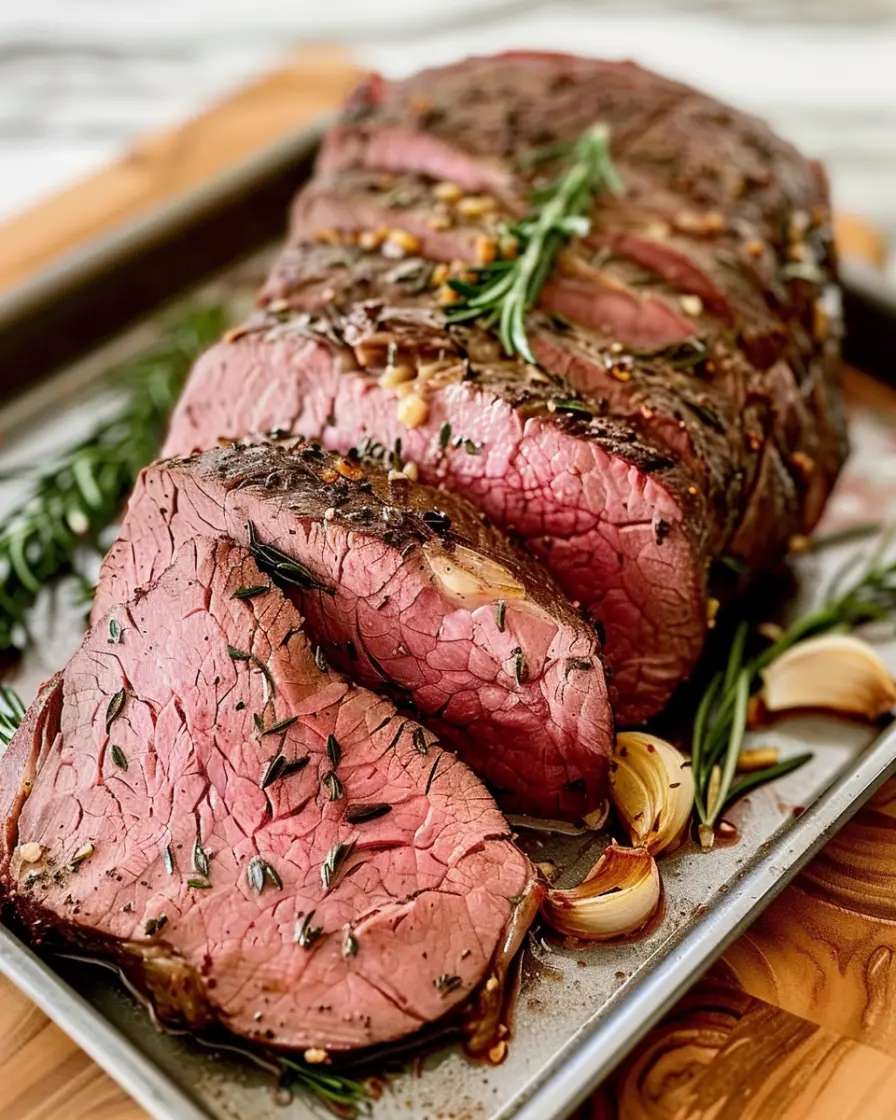
The Ultimate Garlic Lovers Roast Beef: A Guide to Succulent, Flavor-Packed Perfection
Introduction & The Foundation of Flavor
Ah, can you smell it? The unmistakable, glorious aroma of roasting garlic and savory beef that wafts through the house, promising a meal that’s nothing short of spectacular. This isn’t just dinner; it’s an event, a centerpiece, a culinary hug. For those of us who believe that too much garlic is a myth and a perfectly cooked roast is a form of art, you’ve landed in the right place. Furthermore, this guide is designed to be your ultimate companion, transforming you from a hopeful cook into a confident master of the Garlic Lovers Roast Beef.
Ultimately, the magic of this dish lies in its breathtaking simplicity and profound depth of flavor. Imagine it: a beautifully bronzed exterior giving way to a juicy, pink interior that’s utterly infused with the pungent, earthy essence of garlic and herbs. Seriously, is there anything better? Consequently, we’re going to walk through every single step together, leaving absolutely nothing to chance. From selecting your champion cut of beef to crafting a garlic paste that packs a serious punch, consider this your blueprint for success.
Why Garlic and Beef are a Match Made in Culinary Heaven
Let’s be real, some pairings are just destined to be together, and garlic and beef are the power couple of the food world. It’s a partnership built on beautiful contrast and harmony. On one hand, you have the rich, umami-heavy, and sometimes fatty profile of the beef. On the other, you have garlic’s sharp, aromatic, and almost spicy kick that cuts through that richness like a hot knife through butter. This combination doesn’t just add flavor; it creates an entire sensory experience that is both hearty and sophisticated.
Moreover, this dish is incredibly versatile. Are you planning a cozy Sunday family dinner? This is your answer. Need a show-stopping main course for a holiday feast like Christmas or Easter? Look no further. Honestly, a beautifully presented roast beef can turn an ordinary meal into a cherished tradition. It speaks of comfort, generosity, and a little bit of old-school culinary wisdom.
What to Expect in This Guide
Alright, let’s map out our journey! We’re leaving no stone unturned in our quest for the perfect garlic-infused roast. First, we’ll dive deep into the foundation: choosing the absolute best cut of beef for your goals and budget, and selecting the right garlic to make it sing. After that, we’ll get our hands dirty making a truly powerful garlic herb paste that will be the flavor engine of this entire operation.
Next, we’ll march straight into the main event: the cooking process itself. We’ll explore different roasting methods, demystify the critical role of a meat thermometer, and uncover the non-negotiable secret of resting your meat. Then, of course, we’ll whip up a luxurious pan gravy from those precious drippings and learn how to carve and serve our masterpiece like a true pitmaster. Finally, we’ll tackle all your burning questions in a comprehensive FAQ. So, without further ado, let’s get started!
Selecting Your Ingredients & Tools
Listen up, because this is where greatness begins. You simply cannot create a legendary Garlic Lovers Roast Beef with subpar ingredients. Think of it like building a house; a shaky foundation means everything else is doomed to collapse. Conversely, starting with high-quality, well-chosen components sets you up for effortless success and incredible flavor.
Finding the Perfect Cut of Beef for Roasting
Walking into the butcher’s shop can feel overwhelming, right? All those different names and prices! But don’t you worry; we’re going to break it down into two simple categories: the everyday heroes and the splurge-worthy superstar.
Top Tier Cuts: Eye of Round, Sirloin Tip, Top Round
These lean, muscular cuts are the workhorses of the roast beef world. They’re more affordable and, when treated correctly, yield a deliciously savory result that’s perfect for slicing thin.
-
Eye of Round: This is arguably the most popular cut for a classic, lean roast beef. It’s uniform in shape, which helps it cook evenly. However, it has very little fat marbling, so it requires precise cooking to avoid toughness.
-
Sirloin Tip: Another fantastic lean option, the sirloin tip is a bit more tender than the eye of round and boasts a slightly beefier flavor. It’s a great all-rounder.
-
Top Round (Inside Round): Often used for London broil, this cut can also be roasted. It’s a bit broader and flatter, so keep an eye on its cooking time.
The Premium Choice: Standing Rib Roast (Prime Rib)
Oh, the majestic standing rib roast! This is the undisputed king of holiday feasts for a very good reason. It’s characterized by its glorious fat cap and beautiful internal marbling. This fat essentially bastes the meat from the inside as it cooks, resulting in an unbelievably juicy, tender, and flavorful experience. It’s a more significant investment, but for a special occasion, it is absolutely worth it.
The Star of the Show: Selecting and Preparing Your Garlic
This is a “Garlic Lovers” recipe, so we’re not messing around. Put that jar of pre-minced stuff back in the fridge—for this mission, we need the real deal.
Fresh vs. Pre-Minced: Why Fresh is Best
Fresh garlic cloves are an absolute non-negotiable. Why? Because the pungent, complex oils that give garlic its incredible character are at their peak right after being crushed or minced. Pre-minced garlic, often packed in water or citric acid, loses its vibrancy and can impart a slightly tinny or overly sharp flavor. For a dish where garlic is the co-star, fresh is the only way to fly.
How Many Cloves? Measuring Garlic for Maximum Impact
This is no time for timidity! A true garlic lover knows that the measurement is done with the heart, not the measuring spoon. For a robust 3-4 pound roast, you should aim for at least one full head of garlic (about 10-12 cloves), and honestly, two heads is even better. We’re creating a paste that will form a crust, so be generous!
Essential Kitchen Tools for Roast Beef Success
You don’t need a kitchen full of fancy gadgets, but a few key tools are worth their weight in gold:
-
A Sturdy Roasting Pan with a Rack: This is crucial. The rack elevates the meat, allowing hot air to circulate underneath. Consequently, this prevents the bottom from steaming in its own juices and ensures an all-around crispy, caramelized exterior.
-
A Reliable Meat Thermometer: I cannot overstate this. If you take one thing from this guide, let it be this: a good digital meat thermometer is your best friend. It removes all the guesswork and guarantees perfect doneness every single time. Say goodbye to dry, overcooked meat forever!
-
Other Essentials: Sharp knives for trimming and slicing, a sturdy cutting board, and kitchen twine (if your roast needs tying to hold its shape).
The Recipe & Cooking Process
Alright, the prep is done, and it’s time for the main event! This is where we turn our beautiful ingredients into a masterpiece. Follow these steps carefully, and you’ll be rewarded with a roast that will have everyone begging for seconds.
The Ultimate Garlic Lovers Roast Beef Recipe
Prep Time: 20 minutes (plus optional dry brining time)
Cook Time: 1.5 – 2 hours (varies by size and method)
Resting Time: 20 minutes
Total Time: ~3 hours
Servings: 6-8
Ingredients List
For the Garlic-Herb Paste:
-
1-2 whole heads of garlic, cloves peeled and minced (about ¼ – ½ cup)
-
2 tbsp fresh rosemary, finely chopped
-
2 tbsp fresh thyme leaves
-
¼ cup extra virgin olive oil
-
2 tbsp Dijon mustard
-
1 tbsp coarse kosher salt
-
1 tbsp freshly cracked black pepper
-
(Optional) 1 tsp red pepper flakes for a subtle kick
For the Roast:
-
1 (3-4 lb) beef roast (Eye of Round, Sirloin Tip, or Top Round), trimmed
-
1 tbsp coarse kosher salt (for dry brining)
-
1 tbsp olive oil
For the Pan Gravy:
-
Pan drippings from the roast
-
3 tbsp all-purpose flour
-
2 cups beef stock, warmed
-
Salt and pepper to taste
Step-by-Step Instructions
Step 1: Prepping the Beef (The Dry Brine Secret)
This, right here, is your first pro move. The day before you plan to cook, pat the entire beef roastcompletely dry with paper towels. Then, generously season it on all sides with the tablespoon of kosher salt. Place it on a wire rack set over a baking sheet and leave it uncovered in your refrigerator for at least 12, and up to 48, hours.
Why go to all this trouble? This process, called dry brining, works miracles. Firstly, the salt slowly dissolves and penetrates deep into the meat, seasoning it all the way through—something you can’t achieve right before cooking. Secondly, and just as importantly, the uncovered fridge air dries out the surface of the meat. This dry surface is the secret to achieving that incredible, dark, and crispy crust we all crave. It’s a simple step that makes a world of difference.
Step 2: Crafting the Powerful Garlic Herb Paste
An hour or so before you’re ready to cook, take the roast out of the fridge. Meanwhile, let’s make the flavor paste. In a small bowl, combine the minced garlic, chopped rosemary, thyme, olive oil, Dijon mustard, salt, pepper, and red pepper flakes if using. Mash it all together with a fork until it forms a coarse, fragrant paste. Honestly, the smell alone will tell you you’re on the right track!
Step 3: Bringing the Beef to Room Temperature & Applying the Paste
Letting your roast sit on the counter for about 45-60 minutes is a critical step. Why? Because a cold roast straight from the fridge will cook incredibly unevenly; the outside will be overdone before the center even gets warm. After this rest, pat the roast dry one more time—this ensures the paste will stick. Now, using your hands, slather that glorious garlic herb paste all over every single surface of the meat. Press it in there! If you’re feeling adventurous, use a small, sharp knife to make tiny slits all over the roast and stuff slivers of garlic inside for an even more intense flavor.
Step 4: The Roasting Method: Low & Slow vs. High Heat Searing
Now, you have a choice between two excellent methods. Both work wonderfully!
-
Option A: Low and Slow (The Foolproof Method): Preheat your oven to 275°F (135°C). Place the paste-slathered roast on the rack in your roasting pan and slide it into the oven. This gentle heat cooks the meat evenly from edge to center with a very small gray “well-done” band, preserving maximum juiciness.
-
Option B: Sear then Roast (The Classic Method): Preheat your oven to 375°F (190°C). First, heat a tablespoon of oil in a heavy skillet or your roasting pan on the stovetop over high heat. Sear the roast on all sides until a beautiful brown crust forms, about 2-3 minutes per side. Then, transfer it to the oven. This method gives you an instant crust and a slightly more traditional roasted flavor profile.
Step 5: The Non-Negotiable Step: Using a Meat Thermometer
Throw away those old “minutes per pound” charts! They are unreliable guesses. The only way to know exactly when your roast is done is by checking its internal temperature with a digital meat thermometer.
Insert the probe into the thickest part of the meat, making sure not to touch the bone or the pan. Here’s your quick guide to internal temperature for doneness. Remember, the temperature will continue to rise by 5-10°F after you take it out of the oven (this is called “carryover cooking”).
-
Rare: 120-125°F (49-52°C) – Very red and soft
-
Medium Rare: 130-135°F (54-57°C) – This is the sweet spot! Warm red center; perfect juiciness and tenderness.
-
Medium: 140-145°F (60-63°C) – Warm pink center
-
Well Done: 160°F+ (71°C+) – Little to no pink; we don’t recommend this for these cuts.
Step 6: The Critical Resting Period
Once your roast hits about 5-10 degrees below your target temperature, take it out of the oven. Seriously, do not skip this! Transfer the roast to a clean cutting board, tent it very loosely with foil, and walk away for at least 15-20 minutes.
What’s happening during this rest? The muscle fibers, which have tightened up from the heat, finally relax. As they do, all the precious juices that were forced to the center slowly redistribute throughout the entire roast. If you slice it immediately, all those juices will just flood out onto the cutting board, leaving you with dry meat. Patience is truly a virtue here.
Gravy, Carving, and Serving
The roast is resting, the kitchen smells divine, and you’re not done yet! Now we use the incredible browned bits left in the pan to create a show-stopping gravy and learn how to present our masterpiece.
Creating a Rich Garlic and Beef Pan Gravy
Don’t you dare wash that roasting pan! All those dark, crispy bits stuck to the bottom (called the “fond”) are pure flavor gold.
-
Deglaze: Place the roasting pan on the stovetop over medium heat. If there’s a lot of fat, you can pour off all but about 3 tablespoons. Add a splash of beef stock and use a wooden spoon to scrape all those browned bits loose from the pan.
-
Make the Roux: Sprinkle the flour over the drippings and fat. Whisk constantly and cook for about 1-2 minutes until it forms a smooth paste and smells slightly nutty. This cooks out the raw flour taste.
-
Simmer: Gradually pour in the warm beef stock, whisking constantly to avoid lumps. Bring it to a simmer and let it cook for 3-5 minutes until it thickens to a luxurious gravy consistency. Season with salt and pepper to taste. Strain it through a fine mesh sieve for an extra-smooth texture if desired.
How to Carve Roast Beef Like a Pro
Resting time is up! Now for the final act. For lean cuts like eye of round or sirloin tip, carving against the grain is the most important step for tenderness. The “grain” is the direction the muscle fibers run—you can see them as long lines in the meat.
-
Identify the direction of the grain.
-
Using a long, sharp carving knife, slice the meat perpendicular (across) those lines into thin slices, about ¼-inch thick.
-
Cutting against the grain shortens the muscle fibers, making each bite incredibly tender and easy to chew.
Serving Suggestions: The Perfect Accompaniments
Your glorious Garlic Lovers Roast Beef deserves a supporting cast that can keep up!
-
Creamy Mashed Potatoes: The ultimate vehicle for that rich pan gravy.
-
Yorkshire Puddings/Popovers: A classic and delightful pairing for soaking up juices.
-
Roasted Vegetables: carrots, Brussels sprouts, or asparagus roasted alongside the beef.
-
Fresh Horseradish Sauce: A sharp, creamy condiment that complements the garlic beautifully.
-
A Simple Green Salad: Provides a fresh, crisp contrast to the rich, savory main.
FAQs, Tips, and Conclusion
You’ve got questions, and we’ve got answers. Here are solutions to the most common head-scratchers and some final pearls of wisdom.
Garlic Lovers Roast Beef FAQs
How long should I cook my roast beef per pound?
Honestly, I strongly advise against relying on time per pound. Oven temperatures can vary, the shape of the roast changes things, and starting temperature (room temp vs. cold) has a huge impact. The onlyreliable method is using a meat thermometer. It takes the guesswork out and guarantees perfect results every single time. For reference, a 3-4 lb roast at 275°F might take 1.5 to 2 hours, but always trust the thermometer.
Can I use jarred minced garlic instead of fresh?
You can, but the flavor will be noticeably less vibrant and potent. Pre-minced garlic often has a preservative flavor and lacks the pungent, aromatic oils that fresh garlic provides. For a dish that proudly carries the name “Garlic Lovers,” fresh cloves are highly, highly recommended.
How do I prevent my garlic from burning?
A combination of factors prevents burning. Firstly, the paste is mixed with oil and mustard, which creates a protective coating. Secondly, using a low-and-slow roasting method gently toasts the garlic instead of incinerating it. If you use the high-heat sear method, just ensure the garlic paste is well-adhered and not clumped up.
What are the best leftovers ideas?
Leftovers? What are those? Just kidding! Leftover roast beef is a fantastic bonus.
-
Sandwiches: This is the #1 choice. Thinly sliced on crusty bread with horseradish mayo, arugula, and tomato.
-
Beef Hash: Dice it up and pan-fry with potatoes and onions for a phenomenal breakfast.
-
Salads: Slice it thin and serve over a robust salad with a sharp vinaigrette.
-
Beef Stroganoff: A great way to use larger pieces.
Pro Tips for Guaranteed Success
-
Dry Brine: Don’t skip it. It’s the biggest upgrade to your roasting game.
-
Thermometer: I’ll say it again: use one!
-
Rest: Let that roast take a nap before you slice it. Your patience will be rewarded with juiciness.
-
Sharp Knife: A dull knife will tear your beautiful meat. A sharp one gives you clean, professional slices.
Conclusion: Your Masterpiece Awaits
And there you have it! You are now armed with everything you need to confidently create a stunning, succulent, and incredibly flavorful Garlic Lovers Roast Beef that will absolutely wow your family and friends. Remember, great cooking isn’t about magic tricks; it’s about understanding a few key principles: salt ahead of time, cook to temperature, not to time, and always let your meat rest.
So, go on—preheat that oven, grab a few heads of garlic, and get ready to create something truly special. You’ve got this
Print
Garlic Lovers Roast Beef
Description
Garlic Lovers Roast Beef
Ingredients
-
3–4 lb beef roast (ribeye, sirloin, or chuck)
-
8–10 garlic cloves, minced (or roasted for extra sweetness)
-
2 tbsp olive oil
-
1 tbsp fresh rosemary, chopped (or 1 tsp dried)
-
1 tbsp fresh thyme, chopped (or 1 tsp dried)
-
1 tsp salt
-
1/2 tsp black pepper
-
1/2 cup beef broth (optional, for basting)
Instructions
-
Preheat oven: 375°F (190°C).
-
Prepare roast: Pat roast dry. In a small bowl, mix garlic, olive oil, rosemary, thyme, salt, and pepper. Rub mixture generously over entire roast.
-
Sear (optional but recommended): Heat a skillet over medium-high heat. Sear roast 2–3 minutes per side until browned for extra flavor.
-
Roast: Place roast on a rack in a roasting pan. Pour beef broth into the pan if desired for basting. Roast for 1–1.5 hours (depending on size) or until internal temp reaches:
-
125°F (52°C) for rare
-
135°F (57°C) for medium-rare
-
145°F (63°C) for medium
-
-
Rest: Tent roast with foil and rest 15–20 minutes before slicing to allow juices to redistribute.
-
Serve: Slice against the grain and serve with roasted vegetables, mashed potatoes, or a rich gravy.