
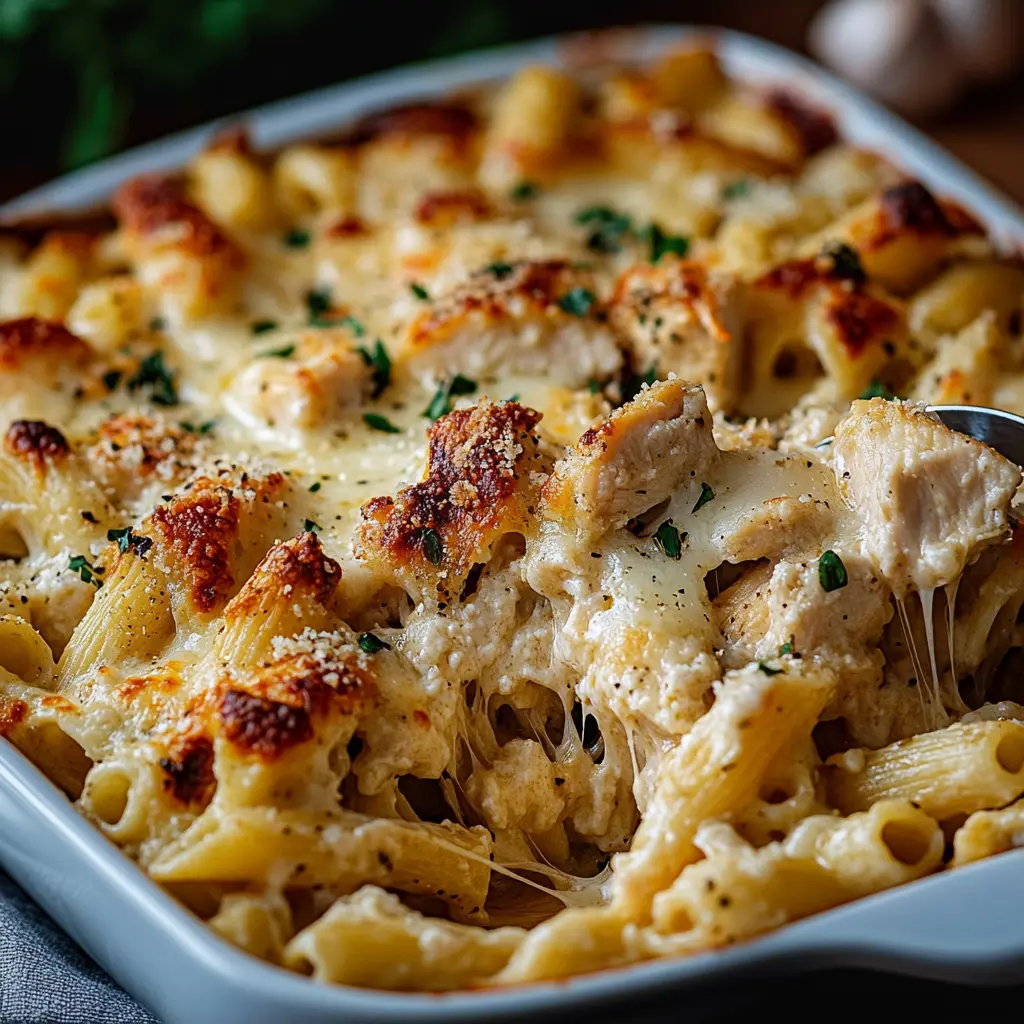
Garlic Parmesan Chicken Pasta Bake: Your New Family Favorite Comfort Food
Why This One-Pan Wonder Deserves a Spot in Your Dinner Rotation
Picture this, for a moment: the incredible aroma of roasting garlic and nutty Parmesan cheese begins to waft from your kitchen, slowly inviting everyone into the dining room. Meanwhile, a gorgeous, golden-brown cheese crust bubbles away enticingly under the oven’s heat. Honestly, this scene is the promise of a perfect weeknight dinner, and it all hinges on one magnificent dish. Furthermore, this Garlic Parmesan Chicken Pasta Bake isn’t just another recipe; it’s a complete, hearty, and phenomenally satisfying meal that miraculously comes together in a single pan. Consequently, it brilliantly minimizes cleanup, which, let’s be real, is a victory in itself after a long day.
Ultimately, this dish is the beautiful love child of a creamy pasta and a hearty casserole, offering the best of both culinary worlds without a doubt. It’s the kind of meal that feels indulgent and special; however, it’s surprisingly straightforward to prepare, even for those who might be a little nervous in the kitchen. Moreover, it’s incredibly versatile! Whether you’re feeding a hungry family, meal prepping for the week, or needing a surefire hit to bring to a potluck, this bake consistently delivers on flavor and comfort. In fact, it’s the culinary equivalent of a warm hug.
What Makes This Recipe Special
So, what exactly sets this particular recipe apart from the countless others out there? Well, for starters, it’s all about achieving that perfect, restaurant-quality creamy garlic Parmesan sauce right in your own home—and guess what? It’s far easier than you might imagine. Unlike a fussy Alfredo, our sauce is wonderfully simple, remarkably reliable, and clings to every nook and cranny of the pasta beautifully.
Additionally, this recipe is a certified family-friendly crowd-pleaser. Its appeal is universal, effortlessly winning over both adults and kids with its familiar, cheesy goodness. Are you looking for a meal prep hero? Look no further! This casserole holds up magnificently in the fridge, and it also freezes like an absolute dream, making future-you profoundly grateful. And finally, think of it as a versatile canvas for your culinary creativity. Feel free to toss in some broccoli, spinach, or sun-dried tomatoes; alternatively, swap the chicken for shrimp. Essentially, you can make it your own, and that’s the true beauty of a fantastic bake.
The Anatomy of a Perfect Garlic Parmesan Chicken Pasta Bake
Building Blocks for Flavor and Texture
Before we dive into the cooking process, let’s take a moment to appreciate the architecture of this incredible dish. You see, a truly great bake isn’t just a random mix of ingredients; instead, it’s a carefully balanced combination of four key components working in perfect harmony. First, you have the sturdy foundation of pasta. Next, comes the hearty protein from the chicken, followed by the rich and luxurious sauce that binds everything together. Finally, the crowning glory is that irresistible, golden-brown cheese topping. Understanding the role each part plays is, without a doubt, the first secret to mastering this recipe.
Choosing Your Ingredients: A Guide to Quality
Alright, let’s get down to the nitty-gritty: the ingredients. While this recipe is wonderfully forgiving, using high-quality components will absolutely transform it from a simple dinner into an unforgettable culinary experience. Trust me on this; the upgrade is more than worth it.
-
The Pasta: Firstly, not all shapes are created equal for baking. You need a short, sturdy pasta that can stand up to the heavy sauce and the heat of the oven without turning into complete mush. Consequently, excellent choices include penne, rigatoni, fusilli, or ziti. Their ridges and tubes are practically designed to trap every last drop of that creamy sauce. Most importantly, you must cook it al dente—meaning it should still have a slight bite to it. Remember, it’s going to spend another 20 minutes in the oven, so if you cook it completely soft in the water, you’ll end up with a mushy bake.
-
The Chicken: Now, for the protein. You have two fantastic options here, each with its own merit. Boneless, skinless chicken breasts are a lean and popular choice; they cook quickly and offer a neutral canvas for the other flavors. However, for truly juicier and more flavorful results, I highly recommend using boneless, skinless chicken thighs. They contain a bit more fat, which means they stay incredibly moist and tender even through the baking process. Whichever you choose, seasoning it well with salt and pepper before cooking is a non-negotiable step for building a deep flavor base.
-
The Garlic: This is not the time to cut corners! Please, I beg of you, use fresh garlic cloves. The pre-minced jarred stuff simply cannot compare in terms of pungent, aromatic flavor and, unfortunately, often carries a slightly bitter, preservative-like aftertaste. Mincing your own garlic is a quick task that pays off a thousandfold in the final taste of your dish. This is one of the most important keywords for a reason—fresh garlic is the soul of this recipe.
-
The Parmesan: Here lies perhaps the most critical pro tip in this entire guide: you must grate your own cheese. I know, I know—it’s tempting to grab that bag of pre-shredded Parmesan. Resist the temptation! Those bags contain anti-caking agents like cellulose (a plant-based powder) that prevent clumping in the bag but also prevent the cheese from melting smoothly into your sauce. The result? A grainy, slightly gritty texture that just isn’t right. Instead, buy a block of real Parmigiano-Reggiano or a high-quality Parmesan and grate it yourself. The difference in flavor and meltability is absolutely night and day. For more on this king of cheeses, you can read about the history and production of authentic Parmigiano-Reggiano cheese.
-
The Cream Base: Our sauce gets its luxurious body from a classic technique: making a roux. This simple mixture of equal parts fat (butter) and flour, cooked briefly, is the magic trick that thickens your sauce and gives it a professional consistency. We then loosen it with chicken broth for savoriness and heavy cream for that unmistakable richness. For a slightly lighter version, half-and-half can work in a pinch, but the sauce won’t be quite as indulgent or stable.
-
The Herbs: Finally, we have the herbs that provide a essential fresh finish. Dried Italian seasoning is perfect for infusing into the sauce itself as it simmers. Conversely, fresh parsley, sprinkled on at the very end, adds a vital pop of color and a bright, clean flavor that cuts through the richness beautifully. Don’t skip this garnish!
How to Make Garlic Parmesan Chicken Pasta Bake: A Step-by-Step Guide
Prep Time: 20 mins | Cook Time: 40 mins | Total Time: 1 hr | Serves: 6-8
Alright, are you ready to create some magic? Fantastic! Here’s everything you’ll need to gather up before we get started. Don’t worry; it’s all pretty standard kitchen gear. Having everything within arm’s reach—a practice chefs call mise en place—makes the entire process smooth and actually enjoyable, rather than a frantic scramble.
Gathering Your Equipment
First things first, let’s talk tools. You won’t need any fancy equipment for this easy family dinner idea. Here’s your simple checklist:
-
A large pot for boiling your pasta to that perfect al dente texture.
-
A large skillet or, even better, a Dutch oven. Using one pan to cook the chicken and build the sauce means you capture all those delicious browned bits left behind from the chicken, adding incredible depth to your sauce.
-
A whisk is absolutely essential for creating a lump-free, silky smooth roux and sauce.
-
A 9×13 inch baking dish is the perfect vessel for our cheesy pasta casserole to bubble and brown.
-
Of course, you’ll need your basic measuring cups and spoons.
-
Lastly, a box grater or microplane for transforming your block of Parmesan into fluffy, flavorful shreds.
The Ingredients List
Now, for the star players! This list is your roadmap to a flawless Italian chicken bake. For the best results, please refer back to our ingredient guide in Part 2.
For the Chicken & Pasta:
-
12 oz (about ¾ of a standard box) of penne pasta
-
1.5 lbs boneless, skinless chicken breasts or thighs, cut into 1-inch cubes
-
2 tbsp olive oil
-
Salt and freshly ground black pepper
For the Garlic Parmesan Sauce:
-
4 tbsp unsalted butter
-
4-5 large cloves of garlic, minced (about 1 ½ tablespoons)
-
2 tbsp all-purpose flour
-
2 cups low-sodium chicken broth
-
1 cup heavy cream (or half-and-half for a lighter version)
-
1 cup freshly grated Parmesan cheese, divided
-
1 tsp Italian seasoning
For the Topping:
-
½ cup shredded mozzarella cheese (for that epic, stretchy pull)
-
Fresh parsley, chopped (for garnish)
The Cooking Instructions
Step 1: Preparing the Pasta and Chicken
Let’s get cooking! First, bring a large pot of generously salted water to a rolling boil. Add your penne and cook it according to the package directions, but aim for al dente. Remember, it will continue to cook in the oven, so you want it to still have a firm bite. Once it’s done, drain it and set it aside; no need to rinse it, as the starch helps the sauce adhere.
Meanwhile, as the pasta cooks, pat your chicken cubes dry with a paper towel—this is key for getting a good sear, not a steam. Season them liberally with salt and pepper. Now, heat the olive oil in your large skillet over medium-high heat. Once the oil is shimmering, add the chicken in a single layer (work in batches if needed to avoid crowding the pan!). Cook it for 5-7 minutes, turning occasionally, until it’s golden brown on all sides and cooked through. You can check for doneness by ensuring the internal temperature reaches 165°F (74°C), the official safe internal temperature for cooked chicken. Transfer the cooked chicken to a clean plate.
Step 2: Crafting the Luxurious Garlic Parmesan Sauce
Here’s where the real alchemy happens! Reduce the heat under your now-empty skillet to medium. Add the butter and let it melt until it’s just beginning to foam. Then, add your freshly minced garlic and sauté it for just about 60 seconds until it becomes incredibly fragrant. You must watch it closely; burnt garlic is bitter and will ruin your sauce.
Now, sprinkle the flour over the butter and garlic. Immediately start whisking! You’re making a roux, and you need to cook it for a full minute to get rid of that raw flour taste. It should form a thick paste. Next, it’s time to add your liquids. Slowly pour in the chicken broth while whisking constantly. This constant whisking is the secret to preventing lumps! Once the broth is fully incorporated and smooth, pour in the heavy cream.
Bring the entire mixture to a gentle simmer, continuing to whisk. You’ll feel the sauce start to thicken beautifully after a few minutes. Now, reduce the heat to low. Take ¾ cup of your freshly grated Parmesan and sprinkle it into the sauce, along with the Italian seasoning. Whisk until the cheese is completely melted and the sauce is smooth and velvety. Give it a taste and season with more salt and pepper if it needs it. Congratulations! You’ve just made a magnificent from-scratch sauce.
Step 3: Combining and Baking to Perfection
Preheat your oven to 375°F (190°C). Lightly grease your 9×13 inch baking dish.
Now, let’s bring it all together. In a large bowl, combine the cooked al dente pasta, the golden-brown chicken cubes, and every last drop of that glorious garlic Parmesan sauce. Gently stir until every single piece of pasta and chicken is perfectly coated in that creamy goodness.
Pour the entire mixture into your prepared baking dish and spread it out into an even layer. In a small bowl, toss the remaining ¼ cup of Parmesan with the ½ cup of mozzarella. Sprinkle this cheesy blend evenly over the top of the casserole.
Slide your masterpiece into the preheated oven and bake for 20-25 minutes, or until the sauce is bubbling vigorously around the edges and the cheese on top is melted and has gorgeous golden spots. For an extra crispy, restaurant-style top, switch the oven to broil for the final 2-3 minutes, but WATCH IT like a hawk to prevent burning!
Once it’s out of the oven, this is the hardest part: you must let it rest for 5-10 minutes. This allows the sauce to set slightly, making it much easier to slice and serve. Finally, garnish with a generous sprinkle of fresh parsley for that pop of color and freshness. Dig in
Mastering Your Bake: Pro Tips and Creative Variations
Alright, you’ve got the basic recipe down pat. Now, let’s turn you into a true Garlic Parmesan Chicken Pasta Bake virtuoso! This is where we move from simply following instructions to truly understanding the why behind them. Furthermore, we’ll explore how to make this dish your own with some delicious and easy twists. After all, a great recipe is a template for creativity, not a rigid set of rules.
Chef’s Secrets for the Best Results
Want to ensure your bake is absolutely perfect every single time? Of course you do! Here are the insider tips that make all the difference between a good casserole and a legendary one.
-
Sauce Consistency is Key: The ideal sauce should coat the back of a spoon thickly. If yours seems a bit too thin after adding the cheese, simply let it simmer on low for a few more minutes, stirring frequently. It will continue to reduce and thicken. Conversely, if it becomes too thick—almost pasty—don’t panic! Just whisk in a small splash of additional chicken broth or cream until it reaches that perfect, pourable consistency.
-
The Al Dente Rule is Non-Negotiable: We mentioned it before, but it’s so important it bears repeating. Overcooking your pasta initially is the number one mistake that leads to a mushy, disappointing bake. That slight resistance in the center is your best insurance policy against texture disaster in the oven.
-
Embrace the Browned Bits: When you remove the cooked chicken from your skillet, you’ll likely see little browned bits stuck to the bottom. Do not scrub these away! Those fond, as chefs call them, are pure flavor gold. When you add the butter and make your sauce in the same pan, you’re deglazing it and dissolving all those delicious caramelized bits directly into your sauce, giving it an incredible depth of flavor.
-
Garlic’s Double Life: Garlic transforms dramatically when cooked. Sautéed gently, it becomes sweet, nutty, and aromatic. Burnt, however, it turns intensely bitter and can ruin an entire dish. This is why we cook it for just a minute until it’s fragrant. If you see it browning too quickly, immediately pull the pan off the heat and add your next ingredient to stop the cooking process.
-
The Resting Period is Crucial: I know it’s tempting to dive right in, but allowing your bake to rest for 5-10 minutes after it comes out of the oven is a critical step. This allows the hot, excited sauce to relax and thicken slightly, which means you’ll get clean, beautiful servings instead of a runny mess on your plate. Patience is a virtue that tastes delicious.
Delicious Variations to Try
Once you’ve mastered the classic, the world is your oyster! This recipe is a fantastic versatile canvasjust begging for your personal touch. Here are some crowd-pleasing ideas to get you started:
-
The Veggie Lover’s Delight: This is an excellent way to sneak more nutrients into your meal. For hardy vegetables like broccoli or cauliflower, chop them into small florets and add them to the pasta pot for the last 2-3 minutes of boiling to blanch them. For quicker-cooking veggies like spinach, simply stir a few large handfuls into the hot sauce just after you’ve taken it off the heat—it will wilt perfectly. Sun-dried tomatoes or sautéed mushrooms are also phenomenal additions that add a huge burst of umami flavor.
-
The Protein Swap: While chicken is the classic, don’t be afraid to experiment. Pre-cooked shrimp can be stirred in at the very end before baking (they just need to heat through). For a richer, spicier kick, try using Italian sausage removed from its casing and browned. It infuses the entire dish with fantastic fennel and red pepper flavors.
-
The Ultimate Cheese Bomb: If you’re a true cheese fanatic, take it to the next level. Before adding the pasta mixture to the baking dish, spread a layer of whole-milk ricotta cheese mixed with a little parsley and black pepper on the bottom. Then, top your assembled bake with a mix of mozzarella, Parmesan, and a little bit of sharp provolone for extra tang.
-
The Cajun Twist: Craving something with a bit of a kick? Toss your raw chicken cubes in 1-2 tablespoons of Cajun or Creole seasoning before browning it. This simple step will create a wonderfully spicy and deeply flavorful dish that’s anything but boring.
Adapting the Recipe: Gluten-Free and Lighter Options
Everyone should be able to enjoy this comfort food classic! Fortunately, this recipe is wonderfully adaptable to various dietary needs.
-
Gluten-Free Adaptation: Making this dish gluten free is incredibly simple. First, obviously, swap the regular pasta for your favorite short, sturdy gluten-free pasta brand (those made with brown rice or quinoa blends often hold up well). Second, you have two options for replacing the flour in the roux. You can use a 1-to-1 gluten-free all-purpose flour blend exactly as you would regular flour. Alternatively, you can use cornstarch. To do this, skip making a roux. Instead, whisk 2 tablespoons of cornstarch into your cold chicken broth until completely dissolved. After sautéing the garlic, pour in the broth-cornstarch slurry and cream together, then bring to a simmer to thicken.
-
Creating a Lighter Version: If you’re looking for a less indulgent but still delicious version, a few smart swaps can lighten it up significantly. For the sauce, you can use half-and-half or even whole milk instead of heavy cream, though the sauce will be slightly less rich and a bit thinner. You can also reduce the butter by half. To compensate for the potential loss of flavor, be sure to use a high-quality, freshly grated Parmesan cheese—its potent flavor means you can sometimes use a little less. Using lean chicken breast and loading up on vegetables are also great ways to make the dish feel lighter.
Serving, Storing, and Making Ahead
You’ve crafted the perfect Garlic Parmesan Chicken Pasta Bake, and the aroma is driving everyone wild. Now what? Well, let’s talk about the finishing touches—how to serve it like a pro, and crucially, how to deal with any leftovers (if you’re lucky enough to have any!). This dish is famously fantastic for meal prep, so understanding how to store and reheat it properly is the final key to unlocking its full potential as a weeknight lifesaver.
What to Serve With Your Pasta Bake
While this bake is a complete meal all on its own, a well-chosen side dish can elevate the entire dining experience. The goal is to find something that complements the rich, creamy, and cheesy flavors without competing with them.
-
A Crisp Green Salad: This is, without a doubt, the number one pairing. The fresh, crisp, and slightly bitter notes of a simple salad provide a perfect textual and flavor contrast to the decadent pasta. A classic romaine or mixed greens salad with a sharp, acidic vinaigrette (like a classic Italian dressing or a simple lemon-Dijon vinaigrette) cuts through the richness beautifully, cleansing the palate between each delicious bite.
-
The Perfect Bread for Dipping: You have a luxurious, creamy sauce; it would be a crime not to have something to soak it all up! A side of garlic bread, buttery dinner rolls, or a sliced, crusty baguette is non-negotiable for many. It’s perfect for ensuring not a single drop of that glorious sauce goes to waste.
-
Simple Roasted Vegetables: For a low-carb side or just to add more color and nutrients to your plate, consider simple roasted vegetables. Green beans, asparagus, or broccoli florets tossed in olive oil, salt, and pepper and roasted until tender-crisp make a wonderful, healthy accompaniment that aligns perfectly with the cozy vibe of the meal.
How to Store and Reheat for Best Quality
Got leftovers? Fantastic—they might even be better the next day as the flavors have more time to meld. However, improper storage and reheating can lead to a dry, disappointing mess. Here’s how to keep your comfort food recipes tasting fresh.
-
Storing Instructions: First, allow the baked casserole to cool completely to room temperature. However, do not leave it out for more than two hours to avoid bacteria growth. Once cool, cover the baking dish tightly with plastic wrap or aluminum foil. Alternatively, transfer individual portions into airtight containers. It will keep safely in the refrigerator for 3 to 4 days.
-
Reheating for Perfect Results: The enemy of reheated pasta is dryness. To combat this:
-
Oven Method (Best for Larger Portions): Preheat your oven to 350°F (175°C). Place the desired amount of bake in an oven-safe dish, splash a tablespoon or two of chicken broth or water over the top to reintroduce moisture, and cover it tightly with foil. Bake for 20-30 minutes, or until heated through.
-
Microwave Method (Best for Single Servings): Place a single serving on a microwave-safe plate. Add a teaspoon of water or broth on top. Cover the plate loosely with a damp paper towel. The steam from the towel will help rehydrate the pasta and prevent it from becoming rubbery. Heat on high in 60-second intervals, stirring in between, until hot.
-
Freezing Instructions for Future Meals
This casserole is a make ahead freezer meal champion! Freezing it is a brilliant way to always have a home-cooked dinner on standby for those hectic nights.
-
To Freeze Before Baking: This is the ideal method for the best texture later. Assemble the casserole completely in a freezer-safe baking dish (or an aluminum pan). Do not bake it. Instead, cover it extremely tightly with a layer of plastic wrap, pressing it directly onto the surface of the food to prevent freezer burn. Then, follow that with a layer of heavy-duty aluminum foil. Label it with the date and contents. It will keep well in the freezer for up to 3 months.
-
To Cook From Frozen: The safest way is to thaw the covered casserole overnight in the refrigerator. Once thawed, bake as directed, though you may need to add 10-15 minutes to the baking time since it will be cold. If baking straight from frozen, do not remove the foil. Bake at 375°F (190°C) for 60-75 minutes, then remove the foil and continue baking for another 15-20 minutes until the center is hot and the top is bubbly and golden brown. Always check that the internal temperature reaches 165°F (74°C).
Frequently Asked Questions (FAQs)
Your Garlic Parmesan Chicken Pasta Bake Questions, Answered
Even with a detailed recipe, a few questions always pop up. Don’t worry—we’ve got you covered. Here are the answers to the most common head-scratchers and concerns to ensure your baking experience is absolutely foolproof.
Q: Can I use pre-cooked or rotisserie chicken?
A: Absolutely! In fact, using a store-bought rotisserie chicken is a fantastic shortcut for a busy weeknight. It’s a huge time-saver that adds a lot of flavor. Simply skip the step of cooking the raw chicken cubes. Instead, shred or chop about 3 to 4 cups of cooked chicken meat and stir it in when you combine the pasta and the sauce. Just be mindful that the chicken is already seasoned, so you may want to slightly reduce the salt you add to the sauce.
Q: Why is my sauce grainy or oily?
A: A grainy sauce is almost always caused by one of two things. First, and most commonly, it’s from using pre-shredded bagged Parmesan cheese. These products contain anti-caking agents like cellulose that prevent clumping in the bag but seize up and refuse to melt smoothly into a sauce. The solution is simple: always grate your own cheese from a block. Secondly, overheating the sauce can cause the fats to separate from the cream, making it look oily or curdled. To prevent this, keep the heat at a gentle simmer and avoid boiling the sauce vigorously after the dairy has been added.
Q: Can I make this entire recipe ahead of time?
A: Yes, it’s an excellent make-ahead meal! You can prepare the entire dish up to the point of baking. Assemble it in the baking dish, cover it tightly with plastic wrap or foil, and refrigerate it for up to 24 hours. When you’re ready to bake, you may need to add 5-10 extra minutes to the baking time since you’ll be starting with a cold-from-the-fridge casserole. The topping might not brown quite as much, so a quick minute under the broiler at the end can help.
Q: What’s the best pasta shape to use for baking, and why?
A: While you can technically use any pasta, short, sturdy shapes with plenty of surface area are the undisputed champions for baking. Tubular shapes like penne, ziti, and rigatoni, or twisted shapes like fusilli (cavatappi), are ideal. Their designs, ridges, and hollow centers are perfect for capturing and holding onto the thick, creamy sauce, ensuring every single bite is flavorful. They also hold their shape and texture much better under the heat of the oven compared to more delicate long pasta.
Garlic Parmesan Chicken Pasta Bake
Description
🧀 Garlic Parmesan Chicken Pasta Bake
Ingredients:
-
3 cups cooked chicken, shredded or cubed (rotisserie works great)
-
12 oz pasta (penne or rotini)
-
3 tbsp unsalted butter
-
4 cloves garlic, minced
-
3 tbsp all-purpose flour
-
3 cups whole milk (or half milk, half heavy cream for richness)
-
1 cup chicken broth
-
1 tsp Italian seasoning
-
1 tsp garlic powder
-
½ tsp onion powder
-
Salt & black pepper, to taste
-
1 cup grated Parmesan cheese
-
2 cups shredded mozzarella cheese (divided)
-
½ cup shredded cheddar cheese (optional, for extra cheesiness)
-
2 tbsp fresh parsley, chopped (for garnish)
Instructions:
-
Cook Pasta
-
Cook pasta in salted boiling water until al dente. Drain and set aside.
-
-
Make Garlic Parmesan Sauce
-
In a large skillet or saucepan, melt butter over medium heat.
-
Add garlic and sauté until fragrant (about 1 minute).
-
Whisk in flour and cook for 1–2 minutes to form a roux.
-
Slowly whisk in milk and chicken broth, stirring until smooth.
-
Add Italian seasoning, garlic powder, onion powder, salt, and pepper.
-
Simmer 3–5 minutes until sauce thickens slightly.
-
Stir in Parmesan cheese until melted and creamy.
-
-
Assemble the Bake
-
Preheat oven to 375°F (190°C).
-
In a large mixing bowl, combine pasta, chicken, half the mozzarella, and sauce.
-
Transfer mixture into a greased 9×13 baking dish.
-
Top with remaining mozzarella and cheddar cheese.
-
-
Bake
-
Bake uncovered for 20–25 minutes, until bubbly and golden on top.
-
-
Garnish & Serve
-
Sprinkle with fresh parsley and serve hot.
-