
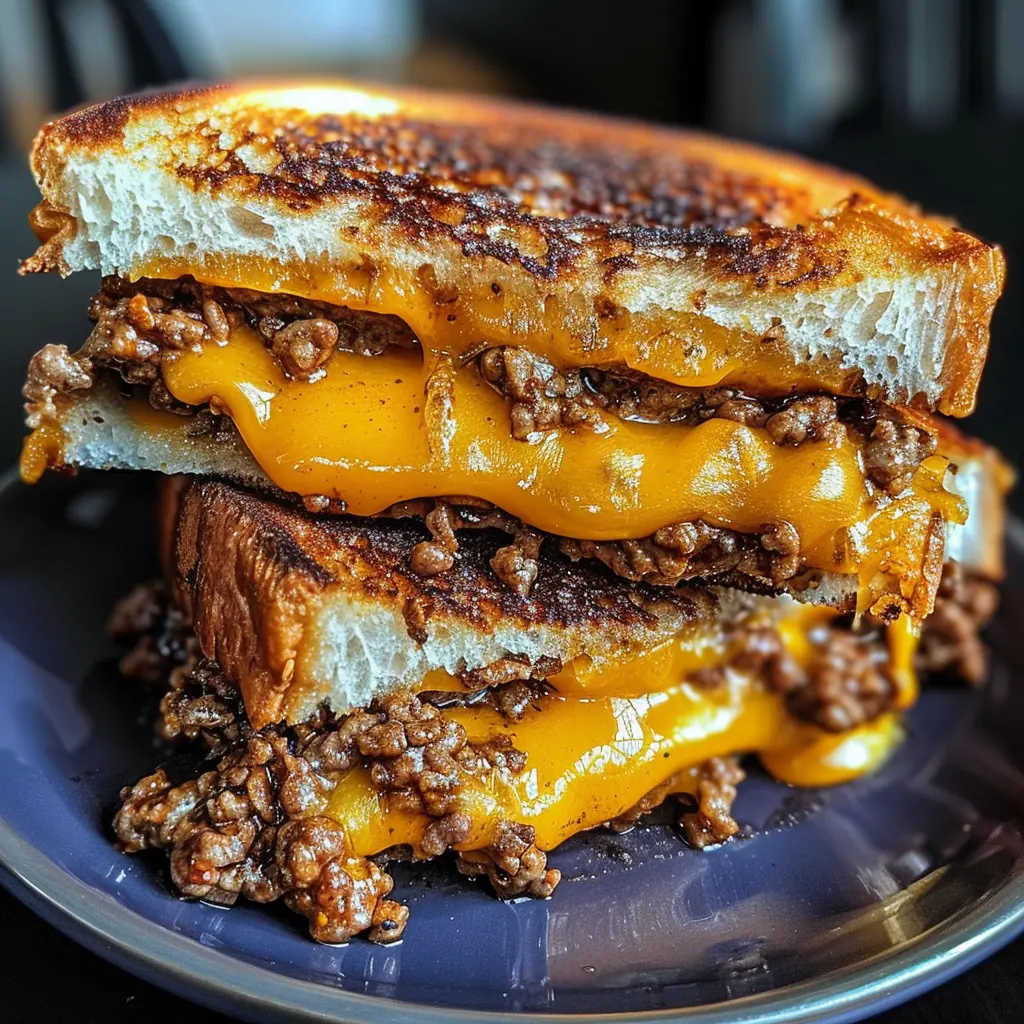
The Ultimate Ground Beef Grilled Cheese Sandwich: A Recipe & Culinary Deep Dive
(Article’s Introduction)
Alright, let’s be honest for a second. The classic grilled cheese is a masterpiece of simplicity, a pillar of comfort food that needs no improvement. Or does it? What if we took that beloved, buttery, crispy, cheesy wonder and supercharged it with something hearty, savory, and utterly irresistible? Enter the Ground Beef Grilled Cheese Sandwich—a behemoth of flavor that transforms a humble lunch into a show-stopping meal.
This isn’t just about slapping some beef between bread; oh no. This is a culinary expedition. We’re talking about juicy, perfectly seasoned ground beef, a symphony of melting cheeses, and bread that achieves a golden-brown, crispy nirvana. Frankly, this sandwich is the answer to the question, “What’s for dinner?” when you crave something spectacular without a fuss. So, buckle up! We’re diving deep into the art, science, and glorious variations of this ultimate comfort food creation. Get ready to make the best sandwich of your life.
Part 1: Introduction and The Foundation
More Than Just a Sandwich: An Introduction to Comfort Food Excellence
Picture this: it’s a chilly evening, and you’re craving something that feels like a warm hug. Suddenly, a standard sandwich just won’t cut it. You need heft. You need flavor. You need, well, a masterpiece. Believe it or not, the Ground Beef Grilled Cheese Sandwich is that masterpiece. It’s a glorious fusion of two iconic dishes, creating a meal that is so much more than the sum of its parts.
This isn’t merely a recipe; it’s a blueprint for culinary joy. The beauty of this dish lies in its beautiful chaos—the way the savory, seasoned beef mingles with the outrageously gooey cheese, all contained within the crisp, buttery embrace of perfectly grilled bread. Every single bite is a textural adventure. Consequently, this guide is designed to be your ultimate resource. We’ll explore everything from selecting the right ingredients to the secret techniques that prevent a soggy disaster. Furthermore, we’ll unlock a world of creative variations to keep your taste buds dancing.
Deconstructing the Dream: The Core Components
Before we fire up the skillet, let’s break down the holy trinity of this sandwich. Understanding the role of each component is, without a doubt, the first step toward sandwich greatness.
The Beef: Choosing Your Grind for Maximum Flavor and Juiciness
The star of the show demands your attention. When you’re picking out your ground beef, you’re making a crucial decision that impacts the entire sandwich. Firstly, let’s talk fat content. An 80/20 blend (80% lean, 20% fat) is often the gold standard for a reason. That fat renders down during cooking, creating an incredibly juicy and flavorful filling that won’t dry out. Conversely, a leaner 90/10 mix is an option, but you’ll need to be extra vigilant about not overcooking it.
Meanwhile, the choice between grass-fed and conventional grain-fed beef is largely about personal preference and budget. Grass-fed often boasts a leaner profile and a slightly more mineral-rich flavor. However, no matter your choice, the real secret is in the seasoning. Browning the beef properly to develop a fond (those tasty browned bits in the pan) and using the right spices are non-negotiable steps for building a deep, complex flavor base.
The Cheese: A Melty, Stretchy, Flavorful Symphony
Ah, the cheese—the glue that holds this beautiful mess together. Not all cheeses are created equal, especially when it comes to meltability. For the ultimate gooey cheese pull, you need a blend that brings both flavor and function.
For instance, classic sharp cheddar provides a fantastic tangy punch, but it can sometimes separate and become oily if used alone. This is why combining it with a superstar melter like American cheese or Monterey Jack is a pro move. These cheeses contain emulsifiers that give you that impossibly smooth, stretchy melt we all dream about. Don’t be afraid to experiment, though! Pepper Jack adds a spicy kick, while Gruyère introduces a nutty, sophisticated depth. Using a cheese blend is, therefore, the ultimate strategy for achieving textural and flavorful perfection.
The Bread: The Unsung Hero of Structure and Crunch
Last but certainly not least, we have the foundation—the bread. This element is all about structure and texture. You simply cannot use flimsy, thin-sliced sandwich bread here; it would buckle under the weight of the hearty filling and become hopelessly soggy.
Instead, you need a sturdy, thick-sliced bread with a tight crumb that can stand up to the challenge. Texas toast is a phenomenal choice because it’s literally designed for this job. Sourdough bread offers a tangy flavor and a robust crust that grills up beautifully. Brioche, with its slight sweetness and buttery richness, creates a decadent experience. Ultimately, the right bread acts as a crucible, containing the glorious filling and transforming into a crispy, golden-brown shell during cooking.
Part 2: The Recipe and Technique
Alright, enough talk—it’s time to get our hands dirty and build this behemoth! This section is your foolproof, step-by-step guide to crafting a sandwich that’s nothing short of perfection. We’ll walk through gathering your ingredients, mastering the filling, assembling like a pro, and achieving that iconic, crispy finish. So, grab your favorite skillet and let’s get cooking!
Gathering Your Arsenal: The Complete Ingredient List
First things first, you gotta have the right tools for the job. This isn’t a complicated recipe, but having everything ready before you start—your mise en place—makes the process smooth and enjoyable. Here’s your shopping list for the ultimate comfort food experience.
For the Savory Beef Filling:
-
1 pound of ground beef (80/20 blend is ideal)
-
1 small yellow onion, finely diced
-
2 cloves garlic, minced
-
1 tablespoon Worcestershire sauce
-
1 teaspoon paprika (smoked paprika is a game-changer!)
-
½ teaspoon garlic powder
-
½ teaspoon onion powder
-
Salt and freshly ground black pepper to taste
-
1 tablespoon olive oil or neutral cooking oil
For the Sandwich Construction:
-
8 slices of sturdy bread (Texas Toast, sourdough, or brioche)
-
3 tablespoons of softened butter (or mayonnaise for extra crispness)
-
2 cups of shredded cheese blend (e.g., sharp cheddar and Monterey Jack)
Optional Flavor Boosters:
-
A dash of hot sauce in the beef
-
A handful of crispy bacon bits
-
Sliced pickles for serving
-
A slather of mustard or ranch dressing on the inside of the bread
The Art of the Filling: Cooking and Seasoning the Ground Beef
Now, for the heart of the operation: the beef. This is where you build the deep, savory flavor that defines the sandwich.
-
Sauté the Aromatics: Begin by heating the oil in a large skillet over medium heat. Add the diced onion and cook, stirring occasionally, until it becomes soft and translucent, which should take about 5 minutes. Then, add the minced garlic and cook for just another minute until it’s wonderfully fragrant. Be careful not to burn it!
-
Brown the Beef: Next, add the ground beef to the skillet. Use your spoon or spatula to break it up into small crumbles. Here’s a pro tip: let it sit for a minute before stirring to allow it to develop a beautiful brown crust—that’s where the big flavor lives! Continue cooking until the beef is no longer pink.
-
Season and Simmer: Now, drain any excess grease from the skillet, leaving behind about a tablespoon for moisture and flavor. Afterwards, stir in the Worcestershire sauce, paprika, garlic powder, onion powder, salt, and pepper. Let this mixture simmer together for a couple of minutes so the flavors can meld magnificently.
-
The Crucial Cool Down: This step is absolutely vital! Transfer the cooked beef filling to a bowl and let it cool for at least 10-15 minutes. Why? Because adding piping hot beef directly onto your cheese will cause it to melt prematurely and create a steamy environment inside your sandwich, which is the fastest route to soggy bread. Patience here pays off in a huge way.
The Assembly Line: Constructing Your Masterpiece
Assembly might seem straightforward, but there’s a method to the madness that guarantees structural integrity and even cooking.
-
Butter Up (The Outside!): Lay out your slices of bread on a clean cutting board. Spread a generous layer of softened butter (or mayonnaise) on one side of each slice. This buttered side will be the outside of your sandwich, responsible for that gorgeous, golden brown crust.
-
Build from the Inside Out: Flip four of the slices over so the unbuttered side is facing up. This is your canvas. On each slice, place a small handful of cheese. Then, divide the slightly cooled ground beef mixture evenly among the four slices, pressing it down gently into an even layer. Top the beef with another hearty handful of cheese. This “cheese-beef-cheese” layering strategy is genius because the cheese on the bottom acts as a moisture barrier for the bread, and the cheese on top melts down into the beef.
-
Top it Off: Carefully place the remaining slices of bread on top, buttered side facing out. Press down gently to secure everything. You’ve just built a sandwich destined for greatness.
The Grand Finale: Grilling to Golden-Brown Excellence
This is the transformation, where simple ingredients become a legendary meal. For this, a heavy-bottomed skillet, preferably cast iron, is your best friend for even heat distribution.
-
Low and Slow is the Way to Go: Place your skillet or griddle over medium-low heat. Seriously, don’t rush this with high heat! You need time for the cheese to melt completely before the outside burns.
-
The Press: Once the skillet is warm, place your assembled sandwiches in it. You might need to cook in batches. Now, here’s a secret weapon: press down on the sandwich with a spatula. Even better, place a lid on the skillet for the first 3-4 minutes. This traps the heat and acts like a mini-oven, ensuring the inside gets hot and the cheese melts gloriously while the outside toasts.
-
The Flip: After about 4-5 minutes, peek underneath. When the bottom is a deep, golden brown, it’s time to flip. Carefully turn the sandwich over. The second side will usually cook a tiny bit faster.
-
The Finish Line: Cook for another 3-4 minutes until the second side is equally golden brown and crisp. If you press lightly on the top with your spatula, you should see that glorious, gooey cheesetrying to escape from the sides. That’s how you know it’s done.
Transfer your masterpiece to a cutting board, let it rest for just a minute (this helps the cheese set slightly so it doesn’t all gush out on the first bite), slice diagonally because it just tastes better that way, and serve immediately. You’ve just achieved grilled cheese nirvana.
Part 3: Variations, Pairing, and Expertise
Whoa, you’ve mastered the classic! But honestly, the fun is just beginning. The true beauty of this recipe lies in its incredible versatility. Think of the basic blueprint not as a rigid rulebook, but as a launchpad for your culinary creativity. Furthermore, a meal this grand deserves the perfect supporting cast. So, let’s explore how to take your sandwich global, pair it with amazing sides, and finally, troubleshoot any pesky issues like a true kitchen pro.
Beyond the Basic: Creative Variations and Twists
Why stop at classic when you can travel the world from your stovetop? These variations are seriously easy to pull off and will completely transform your sandwich experience.
Global Inspirations: Taco Style, Philly Cheesesteak, and Italian Melt
-
The Southwestern Fiesta: Craving some Tex-Mex flair? This one’s for you. Simply swap the standard seasonings for a packet of taco seasoning when browning your beef. Then, kick it up a notch by adding a handful of black beans and corn to the filling. For the cheese, pepper jack is an absolute must here for that spicy kick. Serve this version with a side of cool sour cream, chunky salsa, or even a creamy avocado dip for dipping. It’s a full-blown fiesta in every single bite.
-
The Philly Cheesesteak Mashup: This variation is a crowd-pleaser, no question. First, thinly slice a green bell pepper and a small onion. Sauté them until they’re beautifully soft and slightly caramelized. Then, mix these into your cooked ground beef. The cheese is critical here—shredded provolone is the authentic choice, delivering that iconic, mild, and super stretchy pull. For an even more authentic experience, you could even use a cheese sauce. Pile it high on your bread and you’ve got a handheld taste of Philadelphia.
-
The Italian Melt: Take a quick trip to Italy with this herbaceous and robust option. Stir a few tablespoons of your favorite marinara sauce and a teaspoon of Italian seasoning into the cooked ground beef. For the cheese, a combination of melted mozzarella and provolone is pure magic. If you’re feeling fancy, a few slices of pepperoni layered in with the beef will add a wonderful spicy and salty dimension. It’s basically a pizza in grilled cheese form—what’s not to love?
Gourmet Upgrades: Caramelized Onions, Bacon, and Arugula
Sometimes, you just want to dress to impress, even for a weeknight dinner. These simple additions elevate your sandwich from incredible to absolutely restaurant-quality.
-
The Sweet & Savory Master: The deep, sweet flavor of caramelized onions pairs phenomenally well with the savory beef and sharp cheese. They take a little time to make (low and slow is the only way!), but they are worth every single minute. Spread a layer on top of the beef before adding the final cheese.
-
The Ultimate Carnivore: Let’s be real, everything is better with bacon. Adding a few strips of crispy, crumbled bacon into the beef mixture introduces an incredible smoky flavor and a satisfying crunch. This is a seriously hearty and indulgent take on the classic.
-
The Fresh Finish: For a bit of peppery bite and a fresh contrast to the rich ingredients, try adding a small handful of arugula after the sandwich is cooked. Simply open it up and tuck the greens inside right before serving. The warmth will slightly wilt them, and their vibrant flavor will cut through the richness perfectly. A thin spread of garlic aioli on the inside of the bread wouldn’t hurt either!
The Perfect Bite: Serving Suggestions and Pairings
You’ve crafted a masterpiece; now, let’s complete the meal. The right sides and drinks turn this sandwich from a quick bite into a memorable feast.
Sidekicks: The Best Dips and Sides
-
The Classic Dip: It’s a classic for a darn good reason. A warm, creamy bowl of tomato soup is the ultimate partner for dunking your sandwich. The tangy, slightly sweet tomato flavor complements the rich, cheesy, beefy goodness in a way that feels just right.
-
The Crispy Companion: If you’re not in a soup mood, you can’t go wrong with something crispy. A simple side salad with a bright vinaigrette dressing helps balance the meal. Alternatively, a handful of pickle spears on the side provide a wonderful acidic crunch. For the ultimate indulgence, sweet potato fries or regular french fries are always a winning choice.
-
The Flavorful Dip: Don’t limit yourself to ketchup! A creamy ranch dressing, a spicy sriracha mayo, or even a smoky barbecue sauce for dipping can add an exciting new flavor profile to each bite.
The Perfect Pour: Drink Pairings
While we avoid alcoholic suggestions, the right beverage can elevate your meal. A robust, chilled glass of iced tea—whether sweetened or not—works wonderfully. Its slight bitterness can cleanse the palate. For a fizzy option, a classic cola or a ginger ale stands up well to the robust flavors. Their carbonation and sweetness cut through the richness of the beef and cheese beautifully. Even a simple sparkling water with a squeeze of lime can be incredibly refreshing.
Pro Tips from the Kitchen: Avoiding Common Pitfalls
Even the best chefs run into hiccups. Here’s how to sidestep common grilled cheese disasters and ensure sandwich success every single time.
Troubleshooting Your Sandwich
-
Problem: The outside is burning, but the cheese inside is still solid!
-
Solution: Your heat is too high. Remember, the key is low and slow. You need gentle, consistent heat to melt the interior without incinerating the exterior. Reduce the heat next time and be patient; it’s worth the wait.
-
-
Problem: My bread is getting soggy.
-
Solution: This is almost always caused by the filling being too hot when assembled. Ensure your beef mixture has cooled sufficiently. Also, that double layer of cheese (on the bottom and top of the beef) acts as a crucial protective barrier against moisture.
-
-
Problem: The cheese is oozing out and burning in the pan.
-
Solution: Don’t overfill the sandwich! Keep the filling contained in the center, leaving a small border around the edge. Pressing the edges of the bread together firmly before grilling can also help create a seal.
-
-
Problem: The sandwich is too greasy.
-
Solution: You likely didn’t drain enough fat from the beef after cooking. Be diligent about spooning out excess grease. Using a leaner beef blend can also help mitigate this issue.
-
Part 4: FAQs and Conclusion
Alright, we’ve covered a lot of ground—from the foundational basics to globetrotting variations and pro-level tips. But you might still have a few questions buzzing around. That’s perfectly normal! This section is dedicated to answering those burning questions and wrapping up our ultimate guide to this magnificent sandwich.
Ground Beef Grilled Cheese Sandwich: FAQs
Here are the answers to the most commonly asked questions about crafting the perfect ground beef grilled cheese sandwich.
Frequently Asked Questions
Q: Can I use pre-cooked ground beef for this sandwich?
A: Absolutely! In fact, using leftover taco meat or seasoned ground beef is a fantastic way to make this recipe even quicker. It’s a brilliant solution for a 15-minute meal. Just ensure you warm it up slightly before assembling the sandwich; this helps the interior get hot by the time the bread is perfectly toasted. However, avoid using it straight from the fridge, as the cold center will prevent the cheese from melting properly.
Q: What’s the best way to store and reheat leftovers?
A: Let’s be honest, leftovers are unlikely! But if you do have one, store it in an airtight container in the refrigerator for up to 2 days. The absolute best way to reheat it is in a toaster oven or an air fryer at 350°F (175°C) for about 5-6 minutes. This method will miraculously regain the bread’s crispiness and melt the cheese again. Conversely, the microwave will turn it soft and soggy, so it’s best to avoid that appliance for this particular meal.
Q: Can I make this recipe in an air fryer?
A: Yes, you certainly can! The air fryer is a fantastic tool for achieving an extra-crispy exterior. Assemble the sandwich as usual, then air fry at 370°F (190°C) for 6-8 minutes, flipping it halfway through. Keep a close eye on it towards the end, as air fryers can vary. You’re looking for that same gorgeous, golden brown crust and audible crunch.
Q: How can I make this recipe healthier?
A: There are several easy tweaks to lighten things up without sacrificing flavor. First, opt for a lean ground beef blend like 93/7 or even use ground turkey. Second, choose a whole-wheat or multigrain bread for extra fiber. Third, use a measured amount of reduced-fat cheese—it still melts well! Finally, you can load the filling up with finely chopped veggies like spinach, mushrooms, or bell peppers to add volume and nutrients without many calories.
Conclusion: The King of Comfort Food
And there you have it—the complete, no-stone-left-unturned guide to creating the ultimate ground beef grilled cheese sandwich. This isn’t just another recipe; it’s a passport to culinary creativity. We’ve journeyed through the crucial importance of ingredient selection, nailed the step-by-step technique for a flawless build, and jet-setted around the world with inspired variations.
Remember, the core principles are your foundation: a well-seasoned and properly cooled filling, a strategic blend of cheeses, sturdy bread, and the patience to cook it low and slow. From there, the canvas is yours to paint. Whether you stick with the beloved classic, spice it up with taco flavors, or indulge in the gourmet upgrade with caramelized onions, you are now equipped to create a masterpiece.
So, preheat that skillet, grab your ingredients, and get ready to create a meal that’s so much more than just a sandwich. It’s a warm, cheesy, beefy, crispy hug on a plate—the undisputed king of comfort food. Now, go forth and grill!

Ground Beef Grilled Cheese Sandwich
Description
Ground Beef Grilled Cheese Sandwich 🥩🧀🍞🔥
Ingredients (Makes 2 sandwiches)
-
½ lb ground beef
-
1 tbsp olive oil
-
½ small onion, finely chopped
-
1 garlic clove, minced
-
1 tbsp Worcestershire sauce
-
Salt & black pepper, to taste
-
4 slices bread (Texas toast, sourdough, or your favorite thick-cut bread)
-
4 tbsp butter, softened
-
1 cup shredded cheddar cheese (or a mix of cheddar & mozzarella)
-
2 slices provolone or American cheese (optional, for extra gooeyness)
-
Pickles or jalapeños (optional, for a kick)
Instructions
-
Cook the beef filling:
-
Heat olive oil in a skillet over medium heat.
-
Add onion and garlic, sauté until softened.
-
Stir in ground beef, season with Worcestershire, salt, and pepper.
-
Cook until beef is browned and crumbled. Drain excess grease if needed.
-
-
Assemble the sandwiches:
-
Butter one side of each bread slice.
-
Place 2 slices (buttered side down) in a skillet or griddle over medium-low heat.
-
Add a layer of shredded cheddar, spoon on cooked ground beef, and top with more cheese.
-
Place remaining bread slices on top, buttered side facing up.
-
-
Grill to perfection:
-
Cook sandwiches 3–4 minutes per side, pressing gently with a spatula, until golden brown and cheese is melted.
-
Lower heat if bread browns too quickly before cheese melts.
-
-
Serve:
-
Slice in half, serve hot, and enjoy with ketchup, ranch, or a spicy dipping sauce.
-