
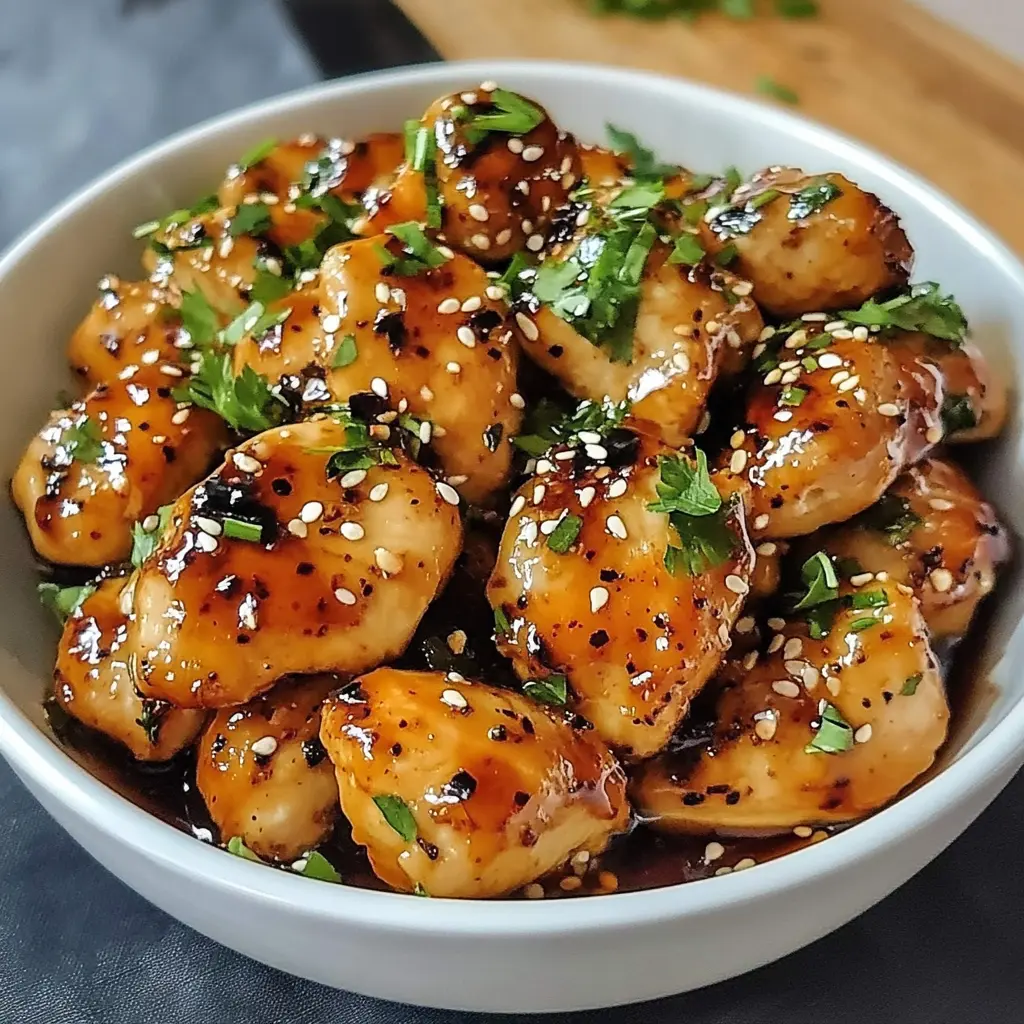
Honey Garlic Chicken: Your Ultimate Guide to a Perfect Sweet & Savory Dinner
Let’s be honest, shall we? We’re all constantly on the prowl for that mythical weeknight dinner recipe—the one that’s incredibly delicious, surprisingly simple to whip up, and guaranteed to get zero complaints from the family. Well, stop the search, because your culinary holy grail has arrived: Honey Garlic Chicken.
This dish is a masterpiece of balance. Imagine this: succulent, juicy chicken, cloaked in a glossy, sticky sauce that’s the perfect dance between sweet and savory. It’s the kind of meal that feels indulgent and fancy, yet, remarkably, it comes together with humble ingredients you probably already have in your pantry. Frankly, it’s a universal favorite for a very good reason.
Throughout this guide, we’ll not only master the classic stovetop method but also explore baking, stir-frying, and even slow cooking. We’ll dive into pro tips, answer all your burning questions, and basically turn you into a Honey Garlic Chicken connoisseur. So, grab your apron, and let’s transform dinner into something spectacular.
Why Honey Garlic Chicken is a Universal Favorite
Honestly, what’s not to love? This dish has skyrocketed to the top of dinner rotation charts globally, and its popularity isn’t just a fluke. Firstly, it’s all about the flavor harmony. The sweetness from the honeydoesn’t just clobber your taste buds; instead, it performs a delicate waltz with the pungent, savory kick of fresh garlic and the deep, salty umami of soy sauce. Consequently, every single bite is a complex and utterly satisfying experience.
Furthermore, its versatility is a huge selling point. Are you in a hurry? A quick stir-fry is your answer. Feeding a crowd? Toss it in the oven. Craving something hands-off? Let the slow cooker work its magic. This incredible adaptability means it never gets boring. Moreover, despite its restaurant-quality taste, it’s famously approachable. You don’t need to be a trained chef to get it right; in fact, it’s a perfect recipe for beginners and busy parents alike.
Ultimately, it’s the ultimate comfort food that also feels a bit special. It’s the dish you make on a hectic Wednesday to turn the day around and the one you serve to guests to elicit genuine, impressed compliments. It’s a true crowd-pleaser in every sense of the word.
Deconstructing the Dish: The Two Key Components
Before we fire up the stove, let’s break down this beautiful dish into its two fundamental parts. Understanding these components is the secret key to unlocking perfection every single time you cook.
The Star of the Show: Choosing Your Chicken
Alright, let’s talk protein. Your choice here fundamentally changes the game, so choose wisely!
-
Chicken Thighs (Boneless, Skinless): For the most succulent, fail-safe result, chicken thighs are the undisputed champion. They boast a higher fat content than breasts, which simply translates to more flavor and juiciness. Even if you accidentally overcook them a tad, they’ll remain tender and forgiving. They are, without a doubt, the top choice for a truly decadent Honey Garlic Chickenexperience.
-
Chicken Breasts: Now, if you’re aiming for a leaner option, chicken breasts will certainly do the job. However, they require a bit more babysitting. The key is to pound them to an even thickness; this ensures they cook uniformly without the thin parts drying out into sad, rubbery disappointments. If you go this route, keep a close eye on the cooking time!
-
Other Cuts: Feel free to get creative! This magical sauce is fantastic on wings (bake them until crispy first!) or drumsticks. Similarly, chicken tenderloins or even meatballs are fantastic vessels for that iconic flavor.
The Heart and Soul: The Honey Garlic Sauce
While the chicken is the canvas, the sauce is the masterpiece painting itself. This is where the magic happens. At its core, you need a mere handful of ingredients: honey, garlic, soy sauce, and often a touch of vinegar or ginger for balance.
The transformation is nothing short of culinary alchemy. You start with a thin, watery liquid; then, through the power of reduction and heat, it morphs into a thick, glossy, caramelized glaze that clings to every nook and cranny of the chicken. It’s sticky, it’s sweet, it’s savory, and it is absolutely irresistible. Using fresh, quality ingredients here—like pure honey and freshly minced garlic—makes a world of difference, elevating the dish from good to “can I have the recipe?” greatness.
For instance, selecting a good quality honey is crucial for the best flavor. If you’re curious about options, you might look into a guide on how to find locally sourced honey to support local beekeepers and get the freshest product possible.
How to Make Classic Stovetop Honey Garlic Chicken: A Step-by-Step Guide
Alright, enough talk—let’s get down to business! This stovetop method is the classic, and for good reason: it’s incredibly fast and delivers an unbeatable, restaurant-quality sear on the chicken with a sauce that caramelizes perfectly in the pan. Honestly, you’re about 20 minutes away from dinner heaven.
Gathering Your Ingredients
First things first, let’s get everything organized. This recipe comes together swiftly, so having your ingredients prepped and measured (a concept chefs call “mise en place”) is the ultimate secret to a stress-free cooking experience.
For the Chicken:
-
1.5 lbs (about 650-700g) boneless, skinless chicken thighs or breasts, cut into bite-sized pieces
-
Salt and black pepper to taste
-
2 tablespoons cornstarch
-
2 tablespoons neutral oil (like avocado or vegetable oil)
For That Iconic Sauce:
-
⅓ cup honey (preferably pure, not imitation)
-
¼ cup low-sodium soy sauce (this lets you control the saltiness)
-
4-5 cloves garlic, freshly minced (trust me, it’s worth it!)
-
1 tablespoon rice vinegar (or apple cider vinegar)
-
1 teaspoon fresh ginger, grated (optional, but highly recommended)
-
1 tablespoon sesame oil
-
(Optional) ¼ teaspoon red pepper flakes for a subtle kick
For Garnish:
-
Sliced green onions
-
Toasted sesame seeds
Step 1: Preparing and Seasoning the Chicken
Now, for a pro tip that makes a world of difference: pat your chicken pieces completely dry with a paper towel. Why? Because moisture is the enemy of a good, crispy sear! Consequently, this simple step ensures your chicken will brown beautifully instead of steaming.
Next, toss the dried chicken pieces into a bowl. Thereafter, season them generously with salt and pepper. Then, sprinkle the cornstarch over the top and toss everything until each piece is evenly and lightly coated. The cornstarch isn’t just for thickening the sauce later; it also creates a delightfully delicate, crispy crust on the chicken when it hits the hot oil.
Step 2: Achieving the Perfect Sear
Here’s where the magic starts. Place a large skillet or wok over medium-high heat and add your neutral oil. You’ll want to wait until the oil is shimmering hot—a drop of water should sizzle and evaporate on contact.
Carefully add the chicken in a single layer, making sure not to overcrowd the pan. (If necessary, cook in two batches; overcrowding is a one-way ticket to steamed, rubbery chicken!). Now, resist the urge to constantly stir! Let the chicken cook undisturbed for 2-3 minutes, allowing it to develop a gorgeous golden-brown crust on one side.
After that, flip the pieces and cook for another 2-3 minutes until browned on the other side and cooked through. While the chicken is cooking, you can quickly check the official safe internal temperature for chicken, which is 165°F (74°C). Once perfectly seared, transfer the chicken to a clean plate. The inside will finish cooking fully when we add it back to the sauce.
Step 3: Whisking and Simmering the Signature Sauce
Without wiping out the skillet, reduce the heat to medium. You’ve got all those delicious browned bits left in the pan—that’s pure flavor! Add a tiny splash of oil if the pan is too dry, then add the freshly minced garlic (and ginger if using). Ah, that smell! Sauté for just 30 seconds until fragrant. Seriously, don’t walk away here; burnt garlic turns bitter and will ruin your sauce.
Quickly pour in the soy sauce, honey, and rice vinegar. Whisk everything together, scraping up all those flavorful browned bits from the bottom of the pan. This process is called deglazing, and it’s the key to a deeply flavorful sauce.
Bring the sauce to a steady simmer. Then, let it bubble away for 2-4 minutes. You’ll actually see it start to reduce, thicken slightly, and become syrupy. This is exactly what you want!
Step 4: The Grand Finale – Coating the Chicken
It’s showtime! Reduce the heat to low. Now, return the cooked chicken and any accumulated juices back into the skillet with your glorious sauce. Toss everything together constantly for another 1-2 minutes. As the sauce heats back up with the chicken in it, it will thicken even more, transforming into a sticky, glossy glaze that clings to every single piece.
Finally, turn off the heat and drizzle in the sesame oil, giving it one final toss. Immediately transfer your masterpiece to a serving platter. Without a doubt, garnish it generously with those sliced green onions and a hearty sprinkle of toasted sesame seeds for that perfect finishing touch, both in flavor and appearance. Serve it hot and prepare for the compliments to roll in!
Beyond the Stovetop: Exploring Different Cooking Methods
So, you’ve mastered the stovetop classic—fantastic! But what if you’re feeding a crowd, trying to minimize cleanup, or simply want to try a different texture? Fortunately, the beauty of Honey Garlic Chicken is its incredible versatility. Let’s explore some other fantastic ways to bring this dish to life.
Crispy Baked Honey Garlic Chicken
If you’re looking for a slightly healthier, hands-off approach that’s perfect for meal prep, baking is your best friend. This method delivers an amazing crispy texture without the need for constant pan-tending.
The Method:
First, preheat your oven to 400°F (200°C) and line a large baking sheet with parchment paper. Then, prepare your chicken as in the stovetop recipe: cut into pieces, pat dry, and toss with salt, pepper, and cornstarch. For extra crispiness, you can even add a tablespoon of oil to the cornstarch coating. Arrange the chicken in a single layer on the baking sheet. Bake for 15-20 minutes, flipping halfway through, until the chicken is cooked through and crispy.
Meanwhile, whip up your sauce in a saucepan on the stovetop, letting it simmer and reduce until thickened. Once the chicken is done baking, transfer it to a large bowl. Pour the hot sauce over the crispy chicken and toss vigorously to coat every piece. The result? Incredibly crispy baked honey garlic chicken with none of the splatter from pan-frying!
Easy Honey Garlic Chicken Stir-Fry
Craving more veggies? Transform this dish into a complete, one-pan stir-fry that’s bursting with color, texture, and nutrients. It’s a brilliant way to clean out the fridge, too!
The Method:
Start by cooking your chicken as in the classic stovetop method, but remove it from the pan once it’s seared. Next, add a bit more oil to the same skillet. Then, toss in your favorite chopped, hardy vegetables—broccoli florets, bell peppers, snap peas, and carrots are all stellar choices. Stir-fry them for 3-4 minutes until they’re bright in color but still crisp-tender.
After that, push the veggies to the side and prepare the sauce directly in the pan. Once the sauce is simmering, return the cooked chicken to the skillet and add any quicker-cooking veggies like spinach. Toss everything together and continue cooking for another 2-3 minutes until the chicken is reheated and the sauce has thickened and coated everything beautifully. Serve it over a bed of fluffy rice for a complete meal.
Simple Slow Cooker or Instant Pot Version
For those days when you just want to “set it and forget it,” your slow cooker or Instant Pot can absolutely deliver on flavor. However, note that the texture will be more tender and fall-apart rather than crispy.
Slow Cooker Method:
Place raw chicken pieces in the slow cooker. Whisk together all the sauce ingredients (except the cornstarch and sesame oil) and pour them over the top. Cover and cook on LOW for 4-5 hours or on HIGH for 2-3 hours. When done, mix a tablespoon of cornstarch with two tablespoons of water to create a slurry. Remove the chicken, stir the slurry into the slow cooker, and add the sesame oil. Cook on HIGH for another 15-20 minutes until the sauce thickens. Finally, return the chicken to the pot and toss to coat.
Instant Pot Method:
Use the Sauté function to sear the chicken pieces in batches; remove and set aside. Add a splash of water or broth to deglaze the pot, scraping up any bits. Then, return the chicken, add the sauce ingredients (again, hold the cornstarch and sesame oil). Cook on HIGH pressure for 5 minutes, followed by a quick release. Remove the chicken, then set the pot back to Sauté. Stir in the cornstarch slurry and simmer until thickened. Turn off the heat, stir in the sesame oil, and add the chicken back to coat.
Adapting the Recipe for Dietary Needs
Everyone should get to enjoy this dish! Luckily, it’s remarkably easy to adapt for various dietary preferences without sacrificing an ounce of flavor.
Making a Gluten-Free Honey Garlic Chicken
This is one of the simplest swaps imaginable. The only potential source of gluten in the classic recipe is the soy sauce. Therefore, simply replace regular soy sauce with an equal amount of tamari (which is traditionally gluten-free, but always check the label) or certified gluten-free coconut aminos. Coconut aminos are slightly sweeter and less salty, so you might want to adjust the honey and salt levels at the end. That’s it—you’ve got a delicious, gluten-free version!
Crafting a Lower-Sugar Version
If you’re watching your sugar intake, you can still enjoy the spirit of this dish with a few clever tweaks. Firstly, you can reduce the amount of honey by half and supplement the sweetness with a splash of 100% apple juice or orange juice. Alternatively, you can use a sugar-free honey substitute. Another great option is to use a natural, no-calorie sweetener like monk fruit sweetener that measures like sugar; just be aware the sauce won’t caramelize and thicken quite the same way. You might need to rely more on a cornstarch slurry to achieve the desired sticky consistency.
Chef’s Secrets: Pro Tips for the Best Honey Garlic Chicken Ever
You’ve got the basics down, but what separates a good dish from a truly unforgettable one? It’s all in the details, my friend. These little pro tips are the secret weapons that will elevate your Honey Garlic Chicken from a simple weeknight dinner to a culinary masterpiece that’ll have everyone begging for your recipe.
First and foremost, use fresh garlic. I know that jar of pre-minced garlic is convenient, but for a sauce where garlic is the co-star, fresh is non-negotiable. Pre-minced garlic often sits in preservative liquid and can develop a slightly bitter, harsh flavor that will come through in your final dish. Taking the two minutes to peel and mince fresh cloves guarantees a sweet, pungent, and aromatic flavor that simply can’t be beaten.
Secondly, and this is crucial: don’t burn the garlic! Garlic goes from perfectly fragrant to acrid and bitter in the blink of an eye. Always sauté it over medium heat, not high, and keep it moving in the pan for no more than 30 seconds. You just want to wake it up and make the kitchen smell amazing. As soon as it’s fragrant, have your liquid ingredients ready to pour in and stop the cooking process immediately.
Is your sauce too thin and just not sticking to the chicken? Don’t panic! This is where a cornstarch slurry comes to the rescue. Simply mix one tablespoon of cornstarch with two tablespoons of cold water in a small bowl until it’s smooth. Then, while your sauce is simmering, whisk this slurry in. Almost like magic, the sauce will thicken into a perfect, glossy glaze within a minute or two.
Furthermore, taste and adjust your sauce before you add the chicken back in. This is the most important habit of a good cook. Is it a little too sweet? Add a splash more soy sauce. Too salty? A bit more honey or a squeeze of lime juice can balance it. Need more depth? A dash of that sesame oil will do the trick. You are the master of your sauce—make it perfect for your palate!
Finally, garnish generously. Those garnishes aren’t just for a pretty picture; they add crucial layers of flavor and texture. The nutty crunch of toasted sesame seeds and the fresh, sharp bite of green onions cut through the richness of the sauce, making each bite more complex and exciting. Don’t you dare skip them!
What to Serve with Honey Garlic Chicken: The Perfect Pairings
Alright, you’ve crafted this phenomenal main dish. Now, what do you put alongside it to create a balanced, show-stopping meal? The good news is that this dish is incredibly friendly and pairs well with almost anything. Here are some classic and creative ideas.
Without a doubt, the number one, go-to pairing is a big bed of fluffy white rice or brown rice. It’s the classic for a reason! The plain, steamy rice is the perfect canvas to soak up every last drop of that incredible sticky sauce. Honestly, the rice might just be the best part of the meal.
Feeling a bit more adventurous? Turn that rice into fried rice the next day using the leftovers! Alternatively, for a low-carb option, cauliflower rice is a fantastic vehicle for the sauce. Just be sure to sauté or steam it first to get rid of any excess moisture.
Noodles are another fabulous route. Tossing your Honey Garlic Chicken with lo mein noodles, ramen noodles, or even soba noodles creates a hearty and satisfying meal. Simply cook the noodles according to package directions and toss them right into the skillet with the chicken and sauce to combine.
Of course, you can’t forget the vegetables! Steamed broccoli is a timeless side that complements the flavors perfectly. Roasted asparagus or green beans add a lovely earthy note. For a fresh contrast, a simple side salad with a light ginger-sesame vinaigrette works wonders to cut through the richness.
Storing and Reheating Your Leftovers
If you’re lucky enough to have leftovers (which is a big if in my house), they store and reheat beautifully, making them a fantastic option for meal prep.
For Storage: First, let the chicken cool to room temperature. Then, transfer it to an airtight container and store it in the refrigerator. It will keep perfectly for 3 to 4 days.
For Freezing: This dish freezes surprisingly well! Portion it out into freezer-safe containers or bags, and it will be good for up to 3 months. Pro tip: leave out the garnishes before freezing. When you’re ready to eat, thaw it overnight in the refrigerator.
For Reheating: The best way to reheat your chicken while preserving its texture is gently on the stove. Place it in a skillet over medium-low heat with a tiny splash of water or chicken broth. This will help loosen the sauce and re-emulsify it without drying out the chicken. The microwave can work in a pinch, but it often makes the chicken a bit rubbery and can cause the sauce to separate. If you must microwave, do it in short bursts and stir in between.
Frequently Asked Questions (FAQs)
Even with a detailed guide, a few questions always pop up. Let’s tackle the most common ones head-on to ensure your cooking experience is completely foolproof.
Can I use chicken breasts instead of thighs?
Absolutely, you can! For the best results, pound thicker breasts to an even ½-inch thickness. This ensures they cook quickly and evenly all the way through without the thinner parts drying out. Keep a close eye on the cooking time, as breasts cook faster than thighs and can become tough if overcooked. Using a meat thermometer to check for the official safe internal temperature for chicken (165°F or 74°C) is your best bet for perfect doneness.
How can I prevent my garlic from burning?
Ah, the cardinal rule of garlic! The key is moderate heat and constant motion. Always sauté your garlic over medium heat, not high. Add it to the pan and stir it constantly for only about 30 seconds—just until it becomes fragrant. You should smell that wonderful aroma, but the garlic should barely take on any color. Have your sauce liquids measured and ready to pour in immediately to stop the cooking process dead in its tracks.
My sauce is too thin. How can I thicken it?
No worries, this is a common and very easy fix! Create a cornstarch slurry by mixing one tablespoon of cornstarch with two tablespoons of cold water in a small bowl until it’s completely smooth. Whisk this slurry into your simmering sauce and cook for another 1-2 minutes. You will see it transform and thicken to your desired glossy, sticky consistency right before your eyes.
Can I make this recipe ahead of time?
You sure can, and it’s a great time-saver! You can mix the sauce ingredients ahead of time and store them in an airtight container in the fridge for up to 3 days. The chicken can also be cut and seasoned a day in advance. For the absolute best texture, however, I recommend cooking the dish just before serving. This ensures the chicken retains its perfect sear and doesn’t get soggy from sitting in the sauce.
What is the best honey to use for honey garlic chicken?
A neutral, pure honey like clover or orange blossom works perfectly. These varieties provide a lovely, floral sweetness without overpowering the other flavors. I’d recommend avoiding very strong, dark honeys like buckwheat, as their robust, malty flavor can dominate the delicate balance of the dish. The quality matters, too; pure honey will give you the best flavor and texture for that ideal sticky glaze.
Conclusion: Your New Go-To Dinner Awaits
And there you have it—your complete, no-stone-left-unturned guide to mastering Honey Garlic Chicken. We’ve journeyed from the fundamental balance of sweet and savory, through the sizzle of the stovetop, and into the creative realms of baking and adapting. You’re now armed with pro tips, pairing ideas, and answers to every possible question.
This dish is more than just a recipe; it’s a reliable, versatile, and downright delicious solution to the eternal “what’s for dinner?” dilemma. It proves that you don’t need complicated techniques or a pantry full of obscure ingredients to create something truly special and deeply satisfying.
So, what are you waiting for? Your new favorite easy chicken dinner is calling your name. Grab that skillet, mince that garlic, and get ready to create a meal that will earn a permanent spot in your culinary rotation. Trust me, your taste buds will thank you.
Honey Garlic Chicken
Description
🍯 Honey Garlic Chicken
Ingredients:
-
4 boneless, skinless chicken breasts (or thighs)
-
Salt & black pepper, to taste
-
2 tbsp olive oil (or vegetable oil)
-
3–4 cloves garlic, minced
-
½ cup honey
-
¼ cup soy sauce (low-sodium if preferred)
-
2 tbsp rice vinegar (or apple cider vinegar)
-
1 tbsp cornstarch + 2 tbsp water (slurry, optional for thickening)
-
1 tsp red pepper flakes (optional, for a little heat)
-
Sesame seeds & chopped green onions (for garnish)
Instructions:
-
Prepare the Chicken:
Pat chicken dry and season lightly with salt and pepper. -
Cook the Chicken:
In a large skillet, heat olive oil over medium-high heat.
Sear chicken on both sides until golden brown and nearly cooked through (about 4–5 minutes per side). Remove from skillet and set aside. -
Make the Honey Garlic Sauce:
In the same skillet, reduce heat to medium. Add minced garlic and sauté for 30 seconds until fragrant.
Stir in honey, soy sauce, and vinegar. Bring to a simmer. -
Thicken (Optional):
If you prefer a thicker glaze, stir in the cornstarch slurry and cook for 1–2 minutes until the sauce thickens. -
Combine:
Return chicken to skillet, spoon sauce over the top, and simmer another 3–5 minutes until the chicken is fully cooked and coated in sticky honey garlic sauce. -
Serve:
Garnish with sesame seeds and chopped green onions. Serve hot with steamed rice, noodles, or roasted veggies.
🍴 Serving Ideas:
-
Over steamed jasmine rice with broccoli.
-
Tossed with stir-fried noodles.
-
With a side of garlic butter roasted potatoes.