
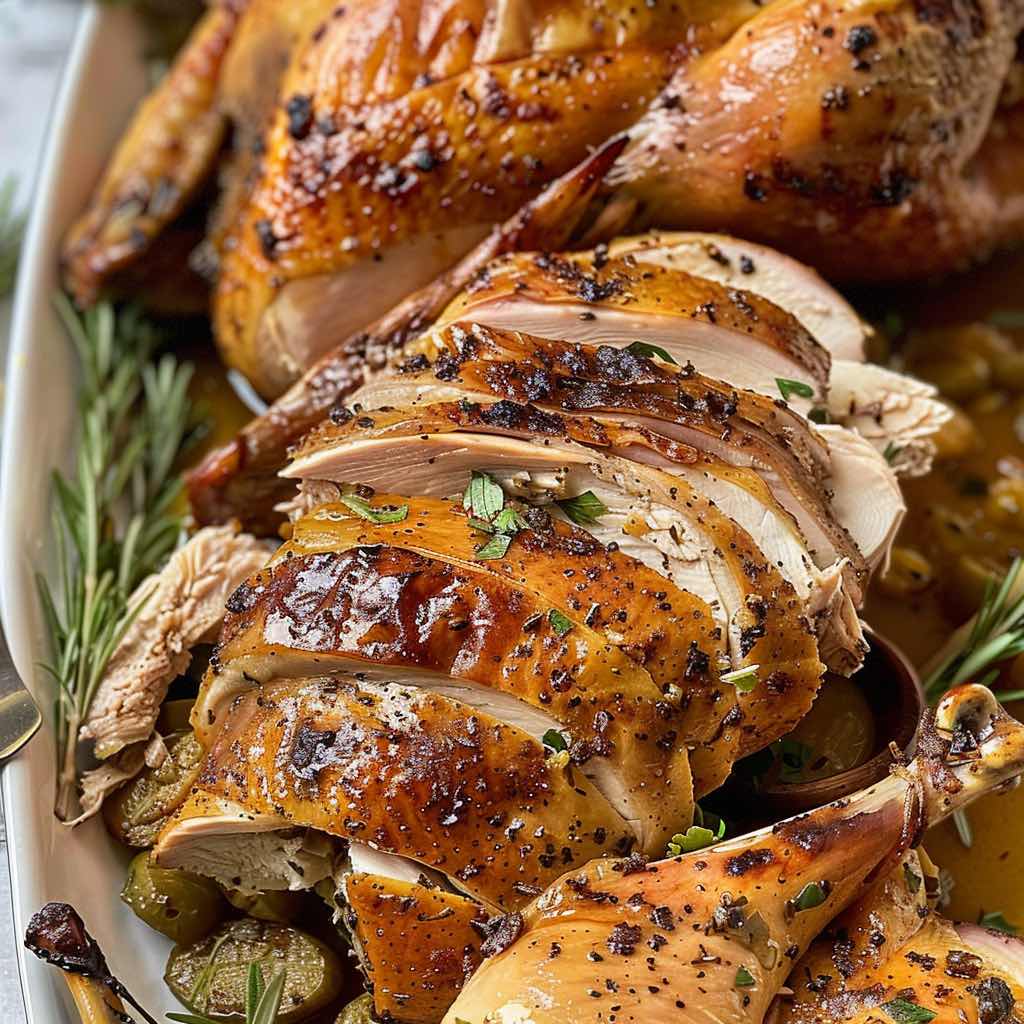
Oven-Roasted Turkey with Gravy
Introduction to Oven-Roasted Turkey
Oven-roasted turkey with gravy represents the centerpiece of countless holiday celebrations and special gatherings. This classic dish brings families together with its golden-brown skin, tender meat, and rich, savory gravy. Moreover, mastering this technique transforms you into a confident home cook.
The art of roasting turkey involves understanding timing, temperature, and preparation methods. However, the process is simpler than many believe. In fact, with proper planning and guidance, anyone can create a stunning oven-roasted turkey with gravy that impresses guests and satisfies appetites.
This comprehensive guide walks you through every step. Therefore, you’ll learn selection, preparation, cooking, and gravy-making techniques. Additionally, we’ll cover troubleshooting tips and storage solutions. By the end, you’ll possess the knowledge to create restaurant-quality results in your home kitchen.
Why Choose Oven-Roasting for Your Turkey
The Traditional Method
Oven-roasting remains the most popular turkey preparation method for several reasons. First, it delivers consistently excellent results. The steady heat circulation creates even cooking throughout the bird. Furthermore, the dry heat produces that coveted crispy skin everyone loves.
Convenience and Control
Unlike other cooking methods, oven-roasting offers maximum control. You can monitor the turkey easily through the oven door. Additionally, adjusting temperature takes seconds. This control ensures your turkey cooks perfectly without constant intervention.
Flavor Development
The oven environment encourages proper browning. Consequently, complex flavors develop on the turkey’s surface. Meanwhile, the meat retains its natural juices. The result? A bird that’s both flavorful and moist throughout.
Selecting the Perfect Turkey
Fresh vs. Frozen
Both fresh and frozen turkeys work wonderfully for oven-roasting. Fresh turkeys offer convenience since they require no thawing. However, frozen turkeys typically cost less. They also provide flexibility in purchase timing.
When choosing frozen, plan ahead. A large turkey needs 3-4 days to thaw safely in your refrigerator. Never thaw turkey at room temperature, as this promotes bacterial growth.
Size Considerations
Calculate approximately 1 to 1.5 pounds per person. This accounts for bones and provides modest leftovers. For instance, an 8-person gathering requires a 12-16 pound turkey. Larger birds need longer cooking times but feed more people.
Quality Indicators
Look for these signs of quality:
-
Plump breast appearance
-
Intact, undamaged skin
-
Fresh smell (no off odors)
-
Clear packaging without excess liquid
-
USDA inspection stamp
-
Proper refrigeration at point of purchase
Essential Equipment and Tools
Must-Have Items
Preparing oven-roasted turkey with gravy requires specific equipment. First, you need a sturdy roasting pan. Choose one with 2-3 inch sides for proper heat circulation. Additionally, a roasting rack elevates the turkey, promoting even cooking.
A reliable meat thermometer is absolutely essential. Digital instant-read thermometers provide accurate readings. Furthermore, they help prevent overcooking or undercooking issues.
Helpful Additional Tools
These items make the process easier:
-
Kitchen twine for trussing
-
Basting brush for moisture application
-
Large cutting board for carving
-
Sharp carving knife and fork
-
Gravy separator or fat separator
-
Aluminum foil for tenting
-
Kitchen shears for removing packaging
Preparation Space
Clear adequate counter space before beginning. You’ll need room for thawing, prepping, and seasoning. Additionally, ensure your oven racks are positioned correctly before preheating.
Preparing Your Turkey for Roasting
Initial Steps
Remove the turkey from packaging carefully. Next, locate the neck and giblet packet inside the cavity. These items are often in both the neck and body cavities. Save them for making gravy later.
Rinse the turkey under cold water, then pat completely dry. Dry skin browns better during roasting. Therefore, this step significantly impacts your final results.
Seasoning Strategies
Basic Seasoning Method
Start with generous amounts of salt and pepper. Apply both inside the cavity and all over the exterior. Next, rub softened butter under the skin. This keeps breast meat moist while adding flavor.
Herb Butter Enhancement
Create an herb butter mixture by combining:
-
1/2 cup softened butter
-
2 tablespoons fresh thyme
-
2 tablespoons fresh rosemary
-
1 tablespoon fresh sage
-
4 cloves minced garlic
-
1 teaspoon black pepper
-
1 teaspoon sea salt
Gently separate skin from breast meat using your fingers. Then, spread the herb butter mixture underneath. This technique ensures maximum flavor penetration.
Aromatics for the Cavity
Fill the turkey cavity with aromatic vegetables and herbs. These add subtle flavor while keeping the meat moist. Consider using:
-
1 quartered onion
-
4 celery stalks, roughly chopped
-
2 carrots, roughly chopped
-
Fresh thyme sprigs
-
Fresh rosemary sprigs
-
1 lemon, halved
-
6 garlic cloves, smashed
Trussing Technique
Trussing helps the turkey cook evenly. Additionally, it creates a more attractive presentation. Use kitchen twine to tie the legs together. Then, tuck the wing tips behind the body. This prevents them from burning during roasting.
The Ultimate Oven-Roasted Turkey Recipe
Ingredients
For the Turkey:
-
1 whole turkey (12-16 pounds)
-
1/2 cup butter, softened
-
3 tablespoons olive oil
-
2 tablespoons kosher salt
-
1 tablespoon black pepper
-
4 cups low-sodium chicken broth
-
Aromatic vegetables (listed above)
-
Fresh herbs (thyme, rosemary, sage)
For Basting:
-
1 cup chicken broth
-
4 tablespoons melted butter
-
2 tablespoons fresh lemon juice
Cooking Instructions
Step 1: Oven Preparation
Preheat your oven to 325°F (165°C). Position the rack in the lower third of the oven. This allows proper heat circulation around the turkey.
Step 2: Turkey Preparation
Following the preparation steps outlined earlier, season your turkey thoroughly. Place aromatic vegetables in the cavity. Then, set the turkey breast-side up on the roasting rack.
Step 3: Initial Roasting
Pour 2 cups of chicken broth into the roasting pan. This creates moisture and prevents drippings from burning. Cover the turkey loosely with aluminum foil. Then, place it in the preheated oven.
Step 4: Basting Schedule
Baste the turkey every 45 minutes during cooking. Use the prepared basting mixture or pan drippings. However, work quickly to minimize heat loss. Each basting session adds moisture and promotes browning.
Step 5: Final Browning
Remove the foil during the last hour of cooking. This allows the skin to brown beautifully. Continue basting every 20-30 minutes during this period.
Step 6: Temperature Check
Begin checking internal temperature after 2.5 hours for smaller birds. Insert the thermometer into the thickest part of the thigh. Avoid touching bone, as this gives inaccurate readings.
The turkey is done when:
-
Thigh registers 175°F (80°C)
-
Breast reaches 165°F (74°C)
-
Juices run clear when pierced
Cooking Time Guidelines
Follow these approximate times based on turkey weight:
-
10-12 pounds: 2.5-3 hours
-
12-14 pounds: 3-3.75 hours
-
14-18 pounds: 3.75-4.25 hours
-
18-20 pounds: 4.25-4.5 hours
-
20-24 pounds: 4.5-5 hours
Remember, these are estimates. Always rely on internal temperature for doneness determination.
Making Perfect Turkey Gravy
Essential Gravy Components
Perfect gravy complements your oven-roasted turkey with gravy presentation. The foundation comes from pan drippings. These drippings contain concentrated turkey flavor and natural gelatin. Together, they create rich, satisfying gravy.
Step-by-Step Gravy Method
Collecting Drippings
After removing the turkey, pour pan drippings into a fat separator. Allow the fat to rise to the surface. Meanwhile, keep the pan for deglazing later.
Alternatively, refrigerate drippings briefly. The fat solidifies on top, making removal easier. However, this method takes longer.
Creating the Roux
Heat 4 tablespoons of reserved turkey fat in a saucepan. Add 4 tablespoons of all-purpose flour. Whisk constantly over medium heat for 3-4 minutes. The mixture should become golden and smell nutty.
This roux thickens your gravy while adding depth. Therefore, don’t rush this step. Proper browning develops essential flavor.
Adding Liquid
Gradually whisk in 4 cups of defatted drippings and broth. Pour slowly to prevent lumps. Keep whisking until the mixture is completely smooth.
Deglazing the Pan
Place your roasting pan over two burners. Add 1 cup of chicken broth. Scrape up all the browned bits stuck to the bottom. These bits contain incredible flavor.
Pour this mixture through a fine-mesh strainer into your gravy. This adds richness and color.
Seasoning and Finishing
Simmer the gravy for 10-15 minutes. Stir occasionally while it thickens. Taste and adjust seasoning with salt and pepper. For extra richness, whisk in 2 tablespoons of butter at the end.
Troubleshooting Gravy Issues
Too Thin: Simmer longer to reduce liquid. Alternatively, make a slurry with equal parts flour and cold water. Whisk this into simmering gravy gradually.
Too Thick: Thin with additional broth or drippings. Add liquid slowly while whisking constantly.
Lumpy: Pour through a fine-mesh strainer. Press solids through with a spoon. Then, return to heat and whisk smooth.
Too Pale: Add a small amount of kitchen bouquet or soy sauce. Both darken gravy without affecting flavor significantly.
Temperature and Timing Guidelines
Understanding Internal Temperatures
Food safety requires specific internal temperatures. The USDA recommends 165°F for all poultry. However, dark meat tastes better at slightly higher temperatures. Therefore, aim for 175°F in the thighs.
Carryover Cooking
Remove turkey when it reaches 160-165°F in the breast. During resting, the temperature continues rising. This phenomenon, called carryover cooking, adds 5-10 degrees. Consequently, your turkey reaches perfect doneness while resting.
Oven Temperature Variations
Standard roasting happens at 325°F. However, some cooks prefer different approaches. Higher temperatures (425°F) create crispier skin but require careful monitoring. Lower temperatures (275°F) cook more gently but take longer.
For beginners, stick with 325°F. This temperature provides the best balance between cooking time and results.
Resting and Carving Your Turkey
The Importance of Resting
Never skip the resting period. This step is crucial for juicy meat. When turkey cooks, juices move toward the center. Resting allows them to redistribute throughout the meat.
Tent the turkey loosely with foil. Then, let it rest for 30-45 minutes. During this time, make your gravy and finish side dishes. The turkey stays warm due to its large mass.
Carving Techniques
Setting Up Your Station
Place the turkey on a large cutting board. Have a serving platter nearby. Additionally, keep paper towels handy for cleanup. Sharp knives make carving safer and easier.
Removing the Legs
First, cut through the skin between the leg and breast. Next, pull the leg away from the body. The joint pops out easily. Then, cut through the joint to separate completely. Repeat on the other side.
Separating Thighs and Drumsticks
Locate the joint between thigh and drumstick. Cut through this joint to separate them. Place both pieces on the serving platter.
Removing the Breast
Make a long cut along one side of the breastbone. Cut downward, following the rib cage. The breast meat separates in one large piece. Repeat on the other side.
Slicing Breast Meat
Place breast pieces on the cutting board. Slice against the grain into 1/2-inch thick pieces. Arrange slices attractively on the platter.
Wing Removal
Pull wings away from the body. Cut through the joints to remove. Wings contain less meat but offer delicious crispy skin.
Common Mistakes and How to Avoid Them
Mistake 1: Inadequate Thawing
Frozen turkey needs proper thawing time. Rushing this process leads to uneven cooking. Plan 24 hours of refrigerator time per 4-5 pounds. Therefore, a 16-pound turkey needs 3-4 days.
Mistake 2: Skipping the Thermometer
Guessing doneness causes problems. Undercooked turkey poses health risks. Overcooked turkey becomes dry and tough. Always use a reliable meat thermometer.
Mistake 3: Opening the Oven Too Often
Each oven opening drops temperature significantly. This extends cooking time unnecessarily. Therefore, limit oven checks to essential moments only.
Mistake 4: Not Drying the Skin
Moisture prevents proper browning. Always pat turkey completely dry before seasoning. Additionally, letting it air-dry in the refrigerator overnight improves skin crispness.
Mistake 5: Stuffing the Cavity
Stuffing inside the turkey cavity creates food safety concerns. The stuffing may not reach safe temperatures. Instead, cook stuffing separately in a dish. Use aromatics in the cavity for flavor only.
Mistake 6: Overcrowding the Pan
Turkey needs space for air circulation. Overcrowded pans trap moisture and prevent browning. Choose a pan that’s appropriately sized for your bird.
Serving Suggestions and Side Dishes
Classic Accompaniments
Oven-roasted turkey with gravy pairs beautifully with traditional sides. Consider serving these popular options:
-
Creamy mashed potatoes
-
Herb stuffing or dressing
-
Roasted vegetables (carrots, Brussels sprouts, squash)
-
Green bean casserole
-
Sweet potato casserole
-
Cranberry sauce
-
Fresh dinner rolls
Modern Twists
Contemporary presentations add exciting variety:
-
Quinoa and wild rice pilaf
-
Roasted root vegetable medley
-
Maple-glazed carrots
-
Garlic butter green beans
-
Cauliflower mash
-
Fresh autumn salad with pomegranate
Presentation Tips
Arrange turkey slices on a large platter. Pour some gravy over the meat. Serve remaining gravy in a gravy boat. Garnish the platter with fresh herbs for visual appeal.
Create height variation on the platter. Stack some slices while laying others flat. This creates an appealing, abundant look. Additionally, add colorful garnishes like roasted vegetables or fresh cranberries.
Storage and Leftover Ideas
Proper Storage Methods
Store leftover turkey within two hours of cooking. Separate meat from bones for easier storage. Place portions in airtight containers. Properly stored turkey lasts 3-4 days refrigerated.
For longer storage, freeze turkey portions. Wrap tightly in plastic wrap, then aluminum foil. Frozen turkey maintains quality for 2-3 months. Label containers with dates for easy tracking.
Store gravy separately in airtight containers. Refrigerated gravy lasts 1-2 days. Frozen gravy keeps for 2-3 months.
Creative Leftover Recipes
Turkey Pot Pie
Combine diced turkey with vegetables in creamy sauce. Top with pastry or biscuits. Bake until golden. This comforting dish uses multiple cups of leftover meat.
Turkey Soup
Simmer turkey bones to create rich stock. Add vegetables, noodles, and shredded meat. Season with herbs for warming soup. This recipe makes excellent use of the carcass.
Turkey Sandwiches
Layer turkey slices with cranberry sauce and stuffing. Add crispy lettuce and mayonnaise. Serve on hearty bread. This simple preparation highlights leftover flavors.
Turkey Tetrazzini
Mix turkey with pasta in creamy mushroom sauce. Top with breadcrumbs and cheese. Bake until bubbly. This casserole feeds a crowd easily.
Turkey Salad
Dice turkey and combine with mayonnaise, celery, and grapes. Season with salt and pepper. Serve on lettuce or in sandwiches. This light option uses smaller portions.
Frequently Asked Questions
How do I know when my oven-roasted turkey with gravy is done?
Use a meat thermometer to check internal temperature. The breast should reach 165°F, while thighs need 175°F. Additionally, juices should run clear when the turkey is pierced. Never rely on visual cues alone for determining doneness.
Should I brine my turkey before roasting?
Brining adds moisture and flavor to turkey. However, it’s optional for oven-roasting. Many turkeys are pre-brined (check the label for added solutions). If you choose to brine, allow 12-24 hours in refrigerator. Use 1 cup salt per gallon of water.
Can I stuff my turkey before roasting?
Food safety experts recommend against stuffing turkey cavities. Stuffing may not reach safe temperatures. Instead, cook stuffing separately in a baking dish. Use aromatics in the cavity for flavor without safety concerns.
Why is my turkey skin not crispy?
Several factors affect skin crispness. First, ensure the skin is completely dry before roasting. Second, remove foil covering during the final hour. Third, increase oven temperature to 425°F for the last 20-30 minutes. Finally, avoid over-basting, which adds moisture.
How long should I let my turkey rest?
Rest turkey for 30-45 minutes before carving. This allows juices to redistribute throughout the meat. Cover loosely with foil to maintain temperature. The turkey stays warm due to its large size.
Can I make gravy without drippings?
Yes, you can create gravy using store-bought broth. Make a roux with butter and flour. Gradually add broth while whisking. Season with herbs, salt, and pepper. While less flavorful than drippings-based gravy, it still tastes good.
What if my turkey is cooking unevenly?
Rotate the roasting pan halfway through cooking. Additionally, tent over-browning areas with aluminum foil. Ensure proper oven rack placement for even heat circulation. Consider using a roasting rack to elevate the turkey.
How do I prevent dry breast meat?
Several techniques help maintain moisture. First, apply butter under the breast skin. Second, roast breast-side down for the first hour. Third, baste regularly throughout cooking. Finally, avoid overcooking by using a thermometer.
Conclusion
Mastering oven-roasted turkey with gravy elevates your cooking skills significantly. This comprehensive guide covered every aspect of preparation, cooking, and serving. From selecting the perfect bird to creating rich gravy, you now possess essential knowledge.
Remember these key points for success. First, proper planning prevents stress during cooking. Second, accurate temperature monitoring ensures food safety. Third, resting time dramatically improves meat juiciness. Finally, practice makes perfect with each turkey you roast.
The techniques outlined here work for holidays, special occasions, or Sunday dinners. Moreover, they adapt easily to your personal preferences. Experiment with different herbs, seasonings, and aromatics. Soon, you’ll develop your signature oven-roasted turkey with gravy recipe.
Your confidence in the kitchen grows with each successful turkey. Therefore, don’t hesitate to try these methods. The reward of serving perfectly roasted turkey makes the effort worthwhile. Your family and guests will appreciate the delicious results.
Oven-Roasted Turkey with Gravy
Description
Oven-Roasted Turkey with Gravy
Ingredients:
For the Turkey:
-
12–14 lb (5–6 kg) whole turkey, thawed
-
½ cup (1 stick) unsalted butter, softened
-
2 tbsp olive oil
-
4 cloves garlic, minced
-
2 tsp salt
-
1 tsp black pepper
-
1 tsp paprika
-
1 tsp dried thyme
-
1 tsp dried rosemary
-
1 tsp dried sage
-
1 large onion, quartered
-
1 lemon, halved
-
1–2 cups low-sodium chicken or turkey broth
For the Gravy:
-
Pan drippings from roasted turkey
-
¼ cup all-purpose flour
-
2 cups chicken or turkey broth (more as needed)
-
Salt & pepper, to taste
Instructions:
-
Prepare the Turkey
-
Preheat oven to 325°F (165°C).
-
Remove giblets and pat turkey dry with paper towels.
-
In a small bowl, mix butter, olive oil, garlic, salt, pepper, paprika, thyme, rosemary, and sage.
-
Rub mixture under the skin and over the outside of the turkey.
-
Stuff cavity with onion and lemon.
-
-
Roast the Turkey
-
Place turkey breast-side up on a rack in a roasting pan.
-
Tent with foil and roast for 2–2.5 hours (for 12–14 lb turkey).
-
Remove foil during last 45 minutes for golden, crispy skin.
-
Baste occasionally with pan drippings or broth.
-
Check internal temperature: 165°F (74°C) in the thickest part of the breast and 175°F (80°C) in the thigh.
-
Let turkey rest 20–30 minutes before carving.
-
-
Make the Gravy
-
Pour pan drippings into a saucepan, skim excess fat.
-
Add flour and cook 1–2 minutes over medium heat to make a roux.
-
Slowly whisk in broth, simmering until thickened.
-
Season with salt and pepper. Strain if desired.
-
-
Serve
-
Carve turkey and serve with hot gravy on the side.
-
Perfect with mashed potatoes, stuffing, and cranberry sauce.
-