
Introduction & The Foundation of Flavor
The Ultimate Guide to a Perfect Pot Roast with Potatoes Dinner
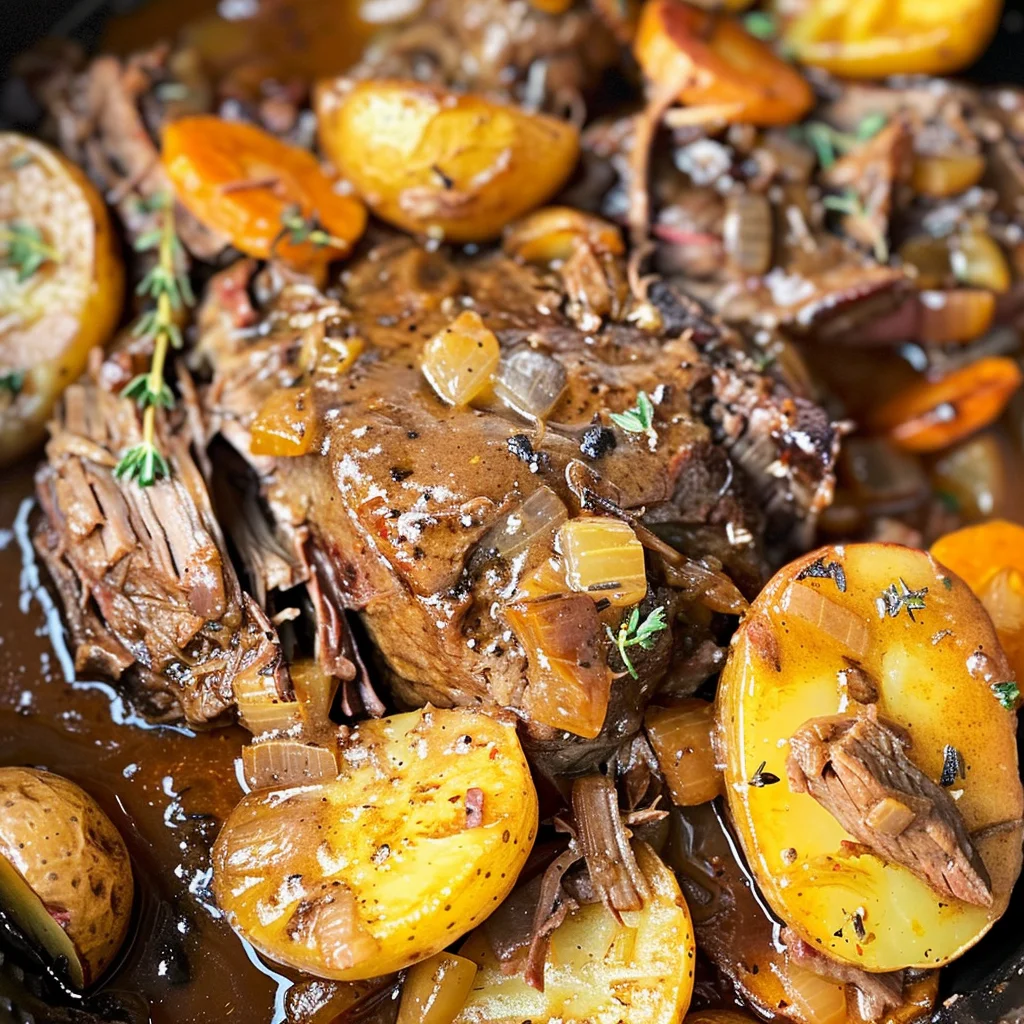
Ah, the pot roast with potatoes dinner. Is there any other meal that so effortlessly whispers of home, comfort, and cherished family gatherings? Imagine this: a chilly evening, the windows slightly fogged, and your kitchen filled with an aroma so profoundly inviting it feels like a warm hug. That, right there, is the magic of this timeless classic pot roast. It’s more than just a meal; it’s a centerpiece for conversation, a remedy for a long week, and a delicious tradition passed down through generations.
Furthermore, this iconic comfort food possesses a beautiful duality. Despite its elegant, company’s-coming presentation, it’s fundamentally humble, forgiving, and surprisingly simple to master. Consequently, this guide is designed to be your ultimate companion on that journey. We’ll walk through every single step, from choosing the very best cut of beef to carving a masterpiece that’s fall-apart tender. Ultimately, our goal is to transform you into a pot roast virtuoso, armed with the knowledge and confidence to create a hearty winter meal that will have everyone begging for seconds. So, pull up a chair, and let’s dive into the delicious world of braised beef perfection.
Why This Meal is a Timeless Classic
Honestly, what’s not to love? This dish is the undisputed champion of easy family dinners for a multitude of reasons. First and foremost, it’s the epitome of a one-pot meal, meaning fewer dishes to wash—a win in anyone’s book! Secondly, it’s incredibly budget-friendly; it transforms an affordable, tougher cut of meat into something luxuriously tender through the low-and-slow magic of braising.
Moreover, its versatility is legendary. Whether you’re using a vintage Dutch oven, a modern slow cooker, or a speedy pressure cooker, the result is always spectacular. It’s a make-ahead dream, often tasting even better the next day as the flavors continue to mingle and deepen. Beyond the practicalities, this Sunday dinner staple is a thread in the fabric of family life, a dish that creates its own nostalgia with every tender, flavorful bite.
Ingredients & Equipment
Gathering Your Ingredients: The Blueprint for Success
You simply can’t build a great house without a solid foundation, and the same goes for an incredible beef pot roast. Let’s break down the cast of characters you’ll need for this culinary performance.
Choosing the Right Cut of Meat (The Star of the Show)
This is the most critical decision you’ll make. Forget lean, tenderloin steaks; for a fork-tender roast, you need a cut rich with collagen and marbling that will melt and self-baste during the long cooking process.
-
Chuck Roast: The undisputed gold standard. Cut from the shoulder, it’s marbled with fat and laced with connective tissue. As it slowly cooks, all that collagen breaks down into unbelievably rich, succulent gelatin. If you see a “chuck roast” or “blade roast,” grab it!
-
Brisket: Another fantastic, though often leaner, option. The “point cut” has more fat than the “flat cut,” making it a juicier choice for pot roasting.
-
Round Roast: Sourced from the hindquarters, this is a leaner cut. While it can work, it requires extra care to prevent it from drying out. It’s often a better candidate for Instant Pot pot roast where the sealed environment locks in moisture.
The Supporting Cast: Vegetables and Aromatics
These aren’t just sides; they are essential flavor builders.
-
Potatoes: Starchy potatoes like Russets will break down slightly and help thicken the cooking liquid, while waxy varieties like Yukon Gold or red potatoes hold their shape beautifully. Yukon Golds are a perfect middle ground—creamy and buttery.
-
Aromatics: This holy trinity forms your flavor base. Onions and carrots caramelize and sweeten the entire dish, while garlic provides its unmistakable depth. Don’t forget celery for an earthy note.
-
Other Optional Vegetables: Feel free to get creative! Parsnips add a sweet, spicy nuance, turnipsoffer a slight bitterness, and mushrooms contribute a deep, savory umami flavor.
Liquids and Seasonings (Building the Braising Liquid)
This liquid is what steam-transforms your tough cut into a tender masterpiece.
-
Liquids: A good, low-sodium beef broth is your base. For incredible depth, use a rich beef stock. You can also use a combination of broth and water.
-
Seasonings: Kosher salt and freshly cracked black pepper are non-negotiable. Tomato paste is a secret weapon for adding richness and color, while Worcestershire sauce introduces a complex tang. Fresh herbs like thyme and rosemary and a bay leaf are the aromatic finishing touches.
Essential Equipment for a Flawless Pot Roast
You don’t need a kitchen full of gadgets, but the right pot makes all the difference.
The Ideal Cooking Vessel
-
Dutch Oven: This is the premier tool for the job. Its heavy construction, typically enameled cast iron, provides superb, even heat distribution and retention—perfect for the consistent, low heat braising requires. It’s also oven-safe and gorgeous enough to go from stove to table.
-
Slow Cooker/Crock-Pot: The champion of hands-off, all-day cooking. Just sear your meat on the stove first (trust me, it’s worth the extra pan), then let the slow cooker work its magic for 8 hours.
-
Instant Pot/Pressure Cooker: For those short on time, this modern marvel can produce a tender pot roast in under 90 minutes. It’s a game-changer for a weeknight comfort food craving.
The Cooking Process – A Step-by-Step Guide
Crafting Your Masterpiece: A Step-by-Step Cooking Guide
Alright, let’s get down to business! This is where we transform those simple ingredients into a legendary meal. Follow these steps, and you’re guaranteed success.
Step 1: Preparation and Bringing Meat to Temperature
Patience starts here. Take your chuck roast out of the fridge at least 45 minutes before cooking. Pat it completely dry with paper towels—this is crucial for getting a good sear. Then, generously season all sides with kosher salt and black pepper. Letting it sit allows the salt to penetrate and the meat to come to room temperature, which promotes even cooking.
Step 2: The Sear – Building a Flavor Foundation
This is the step you never want to skip. Why? It’s all about the Maillard reaction—that complex chemical process that creates hundreds of new flavor compounds when proteins and sugars brown. It’s not about “locking in juices”; it’s about building a deep, flavorful crust that will form the foundation of your entire dish.
Heat a tablespoon of oil in your Dutch oven over medium-high heat until it’s shimmering. Carefully place the roast in the pot. You should hear a confident sizzle. Don’t touch it! Let it sear for a solid 4-5 minutes until a beautiful brown crust forms. Then, carefully flip and repeat on all sides.
Step 3: Sautéing Aromatics and Deglazing
Once the meat is seared, remove it and set it aside on a plate. You’ll be left with those gorgeous browned bits stuck to the bottom of the pot. That’s pure flavor gold, called fond.
Reduce the heat to medium. Now, add your chopped onions, carrots, and celery. Sauté them until they begin to soften and become fragrant, about 5-7 minutes. Add the garlic and tomato paste and cook for another minute until the paste darkens slightly.
Now, for the magic trick: deglazing. Pour in about a cup of your beef broth. As the liquid hits the hot pot, use a wooden spoon to scrape all those browned bits off the bottom. They’ll dissolve into the liquid, creating an incredibly flavorful base for your braise. This process is the heart of building a deep, complex flavor profile.
Step 4: The Braise – Low and Slow Cooking
Now, return the seared roast to the pot, nestling it into the vegetables. Pour in enough remaining liquid to come about halfway up the sides of the meat. You don’t want to submerge it completely. Bring the liquid to a gentle simmer.
Then, cover the pot with a tight-fitting lid and transfer it to a preheated 300°F (150°C) oven. Why the oven? It provides gentle, consistent heat from all sides, preventing the dreaded hot spots that can occur on a stovetop. This is the secret to perfect braised beef.
Now, you wait. Let the roast cook, undisturbed, for about 3 hours. About 1.5 hours into the cooking time, add your potatoes and any other hardy vegetables. This ensures they become perfectly tender without turning to complete mush.
Step 5: Checking for Doneness (It’s Not About Temperature)
Forget your meat thermometer for this one. The only true test for a pot roast is the fork-tender test. After about 3 hours, carefully open the pot. Take a fork and try to pierce the meat. If the fork slides in with little to no resistance and you can easily twist off a piece, it’s done. If it still feels tough, give it another 20-30 minutes and check again. Collagen breaks down at its own pace!
Step 6: The Rest – The Non-Negotiable Final Step
I know, I know—you want to dig in immediately! But resisting that urge is the final key to a juicy roast. Using tongs, carefully transfer the meat to a clean cutting board and tent it loosely with foil. Let it rest for a full 15-20 minutes.
During this time, the muscle fibers, which have tightened from the heat, relax and reabsorb all those incredible juices. If you slice it right away, those juices will just run out onto the board, leaving you with a drier roast. Trust me, resting is a game-changer.
Step 7: Making a Simple Gravy from Pan Juices
While the meat rests, you can make an easy, flavorful gravy. Skim off any excess fat from the surface of the cooking liquid. Then, if you prefer a thicker gravy, you can create a slurry by whisking a tablespoon of cornstarch with two tablespoons of cold water. Whisk this into the simmering liquid in the pot and cook for a few minutes until thickened. For a deeper understanding of this process, you can learn to master the art of making a perfect pan sauce.
Variations, Serving, and Storing
Beyond the Classic: Delicious Variations to Try
Once you’ve mastered the basic formula, the world is your oyster! Here are a few famous twists on the classic pot roast.
Mississippi Pot Roast
This internet sensation is famously easy and packed with flavor. Simply place your seared roast in the pot and top it with a packet of ranch seasoning, a packet of au jus gravy mix, a stick of butter, and 5-6 pepperoncini peppers. Cook as usual. The result is tangy, savory, and ridiculously good.
Herb de Provence Pot Roast
For a French-inspired twist, season the roast generously with Herbs de Provence (a blend typically containing rosemary, thyme, oregano, and lavender) along with the salt and pepper. Use a full cup of broth for deglazing. The herbs perfume the meat and sauce with a beautiful, floral aroma.
Slow Cooker Pot Roast
The ultimate set-it-and-forget-it method. Simply follow Steps 1-3 to sear the meat and sauté the vegetables on the stove. Then, transfer everything to your slow cooker, add the liquid, cover, and cook on LOW for 8-10 hours or on HIGH for 5-6 hours.
Instant Pot Pot Roast
A modern miracle for busy cooks. Use the “Sauté” function to complete Steps 1-3. Add the roast back, the liquid (only about 1 cup is needed), and secure the lid. Cook on High Pressure for 60-80 minutes, followed by a 15-minute natural pressure release. Add the potatoes and cook on High Pressure for another 4-5 minutes.
Serving Your Pot Roast Dinner
How to Carve and Plate for Maximum Tenderness
Remember to always slice your meat against the grain. Look for the direction the muscle fibers are running and cut perpendicular to them. This shortens the fibers, making each piece incredibly tender and easy to chew. Alternatively, you can simply use two forks to pull the roast apart into delicious, rustic chunks.
Perfect Side Dishes to Complement Your Meal
While your pot roast with potatoes is a full meal, a few simple sides can round it out:
-
Buttered Egg Noodles or Mashed Potatoes: The ultimate vehicle for that glorious gravy.
-
Crusty Bread: A must-have for sopping up every last drop on the plate.
-
A Bright, Crisp Salad: Something with a vinaigrette dressing helps cut through the richness of the meal.
-
Glazed Carrots or Green Beans: For an extra pop of color and vegetable goodness.
Storing and Reheating for Future Meals
Proper Storage Methods
One of the best things about this dish is that the leftovers might be even better! Let the roast and vegetables cool completely before storing. Place them in an airtight container in the refrigerator, where they will keep beautifully for 3-4 days. For longer storage, you can freeze it for up to 3 months.
How to Reheat Without Drying Out
The key to reheating is gentle, even heat. Avoid the microwave, which can make the meat rubbery. Instead, place the desired portion in a covered oven-safe dish with a splash of beef broth. Reheat in a 300°F (150°C) oven for 20-30 minutes, until warmed through. You can also reheat it gently in a pot on the stovetop over low heat.
FAQs and Conclusion
Frequently Asked Questions (FAQs)
Why is my pot roast tough and dry?
This is almost always a sign of undercooking. The collagen and connective tissues haven’t had enough time to break down into soft, luxurious gelatin. Simply return it to the pot and continue cooking in 30-minute increments until it becomes fork-tender. Alternatively, not resting the meat can also cause the juices to run out.
Can I put raw potatoes in with my pot roast?
Absolutely! In fact, that’s the traditional way. The key is timing. Add them during the last 1 to 1.5 hours of cooking. This gives them enough time to become tender and soak up the delicious braising liquid without disintegrating into the sauce.
What is the best liquid to cook a pot roast in?
A good, low-sodium beef broth or stock is the best base as it provides a rich, savory foundation without being overly salty. You can use water in a pinch, but the overall flavor of the meat and gravy will be less complex.
How long does it take to cook a pot roast at 350°F?
A general rule of thumb is approximately 1 hour per pound of meat. However, this is just an estimate. The only true indicator of doneness is the fork-tender test. Always rely on that rather than the clock. For safe handling, always ensure the meat reaches official USDA safe internal temperature guidelines.
Should a pot roast be cooked covered or uncovered?
Always covered. Braising is a moist-heat cooking method. The tight-fitting lid traps the steam inside the pot, which is essential for tenderizing the tough muscle fibers. Cooking it uncovered would cause the liquid to evaporate and the meat to dry out and toughen.
Conclusion: Your New Signature Dish
And there you have it—your comprehensive roadmap to a flawless pot roast with potatoes dinner. This isn’t just about following a recipe; it’s about understanding the simple principles of layering flavors and practicing the gentle art of patience. From that initial, critical sear to the final, essential rest, each step builds upon the last to create something truly greater than the sum of its parts.
So, go forth with confidence! Embrace the process, enjoy the incredible aromas that will fill your home, and get ready to create a meal that’s so much more than dinner. It’s a experience, a memory, and your new signature dish for any occasion that calls for genuine, heartfelt comfort.
Print
Pot Roast with Potatoes Dinner
Description
Pot Roast with Potatoes Dinner
Ingredients
-
3–4 lb chuck roast (or brisket/round roast)
-
2 tbsp olive oil
-
Salt and black pepper, to taste
-
1 large onion, sliced
-
4 cloves garlic, minced
-
4 cups beef broth
-
1 cup red wine (optional, can sub more broth)
-
2 tbsp tomato paste
-
2 tbsp Worcestershire sauce
-
1 tsp dried thyme
-
1 tsp dried rosemary
-
2 bay leaves
-
1 ½ lbs baby potatoes (or Yukon golds), halved
-
4 large carrots, cut into chunks
-
2 celery stalks, cut into chunks
-
2 tbsp cornstarch + 2 tbsp water (slurry, optional for thickening)
-
Fresh parsley, chopped (for garnish)
Instructions
-
Prep the roast: Pat beef dry and season generously with salt and pepper.
-
Sear the beef: Heat olive oil in a large Dutch oven (or heavy oven-safe pot) over medium-high heat. Sear roast on all sides until browned, about 4–5 minutes per side. Remove and set aside.
-
Build flavor: In the same pot, sauté onions and garlic until softened. Stir in tomato paste and cook 1 minute. Deglaze with red wine (if using), scraping up browned bits.
-
Slow braise: Add beef broth, Worcestershire, thyme, rosemary, and bay leaves. Return roast to the pot. Bring to a simmer, then cover.
-
Oven method: Transfer to a preheated oven at 325°F (160°C). Cook for 3–4 hours.
-
Stovetop method: Simmer on low, covered, for 3–4 hours.
-
-
Add vegetables: After about 2 hours, add potatoes, carrots, and celery around the roast. Continue cooking until meat is fork-tender and veggies are cooked, about 1½–2 more hours.
-
Thicken gravy (optional): Remove roast and vegetables. Skim fat from cooking liquid. Mix cornstarch slurry into the liquid and simmer until thickened.
-
Serve: Slice or shred pot roast, spoon gravy over top, and serve with potatoes and vegetables. Garnish with parsley.