
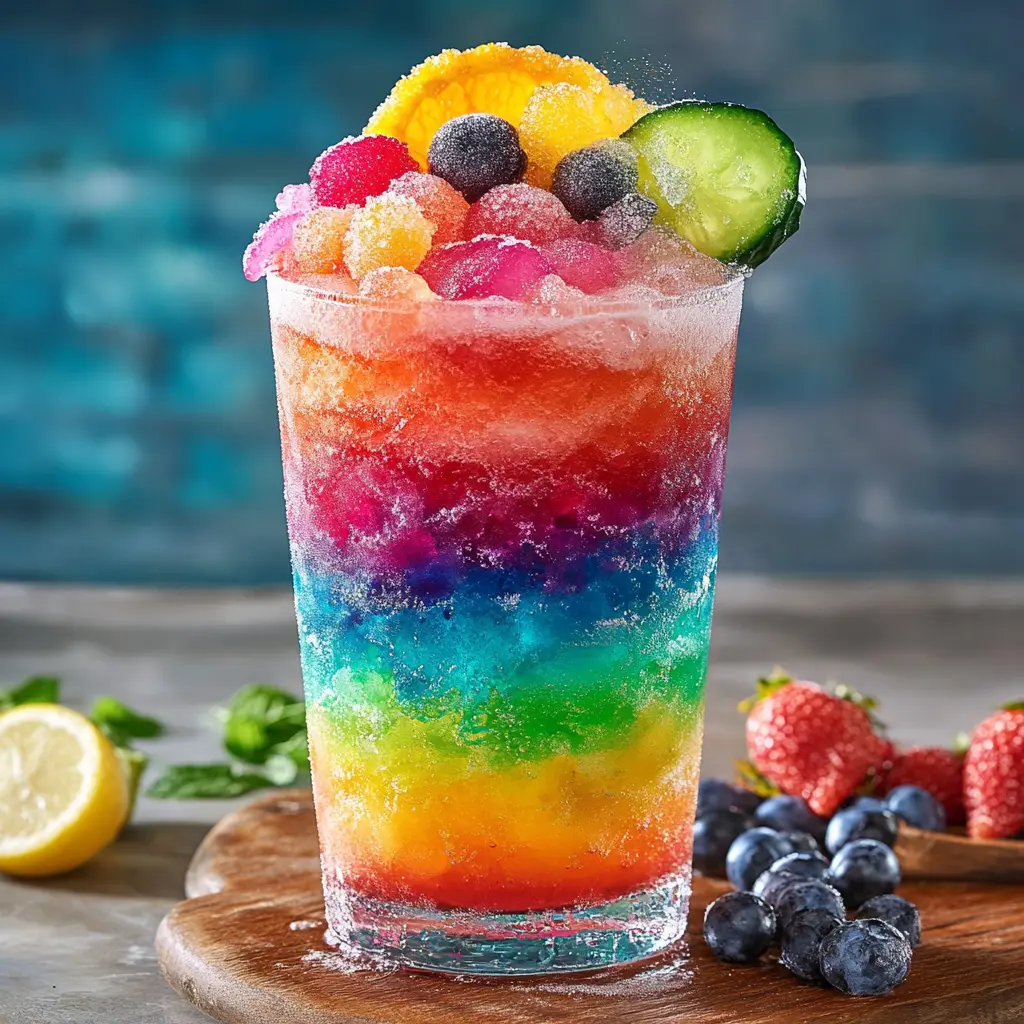
Rainbow Riptide Recipe: The Ultimate Layered Frozen Drink That’s a Candy Tsunami in Every Sip!
If you’re craving a drink that’s as visually stunning as it is delicious, look no further than the Rainbow Riptide — a vibrant, layered frozen drink bursting with candy-like flavors and a rainbow slush storm of colors. Whether you’re hosting a summer party, a kids’ birthday bash, or just want to treat yourself to something fun and refreshing, this recipe is your go-to guide for creating an eye-catching, tasty masterpiece.
In this post, I’ll walk you through everything you need to know to make this dazzling frozen drink, plus tips for customization, presentation ideas, and even a boozy twist for the adults. Ready to dive into a rainbow of flavors? Let’s get started!
What is the Rainbow Riptide?
The Rainbow Riptide is a layered frozen beverage made by blending six different colored and flavored juice or soda layers — red, orange, yellow, green, blue, and purple — each frozen into a thick, slushy consistency. When stacked carefully in a clear glass, the result looks like a magical rainbow slush storm you can sip. The flavor profile is like a “candy tsunami,” meaning it’s sweet, fruity, and intensely flavorful.
Each layer brings a unique taste and color, making it both a feast for the eyes and a refreshing drink perfect for hot days or celebrations. The Rainbow Riptide is especially popular for summer events, Pride celebrations, kids’ parties, and anyone who loves vibrant, Instagram-worthy drinks.
Ingredients Breakdown: What You’ll Need for Your Rainbow Riptide
The beauty of the Rainbow Riptide is its simple ingredient list, which you likely have on hand or can easily find at your local grocery store. Here’s what you’ll need:
For Each Layer (makes about 1/4 cup per layer):
-
Purple Layer: Grape juice or grape soda
-
Blue Layer: Blue raspberry sports drink or Kool-Aid
-
Green Layer: Limeade or green apple soda
-
Yellow Layer: Pineapple juice or lemonade
-
Orange Layer: Orange juice or mango nectar
-
Red Layer: Strawberry or cherry drink (juice, soda, or punch)
Additional Ingredients & Supplies:
-
1 cup of ice per layer (to blend for a thick slush)
-
Whipped cream (optional, for topping)
-
Sour candy belts or rainbow sprinkles (optional garnish)
-
Clear glass or cup (to show off the layers)
-
Rainbow straw or LED stir stick (optional, fun extras)
Step-By-Step Instructions: How to Make a Rainbow Riptide
1. Prepare Each Layer Separately
-
For each color layer, combine 1/4 cup of your chosen juice or drink with 1 cup of ice in a blender.
-
Blend until the mixture becomes thick and slushy.
-
Once blended, transfer each layer into separate containers and place them in the freezer to keep firm while you prepare the other layers.
2. Layer the Drink Carefully
-
Start with the purple layer at the bottom of your clear glass.
-
Using the back of a spoon, slowly pour the blue layer over the purple to prevent mixing.
-
Repeat this technique with the green, yellow, orange, and red layers, stacking them in that order.
-
Pouring slowly and over a spoon’s back is the key to keeping your layers crisp and beautiful.
3. Garnish and Serve
-
Top your Rainbow Riptide with whipped cream for a creamy finish.
-
Sprinkle rainbow sprinkles or drape sour candy belts around the glass for extra color and fun.
-
Add a colorful rainbow straw or an LED stir stick to amp up the presentation.
-
Serve immediately and enjoy your rainbow slush storm!
Pro Tips for the Perfect Rainbow Riptide
-
Thickness is Key: Each layer must be slushy and thick — not watery — for the layers to stay distinct. If a layer is too thin, it will blend into the previous one.
-
Freeze Between Layers: Keep each blended layer in the freezer until ready to pour to maintain its firmness.
-
Use Clear Glassware: The clearer the glass, the better the rainbow effect shows.
-
Flavor Variations: Feel free to experiment with different juices or sodas to create your own custom rainbow.
-
Boozy Version: Add a splash of matching flavored vodka or rum to each layer for an adult-only party drink.
-
Shortcut Version: For a quicker make, use just red, yellow, and blue layers for a bold, tri-color frozen treat.
Why You’ll Love Making and Drinking Rainbow Riptide
-
Visually Stunning: The layered colors look incredible and are a hit on social media.
-
Fun to Make: Blending and layering turns making a drink into a fun activity for all ages.
-
Customizable: Swap out flavors, adjust sweetness, or spike it for adults.
-
Refreshing & Sweet: Perfect for cooling off on hot summer days or brightening up a party.
-
Kid-Friendly (Non-Boozy) or Adult-Only: Make it family-friendly or adult-only depending on your choice of ingredients.
FAQ About Rainbow Riptide
Q: Can I prepare the layers in advance?
A: Yes! You can blend each layer ahead of time and store in the freezer. Just be sure to layer and serve quickly for best effect.
Q: What if I don’t have all the juices or sodas?
A: No worries! You can swap with any juice or flavored drink that matches the color and taste you want.
Q: How do I keep the layers from mixing?
A: Pour each layer slowly over the back of a spoon and ensure the previous layer is thick and frozen before adding the next.
Q: Can I make this dairy-free?
A: Absolutely! Just skip the whipped cream or use a dairy-free alternative.
Perfect Occasions to Serve Rainbow Riptide
-
Birthday Parties: Kids love the vibrant colors and candy-like flavors.
-
Summer BBQs: A refreshing and colorful alternative to traditional sodas or cocktails.
-
Pride Events: The rainbow colors make it perfect for Pride celebrations.
-
Pool Parties: Keep cool and stylish with a fun frozen drink.
-
Holiday Gatherings: Brighten up any celebration with this eye-catching drink.
How to Make Your Rainbow Riptide Instagram-Worthy
-
Use a tall, clear glass to really show off the layers.
-
Add garnishes like sour candy belts that hang over the rim.
-
Place your drink against a bright, colorful background.
-
Use a rainbow or LED straw for an extra pop of color.
-
Capture close-up shots highlighting the texture of the icy layers.
Variations to Try
-
Tropical Rainbow: Use tropical juices like passion fruit, guava, and coconut water.
-
Berry Blast: Substitute each layer with berry-flavored juices or sodas for a berry rainbow.
-
Candy-Inspired: Use candy-flavored sodas and add gummy candies for garnish.
-
Adult Cocktail: Spike each layer with flavored liquors to make a boozy rainbow cocktail.
Nutrition Information (Approximate)
Rainbow Riptide is mainly juice and ice, so calories and sugar will vary depending on your choice of drinks. Using natural juices can provide some vitamins, while sodas and sports drinks may add more sugar and calories. For a lighter version, opt for low-calorie or sugar-free drinks.
Final Thoughts: Make Your Own Rainbow Riptide Today!
The Rainbow Riptide is more than just a drink — it’s an experience. The joy of blending each colorful layer, the magic of seeing them stack into a vibrant rainbow, and the candy tsunami of flavors in every sip make this recipe a must-try. Whether you’re a seasoned home bartender, a parent looking for a fun kids’ drink, or simply a lover of colorful beverages, the Rainbow Riptide delivers on both looks and taste.
So, grab your blender, gather your juices and ice, and create your own rainbow slush storm today. Don’t forget to snap a pic and share your colorful creation with friends and family — it’s a guaranteed crowd-pleaser!
If you enjoyed this recipe, check out more fun and colorful drink ideas on my blog, and subscribe for weekly recipes that bring joy, color, and flavor to your kitchen.
Print
Rainbow Riptide
Description
🌈 Rainbow Riptide
A layered frozen drink in red, orange, yellow, green, blue, and purple – tastes like a candy tsunami and looks like a rainbow slush storm.
🍭 Ingredients (by layer):
For each layer, you’ll need about 1/4 cup of juice or drink + 1 cup of ice, blended until thick and slushy. Here’s the flavor guide:
-
Purple Layer – Grape juice or soda
-
Blue Layer – Blue raspberry sports drink or Kool-Aid
-
Green Layer – Limeade or green apple soda
-
Yellow Layer – Pineapple juice or lemonade
-
Orange Layer – Orange juice or mango nectar
-
Red Layer – Strawberry or cherry drink
You’ll also need:
-
Whipped cream (optional, for topping)
-
Sour candy belts or rainbow sprinkles (for garnish)
-
Clear glass or cup (to show off the layers)
-
Rainbow straw or LED stir stick (optional, for fun)
🌀 Instructions:
-
Blend each layer separately. Start with purple and work your way up to red. Blend each flavor with ice until slushy. Keep each in the freezer as you go so they stay firm.
-
Layer carefully. Add the purple layer to the bottom of your cup. Slowly pour each next color over the back of a spoon to keep the layers distinct.
-
Top it off. Finish with whipped cream, rainbow sprinkles, or sour candy.
-
Serve immediately. Grab a colorful straw and enjoy the wild ride.
🔥 Tips:
-
For the best results, make sure each layer is thick and icy, not watery.
-
Want a boozy version? Add a splash of matching flavored vodka or rum to each layer.
-
For a shortcut version, do just red, yellow, and blue for a bold tri-color hit.