
Introduction & The Foundation
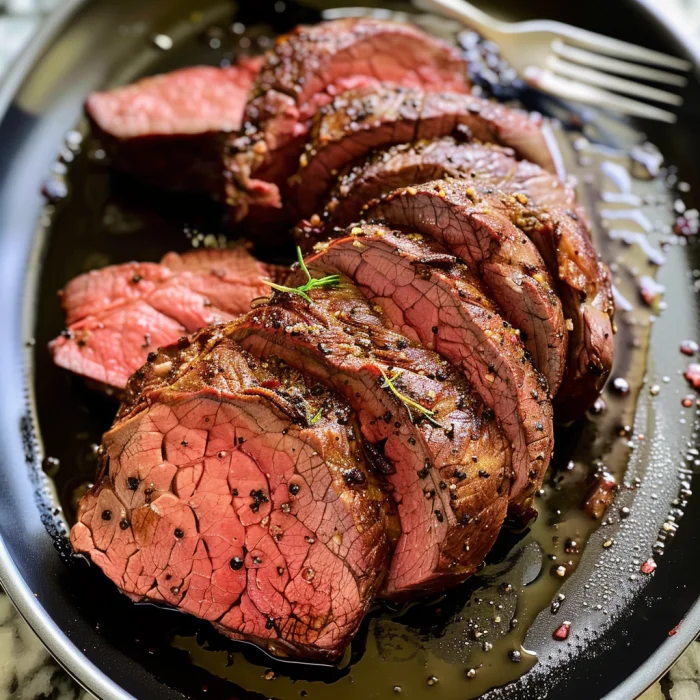
Ah, the beef tenderloin. Just the name conjures images of elegant dinner parties, holiday feasts, and a show-stopping centerpiece that promises melt-in-your-mouth tenderness. It’s the undisputed king of roasts, the crown jewel of the butcher case. But let’s be honest—for something so luxurious, the prospect of cooking it can feel incredibly daunting. Visions of a dry, overcooked, and tragically expensive log of meat have haunted many a home cook. What if you could banish those fears for good?
Well, you absolutely can. This guide is your ultimate masterclass, your step-by-step blueprint to roast beef tenderloin perfection. We’re going to walk through everything, from confidently selecting the right cut at the store to the glorious moment you carve into juicy, pink, flawlessly cooked meat. We’ll tackle seasoning, demystify cooking temperatures, and reveal the secrets to a killer crust. So, take a deep breath; you’re about to learn how to create a restaurant-quality masterpiece right in your own kitchen. Get ready to impress everyone at the table, most of all yourself.
Why Beef Tenderloin is the King of Roasts
Alright, let’s start at the very beginning: what makes this particular cut so special? In short, beef tenderloin is the most tender cut of beef you can buy. Period. This magnificently tender muscle, the psoas major, runs along the spine of the cow and, frankly, it doesn’t do much work. Consequently, this lack of exercise results in an incredibly soft, buttery texture that simply can’t be matched by tougher, more well-used muscles.
Now, here’s the catch—and it’s a big one. This prized tenderness comes with a trade-off. Because it’s so lean, with minimal marbling (those thin streaks of fat within the muscle), it doesn’t have the built-in insurance policy against dryness that a well-marbled ribeye might have. That’s precisely why nailing the cooking technique is non-negotiable; however, the payoff is absolutely worth the effort.
Ultimately, this combination of supreme tenderness and a clean, beefy flavor makes it the premier choice for those truly special occasions. Whether it’s the centerpiece of your Christmas dinner, the star of an anniversary celebration, or the main event for a dinner party you want to be remembered for, a perfectly cooked roast beef tenderloin doesn’t just serve a meal—it makes a statement. It whispers elegance and shouts skill, all at the same time.
Selection & Preparation
Selecting the Perfect Cut: Your Blueprint for Success
Before you even think about turning on your oven, your journey to a perfect beef tenderloin recipebegins at the store or butcher counter. Making the right choice here sets you up for success, so let’s break down your options.
First off, you’ll typically encounter two main choices. On one hand, you have the Whole Tenderloin(sometimes called a full loin). This is the entire, untrimmed muscle, often shaped a bit like a uneven baseball bat. It’s usually a better value per pound and gives you the freedom to trim it exactly how you like; furthermore, you can custom-cut your own steaks from the ends. On the other hand, you have the Pre-Trimmed or Center-Cut Roast. This is the chef’s kiss of convenience. The pesky silverskin and excess fat are already removed, and it’s tied into a beautifully uniform cylinder that promises even cooking from end to end. The trade-off? You’ll pay a premium for that convenience.
So, how much should you buy? A good rule of thumb is to plan for about half a pound (8 ounces) per person. This accounts for some weight loss during trimming and cooking. For instance, a 4-pound whole tenderloin will likely yield a 3-pound roast, comfortably serving six people with the potential for fantastic leftovers.
When you’re examining the meat, use your eyes and hands. Look for flesh that’s a bright, cherry-red color—avoid any that looks brown or dull. While marbling isn’t abundant in this cut, a few fine, wispy streaks of fat are a good sign for flavor. Finally, give it a gentle press; it should feel firm and spring back slightly, not soft or squishy.
Essential Pre-Roast Preparation
You’ve got your gorgeous cut of meat home—now what? Proper preparation is what separates the amateurs from the pros. Honestly, this stage is just as important as the cooking itself.
If you bought a whole tenderloin, your first mission is to tackle the silverskin. This is a tough, silvery membrane that absolutely will not break down during cooking. Leaving it on is like trying to chew through a shoe; it’s a guaranteed way to ruin a beautiful piece of meat. Thankfully, removing it is simpler than it looks. All you need is a sharp, flexible paring or boning knife. Slide the knife blade underneath a section of the silverskin, angle the blade slightly upward toward the membrane (not down into the meat!), and use a gentle sawing motion. Once you have a enough to grip, hold onto the silverskin and pull it up and away as you continue to slide the knife along. You’ll feel like a real butcher, and it’s incredibly satisfying.
Next up: tying the roast. “But does it really matter?” you might ask. For a uniform shape like a center-cut, maybe not. For a tapered whole tenderloin, absolutely! Tying it with kitchen twine at about 1.5-inch intervals creates a consistent cylinder. This ensures the thinner tail end doesn’t become well-done while the thicker center is still rare. It’s a simple trick for perfectly even cooking.
Finally, and this is non-negotiable: bring your roast to room temperature. Take it out of the fridge, set it on a rack over a baking sheet, and let it sit for a good 1.5 to 2 hours before it goes in the oven. Why? Because a cold roast will cook incredibly unevenly. You’ll end up with a ring of overcooked meat on the outside long before the center even gets warm. Letting it warm up slightly is the single easiest way to promote a perfect, edge-to-edge doneness.
Flavor, Cooking & Science
Seasoning and Flavoring Your Masterpiece
Now for the fun part: making it taste amazing. When it comes to a premium cut like this, sometimes simple is best. A generous coating of high-quality kosher salt and a hefty amount of freshly cracked black pepper is a classic for a reason. It creates a stunning, flavorful crust that perfectly complements the beef without overpowering its natural luxury.
Of course, you can absolutely get creative! A garlic-herb paste made from minced garlic, fresh rosemary, thyme, and olive oil is a timeless winner. For a deeper, more earthy profile, a coffee-chili rub can be phenomenal. And let’s not forget a mustard and herb crust—using Dijon mustard as a binder for a mixture of herbs adds a fantastic tangy flavor and helps the seasonings adhere.
A common question is about marinating. Honestly, because beef tenderloin is so tender already, it doesn’t need to be marinated to improve its texture. In fact, highly acidic marinades (with vinegar or citrus) can actually start to break down the delicate proteins and make the surface mushy if left too long. If you want to use a marinade for flavor, a few hours is plenty. Otherwise, a good rub or paste is your best bet.
The Science of Doneness: Temperature is Everything
Listen closely, because this is the most important piece of advice in this entire guide: Use a digital probe thermometer. Guessing based on time or feel is a guaranteed path to disappointment. A thermometer removes all the guesswork and is your direct line to perfection.
Why is it so crucial? Because of a phenomenon called carryover cooking. When you pull the roast from the oven, the intense heat on the outside continues to travel inward, causing the internal temperature to rise by another 5 to 10 degrees Fahrenheit. This means you must remove the roast from the oven beforeit hits your final desired temperature.
Here is your essential temperature guide. Remember, you pull the roast at these temps, and it will rise to the final doneness while resting.
-
Rare: Pull at 120-125°F (Final temp 125-130°F)
-
Medium Rare: Pull at 130-135°F (Final temp 135-140°F) (This is the sweet spot!)
-
Medium: Pull at 140-145°F (Final temp 145-150°F)
-
Medium Well: Pull at 150-155°F (Final temp 155-160°F) (We don’t recommend this)
-
Well Done: Pull at 160°F+ (Please, just don’t)
Trusting these numbers is the key to a juicy, not dry, result. For more on food safety and temperatures, you can always check the USDA safe food handling guidelines.
Cooking Methods: Searing vs. Low-and-Slow
You’ve prepped, you’ve seasoned, now how do you actually cook it? There are two champion methods, each with its own superpower.
Method 1: The Sear-Then-Roast Technique (High Heat)
This is the classic, restaurant-style approach for a reason. It’s all about building a spectacular, flavorful crust. First, you pat the roast completely dry. Then, you heat a tablespoon of oil in a heavy oven-proof skillet (like cast-iron) until it’s smoking hot. Sear the tenderloin on all sides until it’s beautifully browned—this usually takes about 8-10 minutes total. This process, called the Maillard reaction, is what creates that deep, complex flavor. Once seared, the entire skillet goes into a preheated 425°F oven to finish cooking until the thermometer reads your target temperature.
Method 2: The Low-and-Slow (Reverse Sear) Technique
This modern method is a game-changer for achieving ultimate precision. Instead of starting hot, you start low. You place the seasoned roast on a rack in a baking sheet and put it in a low oven, around 225-250°F. You slowly cook it until the internal temperature is about 15°F below your final target. Then, you take it out, crank a skillet to blazing hot, and give it a quick sear for just a minute or two per side to develop that gorgeous crust. The reverse sear is brilliant because it dries the surface of the meat for better browning and delivers perfectly even doneness from edge to edge with zero gray band.
So, which one should you choose? If you want a traditional, crust-forward roast and are confident with timing, go sear-then-roast. If you prize perfect doneness above all and don’t mind the longer cook time, the reverse sear is your best friend.
Resting, Carving & Serving
The Non-Negotiable Step: Resting Your Roast
You’ve pulled the roast from the oven at the perfect temperature. The aroma is driving you crazy. Your instinct is to immediately carve into it—fight that instinct! Resting the meat is not a suggestion; it is a mandatory step.
What’s happening during this time? The intense heat of the oven causes the muscle fibers to tighten and squeeze out the juices toward the center of the roast. If you cut it open immediately, all those precious juices will simply flood out onto your cutting board, leaving you with dry meat. Resting allows the fibers to relax and reabsorb all those flavorful juices throughout the entire roast.
How long? For a large roast, you need at least 15 to 20 minutes. Don’t just leave it on the hot pan, though. Transfer it to a clean cutting board and tent it very loosely with foil. Tenting it tightly will trap steam and ruin that hard-earned crust. The wait will feel like an eternity, but I promise you, the payoff is a dramatically juicier result.
How to Carve a Beef Tenderloin Like a Pro
The finish line is in sight! Now, for a beautiful presentation, you need to carve it properly. First, make sure you have a long, sharp carving knife or a very sharp chef’s knife. A dull knife will tear the meat and ruin the texture.
Start by carefully snipping and removing all the pieces of kitchen twine. Then, locate the direction of the grain—the lines of muscle fiber running through the meat. You always want to slice against the grain(perpendicular to those lines). This shortens the muscle fibers, making each bite seem even more tender. Slice the roast into your desired thickness, anywhere from ½-inch to 1-inch thick rounds. For a pristine presentation, wipe the blade of your knife clean with a towel between slices.
Serving Suggestions: The Perfect Accompaniments
Your masterpiece is ready for its debut. What do you serve with it? You’ll want sides that complement its richness without stealing the spotlight.
Creamy mashed potatoes are a classic and perfect for soaking up any juices. For something with a bit of texture, roasted vegetables like asparagus, carrots, or Brussels sprouts are fantastic. Their slight caramelization pairs beautifully with the savory beef. And no matter what you choose, you absolutely must have a great sauce on the side.
Sauces & Leftovers
Elevate Your Dish: Classic Sauces for Beef Tenderloin
A magnificent sauce can transform a great roast into an unforgettable one. Here are a few timeless pairings:
-
Red Wine Reduction: This is the ultimate classic for a reason. It’s rich, deeply flavorful, and elegant. It involves reducing red wine, shallots, and beef stock with herbs into a luxurious, slightly thickened sauce.
-
Creamy Horseradish Sauce: The sharp, zesty kick of horseradish cut through with cream and a hint of lemon is the perfect contrast to the rich, fatty beef. It’s refreshing and bold.
-
Béarnaise Sauce: A cousin of hollandaise, this is the definition of decadence. A rich, emulsified sauce of butter, egg yolks, and a reduction of tarragon, shallots, and vinegar. It’s a restaurant-worthy treat.
-
Chimichurri: For a bright, herbal option, a vibrant green chimichurri made with fresh parsley, oregano, garlic, vinegar, and oil is incredible. It adds a fresh, tangy punch that lightens the whole dish.
Don’t Waste a Bite: Ideas for Leftover Roast Beef Tenderloin
If you’re lucky enough to have leftovers, celebrate! This is a fantastic problem to have. Store any leftover meat in an airtight container in the refrigerator; it will be good for 3 to 4 days.
Now, what to do with it? Sandwiches are the obvious and glorious choice. Thinly slice the cold tenderloin and pile it high on a crusty baguette with a slather of horseradish sauce and some arugula. Incredible. For breakfast, chop it up and make a luxurious beef hash with diced potatoes and onions, topping it with a fried egg. You can also slice it cold and drape it over a big green salad for a protein-packed lunch. Leftovers are a delicious reward for your hard work.
FAQs & Conclusion
Frequently Asked Questions (FAQs)
What is the best temperature to cook beef tenderloin?
The best oven temperature depends on your method! For the traditional sear-then-roast technique, a high oven temp of 425°F is ideal. For the reverse sear method, a low oven between 225-250°F is used. However, the most critical temperature is the internal temperature of the meat, which you must monitor with a reliable thermometer.
How long do you cook beef tenderloin per pound?
It’s strongly advised to avoid relying on time per pound. So many factors affect cooking time: the starting temperature of the meat, your oven’s accuracy, the roasting pan you use, and the exact size and shape of the roast. Using time is a recipe for inconsistency. The only reliable way to know when it’s done is to use a digital meat thermometer. As a very rough estimate, a 3-pound roast in a 425°F oven might take 30-40 minutes total for medium-rare, but always trust the thermometer, not the clock.
Should you sear beef tenderloin before roasting?
While it’s not strictly mandatory, searing is highly recommended. Searing creates a beautiful brown crust through a process called the Maillard reaction, which adds immense depth and complexity of flavor that you simply can’t get from roasting alone. It’s the difference between tasty and truly spectacular. For a deep dive into why this works, you can read about the science behind the Maillard reaction.
Why is my beef tenderloin tough?
If your beef tenderloin is tough, the most likely culprit, by far, is that it was overcooked. This is a very lean cut with little fat to keep it moist. Once it’s cooked beyond medium, the muscle fibers tighten excessively and squeeze out all their moisture, resulting in a dry and chewy texture. This is why monitoring the internal temperature and accounting for carryover cooking is so critical. Another, less common, reason could be that the silverskin was not fully removed before cooking, as it is extremely tough and inedible.
Conclusion: Your Path to Roast Perfection
You’ve made it. From a daunting, expensive cut of meat to a conquered culinary milestone. Remember, the path to a perfect roast beef tenderloin is paved with a few simple but non-negotiable principles: selecting a good cut, preparing it with care, seasoning it confidently, cooking it to a precise temperature, and resting it patiently.
This isn’t just about following a recipe; it’s about understanding the why behind each step. You now have the knowledge and the confidence to create a truly spectacular meal that will wow your family and friends. So go on, preheat that oven, and get ready to create something unforgettable. You’ve got this.
Print
Roast Beef Tenderloin
Description
Roast Beef Tenderloin
Ingredients (6–8 servings)
-
1 whole beef tenderloin (about 3–4 lbs), trimmed and tied
-
2 tbsp olive oil
-
4 cloves garlic, minced
-
2 tsp fresh rosemary, finely chopped (or 1 tsp dried)
-
2 tsp fresh thyme, finely chopped (or 1 tsp dried)
-
2 tsp kosher salt
-
1 tsp black pepper
-
2 tbsp butter
Instructions
-
Prep tenderloin:
Remove the beef from the fridge 45–60 minutes before cooking so it comes to room temperature. Preheat oven to 475°F (245°C). -
Season:
Rub tenderloin with olive oil, garlic, rosemary, thyme, salt, and pepper. Make sure it’s coated evenly. -
Sear:
Heat a large oven-safe skillet (cast iron is best) over high heat. Add butter and sear tenderloin on all sides until browned (about 3 minutes per side). -
Roast:
Transfer skillet to oven and roast for:-
Rare: 120°F (about 18–20 min)
-
Medium-rare: 125°F (about 20–25 min)
-
Medium: 135°F (about 25–30 min)
Use a meat thermometer for best results.
-
-
Rest:
Remove from oven, cover loosely with foil, and let rest 15 minutes before slicing (temperature will rise slightly as it rests). -
Slice & serve:
Cut into ½–1 inch slices and serve with pan drippings or your favorite sauce.