
Spatchcocked Grilled Chicken: The Ultimate Guide to Perfectly Grilled Chicken
What Is Spatchcocked Grilled Chicken?
Spatchcocked grilled chicken is a whole chicken that has been butterflied by removing the backbone. This technique allows the bird to lie completely flat on the grill. The result is faster cooking, even heat distribution, and incredibly crispy skin. Moreover, this method has gained popularity among home cooks and professional chefs alike. The flattened shape exposes more surface area to direct heat. Consequently, the chicken develops a beautiful char while staying juicy inside.
This cooking method originated centuries ago as a practical solution. Furthermore, spatchcocking transforms an ordinary whole chicken into a show-stopping centerpiece. The technique works beautifully on any grill type. Additionally, it reduces cooking time by nearly 30-40% compared to traditional roasting.
Why Spatchcock Your Chicken?
Faster Cooking Time
Spatchcocking dramatically reduces cooking time. A typical 4-pound whole chicken takes about 45-60 minutes when spatchcocked. In contrast, a traditional whole roasted chicken requires 90 minutes or more. Therefore, this method is perfect for weeknight dinners. The flattened shape allows heat to penetrate more efficiently. As a result, your meal reaches the table much faster.
Even Cooking Throughout
Traditional whole chickens often have dry breasts and undercooked thighs. However, spatchcocking solves this problem completely. The uniform thickness ensures all parts cook at the same rate. Moreover, both white and dark meat finish simultaneously. This means no more sacrificing juicy breasts for properly cooked thighs.
Maximum Crispy Skin
The increased surface area creates more crispy, golden skin. Additionally, the flattened chicken makes direct contact with the grill grates. Furthermore, every inch of skin gets exposed to heat. Consequently, diners enjoy more of the most coveted part. The crispy texture rivals any rotisserie chicken.
Better Flavor Absorption
Marinades and seasonings penetrate more deeply into spatchcocked chicken. The flattened shape provides more surface area for rubs. Additionally, flavors reach the meat more easily. Therefore, every bite bursts with delicious taste. This benefit makes marinating especially worthwhile.
Tools You’ll Need
Kitchen Shears or Poultry Shears
Heavy-duty kitchen shears are essential for removing the backbone. These scissors cut through bones effortlessly. Moreover, they provide better control than knives. Invest in a quality pair for best results. Additionally, keep them sharp for easier cutting.
Sharp Chef’s Knife
A sharp knife helps trim excess fat and skin. Furthermore, it’s useful for making precise cuts. However, shears work better for cutting through bones. Keep your knife nearby for finishing touches.
Cutting Board
Use a large, sturdy cutting board for preparation. Additionally, choose one designated for raw poultry. Plastic boards are easier to sanitize than wood. Moreover, a rimmed board catches any juices.
Meat Thermometer
An instant-read thermometer ensures perfectly cooked chicken. Moreover, it prevents undercooking or overcooking. Digital thermometers provide the most accurate readings. Additionally, probe thermometers monitor temperature continuously.
Grill
Any grill type works for spatchcocked chicken. Gas grills offer precise temperature control. Charcoal grills provide authentic smoky flavor. Moreover, both methods yield excellent results.
How to Spatchcock a Chicken
Remove the Backbone
Place the chicken breast-side down on your cutting board. Starting at the tail end, cut along one side of the backbone. Use kitchen shears to cut through the ribs. Additionally, work your way toward the neck. Repeat on the other side of the backbone. Remove the backbone completely. Save it for making stock or discard it.
Flatten the Chicken
Flip the chicken over so the breast faces up. Locate the breastbone in the center. Press down firmly on both sides of the breast. Use the heel of your hand to apply pressure. Moreover, you’ll hear a crack as the breastbone breaks. The chicken should now lie completely flat. Additionally, check that both sides are even.
Alternative Method for Breastbone
Some cooks prefer removing the breastbone entirely. Make a small cut in the cartilage between the breasts. Use a paring knife to cut along the cartilage. Furthermore, remove the entire breastbone if desired. This method takes longer but creates an even flatter bird.
Tuck the Wings
The wing tips tend to burn during grilling. Tuck them behind the body of the chicken. Alternatively, trim the wing tips completely. This step protects them from overcooking.
Pat Dry
Use paper towels to pat the entire chicken dry. Moisture prevents crispy skin development. Therefore, removing surface water is crucial. Additionally, dry skin accepts seasonings better.
Best Seasonings and Marinades
Simple Dry Rub
A basic dry rub delivers excellent flavor without much effort. Combine 2 teaspoons of black pepper, 2 teaspoons of sweet paprika, and 2 teaspoons of garlic powder. Add 1 teaspoon of salt and 1 teaspoon of celery salt. Furthermore, include ¼ teaspoon of ground cumin and ¼ teaspoon of ground coriander. Mix all ingredients thoroughly. Rub the mixture generously over the entire chicken.
Herb and Garlic Blend
Fresh herbs create aromatic, flavorful chicken. Mix 1 tablespoon of chopped fresh rosemary with 1 tablespoon of chopped fresh sage. Add 2 tablespoons of chopped fresh parsley. Additionally, combine with salt, pepper, and olive oil. Rub this mixture under and over the skin. Moreover, let it marinate for at least 2 hours.
Smoky Spice Rub
For bolder flavor, try a smoky blend. Combine 2 tablespoons of smoked paprika with 1 tablespoon of chipotle powder. Add 1 teaspoon of chili powder, garlic powder, and black pepper. Furthermore, use 2 tablespoons of salt for proper seasoning. This rub creates a beautiful crust with deep flavor.
Citrus Marinade
Bright citrus flavors complement grilled chicken perfectly. Combine fresh lime juice, olive oil, and minced garlic. Add cumin, oregano, and black pepper. Moreover, marinate the chicken for at least 4 hours. Alternatively, refrigerate overnight for maximum flavor penetration.
How Long to Marinate
Marinades work best when given time to penetrate. Aim for at least 2 hours of marinating time. However, overnight marination yields the best results. Furthermore, always marinate in the refrigerator. Remove the chicken 30 minutes before grilling to take off the chill.
Grilling Techniques and Temperature
Two-Zone Grilling Setup
Two-zone grilling is the key to perfectly cooked chicken. Create a hot zone for searing and a cooler zone for indirect cooking. On a gas grill, heat one side to high and leave the other on low. For charcoal grills, pile coals on one half. This setup prevents burning while ensuring thorough cooking.
Gas Grill Temperature
Preheat your gas grill to 400-450°F. Moreover, this temperature range provides excellent results. Additionally, ensure the grill grates are clean and well-oiled. Use a paper towel dipped in oil to coat the grates. This prevents sticking and creates beautiful grill marks.
Charcoal Grill Setup
For charcoal grills, arrange hot coals on one side only. Leave the other half empty for indirect heat. Additionally, allow the coals to ash over before cooking. The temperature should read 350-400°F. Moreover, add wood chips for extra smoky flavor if desired.
Direct vs. Indirect Heat
Start by searing the chicken over direct heat. This creates crispy, charred skin. Then, move the chicken to indirect heat to finish cooking. Furthermore, this prevents the outside from burning before the inside cooks through. The combination yields perfect results every time.
Step-by-Step Grilling Instructions
Prepare the Grill
Clean the grill grates thoroughly with a wire brush. Preheat the grill according to your setup method. Additionally, oil the grates right before adding the chicken. This final step ensures nothing sticks.
Initial Sear
Place the chicken skin-side down over direct heat. Close the grill lid and cook for 2-5 minutes. Moreover, watch carefully for charring and grill marks. The skin should turn golden brown with slight char marks. Then, flip the chicken so the bone side faces down.
Move to Indirect Heat
Transfer the chicken to the cooler side of the grill. Position it bone-side down for the remaining cooking time. Close the grill lid to maintain consistent temperature. Additionally, keep the vents open for proper airflow.
Cooking Time
A 4-pound spatchcocked chicken takes 40-50 minutes total. However, cooking time varies based on chicken size and grill temperature. Therefore, always use a meat thermometer to check doneness. Start checking the temperature after 30 minutes.
Optional Basting
Some recipes call for basting with sauce during cooking. If using barbecue sauce, apply it during the last 15-20 minutes. Moreover, brush the sauce on 2-3 times. However, avoid adding sugary sauces too early. They can burn and create bitter flavors.
Final Adjustments
For the last 10-20 minutes, consider turning off the burner under the chicken. Leave the other burners on to maintain oven-like conditions. This technique prevents over-charring. Additionally, it ensures the chicken cooks through completely.
Tips for Crispy Skin
Pat the Skin Completely Dry
Moisture is the enemy of crispy skin. Therefore, thoroughly pat the entire chicken with paper towels. Additionally, let the chicken air-dry in the refrigerator for 1-2 hours. Uncovered refrigeration dries the skin even more. Consequently, it crisps up beautifully during grilling.
Use High Heat Initially
High heat creates the crispy exterior everyone loves. Start with temperatures of 400-450°F. Moreover, the initial sear over direct heat jump-starts the crisping process. Furthermore, don’t skip this important step.
Avoid Moving the Chicken
Resist the urge to constantly check the chicken. Every time the lid opens, heat escapes. Moreover, frequent flipping prevents proper browning. Therefore, follow the cooking plan and check only when necessary.
Oil the Skin, Not the Grates
Many cooks oil the grill grates before cooking. However, also brush a thin layer of oil on the chicken skin. This extra step promotes even browning. Additionally, it prevents sticking to the grates.
How to Tell When It’s Done
Use a Meat Thermometer
The most reliable method is checking internal temperature. Insert an instant-read thermometer into the thickest part of the breast. Additionally, check the thigh meat as well. The chicken is done when it reaches 160-165°F. Remember that carryover cooking raises the temperature by 5-10 degrees.
Visual Cues
Properly cooked chicken has golden-brown skin with char marks. Moreover, the juices run clear when pierced. Additionally, the meat pulls away slightly from the bones. However, always verify with a thermometer for food safety.
Resting Period
Remove the chicken from the grill at 160°F. Let it rest for 10-15 minutes before carving. During this time, the temperature rises to 165°F. Furthermore, resting allows juices to redistribute throughout the meat. Consequently, every bite stays moist and flavorful.
Thigh Temperature
Dark meat benefits from slightly higher temperatures. Aim for 165-175°F in the thickest part of the thigh. Moreover, this ensures tender, fully cooked dark meat. The higher temperature breaks down connective tissue better.
Serving Suggestions
Carving the Chicken
Spatchcocked chicken is remarkably easy to carve. Start by cutting between the breast and thigh. Additionally, separate the drumsticks from the thighs. Cut the breast meat away from the breastbone. Furthermore, slice the breast meat against the grain. The flat shape makes every cut straightforward.
Side Dish Pairings
Grilled vegetables complement spatchcocked chicken perfectly. Try grilled zucchini, bell peppers, or asparagus. Additionally, corn on the cob provides a classic pairing. Moreover, fresh salads with vinaigrette balance the rich chicken. Roasted potatoes or rice pilaf round out the meal beautifully.
Sauce Options
While the chicken is delicious on its own, sauces add variety. Chimichurri provides bright, herbaceous flavor. Additionally, garlic herb butter melts beautifully over hot chicken. Furthermore, barbecue sauce offers sweet and tangy notes. Ranch dressing works well as a dipping sauce too.
Presentation Ideas
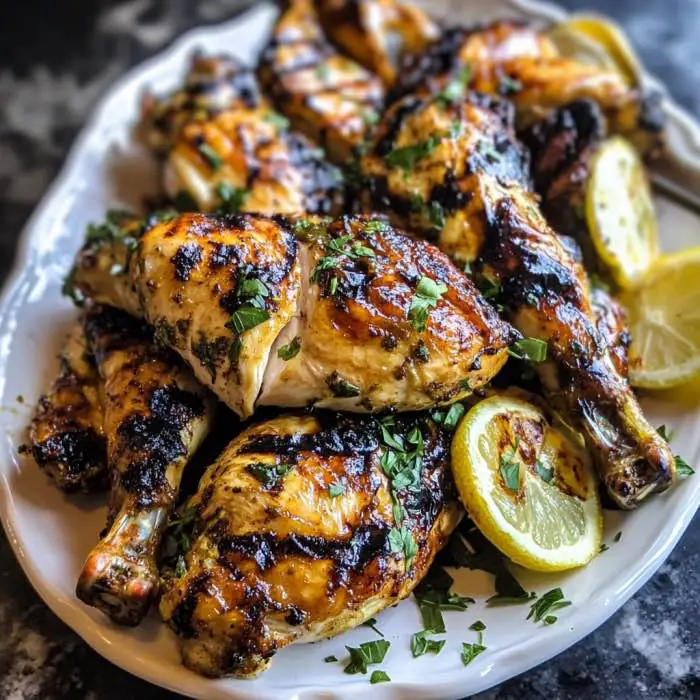
Serve the whole spatchcocked chicken on a large platter. Garnish with fresh herbs like parsley or cilantro. Additionally, add lemon wedges around the edges. Moreover, this rustic presentation impresses dinner guests. The golden, crispy skin looks absolutely stunning.
Storage and Leftovers
Refrigerator Storage
Store leftover chicken in airtight containers within 2 hours. Additionally, separate the meat from the bones if possible. Refrigerated chicken stays fresh for 3-4 days. Moreover, store any pan juices separately for reheating.
Freezer Storage
Spatchcocked chicken freezes well for up to 3 months. Wrap pieces tightly in plastic wrap, then aluminum foil. Additionally, label containers with the date. Furthermore, freeze in meal-sized portions for convenience.
Reheating Methods
Reheat chicken in a 350°F oven for best results. Cover with foil to prevent drying out. Additionally, add a splash of chicken broth for moisture. Alternatively, reheat in the microwave on medium power. However, the oven maintains texture better.
Using Leftovers
Leftover grilled chicken works in countless recipes. Chop it for chicken salad or tacos. Additionally, add it to pasta dishes or grain bowls. Moreover, it makes excellent chicken soup or quesadillas. The smoky grilled flavor enhances any dish.
Common Mistakes to Avoid
Not Patting the Chicken Dry
Wet skin never crisps properly. Therefore, always thoroughly dry the chicken. Additionally, this step helps seasonings adhere better. Moreover, take the extra minute to ensure the skin is completely dry.
Cooking Over Direct Heat the Entire Time
Direct heat throughout cooking burns the exterior. Meanwhile, the interior remains undercooked. Therefore, always use the two-zone method. Furthermore, indirect heat finishes the cooking gently.
Opening the Grill Too Often
Every lid opening releases heat and smoke. Consequently, cooking time increases significantly. Moreover, temperature fluctuations affect the final result. Therefore, resist checking too frequently. Trust the process and use a thermometer.
Not Using a Thermometer
Guessing doneness leads to dry or undercooked chicken. Therefore, invest in a quality meat thermometer. Additionally, check multiple spots for accuracy. Moreover, this tool guarantees food safety every time.
Skipping the Resting Period
Cutting into chicken immediately releases all the juices. Therefore, always rest the chicken for 10-15 minutes. Additionally, tent it loosely with foil during resting. Consequently, the meat stays incredibly juicy.
Over-Seasoning or Under-Seasoning
Balance is key with seasonings. Too much salt overpowers other flavors. However, too little leaves the chicken bland. Therefore, measure seasonings carefully. Additionally, taste and adjust before cooking if possible.
Frequently Asked Questions
What does spatchcock mean?
Spatchcock means removing the backbone and flattening the bird. This technique allows for faster, more even cooking. Additionally, it maximizes crispy skin development. The term comes from an old Irish cooking method.
Can I spatchcock chicken ahead of time?
Yes, absolutely. Spatchcock the chicken up to 24 hours in advance. Additionally, season it and store covered in the refrigerator. Moreover, this actually improves flavor penetration. Bring it to room temperature 30 minutes before grilling.
How long does spatchcocked grilled chicken take to cook?
A typical 4-pound spatchcocked chicken takes 45-60 minutes on the grill. However, exact time depends on grill temperature and chicken size. Therefore, always use a meat thermometer to confirm doneness. Start checking at 40 minutes.
What internal temperature should spatchcocked chicken reach?
The chicken is safe to eat at 165°F internal temperature. However, pull it from the grill at 160°F. Additionally, carryover cooking raises the temperature during resting. For thighs, 170-175°F yields more tender meat.
Can I cook spatchcocked chicken in the oven instead?
Yes, oven cooking works excellently. Preheat to 425°F and roast for 40-45 minutes. Additionally, the chicken develops crispy skin in the oven too. Moreover, check internal temperature for doneness. However, grilling adds smoky flavor that ovens can’t replicate.
Do I need to marinate spatchcocked grilled chicken?
Marinating is optional but highly recommended. It adds tremendous flavor and moisture. Additionally, marinades penetrate better in flattened chicken. Moreover, overnight marination yields the best results. However, a simple dry rub also works beautifully.
What’s the best way to get crispy skin?
Pat the chicken completely dry before seasoning. Additionally, start with high heat to sear the skin. Moreover, avoid opening the grill lid frequently. Furthermore, brushing the skin with oil helps browning. These steps guarantee crispy, golden skin.
Can I use a charcoal grill for spatchcocked chicken?
Charcoal grills work wonderfully for spatchcocked chicken. Set up coals on one side for two-zone cooking. Additionally, charcoal provides authentic smoky flavor. Moreover, maintain temperature around 350-400°F. Check out our guide on [insert link] charcoal grilling techniques for more tips.
Conclusion
Spatchcocked grilled chicken delivers restaurant-quality results at home with minimal effort. This technique ensures faster cooking, even heat distribution, and incredibly crispy skin. Moreover, the method works on any grill type and accommodates various seasonings. Furthermore, once mastered, spatchcocking becomes the only way to cook whole chicken. The combination of juicy meat and crispy exterior satisfies every time.
Remember the key steps: remove the backbone, flatten the bird, season generously, and use two-zone grilling. Additionally, always check internal temperature for perfect doneness. Moreover, don’t skip the crucial resting period before carving. These simple techniques transform an ordinary chicken into an extraordinary meal.
Print
Spatchcocked Grilled Chicken
Description
Spatchcocked Grilled Chicken
Ingredients:
-
1 whole chicken (3–4 lbs), backbone removed
-
3 tablespoons olive oil
-
3 cloves garlic, minced
-
1 tablespoon fresh rosemary, chopped (or 1 tsp dried)
-
1 tablespoon fresh thyme leaves (or 1 tsp dried)
-
1 teaspoon smoked paprika
-
1 teaspoon salt
-
½ teaspoon black pepper
-
1 lemon, halved
Instructions:
-
Prepare the chicken:
-
Remove the backbone using kitchen shears (save for stock if desired).
-
Flatten chicken by pressing down on the breastbone.
-
-
Season:
-
In a small bowl, mix olive oil, garlic, rosemary, thyme, smoked paprika, salt, and pepper.
-
Rub evenly over the chicken, including under the skin for extra flavor.
-
Squeeze lemon juice over the chicken and place lemon halves inside the cavity.
-
-
Preheat grill:
-
Set up a two-zone fire: one side medium-high, the other side medium-low.
-
-
Grill the chicken:
-
Place chicken skin-side down over direct heat for 5–7 minutes to sear.
-
Move to indirect heat, skin-side up, cover, and cook 35–40 minutes, until internal temperature reaches 165°F (74°C) in the thickest part of the thigh.
-
-
Rest & serve:
-
Let chicken rest 5–10 minutes before carving.
-
Serve with grilled vegetables, rice, or a fresh salad.
-