
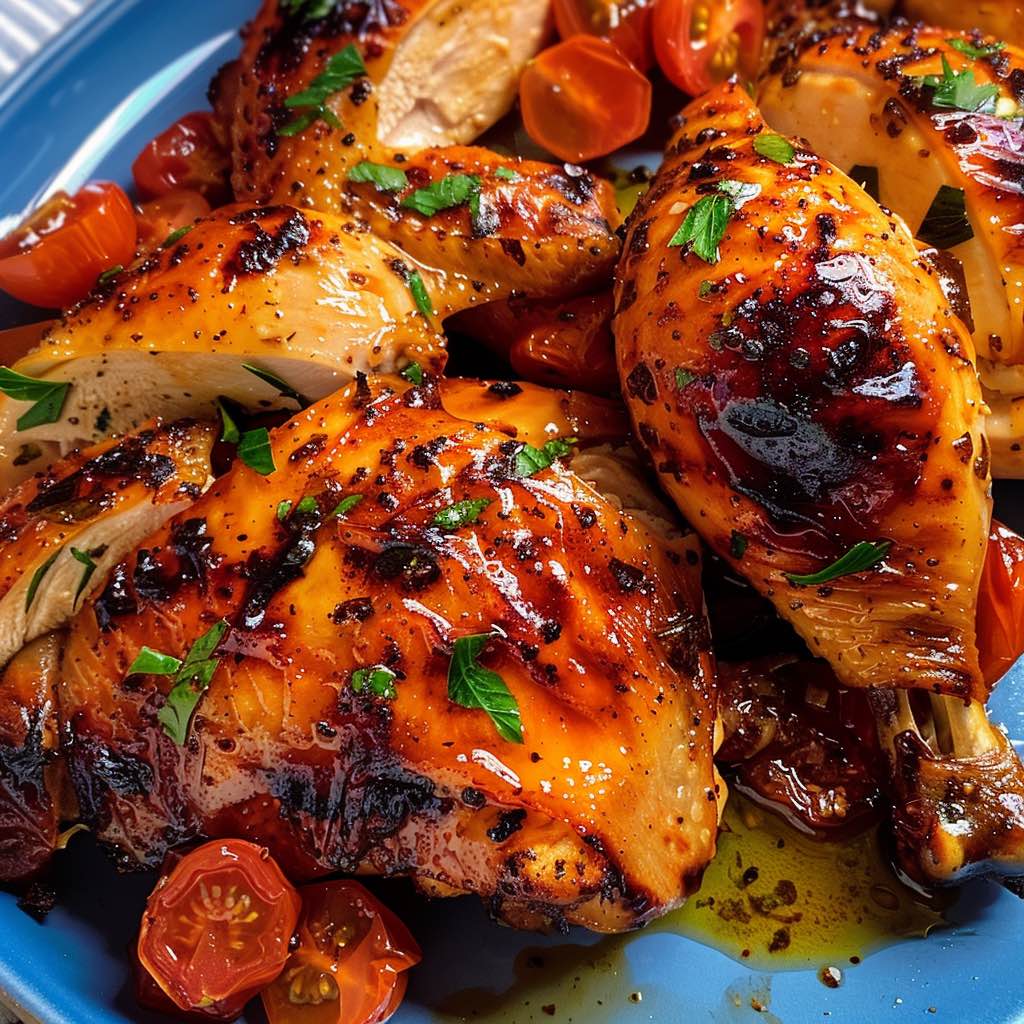
Tomato-Butter Roast Chicken: The Ultimate Comfort Food Recipe
Introduction
Imagine a chicken so tender it falls off the bone. Picture golden, crispy skin glazed with a rich tomato-butter sauce. That’s exactly what you’ll get with this Tomato-Butter Roast Chicken recipe.
This dish combines simple ingredients to create extraordinary flavors. The butter adds richness while tomatoes provide a subtle tang. Together, they create a sauce that’s both comforting and sophisticated.
Whether you’re cooking for family or entertaining guests, this recipe never disappoints. Additionally, it’s surprisingly easy to prepare. You don’t need fancy techniques or hard-to-find ingredients. Just follow these simple steps for perfect results.
Best of all You’ll achieve incredible depth of flavor using only wholesome ingredients. Let’s dive into making the most delicious roast chicken you’ve ever tasted.
What Makes Tomato-Butter Roast Chicken Special
The Perfect Flavor Combination
Tomato-butter roast chicken stands out for its incredible flavor profile. The butter creates a rich, velvety texture. Meanwhile, tomatoes add brightness and acidity. This balance prevents the dish from feeling too heavy.
The combination works on multiple levels. First, the butter helps the chicken stay moist during roasting. Second, it creates a beautiful golden color on the skin. Third, the fat carries flavors throughout the meat.
Tomatoes bring their own magic to the dish. They break down during cooking and create a natural sauce. This sauce bastes the chicken continuously. As a result, every bite is juicy and flavorful.
Why This Recipe Works
This recipe succeeds because of smart cooking techniques. High initial heat sears the chicken skin. Then, lower temperatures cook the meat through gently. This two-stage process ensures crispy skin and tender meat.
The tomato-butter mixture acts as both marinade and sauce. It penetrates the meat while creating external flavor. Furthermore, it prevents the chicken from drying out. The fat content keeps everything moist and delicious.
Temperature control is crucial for success. Starting hot creates the sear. Then, moderate heat finishes the cooking. This method guarantees consistent results every time.
Health Benefits
This tomato-butter roast chicken offers nutritional advantages. Chicken provides lean protein essential for muscle health. It also contains B vitamins and minerals like zinc. These nutrients support overall wellbeing.
Tomatoes contribute lycopene, a powerful antioxidant. They also provide vitamins C and K. Additionally, they contain potassium and folate. These nutrients support heart health and immune function.
While butter adds richness, it’s used moderately here. The recipe balances indulgence with nutrition. You get incredible flavor without excessive calories.
Essential Ingredients You’ll Need
Main Ingredients
Whole Chicken (4-5 pounds)
The star of the show. Choose a fresh, high-quality bird. Look for plump breasts and firm skin. Free-range chickens often have better flavor.
Butter (½ cup, softened)
Use unsalted butter for better control over seasoning. Butter should be at room temperature. This makes it easier to mix with other ingredients.
Fresh Tomatoes (2 pounds)
Roma tomatoes work beautifully for this recipe. They have less water and more flesh. Cherry tomatoes are also excellent. They add sweetness and burst during cooking.
Garlic (6-8 cloves)
Fresh garlic is essential for bold flavor. Minced garlic distributes evenly throughout the dish. It complements both butter and tomatoes perfectly.
Fresh Herbs (thyme, rosemary, basil)
These herbs elevate the entire dish. Thyme pairs wonderfully with chicken. Rosemary adds earthiness. Basil brings freshness.
Seasoning and Aromatics
Kosher Salt (2 tablespoons)
Salt is crucial for flavor development. It also helps crisp the skin. Use kosher salt for even distribution.
Black Pepper (1 tablespoon, freshly ground)
Freshly ground pepper makes a difference. It adds heat and aromatic qualities. Don’t skip this ingredient.
Onions (2 medium)
Onions add sweetness and depth. They caramelize during roasting. This creates additional flavor complexity.
Lemon (2 whole)
Lemon brightens the entire dish. Its acidity balances the rich butter. Zest and juice both contribute flavor.
Olive Oil (¼ cup)
Extra virgin olive oil adds fruity notes. It also helps with browning. Use good quality oil for best results.
Optional Ingredients
Consider these additions for extra flavor:
-
Red pepper flakes for heat
-
Smoked paprika for depth
-
Fresh oregano for Mediterranean flair
-
Capers for briny contrast
-
Olives for savory richness
Kitchen Tools and Equipment
Essential Equipment
Roasting Pan with Rack
A heavy-duty roasting pan is crucial. The rack elevates the chicken for even cooking. This also allows fat to drip away. Choose a pan that fits your oven comfortably.
Instant-Read Thermometer
This tool ensures perfectly cooked chicken. It takes the guesswork out of roasting. Insert it into the thickest part of the thigh. The temperature should reach 165°F.
Chef’s Knife and Cutting Board
Sharp knives make prep work easier. You’ll need them for chopping vegetables. A large cutting board provides ample workspace.
Mixing Bowls
Various sizes help with preparation. Use one for the butter mixture. Another holds chopped vegetables. Glass or stainless steel works best.
Kitchen Twine
Trussing the chicken ensures even cooking. It also creates a beautiful presentation. Cotton twine is food-safe and effective.
Helpful Tools
These items make the process smoother:
-
Basting brush for applying butter
-
Aluminum foil for covering if needed
-
Meat fork for handling hot chicken
-
Serving platter for presentation
-
Gravy separator for the sauce
Step-by-Step Cooking Instructions
Preparation Phase
Step 1: Prepare the Chicken
Start by removing the chicken from refrigeration. Let it sit at room temperature for 30 minutes. This ensures even cooking throughout.
Pat the chicken completely dry with paper towels. Moisture prevents crispy skin. Pay special attention to the cavity and under the wings.
Remove any giblets from the cavity. Set them aside for another use. Season the cavity generously with salt and pepper.
Step 2: Make the Tomato-Butter Mixture
Combine softened butter with minced garlic in a bowl. Add chopped fresh herbs (thyme, rosemary, basil). Mix until well combined.
Season the mixture with salt and pepper. Add lemon zest for brightness. Consequently, you’ll have a fragrant compound butter ready to use.
Set aside about one-third of the mixture. You’ll use this for basting later. The rest goes under the chicken skin.
Step 3: Prepare the Tomatoes
Wash the tomatoes thoroughly under cold water. Cut larger tomatoes into wedges. Leave cherry tomatoes whole for bursting flavor.
Toss tomatoes with olive oil, salt, and pepper. Add sliced onions to the mixture. These vegetables will create a flavorful base.
The tomatoes will release their juices during cooking. This creates a natural sauce for the chicken. It’s a simple yet effective technique.
Seasoning and Assembly
Step 4: Season Under the Skin
Gently loosen the skin from the chicken breast. Use your fingers to create a pocket. Be careful not to tear the skin.
Spread the tomato-butter mixture under the skin. Work it over the breast meat evenly. This technique infuses flavor directly into the meat.
Smooth the skin back into place. Pat it down gently. The butter will melt during cooking and baste the meat.
Step 5: Truss the Chicken
Trussing creates a compact shape for even cooking. Cross the legs and tie them together. Tuck the wing tips under the body.
This step also improves presentation. The chicken looks more attractive when properly trussed. However, it’s optional if you’re short on time.
Rub the outside of the chicken with olive oil. Season generously with salt and pepper. Don’t be shy with seasoning here.
Step 6: Arrange in Roasting Pan
Place the tomato-onion mixture in the roasting pan. Spread it evenly across the bottom. This creates a flavorful bed for the chicken.
Set the roasting rack over the vegetables. Place the seasoned chicken breast-side up on the rack. Stuff the cavity with lemon halves and herb sprigs.
The elevated position allows heat circulation. Fat drips down and flavors the vegetables. Everything cooks together beautifully.
Roasting Process
Step 7: Initial High-Heat Roasting
Preheat your oven to 425°F. This high temperature is essential for crispy skin. Place the roasting pan on the center rack.
Roast at this temperature for 30 minutes. The skin will begin to brown and crisp. Meanwhile, the internal temperature starts rising.
Don’t open the oven door during this phase. Heat loss slows the cooking process. Trust the timing for best results.
Step 8: Reduce Heat and Continue Cooking
After 30 minutes, reduce the oven to 375°F. This gentler heat cooks the meat through. It prevents the outside from burning.
Baste the chicken with pan juices every 20 minutes. Use the reserved tomato-butter mixture too. This keeps the meat moist and adds flavor.
The total cooking time depends on chicken size. Generally, plan for 20 minutes per pound. A 5-pound chicken needs about 100 minutes total.
Step 9: Check for Doneness
Insert a thermometer into the thickest part of the thigh. Don’t touch the bone as this gives false readings. The chicken is done at 165°F.
Additionally, juices should run clear when pierced. The legs should move easily in their sockets. These visual cues confirm doneness.
If the skin browns too quickly, tent with foil. This prevents burning while the inside finishes cooking. Remove the foil for the last 10 minutes.
Finishing Touches
Step 10: Rest Before Carving
Remove the chicken from the oven carefully. Transfer it to a cutting board. Let it rest for 15-20 minutes before carving.
Resting allows juices to redistribute throughout the meat. Cutting too soon causes juices to run out. Consequently, the meat becomes dry.
Cover loosely with foil during resting. This keeps the chicken warm. Meanwhile, prepare your serving platter and sides.
Step 11: Prepare the Pan Sauce
While the chicken rests, make sauce from pan drippings. Remove excess fat if desired. Mash the roasted tomatoes into the liquid.
Place the roasting pan over medium heat. Scrape up any browned bits from the bottom. These add incredible flavor to the sauce.
Simmer until slightly thickened. Season with salt and pepper to taste. Strain if you prefer a smooth sauce. Otherwise, serve it rustic-style.
Step 12: Carve and Serve
Remove the trussing string from the chicken. Cut along the breastbone to remove each breast half. Separate the legs from the body.
Divide the legs into thighs and drumsticks. Slice the breast meat against the grain. Arrange everything attractively on the platter.
Spoon the tomato-butter sauce over the chicken pieces. Garnish with fresh herbs for color. Serve immediately while everything is hot.
Pro Tips for Perfect Results
Before Cooking
Dry the Skin Thoroughly
Moisture is the enemy of crispy skin. Pat the chicken completely dry before seasoning. Some cooks even air-dry in the refrigerator overnight. This extra step creates incredibly crispy skin.
Bring to Room Temperature
Cold chicken cooks unevenly. The outside overcooks while the inside stays raw. Therefore, let chicken sit out for 30-45 minutes. This simple step ensures even cooking.
Don’t Skip the Butter Under Skin
This technique is crucial for juicy meat. The butter melts and bastes from the inside. It creates unmatched tenderness and flavor.
During Cooking
Use Two Temperature Stages
High heat at the start creates crispy skin. Lower heat finishes the cooking gently. This combination produces the best texture contrast.
Baste Regularly
Basting keeps the meat moist and flavorful. It also builds up layers of delicious crust. Set a timer to remind yourself every 20 minutes.
Rotate the Pan
Ovens often have hot spots. Rotating ensures even browning. Turn the pan 180 degrees halfway through cooking.
After Cooking
Rest Properly
This step is non-negotiable. Resting makes the difference between good and great chicken. The internal temperature also continues rising slightly.
Save the Drippings
Pan drippings are liquid gold. They make amazing sauce or gravy. You can also save them for future recipes. Strain and refrigerate for up to a week.
Carve with Sharp Knives
Dull knives tear the meat and ruin presentation. Sharp knives create clean cuts. They also make carving safer and easier.
Flavor Variations to Try
Mediterranean Style
Transform this into a Mediterranean feast. Add olives, capers, and oregano to the tomato mixture. Use sun-dried tomatoes for concentrated flavor.
Include artichoke hearts in the roasting pan. They absorb the delicious pan juices. Finish with crumbled feta cheese before serving. This variation brings bold, tangy flavors.
Spicy Version
Heat lovers will enjoy this variation. Add red pepper flakes to the butter mixture. Use hot cherry peppers instead of regular tomatoes.
Incorporate smoked paprika for depth. Add a pinch of cayenne pepper too. The result is a chicken with a spicy kick. It’s perfect for those who love heat.
Herb Garden Version
Maximize fresh herb flavors in this variation. Double the amount of fresh herbs. Try combinations like tarragon and chervil.
Add fresh parsley, sage, and marjoram. Stuff the cavity with herb bouquets. The chicken becomes incredibly aromatic. Every bite tastes like spring.
Lemon-Garlic Variation
Increase the lemon and garlic for brightness. Use the juice of four lemons instead of two. Add 10 cloves of garlic instead of six.
This version is tangy and pungent. It cuts through the richness beautifully. The garlic mellows during roasting and becomes sweet.
Smoky Tomato Version
Add smokiness without grilling. Use smoked paprika generously. Include fire-roasted tomatoes instead of fresh ones.
Add chipotle peppers (dried, not in adobo sauce). The result is deep, complex flavor. It tastes like it came off a smoker.
Serving Suggestions and Side Dishes
Perfect Pairings
Roasted Vegetables
Roasted vegetables complement tomato-butter roast chicken beautifully. Try Brussels sprouts, carrots, or asparagus. Toss them with olive oil and roast alongside.
The vegetables caramelize and develop sweetness. They also soak up the flavorful pan juices. It’s a complete meal in one pan.
Creamy Mashed Potatoes
Classic mashed potatoes are always welcome. They soak up the tomato-butter sauce perfectly. Make them extra creamy with butter and cream.
For a lighter option, try mashed cauliflower. It’s lower in carbs but equally satisfying. Either way, you’ll love the combination.
Fresh Green Salad
A crisp salad provides refreshing contrast. Use mixed greens with a light vinaigrette. Add cherry tomatoes for thematic consistency.
Include cucumber and radishes for crunch. The cool, fresh salad balances the rich chicken. It’s the perfect palate cleanser.
Crusty Bread
Don’t forget the bread for soaking up sauce. Artisan sourdough or French baguette works wonderfully. Toast it lightly before serving.
The bread becomes a vehicle for that incredible sauce. Every drop of flavor gets enjoyed. Nothing goes to waste.
Complete Menu Ideas
Casual Family Dinner
Start with a simple mixed green salad. Serve the tomato-butter roast chicken as the main. Add roasted potatoes and green beans. Finish with a fruit dessert.
This menu is approachable and satisfying. Everything can be prepared ahead. You’ll spend less time cooking and more time together.
Special Occasion Feast
Begin with a tomato bruschetta appetizer. Follow with the roast chicken as the centerpiece. Include wild rice pilaf and glazed carrots. End with a decadent chocolate dessert.
This menu impresses without overwhelming. The flavors complement each other beautifully. Your guests will remember this meal.
Sunday Supper
Keep it simple for a relaxed Sunday meal. Serve the chicken with buttered egg noodles. Add a Caesar salad on the side. Finish with ice cream.
This comforting menu feels special yet easy. It’s perfect for winding down the weekend. Everyone will leave the table happy.
Storage and Reheating Guidelines
Proper Storage
Refrigerator Storage
Allow the chicken to cool completely before storing. Separate the meat from the bones for easier storage. Place pieces in airtight containers.
Refrigerate within two hours of cooking. Properly stored chicken lasts 3-4 days. Label containers with the date for safety.
Store the sauce separately in a jar or container. This prevents the meat from becoming soggy. The sauce keeps for up to 5 days refrigerated.
Freezer Storage
Freeze cooked chicken for longer storage. Wrap pieces tightly in plastic wrap. Then place in freezer bags removing excess air.
Frozen cooked chicken maintains quality for 2-3 months. Label bags with the date and contents. Thaw in the refrigerator overnight before reheating.
Don’t freeze cream-based sauces as they may separate. However, the tomato-butter sauce freezes beautifully. Freeze in portion-sized containers for convenience.
Reheating Methods
Oven Reheating
This method produces the best results. Preheat your oven to 350°F. Place chicken pieces in a baking dish.
Add a splash of broth or saved sauce. Cover with foil to retain moisture. Heat for 20-25 minutes until warmed through.
Remove the foil for the last 5 minutes. This crisps the skin slightly. The chicken tastes almost as good as fresh.
Microwave Method
While not ideal, microwaving works in a pinch. Place chicken on a microwave-safe plate. Add a tablespoon of water or sauce.
Cover with a damp paper towel. Heat in 1-minute intervals, checking between. This prevents overcooking and drying out.
The microwave won’t crisp the skin. However, it’s quick and convenient. Perfect for weekday lunches.
Stovetop Reheating
Reheat on the stovetop for moist results. Place chicken in a skillet with sauce. Cover and heat over medium-low heat.
Turn pieces occasionally for even heating. This method works especially well for thighs and drumsticks. The meat stays tender and juicy.
Food Safety Tips
Always reheat to an internal temperature of 165°F. Use a thermometer to check. This ensures food safety.
Never reheat chicken more than once. Multiple heating cycles increase bacteria growth. They also dry out the meat significantly.
Discard chicken if it develops an off smell. Trust your senses when evaluating leftovers. When in doubt, throw it out.
Nutritional Information
Per Serving Breakdown
This tomato-butter roast chicken provides balanced nutrition. One serving (about 4 ounces of meat) contains approximately:
Calories: 350-400
The calorie count varies by piece. Dark meat contains more calories than breast meat. Factor in your portion size accordingly.
Protein: 35-40 grams
Chicken is an excellent protein source. It supports muscle growth and repair. This amount meets a significant portion of daily needs.
Fat: 20-25 grams
The fat comes from chicken skin and butter. While higher in fat, it’s mostly healthy monounsaturated fat. Removing the skin reduces fat content.
Carbohydrates: 5-8 grams
Carbs come primarily from the tomatoes. This makes it suitable for low-carb diets. The carbs are complex and provide fiber.
Vitamins and Minerals
This dish provides essential micronutrients. Tomatoes contribute vitamins A and C. Chicken offers B vitamins, particularly B6 and niacin.
The meal includes important minerals too. Selenium, zinc, and iron come from the chicken. Potassium comes from both chicken and tomatoes.
Fresh herbs add their own nutritional benefits. They contain antioxidants and anti-inflammatory compounds. These support overall health and wellness.
Dietary Considerations
Lower-Calorie Option
Remove the skin before eating to reduce calories. This cuts fat by nearly half. The meat remains flavorful from the butter underneath.
Higher-Protein Version
Focus on white meat portions for more protein. Breast meat has higher protein-to-fat ratio. It’s ideal for muscle building.
Heart-Healthy Adjustments
Use olive oil-based butter alternatives. Reduce overall butter quantity if desired. The dish remains delicious with modifications.
Common Mistakes to Avoid
Preparation Errors
Skipping the Dry Step
Wet skin never crisps properly. Always pat the chicken completely dry. This single step dramatically improves results. Take the time to do it thoroughly.
Underseasoning
Chicken needs generous seasoning. Don’t be afraid of salt and pepper. Season liberally inside and out. Remember, some seasoning falls off during cooking.
Cold Chicken
Cooking cold chicken causes uneven results. The outside overcooks while the inside stays raw. Always bring chicken to room temperature first.
Cooking Mistakes
Opening the Oven Too Often
Every time you open the oven, heat escapes. This extends cooking time and affects browning. Trust your timer and resist peeking.
Skipping the Thermometer
Guessing doneness leads to dry or undercooked chicken. Invest in a reliable instant-read thermometer. It guarantees perfect results every time.
Overcrowding the Pan
Too many vegetables prevent proper air circulation. This creates steam instead of roasting. Leave space around the chicken for best results.
Post-Cooking Errors
Cutting Too Soon
Impatience leads to dry chicken. The resting period is crucial. Those 15-20 minutes make all the difference. Plan for this in your timing.
Using Dull Knives
Dull knives tear meat and create messy cuts. Sharp knives produce clean slices. They also make carving safer and faster.
Discarding Pan Drippings
Those drippings are flavor gold. Never pour them down the drain. Make sauce, save for gravy, or freeze for future use.
Frequently Asked Questions
Can I use chicken pieces instead of a whole chicken?
Yes, you can adapt this recipe for chicken pieces. Thighs and drumsticks work particularly well. Reduce the cooking time to about 45-55 minutes.
Check the internal temperature to ensure doneness. Pieces cook faster than whole chickens. However, you’ll miss the dramatic presentation of carving a whole bird.
How do I know when the tomato-butter roast chicken is done?
The most reliable method is using a meat thermometer. Insert it into the thickest part of the thigh. The chicken is done when it reaches 165°F.
Additionally, check that juices run clear when pierced. The leg should move easily in its socket. These visual cues confirm proper cooking.
Can I make this recipe ahead of time?
You can prep components ahead. Make the butter mixture a day early. Chop vegetables and store them refrigerated. However, cook the chicken fresh for best results.
Leftover cooked chicken reheats well. Follow the storage and reheating guidelines above. The flavors actually develop further overnight.
What if I don’t have fresh herbs?
Dried herbs work in a pinch. Use one-third the amount of dried herbs. They’re more concentrated than fresh. Mix them into the butter thoroughly.
However, fresh herbs provide superior flavor. Try to use them when possible. They make a noticeable difference in the final dish.
Can I cook this at a different temperature?
This recipe uses a specific two-temperature method. However, you can adjust if needed. Cook at 375°F throughout for more gentle cooking.
This takes longer but works if your oven runs hot. Conversely, increasing to 450°F initially creates extra-crispy skin. Adjust based on your oven’s performance.
Why is my chicken skin not crispy?
Several factors affect skin crispiness. Moisture is the main culprit. Ensure the chicken is completely dry before cooking.
Additionally, roast at high enough temperature initially. The 425°F start is crucial for browning. Finally, avoid basting too frequently at the beginning.
Can I add other vegetables to the roasting pan?
Absolutely! Many vegetables work beautifully. Try potatoes, carrots, or bell peppers. Cut them into similar-sized pieces for even cooking.
Remember they’ll cook in the chicken fat. They become incredibly flavorful. Add heartier vegetables at the start. Add quick-cooking ones halfway through.
What’s the best way to carve the chicken?
Start by removing the legs. Cut through the skin and joints. Separate thighs from drumsticks at the joint.
Next, remove the breast meat. Cut along one side of the breastbone. Follow the ribcage down to remove the breast. Slice against the grain for serving.
Final Thoughts
Tomato-butter roast chicken represents comfort food at its finest. This recipe combines simple techniques with incredible flavors. The result is a dish that impresses every time.
The beauty lies in its versatility. Serve it for casual family dinners. Alternatively, present it for special occasions. Either way, it delivers satisfaction and flavor.
Furthermore, this recipe builds confidence in the kitchen. Once you master this technique, you’ll use it repeatedly. The skills transfer to other roasting recipes too.
The tomato-butter combination creates magic. Rich butter provides moisture and flavor. Fresh tomatoes add brightness and complexity. Together, they elevate simple roast chicken to new heights.
Don’t forget the practical benefits. This dish feeds a crowd easily. Leftovers taste amazing in sandwiches and salads. One chicken provides multiple meals.
Most importantly, this recipe brings people together. A roast chicken on the table creates special moments. It’s a centerpiece that sparks conversation and connection.
Ready to transform your dinner routine? This tomato-butter roast chicken is your answer. Gather your ingredients and start cooking. Your kitchen will smell incredible, and your family will thank you.

Tomato-Butter Roast Chicken
Description
Tomato-Butter Roast Chicken
Ingredients:
-
1 whole chicken (about 4–5 lbs / 1.8–2.3 kg)
-
Salt & black pepper, to taste
-
2 tablespoons olive oil
-
4 tablespoons unsalted butter, softened
-
1 cup cherry tomatoes, halved (or 1 cup canned diced tomatoes, drained)
-
3 cloves garlic, minced
-
1 teaspoon smoked paprika
-
1 teaspoon dried thyme (or 1 tablespoon fresh)
-
1 teaspoon dried oregano
-
1 lemon, halved
-
Fresh herbs for garnish (parsley, thyme, or rosemary)
Instructions:
-
Preheat Oven
-
Preheat oven to 425°F (220°C).
-
-
Prepare Chicken
-
Pat the chicken dry with paper towels.
-
Season generously with salt and black pepper inside and out.
-
Rub olive oil over the skin.
-
-
Make Tomato-Butter Mixture
-
In a small bowl, mix softened butter, garlic, smoked paprika, thyme, oregano, and a pinch of salt.
-
Stir in the cherry tomatoes lightly.
-
-
Stuff & Spread
-
Stuff the chicken cavity with lemon halves and a few herbs.
-
Gently lift the skin over the breasts and thighs and spread some tomato-butter mixture underneath.
-
Spread remaining mixture over the outside of the chicken.
-
-
Roast
-
Place chicken on a roasting rack in a roasting pan.
-
Roast 1 hour 15 minutes to 1 hour 30 minutes (depending on size), basting once or twice with pan juices.
-
Chicken is done when the internal temp reaches 165°F (74°C) in the thickest part of the thigh.
-
-
Rest & Serve
-
Let rest 10–15 minutes before carving.
-
Spoon pan juices and roasted tomatoes over the chicken.
-
Garnish with fresh herbs and serve with roasted vegetables, mashed potatoes, or crusty bread.
-