
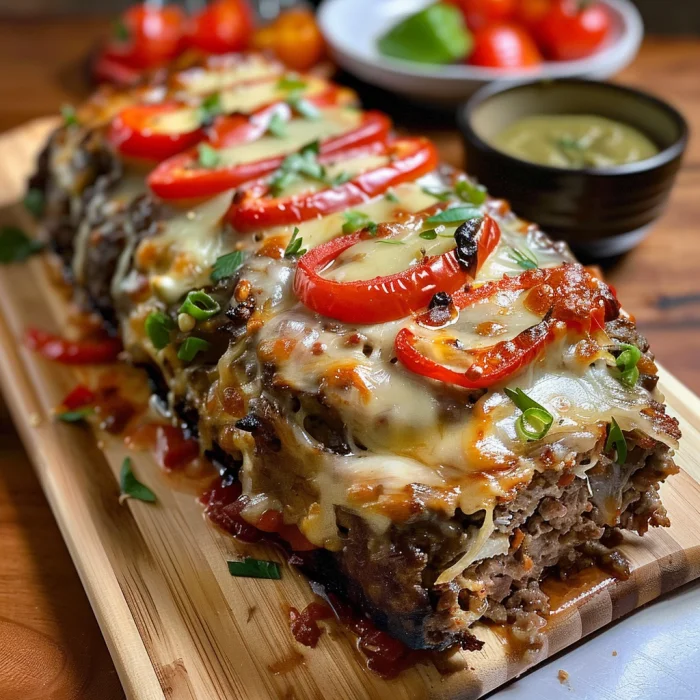
The Ultimate Philly Cheesesteak Meatloaf: A Masterpiece of Comfort Food Fusion
Let’s be honest, who can resist the siren call of a perfect Philly Cheesesteak? Imagine, if you will, that iconic combination of thinly sliced beef, melted cheese, and savory fried onions, all hugged by a soft hoagie roll. Now, picture that very same flavor packed into the hearty, home-cooked form of a classic meatloaf. Sounds like a dream, right? Well, hold onto your taste buds because that dream is about to become your delicious reality.
This article is your ultimate guide to creating a show-stopping Philly Cheesesteak Meatloaf that brilliantly fuses two all-American classics into one unforgettable main dish. We’re not just tossing a few ingredients together; we’re diving deep into the art and science behind it. Consequently, we’ll explore the perfect meat selection, the crucial “Philly Trinity” of veggies, and the great cheese debate. Furthermore, you’ll get a detailed, step-by-step method to ensure juicy, flavorful success every single time. So, without a doubt, get ready to roll up your sleeves and create a new family favorite that is bursting with cheesy, meaty perfection.
Why This Fusion Works: The Best of Two Classics
At first glance, a sandwich and a loaf of meat might seem like strange bedfellows. However, when you break them down, they share a incredible amount of culinary DNA. Both are fundamentally about savory, well-seasoned beef, aromatic onions, and a rich, cheesy component. The magic of this fusion recipe lies in how it solves a few tiny problems while amplifying all the best flavors.
For instance, a traditional cheesesteak can be wonderfully messy—dripping with cheese and juices all over your hands. This meatloaf version, on the other hand, delivers that iconic taste in a neat, sliceable package where every single piece has the perfect ratio of meat, cheese, and veg. Moreover, it transforms a handheld sandwich into a magnificent centerpiece meal that can easily feed a hungry crowd. Ultimately, it takes the familiar comfort of grandma’s meatloaf and gives it a gourmet, restaurant-quality twist that is downright irresistible.
Gathering Your Ingredients: The Foundation of Flavor
You simply cannot build a magnificent house without a solid foundation, and the same principle applies to cooking. Therefore, using high-quality, fresh ingredients is the absolute key to making this dish truly ultimate. Skimping here will absolutely affect the final result, so let’s gather the dream team of components that will make your taste buds sing.
The Meat Selection: Choosing Your Base
This is the star of the show, so your choice here is paramount. For the juiciest, most flavorful result, ground chuck with an 80/20 lean-to-fat ratio is your golden ticket. Believe me, that fat is where the flavor lives, and it will render out during baking, keeping your masterpiece wonderfully moist.
Now, if you’re looking for a leaner option, ground sirloin or tri-tip can work; however, you must be extra careful not to overcook it, as it can dry out much faster. For a truly special occasion, though, why not go all out? The pro’s choice is to use hand-chopped ribeye steak, which is the traditional meat used in an authentic Philly cheesesteak. It adds an incredible depth of beefy flavor and a slightly different texture that is pure luxury.
The “Philly” Trinity: Peppers, Onions, and Mushrooms
What’s a Philly without its famous trinity? This aromatic vegetable base is non-negotiable for authentic flavor. Green bell peppers are the classic, go-to choice, providing a slightly bitter counterpoint to the rich meat and cheese. Conversely, feel free to use red or yellow bells for a touch of sweetness.
Yellow onions are your best bet for their strong, pungent flavor that becomes sweet and magical when sautéed. As for mushrooms, cremini (baby bellas) offer a earthier flavor, while white buttons are a perfectly fine and mild alternative. Here’s a pro tip: sautéing them first is a critical step you cannot skip—it drives out all that excess water that would otherwise steam inside your meatloaf and make it soggy.
The Cheese Factor: Provolone, Cheez Whiz, or American?
Ah, the great cheese debate that has divided Philadelphia for decades! Each option brings its own unique personality to the party. Provolone is the classic deli choice, offering a superb melt and a slightly sharp, smoky flavor that beautifully complements the beef.
Then there’s Cheez Whiz. Now, I know it might seem controversial, but hear me out! This processed cheese sauce is undeniably iconic and packed with nostalgic, salty flavor that many argue is the onlyauthentic topping. Using it as a warm sauce poured over the top is a fantastic option. White American cheese, meanwhile, is the ultimate melter. It creates that incredible, gooey, stretchy pull that is so satisfying. My ultimate recommendation? Don’t choose—use a combination! Try stuffing the loaf with provolone and then draping American over the top after baking for the best of both worlds.
Binders and Flavor Boosters: More Than Just Breadcrumbs
You need something to hold this beautiful beast together. While plain breadcrumbs work just fine, for an extra layer of authentic flavor, try using torn-up pieces of a hoagie roll. It’s a genius little trick that reinforces the “cheesesteak” essence right in the mix.
Of course, eggs are your primary binder, crucial for structure. But the real flavor boosters come from the seasonings. A good dash of Worcestershire sauce adds a deep, umami richness, while garlic powder, black pepper, and a little paprika will build a complex flavor profile that makes this meatloaf truly extraordinary.
The Step-by-Step Cooking Process
Alright, enough talk—it’s time to get our hands dirty and build this masterpiece! This process is surprisingly straightforward, but a few key techniques separate a good meatloaf from a great one. So, without further ado, let’s transform those ingredients into pure comfort food magic.
Step 1: Sautéing the Vegetables to Perfection
First things first, we must deal with our vegetable trinity. Now, you might be tempted to throw them in raw; however, that is a one-way ticket to Soggy Loaf City. Sautéing is absolutely non-negotiable because it accomplishes two vital things: it caramelizes the natural sugars for a deeper, sweeter flavor, and it drives off all that excess moisture that would otherwise steam out inside the oven.
Here’s how to do it right: Heat a tablespoon of oil or butter in a large skillet over medium heat. Toss in your onions and peppers first, cooking them for about 5-7 minutes until they become soft and fragrant. After that, add your mushrooms and continue to cook everything until the vegetables are beautifully golden and any liquid from the mushrooms has completely evaporated. Finally, season them with a pinch of salt and pepper, then spread them out on a plate to cool completely. This last step is crucial—adding hot veggies to your meat mixture will start cooking the eggs prematurely. Yikes!
Step 2: Creating the Meatloaf Mixture (The “Meat” of the Matter)
Now for the fun, hands-on part! In a very large bowl, combine your ground beef, the cooled veggie mixture, your breadcrumbs or hoagie pieces, eggs, Worcestershire sauce, and all those wonderful seasonings.
Here is the single most important tip for a tender meatloaf: do not overmix! Use your hands to gently combine everything until the ingredients are just evenly distributed. Seriously, the moment there are no more dry pockets of breadcrumbs, you must stop. Overworking the meat activates the proteins too much, resulting in a dense, tough, hockey-puck-like texture—and we are absolutely not going for that.
Want a pro chef’s trick? Before you form the whole loaf, cook a tiny, bite-sized patty of the mixture in your skillet. This allows you to taste it and adjust the seasoning if needed. It’s a simple step that guarantees a perfectly flavored final product.
Step 3: Forming and Stuffing: The Cheesy Surprise Inside
This is where the magic happens! Preheat your oven to 375°F (190°C). Furthermore, line a baking sheet with parchment paper—trust me, this is far better than a loaf pan because it allows the heat to circulate around the entire loaf, giving you more of that delicious, caramelized surface area.
There are two fantastic methods for incorporating the cheese:
-
Method 1: The Cheesy Core. Pat half of your meat mixture into a rectangular loaf shape on the baking sheet, creating a sort of “boat” or trough. Then, generously pile your shredded cheese down the center, leaving a clear border around the edges. After that, carefully top it with the remaining meat mixture and seal the edges tightly, ensuring no cheesy escape routes are left.
-
Method 2: The Layered Delight. On a piece of parchment paper, press the entire meat mixture into a flat, roughly 9×13 inch rectangle. Next, sprinkle an even layer of cheese over the entire surface, again leaving a small border. Using the parchment paper to help you, start from the short end and gently but firmly roll the meat up into a tight log, just like a jelly roll. Finally, pinch the seam and ends to seal.
Step 4: Baking to Juicy Perfection
Place your beautifully formed loaf onto the prepared baking sheet and pop it into the preheated oven. Now, the baking time can vary based on your oven and the shape of your loaf; however, you can generally expect it to take between 50 to 70 minutes.
Nevertheless, guessing is not an option! The only way to know for sure if your meatloaf is perfectly cooked is to use a digital meat thermometer. You must insert it into the thickest part of the loaf, ensuring it reaches the official USDA safe internal temperature for ground beef of 160°F (71°C). This guarantees both safety and that perfect, juicy texture.
Optionally, during the last 15 minutes of baking, you can brush the top with a simple glaze made from ketchup and a dash of Worcestershire sauce for a classic, tangy finish.
Step 5: The Grand Finale: The Cheesy Topping
Once that thermometer reads 160°F, carefully remove the meatloaf from the oven. Immediately layer slices of provolone or white American cheese over the top so the residual heat starts melting it. Then, return it to the oven for just 2-3 more minutes—literally just long enough for the cheese to become completely molten, bubbly, and irresistible.
For the Cheez Whiz enthusiasts, simply warm the cheese sauce in a small saucepan while the meatloaf rests. Now, here is the step that requires true willpower: let the meatloaf rest for 10-15 minutes before you even think about slicing it. This allows the juices to redistribute throughout the loaf. If you slice it immediately, all those wonderful juices will just run out onto the cutting board, leaving you with a drier result. Trust me, it’s worth the wait!
Serving, Storing, and Advanced Tips
Congratulations! You’ve just pulled a culinary marvel from the oven. Now, let’s talk about how to present it, preserve it, and even how to level it up next time.
Serving Your Culinary Masterpiece
The beauty of this dish is its incredible versatility. For the full, mind-blowing Philly Cheesesteakexperience, serve thick, warm slices on toasted hoagie rolls. It’s a sandwich that eats like a meal!
Alternatively, plate it up as a magnificent family dinner main course. It pairs fantastically with so many sides. Creamy garlic mashed potatoes are a classic comfort food partner, while crispy roasted potatoes or even a simple, sharp arugula salad can provide a wonderful contrast to the richness. A final sprinkle of fresh chopped parsley not only adds a pop of color but also a touch of freshness that cuts through the decadence.
Storing and Reheating: Enjoying the Leftovers
Let’s be real—if you have leftovers, you’re a more disciplined person than I am! But if you do, they store and reheat beautifully. First, allow the meatloaf to cool completely to room temperature. Then, store it in an airtight container in the refrigerator for up to 4 days.
To freeze it for longer storage, wrap individual slices or the entire loaf tightly in plastic wrap and then again in aluminum foil. It will keep well in the freezer for up to 3 months. Just thaw it overnight in the refrigerator before reheating.
Now, reheating is key to preserving that fantastic texture. The oven or air fryer is your best friend here. Reheat slices at 325°F (165°C) until warmed through. This method keeps the outside from getting soggy and the inside juicy. An air fryer is phenomenal for single slices, making them quick and crispy. You can use the microwave in a pinch, but use a lower power setting to avoid turning the cheese rubbery.
Pro Tips and Variations for the Ultimate Experience
Once you’ve mastered the basic recipe, the world is your oyster! Here are some ways to make it your own:
-
Add Bacon: Everything is better with bacon, right? Incorporate cooked, crumbled bacon into the meat mixture, or for a stunning presentation, weave a blanket of bacon strips over the top of the loaf before baking.
-
Spicy Kick: If you like a little heat, add some diced jalapeños or poblano peppers to the veggie sauté. Using pepper jack cheese inside and on top is also a fantastic way to turn up the temperature.
-
Low-Carb/Keto Version: This recipe is easily adaptable! Simply swap the breadcrumbs for crushed pork rinds or almond flour. Serve it over a bed of crisp lettuce or with a side of creamy cauliflower mash for a completely satisfying low-carb meal.
-
Creamy Horseradish Sauce: The sharp, creamy tang of horseradish is a brilliant foil for the rich beef and cheese. Whip up a simple sauce with sour cream, prepared horseradish, chopped chives, a squeeze of lemon, and salt and pepper. It’s an incredible dipping sauce or dollop on top.
Common Mistakes to Avoid
Even the best chefs can make simple errors. Here’s a quick checklist to ensure perfection:
-
Overmixing the meat: This is the #1 cause of tough meatloaf. Mix with a light touch!
-
Adding warm vegetables: This can begin to cook the egg, altering the texture.
-
Skipping the rest time: Patience is a virtue that rewards you with juicy, neat slices.
-
Using meat that is too lean: Embrace the fat for flavor and moisture.
-
Not using a thermometer: Guesswork leads to overdone, dry meatloaf.
FAQs and Conclusion
You’ve got questions? We’ve got answers. Here are some of the most common queries about crafting the ultimate Philly Cheesesteak Meatloaf.
Philly Cheesesteak Meatloaf FAQs
Can I make Philly cheesesteak meatloaf ahead of time?
Absolutely! In fact, it’s a fantastic make-ahead meal. You can assemble the entire meatloaf, cover it tightly with plastic wrap, and refrigerate it for up to 24 hours before you need to bake it. When you’re ready, just pop it in the oven. You might need to add a few extra minutes to the baking time since it will be going in cold.
What is the best cheese to use for an authentic Philly taste?
This is the great debate! For the most authentic Philly cheesesteak experience, you can’t go wrong with either Provolone or Cheez Whiz. Provolone offers a fantastic, melty, and slightly sharp flavor that purists love. Cheez Whiz, on the other hand, provides that iconic, nostalgic, and salty sauce that many famous Philadelphia spots are known for. Why not try both?
Can I use steak strips instead of ground beef?
While the ground beef is essential for creating the cohesive structure of a meatloaf, you can certainly incorporate steak for extra authenticity. A fantastic hybrid method is to use ground chuck as your base but also mix in some finely chopped, quickly seared ribeye steak pieces. This gives you the best of both worlds: the structure of the ground meat and the classic texture and flavor of steak. For more on the classic sandwich’s roots, you can read about the authentic history of the Philly Cheesesteak.
How do I keep my meatloaf from falling apart?
This usually comes down to two things: binders and rest time. Ensure you have enough egg and breadcrumbs (or their substitutes) in your mixture. The single most important factor, however, is letting the meatloaf rest after it comes out of the oven. This allows the proteins to relax and set, ensuring your slices hold together perfectly.
What sides go best with this meatloaf?
The possibilities are endless! Beyond hoagie rolls, it’s excellent with:
-
Classic sides: Mashed potatoes, roasted potatoes, or steamed green beans.
-
Lighter options: A simple side salad with a vinaigrette or roasted broccoli.
-
For a true Philly vibe: Serve with potato chips or a pickle spear.
Conclusion: Your New Family Favorite Awaits
Well, there you have it—your comprehensive guide to creating the ultimate Philly Cheesesteak Meatloaf. This recipe is more than just a list of ingredients; it’s a fusion of two beloved classics that creates something entirely new and spectacularly delicious. It’s the perfect centerpiece for a weeknight dinner that feels special enough for weekend guests.
So, what are you waiting for? Gather those ingredients, embrace the process, and get ready to enjoy the incredible, cheesy, savory results. This isn’t just another meatloaf; it’s a conversation-starting, comfort-food masterpiece that is sure to earn a permanent spot in your recipe rotation. Happy cooking
Print
Ultimate Philly Cheesesteak Meatloaf
Description
Ultimate Philly Cheesesteak Meatloaf
Ingredients:
For the meatloaf:
-
2 lbs ground beef (or mix of beef & pork)
-
1 cup breadcrumbs
-
2 large eggs
-
1 medium onion, finely diced
-
1 green bell pepper, finely diced
-
1 cup mushrooms, finely diced (optional, adds depth)
-
2 cloves garlic, minced
-
1 tbsp Worcestershire sauce
-
1 tsp salt
-
½ tsp black pepper
-
½ tsp paprika
For the filling:
-
1 ½ cups provolone or mozzarella cheese, shredded
-
½ cup sautéed onions & peppers (reserve some from above mixture before adding raw to meatloaf)
For topping:
-
4 slices provolone cheese
-
Fresh parsley, for garnish
Instructions:
-
Prep oven: Preheat to 375°F (190°C). Line a loaf pan with parchment or lightly grease.
-
Cook veggies: In a skillet, sauté onions, peppers, mushrooms, and garlic until soft. Reserve ½ cup for filling, let the rest cool slightly.
-
Mix meatloaf base: In a large bowl, combine ground beef, breadcrumbs, eggs, Worcestershire, seasonings, and cooled sautéed veggies. Mix gently until just combined (don’t overmix).
-
Assemble loaf:
-
Place half the meat mixture in the loaf pan.
-
Add the reserved peppers/onions and 1 ½ cups shredded cheese down the center.
-
Top with remaining meat mixture, sealing edges around the cheese.
-
-
Bake: Cook uncovered 45–50 minutes until meatloaf is nearly done (internal temp ~155°F).
-
Cheese topping: Lay provolone slices on top and return to oven for 5–10 minutes until melted and bubbly.
-
Rest & serve: Let sit 10 minutes before slicing. Garnish with parsley.