
Twisted Rainbow Shot Recipe: Sweet, Sour, and Totally Instagram-Worthy
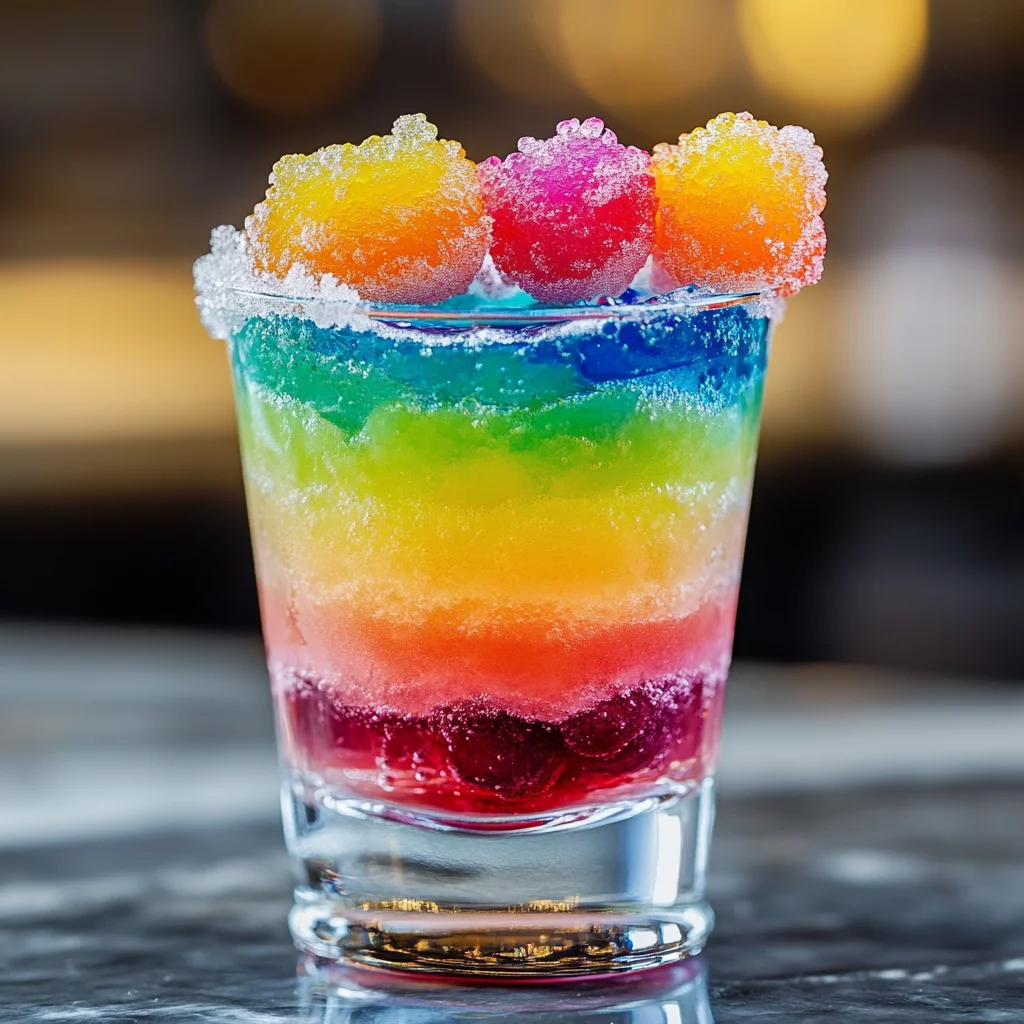
If you’re looking for a show-stopping party drink that’s as fun to look at as it is to drink, the Twisted Rainbow Shot is your new best friend. With eye-catching layers of vibrant melon, electric blue raspberry, and sour cherry syrup, this candy-inspired concoction is a blend of sweet, sour, and sparkle — perfect for parties, holidays, or just leveling up your weekend.
Whether you’re crafting this as a non-alcoholic mocktail or spiking it with liqueurs for a wild night, this rainbow layered shot is guaranteed to dazzle your guests and dominate your Instagram feed.
Why You’ll Love This Twisted Rainbow Shot
From the first glittery pour to the final sour pop, here’s why this layered rainbow shot is a must-try:
-
Bright and Bold Colors: It’s literally a rainbow in a shot glass.
-
Tastes Like Candy: Think Jolly Ranchers, sour belts, and fruity sweets in liquid form.
-
Perfect for Photos: The distinct layers and shimmer make it super shareable.
-
Customizable: Make it a kid-friendly mocktail or boozy adult treat.
-
Party-Perfect: Ideal for Pride Month, birthdays, New Year’s, or any celebration.
Ingredients (Per Shot Glass)
Let’s break down the magic behind the rainbow layers. Here’s what you’ll need:
-
⅓ oz melon syrup (or Midori for an alcoholic version)
-
⅓ oz blue raspberry syrup (or blue curaçao syrup)
-
⅓ oz sour cherry or strawberry syrup
-
Tiny pinch of edible glitter (optional, but highly recommended for sparkle)
-
Sour sugar or crushed Pop Rocks (for rimming the glass)
-
Mini sour belt or gummy (for garnish)
Tip: You can find all these syrups in the cocktail or coffee section of most grocery or specialty stores. For maximum visual appeal, look for bright, translucent syrups.
Directions: How to Layer the Twisted Rainbow Shot
Creating perfect rainbow layers might look tricky, but it’s easier than you think with the right technique.
1. Prep the Glass
Start by rimming your shot glass with something fun and sour. Here’s how:
-
Lightly wet the rim of the glass using a lemon wedge.
-
Dip the rim into sour sugar or crushed Pop Rocks for a tangy, fizzy touch.
2. Layer Like a Pro
This is the fun part! Be patient and precise to get those beautiful, separated layers.
-
First Layer: Pour in the melon syrup (green). This is typically the heaviest and densest syrup.
-
Second Layer: Using the back of a spoon, slowly pour the blue raspberry syrup (blue) over the melon layer. The spoon helps prevent the liquids from mixing.
-
Final Layer: Gently add the sour cherry or strawberry syrup (red/pink) on top, again using the spoon trick.
3. Add Some Sparkle
Sprinkle just a pinch of edible glitter or shimmer dust over the top. This adds an ethereal sparkle, especially under party lights or flash photography.
4. Garnish and Serve
-
Add a mini sour belt on the rim.
-
Or, drop in a tiny gummy for a burst of chewy fun.
And there you have it — your Twisted Rainbow Shot is ready to serve!
Tips for Perfect, Clean Layers
Achieving those crisp, candy-colored layers is all about science — specifically, density.
-
Use cold syrups: Chill each one for about 30 minutes beforehand. Cold syrups are thicker and easier to layer.
-
Order matters: Syrups have different sugar content and density. Generally:
-
Melon syrup (green) = heaviest
-
Blue raspberry (blue) = medium
-
Cherry/strawberry (red) = lightest
-
-
Use a bar spoon: Pour slowly over the back of a spoon to prevent the layers from mixing.
-
Let gravity do the work: Don’t rush. The slower you pour, the better the layers.
Alcoholic Version (Party Mode)
Want to make this shot party-ready for adults? Here’s how to turn the Twisted Rainbow Shot into a boozy rainbow bomb:
Replace the syrups with flavored liqueurs:
-
⅓ oz melon liqueur (like Midori)
-
⅓ oz blue curaçao
-
⅓ oz sour cherry schnapps or strawberry liqueur
Follow the same layering steps for a grown-up twist that tastes like a cocktail candy explosion.
Twisted Rainbow Shot Variations
Unicorn Galaxy Shot
-
Add a drop of purple syrup between the blue and red layers.
-
Use edible glitter with a slight holographic tint.
Cotton Candy Dream Shot
-
Swap out the blue raspberry for pink cotton candy syrup.
-
Top with a fluff of cotton candy before serving.
Tropical Sunset Shot
-
Layer mango syrup, passionfruit syrup, and strawberry.
-
Rim with tajín or chili-lime sugar for a tangy tropical vibe.
What to Pair It With
Looking to serve these at a party or event? Pair with:
-
Rainbow cupcakes
-
Sour candy skewers
-
Fruit punch popsicles
-
Candy charcuterie boards
-
Mini gummy burgers or pizza candy for laughs
When to Serve Twisted Rainbow Shots
These vibrant shots are perfect for:
-
Pride celebrations
-
Birthday parties
-
Bachelorette parties
-
Color-themed events
-
New Year’s Eve
-
Kids’ mocktail nights
-
Unicorn- or candy-themed events
Fun Fact: Why Do Syrups Layer?
Syrups layer because of their specific gravity — basically, how heavy they are compared to water. Denser liquids stay on the bottom while lighter ones float. That’s why it’s crucial to pour in order and slowly, using the spoon to break the fall.
Storage and Make-Ahead Tips
-
These shots are best made fresh for visual impact.
-
However, you can chill your syrups and pre-rim the glasses a few hours before your party.
-
Keep syrups in squeeze bottles for easy, mess-free pouring.
Final Thoughts
The Twisted Rainbow Shot isn’t just a drink — it’s a party trick, photo op, and conversation starter all in one. Whether you’re going alcohol-free or full party mode, this vibrant, sour-sweet shot delivers big on taste, looks, and fun.
So grab your syrups, a sprinkle of glitter, and start layering — your tastebuds and your camera roll will thank you.
Recommended Tools
-
Bar spoon or layering spoon
-
Shot glasses (clear glass for best effect)
-
Edible glitter (silver, rainbow, or holographic)
-
Squeeze bottles (for easy syrup control)
-
Mini tongs for garnishes
Twisted Rainbow Shot
Description
🌈💥 Twisted Rainbow Shot
A layered shot of melon, berry, and sour candy flavors — sweet, sour, and Instagram-worthy.
🍭 Ingredients (for 1 shot glass):
-
⅓ oz melon syrup (or Midori if alcoholic)
-
⅓ oz blue raspberry syrup (or blue curaçao syrup)
-
⅓ oz sour cherry or strawberry syrup
-
Tiny pinch of edible glitter or shimmer (optional)
-
Sour sugar or Pop Rocks (for rim)
-
Mini sour belt or gummy (for garnish)
🎨 Directions:
-
Prep the Glass: Lightly wet the rim of a shot glass with lemon juice and dip in sour sugar or crushed Pop Rocks.
-
Layer Like a Pro:
-
First pour the melon syrup in.
-
Slowly layer the blue raspberry syrup using the back of a spoon.
-
Top gently with the sour cherry or strawberry syrup, again over the back of a spoon to create distinct layers.
-
-
Add a Sparkle: If using, sprinkle a micro pinch of edible glitter on top for that glowy twist.
-
Garnish & Serve: Stick a mini sour belt on the rim or drop in a tiny gummy for a pop of fun.
🔥 Tips for Clean Layers:
-
Chill each syrup so they’re slightly thickened.
-
Use denser syrups first (typically melon > blue raspberry > cherry).
🍹 Optional Alcoholic Version:
Use flavored liqueurs: melon liqueur, blue curaçao, and sour cherry schnapps in the same order.