
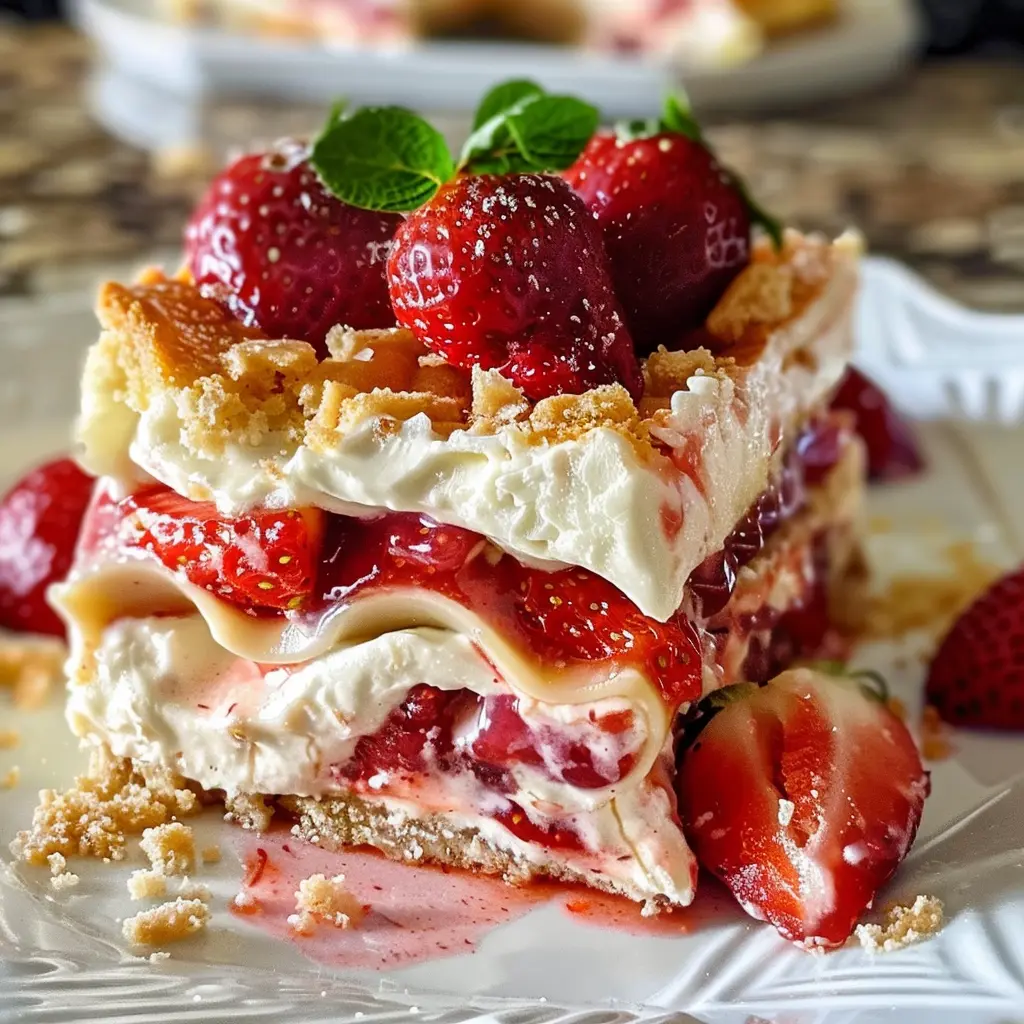
A Quick Taste of What’s to Come
Alright, let’s get one thing straight: this isn’t your nonna’s lasagna. Forget the pasta, the savory meat sauce, and the bubbling cheese—well, actually, hold onto the cheese part, because we’re transforming it into something spectacularly sweet. We’re talking about a dessert so layered, so creamy, and so downright irresistible that it has stolen the spotlight at potlucks and family gatherings across the globe. This article is your ultimate guide to creating the legendary Strawberry Cheesecake Lasagna, a no-bake dessert that is shockingly easy to master. We’ll walk through every single step, from the buttery graham cracker base to the cloud-like whipped cream topping, unveiling pro tips and delicious variations along the way. So, get ready to ditch the oven and embrace the chill, because your new favorite summer dessert is waiting to be built.
Strawberry Cheesecake Lasagna: The Ultimate No-Bake Summer Dessert
Picture this: the sun is blazing, the last thing you want to do is turn on your oven, yet you’re hit with an undeniable craving for something decadent and sweet. Sound familiar? Well, my friend, you’ve just stumbled upon the solution to all your warm-weather woes. Enter Strawberry Cheesecake Lasagna, the easy dessert recipe that is about to revolutionize your treat-making game. This show-stopping creation combines all the tangy, creamy goodness of a classic cheesecake with the fun, layered appeal of an icebox cake. Consequently, it requires exactly zero baking, making it a total lifesaver.
What Exactly is a Strawberry Cheesecake Lasagna?
Now, you might be scratching your head, wondering how on earth “lasagna” and “cheesecake” end up in the same sentence. Frankily, it’s a fair question! Essentially, the name doesn’t refer to taste but to structure. Instead of pasta sheets, this ingenious layered dessert uses a foundation of sweet, crunchy graham crackers. Subsequently, the “cheese” layer is a lush, velvety cheesecake filling that’s light as air. Furthermore, the “topping” is a glorious cascade of fresh strawberries, often held together with a simple, glossy glaze. Ultimately, the whole magnificent creation is finished with a fluffy blanket of whipped cream. It’s a textural masterpiece—crunchy, creamy, and fruity all in one unforgettable bite.
Why This Dessert Will Become Your Go-To Recipe
Honestly, the benefits of this dessert are almost as delicious as the dessert itself. First and foremost, its no-bake nature is an absolute godsend during the sweltering summer months; you can whip it up without breaking a sweat! Moreover, it’s incredibly simple, making it a perfect project for beginner bakers and a reliable fallback for seasoned pros. Another huge advantage? Its make-ahead convenience. You can assemble this beauty the night before a big event, letting it set peacefully in the fridge while you get your beauty sleep. And let’s not forget the visual appeal—this is a crowd-pleasing dessert that looks like you slaved for hours, yet the secret is safely yours to keep. With its universal love affair of strawberry and cheesecake flavors, it’s practically guaranteed to earn you rave reviews.
Gathering Your Ingredients: A Detailed Shopping List
Alright, let’s roll up our sleeves and get down to the good stuff: the ingredients. The beauty of this no-bake dessert lies not only in its simplicity but also in the flexibility of its components. You likely have many of these staples in your pantry already! Here’s your complete shopping list, broken down by layer for ultimate clarity.
For the Graham Cracker Crust:
-
2 cups graham cracker crumbs (this is about 15-16 full sheets)
-
1/2 cup unsalted butter, melted
-
1/4 cup granulated sugar
For the Luxurious Cheesecake Layer:
-
2 (8-ounce) blocks full-fat cream cheese, softened to room temperature (This is non-negotiable for a smooth filling!)
-
1 cup powdered sugar
-
1 teaspoon pure vanilla extract
-
1 (8-ounce) tub frozen whipped topping, thawed (like Cool Whip), or an equal amount of homemade whipped cream
For the Vibrant Strawberry Layer:
-
1 quart fresh strawberries, washed, hulled, and sliced
-
1/3 cup granulated sugar (for macerating)
-
2 tablespoons cornstarch (if making a glaze)
-
1/4 cup water (if making a glaze)
For the Topping & Garnish:
-
Additional whipped topping or fresh whipped cream
-
A few whole or sliced strawberries for decoration
Ingredient Deep Dive: Choices for Quality and Substitutions
Now, let’s chat about the why behind the what. Making smart choices here can elevate your dessert from great to absolutely sublime.
First up, the cream cheese. Using full-fat cream cheese is highly recommended for that rich, authentic cheesecake flavor and a luxuriously thick texture. While you can use a low-fat version, be warned: the final filling might be slightly softer and less decadent. The single most important tip? Ensure your blocks are supremely soft at room temperature; this is the ultimate secret to a lump-free, creamy filling.
Next, the foundation: the graham crackers. You can certainly crush your own from whole crackers for a wonderfully rustic texture. Conversely, store-bought crumbs are a fantastic time-saver. For a twist, try using digestive biscuits or even ginger snaps! For a gluten-free version, simply grab a box of certified gluten-free graham-style crackers.
Finally, the star of the show: the strawberries. Obviously, fresh strawberries at the peak of their season will yield the very best flavor. However, if you’re in a pinch, frozen berries can work wonderfully in the cooked glaze method. Just be sure to thaw and drain them thoroughly to avoid a watery dessert. The choice between a simple macerated berry layer and a cooked glaze is yours; the glaze, however, intensifies the flavor and creates a more stable, pie-like layer that holds its shape when sliced.
Essential Tools You’ll Need
Gathering your gear is a breeze for this recipe; you won’t need any fancy or complicated equipment. In fact, most of these items are probably already hiding in your kitchen drawers. Essentially, this shortlist is your ticket to dessert paradise:
-
A 9×13 inch Baking Pan: This is the standard stage for your layered dessert masterpiece. A glass or ceramic dish is perfect for seeing those beautiful layers.
-
An Electric Mixer: A hand mixer or a stand mixer is absolutely crucial for achieving that perfectly smooth, lump-free cheesecake filling. Trying to do this by hand with a whisk is, frankly, a recipe for sore arms and a gritty texture.
-
Mixing Bowls: You’ll need a few—one for the crust, one for the filling, and another for the strawberries.
-
A Spatula: A trusty silicone spatula is your best friend for scraping down the bowl and spreading layers evenly without deflating that airy filling.
-
A Food Processor or Zip-Top Bag: For quickly turning whole graham crackers into fine, even crumbs. If you don’t have a processor, a rolling pin and a sturdy bag work just as well!
-
A Saucepan: You’ll only need this if you choose to make a cooked strawberry glaze, which is highly recommended for its incredible flavor and stability.
Crucial Preparation Tips Before You Begin
Alright, before we dive into the fun part, let’s talk strategy. A little bit of prep work truly makes the entire process seamless and practically foolproof.
First and foremost, the most critical step: bring your cream cheese to room temperature. I know, I know—it sounds like a tiny detail. However, this is the single biggest factor between a silky-smooth filling and a lumpy, grainy one. Simply take the blocks out of the fridge about 1-2 hours before you start. When you press your finger into it, it should yield very easily. Seriously, don’t skip this!
Next up, consider your mise en place—a fancy French term for having all your ingredients measured and ready to go. Since this recipe comes together fairly quickly, having everything prepped and within arm’s reach prevents any frantic last-minute searches in the pantry.
Finally, there’s no need to grease your pan. In fact, the slight stickiness helps the crust grip the sides, making it easier to get that first piece out. Just grab your dish, and you’re all set to build your no-baketriumph.
Crafting the Perfect Graham Cracker Crust
This is where our masterpiece begins—with a solid, buttery, and sweet foundation. The crust provides that essential crunch against the creamy layers above, so let’s get it right.
Step 1: Creating the Crumbs
First, transform your whole graham crackers into fine, sandy crumbs. If you’re using a food processor, simply pulse the sheets until they’re uniformly ground. Conversely, if you’re going the rustic route, place the crackers in a sturdy zip-top bag, seal it tightly (getting out as much air as possible!), and use a rolling pin to crush them. Roll it back and forth until you have two cups of perfect, even crumbs. A few larger pieces are okay; they’ll add a lovely textural surprise.
Step 2: The Buttery Bind
Now, transfer those gorgeous crumbs to a mixing bowl. Pour in the melted butter and granulated sugar. Then, grab a fork and mix everything together until the mixture resembles wet sand. You’re looking for a consistency where, if you squeeze a handful, it holds its shape perfectly. This means there’s enough butter to properly bind the crust, ensuring it won’t crumble apart when you slice your dessert lasagna.
Step 3: Pressing for Perfection
Here’s the pro tip: dumping the crumbs into the pan and trying to press them down often leads to an uneven base. Instead, pour the crumb mixture into your 9×13 inch dish and use the bottom of a measuring cup or a flat-bottomed glass to press it down firmly and evenly. Don’t be shy! Press it into an compact, uniform layer across the bottom and slightly up the sides. This creates a sturdy “bowl” for your luxurious filling.
Step 4: The Preliminary Chill
This is a sneaky-important step that many recipes overlook. Once pressed, slide the crust into the refrigerator for about 15 minutes. This brief chill allows the melted butter to firm up slightly, which helps the crust set and prevents it from mixing into the cheesecake layer later on. It’s a simple wait that pays off in structural integrity.
Creating the Luxurious, No-Bake Cheesecake Filling
This is the heart of the operation—the decadent, creamy layer that makes this dessert so irresistible. The method here is everything for achieving that dreamy, cloud-like texture.
Step 1: Beating to Smoothness
Take your softened cream cheese and place it in a large bowl. Using your electric mixer on medium-high speed, beat it alone for a good minute or two until it is completely smooth, scraping down the sides of the bowl as needed. You must eliminate every single lump at this stage; they are nearly impossible to fix later. The cream cheese should look whipped and almost fluffy.
Step 2: Incorporating Sweetness
Next, reduce the mixer speed to low and gradually add the powdered sugar and vanilla extract. Once most of it is incorporated, crank the speed back up to medium and beat for another two minutes. The goal here is not just to mix but to aerate the mixture, making it light and giving it volume. The mixture should look pale and super creamy.
Step 3: The Gentle Fold
Now, for the most delicate part. You need to add the whipped topping. If you beat it aggressively with the mixer, you’ll deflate all the air and end up with a dense, heavy filling. So, instead, use your spatula! Add about one-third of the whipped topping to the cream cheese mixture. Gently fold it in using a broad, sweeping motion, turning the bowl as you go. Once that’s incorporated, gently fold in the remaining whipped topping until no white streaks remain. The result should be a phenomenally light, mousse-like cheesecake filling that’s begging to be eaten.
Preparing the Star: The Fresh Strawberry Layer
This is where your dessert gets its vibrant color and that quintessential burst of fruity flavor. You have two fantastic paths here, each with its own merits.
Option A (Simple & Fresh Maceration): The No-Cook Route
This method is all about freshness and speed. Simply take your sliced strawberries and toss them in a bowl with the granulated sugar. Then, just let them sit for about 20-30 minutes. During this time, the sugar works its magic, drawing out the berries’ natural juices and creating a light, syrupy sauce. It’s wonderfully easy and preserves the bright, fresh taste of the fruit. However, this version can make the dessert a tad more watery over time, so it’s best served the same day.
Option B (Cooked Glaze/Sauce): The Flavor-Intense Route
For a more robust and stable layer, a simple cooked glaze is the way to go. This method intensifies the strawberry flavor and acts as a barrier, helping to protect the creamy cheesecake layer from moisture.
-
In a saucepan, combine about one-third of your sliced strawberries, 1/3 cup of sugar, and 1/4 cup of water. Bring it to a gentle simmer over medium heat, stirring frequently. The berries will break down and become saucy.
-
In a small separate bowl, create a slurry by mixing the 2 tablespoons of cornstarch with a tablespoon of cold water until it’s completely smooth.
-
Slowly whisk this slurry into the simmering strawberry mixture. Continue to cook for another 2-3 minutes, stirring constantly, until the mixture thickens noticeably and becomes glossy.
-
Remove the glaze from the heat and let it cool completely to room temperature. Once cool, stir in the remaining fresh sliced strawberries. This creates an incredible contrast of textures between the lush glaze and the fresh berry pieces.
Assembling Your Masterpiece: The Layering Technique
The moment has arrived! It’s time to build our strawberry cheesecake lasagna. The key here is a gentle touch to maintain those distinct, beautiful layers.
Step 1: The Cheesecake Blanket
Retrieve your chilled crust from the refrigerator. Using your spatula, dollop all of that glorious no-bake cheesecake filling onto the crust. Then, gently spread it out into a perfectly even layer, all the way to the edges. Be careful not to press too hard and disrupt the crumb base beneath it.
Step 2: Adding the Berry Brilliance
If you made the cooked glaze, ensure it is completely cool before this next step. Otherwise, you risk melting the creamy layer below! Carefully spoon your strawberry mixture (whether macerated or glazed) over the cheesecake layer. Spread it evenly, making sure to get all that delicious juice or glaze into every corner.
Step 3: The Final Flourish
For the crowning glory, spread your final layer of whipped topping over the strawberries. Again, a gentle hand is best to avoid mixing the red strawberry layer into the white topping. An offset spatula works wonders here for getting a beautifully smooth, professional-looking finish.
Step 4: Garnish and Admire
For a gorgeous presentation, artfully place a few additional strawberry slices or a sprinkle of leftover graham cracker crumbs on top. Now, take a second to admire your handiwork—you’ve built a dessert masterpiece!
The Final Step: Patience During Chill Time
I know, I know—this is the hardest part. But trust me, this is not a suggestion; it’s a requirement. You must cover the pan with plastic wrap and refrigerate your creation for at least 4-6 hours, but ideally overnight.
This marathon chill session is non-negotiable for three brilliant reasons:
-
It Sets the Layers: The cold allows the fats in the cream cheese and whipped topping to firm up dramatically, transforming the filling from soft to sliceable.
-
It Melds the Flavors: The components need time to get to know each other. The flavors marry and intensify, becoming far greater than the sum of their parts.
-
It Ensures a Clean Slice: A properly chilled dessert will give you those pristine, picture-perfect pieces everyone will be Instagramming.
Resist the urge to cut into it early! The wait, however painful, is what separates a good dessert from an absolutely legendary one.
How to Achieve the Perfect Slice
The wait is over, and your magnificent Strawberry Cheesecake Lasagna is fully set. Now, how do you serve it without turning it into a messy puddle? It’s easier than you think.
For flawlessly clean slices that showcase every beautiful layer, you need the right tool and a simple trick. First, always use a sharp, thin-bladed knife. Wipe the blade completely clean with a warm, damp cloth between each and every cut. This removes any sticky residue, ensuring the next slice is just as pristine as the first.
For an even more professional result, briefly dip the knife in a glass of hot water and dry it quickly before slicing. The warm blade glides through the cold, creamy layers like a dream, preventing the topping from squishing or the berries from smearing. It’s a tiny bit of extra effort that makes a huge visual difference, guaranteeing your crowd-pleasing dessert looks as incredible as it tastes.
Storing Your Strawberry Cheesecake Lasagna for Freshness
Let’s be honest, it’s unlikely you’ll have much left over—but just in case, proper storage is key to maintaining that fantastic texture and flavor.
If, by some miracle, there are leftovers, simply cover the baking dish tightly with plastic wrap or aluminum foil. Alternatively, you can transfer individual slices to an airtight container. Stored correctly in the refrigerator, your dessert will stay fresh and delicious for 3 to 4 days. Be aware that the graham cracker crust will gradually soften the longer it sits, becoming more cake-like, but it will still be utterly delightful.
This dessert also freezes surprisingly well! To freeze the whole pan or individual portions, first place the uncovered dish in the freezer for about an hour until the topping is very firm. This prevents the plastic wrap from sticking to and damaging your beautiful finish. Then, wrap the entire dish tightly in a few layers of plastic wrap and a final layer of foil. It can be frozen for up to 2 months. To serve, thaw it overnight in the refrigerator. This is a fantastic trick for always having an impressive make-ahead dessert on hand for unexpected guests.
Pro Tips for a Flawless Dessert Every Time
You’ve mastered the recipe, but these little nuggets of wisdom are what will make you a true Strawberry Cheesecake Lasagna virtuoso.
-
Lump-Free is the Way to Be: I can’t stress this enough—room temperature cream cheese is non-negotiable. Taking it out of the fridge 1-2 hours beforehand is the absolute best way to guarantee a silky-smooth, lump-free filling. No one wants a gritty cheesecake layer!
-
Press for Success: When forming your crust, really press it down firmly and evenly. A well-compacted crust won’t crumble when you slice into it and provides a sturdy base for the heavy layers above.
-
Cool it Down: If you opt for the cooked strawberry glaze, let it cool completely to room temperature before spreading it over the cheesecake layer. A warm glaze will instantly melt the creamy filling beneath it, creating a soupy mess and marring your clean layers.
-
Garnish with Gusto: For the best presentation, add any fresh strawberry garnishes right before serving. This keeps them looking bright and perky instead of weepy and soft from sitting on the cold whipped topping.
Delicious Variations to Try
Once you’ve nailed the classic, the world of layered desserts is your oyster! This recipe is a fantastic base for endless creativity.
-
Mixed Berry Bliss: Swap the strawberries for a vibrant mix of raspberries, blueberries, and blackberries. The combination of tart and sweet is absolutely phenomenal.
-
Chocolate-Dipped Dream: For the chocolate lovers, add a layer of chocolate pudding between the cheesecake and strawberry layers. You could even sprinkle some chocolate shavings on top for an elegant finish.
-
Tropical Twist: Imagine a version with a coconut macaroon crust, a cheesecake layer flavored with a touch of lime zest, and a topping of fresh mango and pineapple. Hello, vacation in a pan!
Adapting the Recipe: Gluten-Free and Vegan Options
This dessert is wonderfully adaptable to various dietary needs, so everyone can enjoy a slice.
For a Gluten-Free Version: This is one of the easiest swaps! Simply use your favorite certified gluten-free graham crackers or gluten-free vanilla cookies to make the crust. The rest of the recipe is naturally gluten-free, so you’re good to go.
For a Vegan Version: With a few smart substitutions, you can create a fantastic vegan version. Use vegan butter for the crust. For the filling, use a plant-based cream cheese alternative and vegan powdered sugar. Finally, swap the dairy whipped topping for a coconut whipped cream or another vegan whipped topping. The result is a completely plant-based dessert that’s just as creamy and satisfying.
Frequently Asked Questions (FAQs)
Can I use frozen strawberries instead of fresh?
Absolutely, you can! Frozen strawberries are a fantastic and often more economical option, especially outside of summer. The key is to manage the extra moisture. Always thaw and drain them thoroughly in a colander, and consider gently pressing them to release more liquid. Because of their higher water content, using frozen berries in the cooked glaze method is highly recommended. The cooking process will effectively thicken the excess juices, preventing a soggy dessert and concentrating that wonderful berry flavor.
How long does strawberry cheesecake lasagna last in the fridge?
When stored correctly in an airtight container or with the baking dish tightly wrapped in plastic wrap, your dessert will stay fresh and delicious for 3 to 4 days in the refrigerator. It’s the ultimate make-ahead dessert for any event. Do note that the graham cracker crust will continue to soften over time, becoming more cake-like, but it will still be utterly enjoyable. For the best texture, enjoying it within the first three days is ideal.
Can I make this dessert ahead of time?
You not only can, but you absolutely should! Preparing this dessert ahead of time is highly encouraged and part of what makes it so brilliant. The required chill time means that assembling it the night before you plan to serve it is the perfect strategy. This allows the layers to set firmly and the flavors to meld together beautifully. In fact, many people find it tastes even better on the second day.
Why is my cheesecake layer lumpy?
The most common culprit is cream cheese that wasn’t properly softened. Using cold cream cheesestraight from the fridge makes it impossible to achieve a smooth, creamy dessert texture. For a perfectly silky, lump-free filling, ensure your blocks are softened at room temperature until they are very pliable. Secondly, not beating the cream cheese by itself first can hide lumps. Always beat the softened cream cheese alone until it’s completely smooth before adding any other ingredients like sugar or vanilla.
Conclusion: Your New Signature Dessert Awaits
And there you have it—your complete, no-fail guide to creating the most spectacular Strawberry Cheesecake Lasagna imaginable. From the crunchy, buttery graham cracker base to the cloud-like cheesecake filling and the vibrant, fruity strawberry topping, you’re now equipped to build a dessert that is as stunning to look at as it is divine to eat.
This isn’t just another recipe; it’s your new secret weapon for potlucks, birthdays, holidays, or simply turning a regular Tuesday into something special. It’s the ultimate easy dessert recipe that delivers maximum reward for minimal effort. So, what are you waiting for? Gather those simple ingredients, channel your inner dessert architect, and get ready to receive a standing ovation. Your journey to becoming a no-bake dessert legend starts now.
Strawberry Cheesecake Lasagna
Description
🍓 Strawberry Cheesecake Lasagna
Ingredients
Crust Layer:
-
1 package (14 oz) Golden Oreos (crushed)
-
½ cup unsalted butter, melted
Cream Cheese Layer:
-
16 oz cream cheese, softened
-
1 cup powdered sugar
-
2 cups whipped topping (Cool Whip or homemade)
Strawberry Layer:
-
2 packages (3.4 oz each) instant cheesecake pudding mix (or vanilla if not available)
-
3 cups cold milk
-
1 cup whipped topping
-
2 cups fresh strawberries, sliced
Topping:
-
2 cups whipped topping
-
1 cup fresh strawberries, diced or halved
-
½ cup white chocolate shavings or crushed Oreos (optional)
Instructions
-
Make the Crust:
-
Crush Golden Oreos into fine crumbs (a food processor works best).
-
Mix with melted butter until combined.
-
Press firmly into the bottom of a 9×13-inch dish. Place in fridge to set.
-
-
Cream Cheese Layer:
-
Beat cream cheese and powdered sugar until smooth.
-
Fold in 2 cups whipped topping.
-
Spread evenly over the Oreo crust.
-
-
Strawberry Cheesecake Layer:
-
Whisk pudding mixes with cold milk until thickened (about 2 minutes).
-
Fold in 1 cup whipped topping.
-
Gently spread over cream cheese layer.
-
Top with a layer of fresh sliced strawberries.
-
-
Final Topping:
-
Spread remaining whipped topping evenly.
-
Garnish with strawberries and white chocolate shavings or extra Oreo crumbs.
-
-
Chill:
-
Refrigerate at least 4 hours (or overnight) before serving so layers set beautifully.
-