
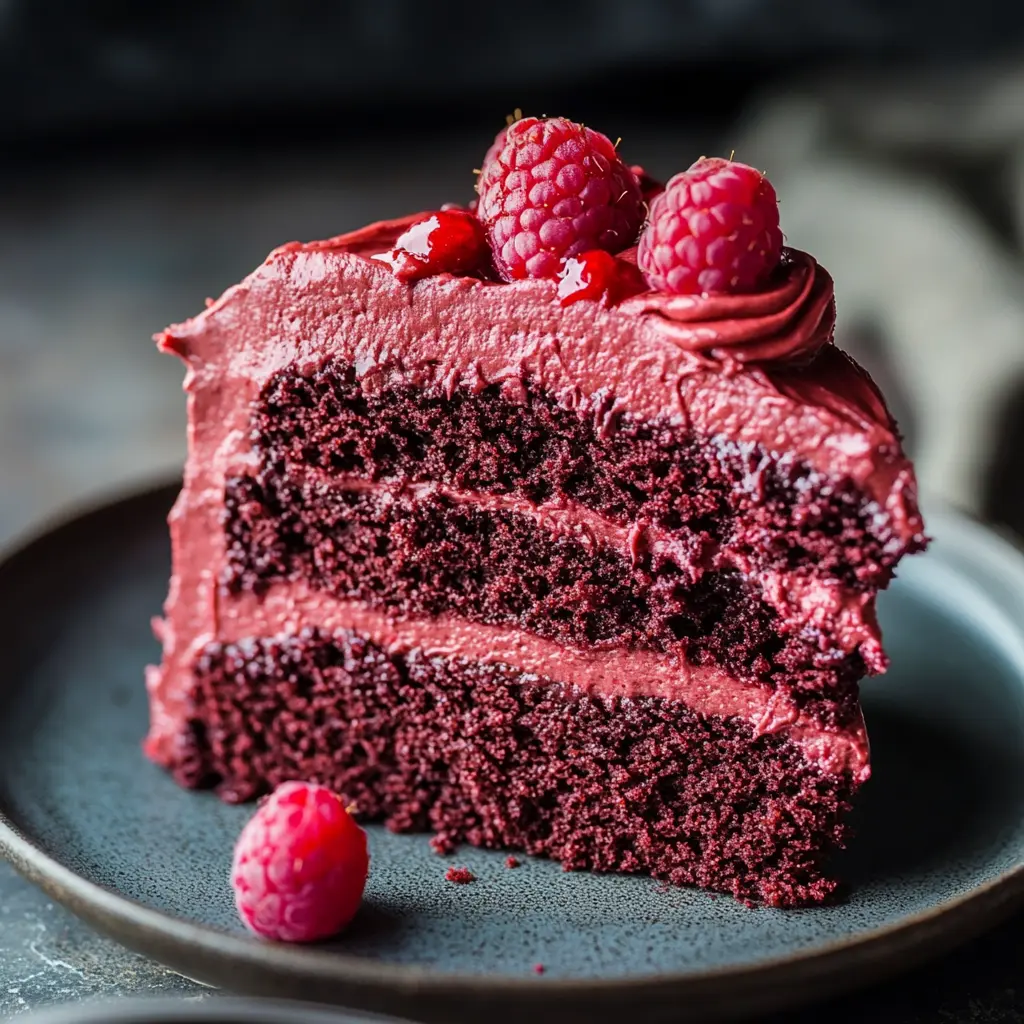
Chocolate Velvet Cake with Raspberry Frosting: The Ultimate Decadent Dessert
Picture this: a slice of cake so incredibly moist and tender it practically melts on your tongue, delivering a profound, rich chocolate flavor that is nothing short of luxurious. Now, imagine that deep, dark cake enveloped in a cloud of the most stunning pink frosting—a frosting that’s not just sweet, but beautifully tart, fruity, and creamy all at once. That, my friends, is the magic of a homemade Chocolate Velvet Cake with Raspberry Frosting. This isn’t just a dessert; it’s an experience, a show-stopping centerpiece that promises to turn any occasion into a celebration.
Furthermore, this comprehensive guide is your golden ticket to recreating this masterpiece in your own kitchen. We’ll walk through every single step, from unraveling the delicious history of “velvet” cakes to mastering the art of that silky raspberry cream cheese frosting. So, preheat your ovens and get ready to bake a memory!
What is Chocolate Velvet Cake? A Rich History
Alright, let’s clear something up right away. While its famous cousin, the Red Velvet Cake, often steals the spotlight with its vibrant color, the Chocolate Velvet Cake is a star in its own right. Essentially, the term “velvet” in baking doesn’t refer to a color; instead, it describes a specific, supremely soft texture. Historically, this delicate crumb was achieved by using unconventional ingredients for the time, like cocoa powder or vinegar and buttermilk, to chemically tenderize the flour.
Consequently, our Chocolate Velvet version proudly puts the chocolate flavor front and center. Forget a hint of cocoa; we’re talking about a deep, dark, and intensely decadent chocolate dessert that truly lives up to its luxurious name. The “red” is traded for a rich brown, allowing the pure, unadulterated essence of chocolate to shine. Then, to cut through that richness with perfect harmony, we introduce a luscious, tangy raspberry frosting. This brilliant pairing creates a balance of flavors that is simply unforgettable, making it the ultimate special occasion cake for birthdays, anniversaries, or just because.
Gathering Your Ingredients: A Guide to Quality
Alright, let’s get down to the nitty-gritty: the ingredients. Now, you might be tempted to just grab whatever’s in the pantry, but trust me on this—for a cake that promises velvety perfection, quality isn’t just a detail; it’s the main event. Using top-shelf components is the absolute secret weapon for transforming a simple homemade chocolate cake into a truly decadent chocolate dessert that will have everyone begging for the recipe.
Think of it like building a house; you wouldn’t use flimsy materials for the foundation, right? The same goes for baking. Therefore, investing in good-quality basics makes all the difference between a moist chocolate cake recipe and a dry, disappointing one. Let’s break it all down.
For the Chocolate Velvet Cake Layers
First up, the star of the show: the cake itself. Each ingredient here has a specific, crucial job to do.
-
The Chocolate: This is non-negotiable. For a deep, rich flavor, you need a high-quality cocoa powder. The debate between natural and Dutch-process cocoa is a real one amongst bakers. Honestly, for this recipe, Dutch-process is a superstar because its alkalization process mellows the acidity and gives it a darker color and smoother, more mellow flavor that is perfect for our chocolate velvet goals. However, in a pinch, natural cocoa will still work.
-
The Fat: Here’s where we get scientific. This recipe cleverly uses both butter and a neutral oil. Why? Well, butter gives you that incredible, irreplaceable flavor. Oil, on the other hand, is a champion of moisture. Since oil is liquid at room temperature, it creates a more tender and moist crumb that stays that way for days. It’s the best of both worlds!
-
The Leavening: This is the cake’s rising crew. We’re using both baking soda and baking powder to ensure a good lift and that signature soft, airy texture. The baking soda also reacts with the acid in the buttermilk, giving the cake an extra bit of rise and tenderness.
-
The Acid: Speaking of which, buttermilk is the MVP of tenderness. Its acidity helps break down the gluten in the flour, resulting in that fine, soft crumb we’re after. It also adds a very subtle tang that makes the chocolate flavor pop. No buttermilk? Don’t panic! You can easily make a substitute (we’ll cover that in the FAQs).
-
The Flour: Simple, reliable all-purpose flour is the way to go. The key here is to measure it correctly to avoid a dense cake. For the love of baking, please use the spoon-and-level method: spoon the flour into your measuring cup and then level it off with a knife. Don’t scoop directly from the bag!
For the Raspberry Frosting
Now, for the gorgeous pink cloud that will envelop our cake. This isn’t your average buttercream.
-
The Raspberries: You have options here: fresh or frozen raspberries. Fresh are fantastic when in season, but frozen are a brilliant, year-round option and are often more affordable because they’re frozen at peak ripeness. You’ll be cooking them down into a puree anyway, so frozen work perfectly. The most important step for a smooth frosting? Straining the puree to remove those pesky seeds.
-
The Butter & Cream Cheese: The dynamic duo! Using both unsalted butter and full-fat cream cheese creates a frosting that is stable, creamy, and tangy—a perfect contrast to the sweet cake. Crucially, both must be at room temperature. I cannot stress this enough. If they’re cold, you’ll end up with a lumpy mess instead of a smooth, fluffy frosting.
-
The Sweetener: We’re using confectioners’ sugar (also known as powdered or icing sugar). Its fine texture dissolves easily, preventing a gritty frosting. And here’s a pro tip: you must sift it. Yes, it’s an extra step, but it’s 100% worth it for that irresistibly silky-smooth texture.
Essential Baking Tools for Success
Alright, let’s talk gear. Now, I’m not one for single-use kitchen gadgets that clutter up the drawers, but having the right tools for the job is a complete game-changer. Think of it this way: you wouldn’t try to build a bookshelf without a hammer and a level, right? Similarly, the right baking equipment sets you up for success, making the process smoother and the results infinitely better. It’s all about working smarter, not harder, to create your decadent chocolate dessert.
Must-Have Equipment
Gathering these tools before you start will make your baking session feel like a well-orchestrated dance rather than a frantic scramble.
-
Cake Pans: You’ll need two or three 8-inch or 9-inch round pans. Here’s a pro tip: opt for light-colored metal pans. They conduct heat more evenly than dark metal pans, which can sometimes over-brown the edges of your cake layers before the center is done. Don’t forget to grease them well and line the bottoms with parchment paper—it’s your insurance policy for perfect release.
-
Mixer: A stand mixer is a baker’s best friend for a recipe like this, but a sturdy hand electric mixerwill work absolutely fine. You’ll need its power to cream the butter and sugar properly for the cake and to whip the frosting to a fluffy consistency.
-
Parchment Paper: Speaking of insurance, this is non-negotiable. Lining your pans with parchment circles guarantees your beautiful chocolate velvet layers will slide out effortlessly without leaving a single crumb behind.
-
Sifter/Fine-Mesh Sieve: This is crucial for two ingredients: your cocoa powder and your confectioners’ sugar. Sifting not only removes any lumps but also aerates the ingredients, leading to a lighter cake crumb and a perfectly smooth raspberry frosting.
-
Cooling Racks: These are vital for allowing air to circulate around your baked cake layers. If you let them cool completely in the pan, they’ll essentially steam themselves and become soggy. Nobody wants a soggy bottom!
-
Offset Spatula & Bench Scraper: Want to frost your cake like a pro? These two tools are the secret. An offset spatula gives you unparalleled control for spreading frosting smoothly, while a bench scraper is magic for creating those beautifully sharp, clean sides on your finished masterpiece.
-
Food Processor or Blender: You’ll need one of these to create a perfectly smooth raspberry pureefor your frosting. A blender will give you the silkiest results, but a food processor works great too. Remember, you’ll want to strain the puree to remove the seeds for that luxuriously smooth texture. For a fantastic guide on this, check out this resource on how to make a smooth raspberry puree.
Part 1: Baking the Perfect Chocolate Velvet Cake Layers
Alright, it’s go time. This is where the magic happens and your kitchen starts to smell like a professional patisserie. Now, baking a sublime moist chocolate cake isn’t just about dumping ingredients in a bowl; it’s a bit of a delicious science. But don’t you worry—we’re going to walk through each step together. The key? Mise en place. It’s just a fancy way of saying “get everything in its place” before you start. So, measure out your ingredients, line your pans, and let’s create some magic.
Step-by-Step Instructions
Step 1: Prep Work is Everything.
First things first, preheat that oven. You want it hot and ready for your batter, not the other way around. Set it to 350°F (175°C). Now, grab your cake pans. Grease the sides generously with butter or baking spray. Then, trace the bottom of the pan on a piece of parchment paper, cut out the circle, and place it in the bottom. This little trick is your absolute best friend for guaranteeing your layers will release perfectly. Give the parchment a quick spray too, for good measure. For an extra non-stick guarantee, dust the entire pan with a light coating of cocoa powder instead of flour—no white marks on your beautiful chocolate cake!
Step 2: Whisk the Dry Ingredients.
In a large bowl, whisk together your flour, sugar, cocoa powder, baking soda, baking powder, and salt. You want to do this for a good minute. Why? Because you’re not just mixing; you’re aerating the flour and ensuring all those leavening agents are evenly distributed. This simple step is the foundation of a uniform, tender crumb. No one wants a pocket of baking soda in their slice!
Step 3: Combine the Wet Ingredients.
In a separate medium bowl or a large liquid measuring cup, whisk together the eggs, buttermilk, oil, and vanilla extract. Whisk until the mixture is completely smooth and homogenous. This ensures that when you add it to the dry ingredients, everything will incorporate evenly without you having to overmix the batter.
Step 4: The Magic of Combining.
Now, here’s where you need a gentle touch. Pour the wet ingredients into the bowl with the dry ingredients. Using your mixer on low speed (or a sturdy spatula by hand), mix everything together justuntil the ingredients are combined. The batter will be thick. Seriously, stop the moment you no longer see streaks of dry flour. Overmixing is the enemy of a tender velvet texture because it develops the gluten in the flour, leading to a tough cake.
Step 5: The Final, Flavor-Boosting Addition.
Carefully pour in the hot coffee or water. Wait, coffee? Don’t panic! You won’t taste it. The coffee’s job is to intensify and deepen the chocolate flavor without adding a coffee taste. It makes the chocolate taste more chocolaty—it’s a baker’s secret weapon! The batter will now become very thin and liquid. That’s perfectly normal. Gently stir until the liquid is fully incorporated and the batter is smooth.
Step 6: Baking and Testing for Doneness.
Divide the batter evenly between your prepared pans. A kitchen scale is fantastic for this to ensure perfectly even layers, but you can also eyeball it. Pop them in the preheated oven and set your timer. Bake for 30-35 minutes. Now, the toothpick test is your best friend here. When the timer goes off, don’t pull the cakes out just yet. Instead, open the oven and insert a toothpick into the center of a cake layer. If it comes out with a few moist crumbs clinging to it, it’s done! If it comes out with wet batter, it needs more time. If it’s completely clean, it might be ever so slightly overdone, but it’ll still be delicious.
Step 7: Cooling Properly is Non-Negotiable.
This might be the hardest step: patience. When the cakes are done, pull them out and let them cool in their pans on a wire rack for exactly 15 minutes. This allows them to set enough to be handled. Then, run a knife around the edge of each pan to loosen the sides, invert the pans onto the rack, and carefully lift them off. Peel away the parchment paper circles. Finally, and this is crucial, you must let the cakes cool completely before you even think about frosting them. If you frost a warm cake, the raspberry cream cheese frosting will melt into a sad, runny puddle. Let them cool for at least 2 hours.
Part 2: Crafting the Luscious Raspberry Frosting
While those beautiful chocolate velvet layers are cooling, it’s time to turn our attention to the crowning glory: the frosting. This isn’t just any buttercream; oh no, this is a tangy, fruity, and breathtakingly pink raspberry cream cheese frosting that will cut through the richness of the cake like a dream. The process is simple, but a few key techniques will ensure your frosting is smooth, stable, and utterly sublime. Let’s get mixing!
Preparing the Raspberry Puree
First, we need to transform our berries into a concentrated, seedless puree. This step is the secret to achieving that vibrant raspberry flavor without watering down our frosting.
If you’re using frozen raspberries, there’s no need to thaw them first. Simply place them in a small saucepan over medium heat. As they warm up, they’ll release their juices. Use a wooden spoon or spatula to mash them as they cook. Let the mixture simmer for about 5-7 minutes, stirring occasionally, until it has broken down and become very liquid.
For fresh raspberries, the process is the same. Toss them into the saucepan and cook, mashing gently, until they are completely soft and juicy.
Now, for the crucial part: straining. Place a fine-mesh sieve over a bowl and pour the hot raspberry mixture into it. Using the back of a spoon, press and swirl the pulp through the sieve. This will separate the gorgeous, smooth puree from all the seeds. You should be left with a vibrant, liquid puree.
Return this puree to the saucepan. Cook it over low heat for another 5-10 minutes, stirring frequently, until it has reduced by about half. You’re essentially cooking out the excess water, which is public enemy number one for frosting consistency. Let this reduced puree cool completely to room temperature before you use it. Rushing this step will lead to runny frosting!
Mixing the Frosting to Perfect Consistency
Now for the fun part—putting it all together. Remember, temperature is everything here. Your butter and cream cheese must be at room temperature; if they’re even slightly cold, your frosting will be lumpy.
Step 1: Cream the Base.
In the bowl of your stand mixer fitted with the paddle attachment (or using a hand mixer), beat the room-temperature butter and cream cheese together on medium-high speed. You want to beat them for a good 2-3 minutes until the mixture is completely smooth, pale, and fluffy. Scrape down the bowl and the beater to ensure no lumps are hiding at the bottom.
Step 2: Gradually Add Sugar.
Turn the mixer down to its lowest possible speed. Gradually add the sifted confectioners’ sugar, about a half cup at a time. Letting it incorporate slowly prevents a sugar dust storm from covering your kitchen. Once all the sugar is added, scrape down the bowl again, then increase the speed to medium-high and beat for another 2 minutes until the mixture is very smooth and creamy.
Step 3: Incorporate the Flavor.
Turn the mixer back to low speed and slowly pour in your completely cooled raspberry puree and the vanilla extract. Once it’s mostly incorporated, turn the speed up to medium and beat for one final minute, until the frosting is uniformly pink, light, and fluffy. Taste it! Isn’t that incredible?
Troubleshooting Frosting Consistency:
-
Too Thin? If your puree was still a bit warm or you added a touch too much, your frosting might be soft. Don’t panic! Just pop the entire bowl of frosting into the refrigerator for 20-30 minutes to firm up, then re-whip it.
-
Too Thick? If it seems a little stiff for spreading, you can loosen it up with a tiny splash (think ½ teaspoon) of heavy cream or milk. Beat it in on low speed.
-
Too Soft? Chilling is always the answer. A brief stint in the fridge will work wonders on a soft, creamy frosting.
Part 3: Assembly, Decoration, and Presentation
The moment of truth has arrived! Your kitchen is filled with the aroma of chocolate, your cake layers are cool, and your frosting is flawlessly fluffy. Now, we transform these components into a stunning masterpiece. Assembling a layer cake can feel intimidating, but with a few simple techniques, you’ll achieve a professional-looking result. This is where your decadent chocolate dessert truly comes to life. So take a deep breath—you’ve got this.
The Art of Leveling and Filling
First, ensure your cake layers are completely cool to the touch. If they are even slightly warm, your frosting will melt.
Now, let’s create a flat, stable surface. If your cake layers have a slight dome, you’ll want to level them. Using a long, serrated knife, gently saw horizontally across the top of the cake to remove the dome. Pro Tip: Keep the knife level and rotate the cake, not your wrist, for an even cut. Those leftover cake scraps? They’re your well-earned baker’s treat!
Place your first cake layer on your serving plate or cake board. To prevent any stray crumbs from messing up your plate, you can tuck small strips of parchment paper underneath the edges of the cake.
Now, add your first layer of frosting. Scoop a generous amount of raspberry frosting onto the center of the cake layer. Using an offset spatula, spread it evenly right to the edges. An easy way to get an even layer is to add more frosting than you think you need—you can always scrape the excess back into the bowl.
Carefully place the second cake layer on top, bottom-side up. This gives you an perfectly flat top. If you’re using a third layer, repeat the process.
Frosting and Decoration Techniques
Here’s the secret to a beautifully frosted cake: the crumb coat. This is a very thin layer of frosting that seals in all the loose crumbs. Apply a thin layer of frosting over the entire cake—top and sides. Don’t worry about it looking perfect! Once it’s covered, pop the entire cake into the refrigerator for about 15-20 minutes. This chills the frosting and sets the crumbs in place, ensuring your final coat is flawlessly smooth.
Once the crumb coat is set, it’s time for the final coat. Apply large dollops of frosting to the top and sides of the chilled cake. Use your offset spatula to spread it evenly across the top first, then smooth it down the sides.
For super smooth sides, use a bench scraper. Hold it straight against the side of the cake and slowly turn your cake stand (or the plate itself). The bench scraper will remove excess frosting and leave a beautifully sharp edge. Smooth the top with your spatula.
Decoration Ideas:
-
Simple & Elegant: Top the cake with a pile of fresh raspberries and a few mint leaves for a pop of color. A light dusting of powdered sugar looks beautiful on the dark chocolate.
-
Chocolate Lover’s Dream: Press chocolate shavings or curls gently into the frosting on the sides of the cake. You can also grate a dark chocolate bar over the top for a beautiful finish.
-
Rustic “Naked Cake”: For a trendy look, skip the final coat on the sides after the crumb coat. Simply use your spatula to ensure the frosting between the layers is visible and clean. It’s forgiving and gorgeous.
-
Dramatic Drizzle: Create a simple chocolate ganache (heat ½ cup cream and pour over ½ cup chocolate chips, let sit, then stir) and let it cool slightly. Drizzle it from the center of the cake towards the edges, allowing it to drip down the sides naturally.
Serving, Storage, and Make-Ahead Tips
The cake is frosted, decorated, and absolutely gorgeous. But wait! Before you dive in with a knife, there are a few final things to know that will ensure your creation is served and stored perfectly. A little patience now will guarantee every single slice is as incredible as the last. After all, you’ve put so much love into this homemade chocolate cake; let’s make sure it stays perfect.
Serving Suggestions
You’ve waited hours, but hold on just a little longer! For the cleanest, most beautiful slices, give your frosted cake about 20-30 minutes to set at room temperature before slicing. This allows the frosting to firm up slightly.
When you’re ready to serve, use a long, thin knife. For the cleanest cuts, dip the knife in hot water, wipe it dry with a towel, and then make your slice. The warm blade will glide through the frosting and layers seamlessly. Wipe the blade clean and reheat it between each slice for a picture-perfect presentation every time.
This cake is delicious slightly cool or at room temperature. Serving it straight from the fridge will mute the flavors and make the texture a bit firmer. Letting it sit out for 20-30 minutes before serving allows the chocolate velvet layers to soften and the raspberry cream cheese frosting to become luxuriously creamy again.
How to Store Your Cake
Because this frosting contains cream cheese, refrigeration is required.
-
Short-Term Storage (2-3 days): Place your cake in a cake carrier, which is the ideal solution. If you don’t have one, you can improvise. Carefully place two toothpicks in the top of the cake, standing up high enough to clear the frosting. Gently place an large inverted bowl (or a large pot) over the cake. The toothpicks will prevent the bowl from touching and smudging the frosting. This will protect the cake in the fridge for up to 5 days.
-
Freezing for Later Enjoyment: This cake freezes beautifully!
-
Unfrosted Layers: Wrap each cooled cake layer individually in two layers of plastic wrap, then a layer of aluminum foil. They can be frozen for up to 3 months. Thaw overnight in the refrigerator before frosting.
-
Whole Frosted Cake: First, you need to “flash freeze” it. Place the fully frosted cake, uncovered, in the freezer for about 1-2 hours, or until the frosting is very firm. Then, wrap the entire cake tightly in several layers of plastic wrap and then foil. It will keep for up to 1 month. To serve, thaw the cake, still wrapped, overnight in the refrigerator. Unwrap it a couple of hours before serving to let it come to the perfect serving temperature.
-
Frequently Asked Questions (FAQs)
Even the most confident bakers have questions, and that’s perfectly normal! Baking is a science, and sometimes things don’t go exactly as planned. Here are answers to the most common questions about making this Chocolate Velvet Cake with Raspberry Frosting, based on what other bakers are searching for.
Can I make this cake without buttermilk?
Absolutely! While buttermilk is a key ingredient for tenderness and that signature subtle tang, it’s easy to make a fantastic substitute. Simply add 1 tablespoon of white vinegar or fresh lemon juice to a liquid measuring cup. Then, fill the cup with whole milk until it reaches the 1-cup line. Stir gently and let it sit for 5-10 minutes. The milk will curdle and thicken slightly, creating a perfect buttermilk stand-in for your moist chocolate cake recipe.
Can I use frozen raspberries for the frosting?
You absolutely can, and they are often a brilliant choice! Frozen raspberries are typically picked and frozen at peak ripeness, which locks in their flavor and nutrients. There’s no need to thaw them if you are making a cooked puree; they will thaw and break down quickly in the saucepan. In fact, using frozen berries can be more convenient and affordable than fresh, especially when they are out of season.
Why did my frosting turn out runny?
A runny frosting is usually caused by one of two things:
-
The Butter/Cream Cheese Was Too Warm: If your dairy ingredients weren’t just cool enough at room temperature, the frosting can become soft. Likewise, if your kitchen is very warm, this can happen.
-
The Raspberry Puree Was Too Wet or Warm: If you didn’t reduce the puree enough to cook off excess water, or if it wasn’t completely cooled before adding, it can thin out the frosting.
Don’t worry, it’s an easy fix! Pop the entire bowl of frosting into the refrigerator for 20-30 minutes to firm up. Then, take it out and re-whip it with your mixer. If it’s still too soft, you can gradually beat in a little more sifted powdered sugar until it reaches your desired consistency.
What’s the difference between chocolate velvet and red velvet cake?
This is a fantastic question! While they are related, they have distinct differences:
-
Chocolate Velvet Cake is all about a deep, intense chocolate flavor. It uses a significant amount of high-quality cocoa powder (often Dutch-process) for a rich, dark brown color and a tender, “velvety” crumb. There is no food coloring involved.
-
Traditional Red Velvet Cake originally relied on a chemical reaction between natural (non-alkalized) cocoa, acidic buttermilk, and vinegar to achieve its very subtle chocolate flavor and a slight reddish tint. Today, it is known for its bright red color, which comes primarily from red food coloring. Its flavor is more buttery and tangy than chocolaty.
Can I make this into cupcakes?
Yes, this recipe adapts wonderfully to cupcakes! They become the ultimate portable decadent chocolate dessert.
-
Line two muffin tins with paper liners.
-
Fill each liner about 2/3 full with the batter.
-
Bake at 350°F (175°C) for 18-22 minutes, or until a toothpick inserted into the center comes out clean.
-
Let the cupcakes cool completely before frosting them with the raspberry cream cheese frosting.
-
This recipe should yield approximately 24-28 delicious cupcakes.
Chocolate Velvet Cake with Raspberry Frosting
Description
Chocolate Velvet Cake with Raspberry Frosting
Ingredients
For the Chocolate Velvet Cake:
-
1 ¾ cups all-purpose flour
-
¾ cup unsweetened cocoa powder
-
2 cups granulated sugar
-
1 ½ tsp baking powder
-
1 ½ tsp baking soda
-
½ tsp salt
-
2 large eggs
-
1 cup buttermilk (room temperature)
-
½ cup vegetable oil
-
2 tsp vanilla extract
-
1 cup hot coffee (or hot water for milder flavor)
For the Raspberry Frosting:
-
1 cup unsalted butter (softened)
-
4 cups powdered sugar (sifted)
-
½ cup seedless raspberry jam (good quality)
-
2–3 tbsp heavy cream (for texture)
-
1 tsp vanilla extract
-
Fresh raspberries (for garnish)
Instructions
Make the Cake:
-
Preheat oven to 350°F (175°C). Grease and flour two 9-inch round cake pans.
-
In a large bowl, whisk flour, cocoa powder, sugar, baking powder, baking soda, and salt.
-
Add eggs, buttermilk, oil, and vanilla. Beat until smooth.
-
Slowly pour in hot coffee and mix (batter will be thin — that’s good).
-
Divide batter evenly between pans and bake for 30–35 minutes, or until a toothpick inserted in the center comes out clean.
-
Cool cakes in pans for 10 minutes, then transfer to wire racks to cool completely.
Make the Raspberry Frosting:
-
Beat softened butter until creamy and pale.
-
Add powdered sugar, one cup at a time, mixing well.
-
Mix in raspberry jam and vanilla.
-
Add heavy cream as needed until frosting is fluffy and spreadable.
Assemble the Cake:
-
Place one cake layer on a serving plate. Spread a generous layer of raspberry frosting.
-
Top with the second cake layer and frost the top and sides.
-
Garnish with fresh raspberries and a drizzle of extra raspberry jam if desired.
🌟 Tips for Extra Decadence
-
Add a thin layer of ganache under the raspberry frosting for a richer bite.
-
Chill the cake for 30 minutes before slicing for cleaner cuts.
-
Decorate with chocolate curls or shavings for a bakery-style finish.