
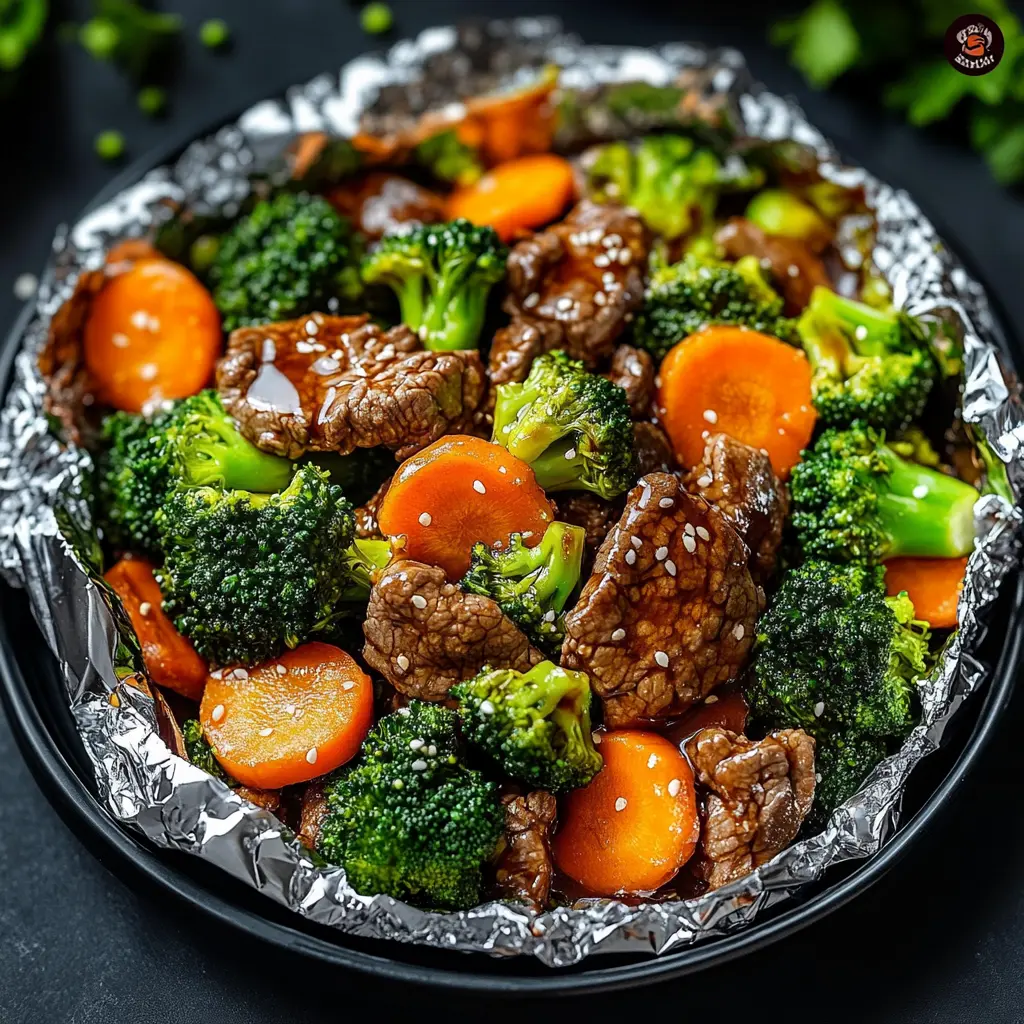
The Ultimate Beef, Broccoli, Carrots, and Soy Sauce Foil Pack: Your Guide to an Easy, Flavorful Dinner
Let’s be honest; after a long day, the last thing anyone wants is a mountain of dirty pots and pans staring back from the kitchen sink. We crave something delicious, wholesome, and—let’s not kid ourselves—incredibly easy to clean up. Well, what if I told you there’s a game-changing cooking method that delivers a restaurant-quality meal with literally one pan to wash (and even that’s optional)? Enter the humble yet mighty foil pack dinner.
This isn’t just another recipe; it’s your ticket to reclaiming your evenings. Imagine tender beef, crisp-tender broccoli, and sweet carrots all steaming together in a savory, garlicky soy sauce marinade, each flavor melting into the next. Best of all? You simply toss everything together, wrap it up, and let the oven (or grill!) do all the work. The result? A flavor-packed meal and a spotless kitchen. This guide is your ultimate resource for mastering the Beef, Broccoli, Carrots, and Soy Sauce Foil Pack, taking you from a simple recipe to a weeknight hero.
Why the Foil Pack Method is a Game-Changer for Weeknight Dinners
Alright, let’s dive right into the magic. Why has this simple technique become a secret weapon for busy home cooks and seasoned chefs alike? The reasons are as clear as day, and they go far beyond just avoiding dish duty.
The Promise of Minimal Cleanup
Honestly, this is the big one. The psychological weight of a messy kitchen can ruin the enjoyment of even the most fantastic meal. With foil packet dinners, however, you’re essentially using your foil as both a cooking vessel and a plate. Once you’re done eating, you can just ball up the foil and toss it in the recycling bin. Poof! The cleanup is done. It’s the closest thing to a magic trick you’ll find in the kitchen, making it a perfect family-friendly dinner solution that keeps everyone happy, especially the person doing the washing up.
Locked-in Flavors and Perfect Steaming
Furthermore, cooking inside a sealed foil pack creates a miniature oven environment. As the packet heats up, the moisture from the meat and vegetables turns into steam, which then circulates relentlessly, basting every single ingredient in that incredible ginger garlic soy marinade. This process essentially pressure-cooks your food in its own juices, resulting in beef that’s unbelievably tender and vegetables that are perfectly cooked—crisp yet tender, not mushy. Consequently, every bite is an explosion of concentrated flavor that you just can’t achieve with traditional open-pan methods.
Ultimate Customization and Portion Control
Another huge advantage is the built-in customization. Got a kid who won’t touch broccoli? No problem! Simply make their pack with extra carrots. Watching your carb intake? Skip the rice and load up on extra beef and veggies. Cooking for one? The recipe scales down perfectly. Meal prep foil packs are a dream because you can assemble several individualized meals at once, each tailored to different tastes or dietary needs, all cooked simultaneously on one baking sheet. It’s brilliantly efficient.
Versatility in Cooking Methods
Finally, let’s talk about flexibility. While your oven is the most common tool for this job, the foil packmethod is wonderfully adaptable. Feeling those summer grill vibes? Throw the packets right on the grates for a delicious smoky flavor. Planning a campfire meal on your next outdoor adventure? These packs are literally made for cooking over hot coals. This versatility means your favorite easy dinner isn’t limited by the season or your location.
Gathering Your Ingredients: A Checklist for Success
Alright, so you’re sold on the no-dishes dream—fantastic! Now, let’s talk ingredients. Because this cooking method is so simple and direct, the quality and preparation of what you put into the pack truly determines what you get out of it. Think of it this way: you’re building a flavor powerhouse, so you want to start with the best foundation. Don’t worry, though; we’re not talking about fancy, hard-to-find items. This is all about smart, simple choices.
The Beef: Selecting the Right Cut
First up, the star of the show: the beef. Your choice here will define the texture and overall feel of the dish. Fortunately, you’ve got great options.
For a quick, economical, and family-friendly option, ground beef is your absolute best bet. It cooks in a flash and soaks up the sauce wonderfully. Aim for an 85/15 lean-to-fat ratio; you’ll get plenty of flavor without an excessive amount of grease pooling in your packet.
If you’re aiming for a more steakhouse-style experience, thinly sliced sirloin or flank steak is the way to go. Here’s a pro tip: for supremely tender beef, always slice your meat against the grain. This shortens the muscle fibers, making each piece much easier to chew. Honestly, it makes a world of difference.
While you might see it in other recipes, I’d generally steer clear of stewing beef for this particular application. It typically requires a much longer, slower cook time to become tender, which would turn our crisp-tender vegetables into absolute mush. Let’s keep things simple and efficient!
The Vegetable Trio: Freshness is Key
Next, the supporting cast: your vegetables. This is where that freshness factor really comes into play.
Broccoli: You absolutely want to use fresh florets. While frozen broccoli is convenient, it retains a lot of water that it will release into your packet, creating a soggy stew instead of a vibrant, healthy dinner. Chop the florets into uniform, bite-sized pieces so everything cooks at the same rate.
Carrots: Similarly, fresh carrots are non-negotiable for the best texture. To save time and ensure quick, even cooking, I highly recommend buying a bag of pre-cut julienned carrots or matchsticks. Alternatively, you can easily cut your own; just aim for a similar thin, uniform shape.
Aromatics: Never, ever underestimate the power of the aroma team! Fresh garlic and fresh ginger(grated or very finely minced) are the soul of your sauce, providing a pungent, spicy backbone that powdered versions simply cannot match. Finally, a handful of sliced green onions adds a fresh, sharp finish that cuts through the richness of the sauce beautifully.
The Sauce: Deconstructing the Flavor Profile
Now, for the magic potion that brings it all together: the sauce. This simple mixture is what transforms basic ingredients into an unforgettable Asian-inspired foil pack experience. Let’s break down its components:
-
Soy Sauce: This is your primary source of salty, umami flavor. For a healthier twist, opt for a low-sodium variety so you can control the salt level.
-
Sesame Oil: A small amount of this toasted oil provides an intense, nutty aroma that is absolutely essential to the profile. A little goes a very long way!
-
Brown Sugar: This is your sweet element, which perfectly balances the saltiness of the soy and the sharpness of the aromatics. It also helps the sauce caramelize slightly around the edges of the packet.
-
Rice Vinegar: A splash of acidity is crucial. It brightens all the other flavors and prevents the dish from tasting too heavy or one-dimensional.
-
Black Pepper: Finally, a good crack of black pepper adds a subtle, warming heat that ties everything together.
Whisk these together, and voilà—you’ve just created a perfectly balanced, restaurant-quality sauce right in your kitchen.
Step-by-Step Instructions: Assembling the Perfect Foil Pack
Okay, team, it’s go time. You’ve got your ingredients prepped and your sauce whisked; now for the fun part—putting it all together! This process is incredibly straightforward, but a few small tricks will guarantee your foil packet dinner turns out perfectly every single time. Think of yourself as a craftsman building a delicious, steam-powered flavor bomb.
Step 1: Prepping Your Station
Before you get your hands messy, let’s set the stage. First, tear off four large sheets of heavy-duty aluminum foil. Honestly, this is not the time to skimp; heavy-duty foil is far less likely to tear or leak, saving you from a potential dinner disaster. Each sheet should be roughly 12×12 inches—giving you plenty of room to fold and seal. Lay them out on your counter and give the center of each one a quick spray with non-stick cooking spray. This little extra step ensures nothing sticks, guaranteeing you get every last drop of that delicious sauce.
Step 2: Whisking the Magical Sauce
If you haven’t already, now is the moment to combine your liquid gold. In a small bowl or a liquid measuring cup, combine the soy sauce, sesame oil, brown sugar, rice vinegar, and black pepper. Whisk them together until the sugar has mostly dissolved. Go ahead, taste a tiny drop on a spoon. This is your chance to be the boss! Does it need a bit more sweetness? Add a pinch more sugar. More zip? Another splash of vinegar. You are in complete control of your homemade foil pack destiny.
Step 3: Combining Beef and Veggies
Now, grab a large mixing bowl—this is where the party starts. Place your beef, broccoli florets, carrots, and those all-important aromatics (garlic, ginger, and most of the green onions) into the bowl. Then, pour that whisked sauce over everything.
Here’s the key: roll up your sleeves and use your hands (or two large spoons) to toss everything together. You want to mix it thoroughly until every single piece of beef and every vegetable is glistening and beautifully coated in the marinade. This ensures every bite is packed with flavor, not just the bits on the top.
Step 4: The Art of Sealing the Foil Pack
This is the most crucial step of all! Dividing the mixture evenly, spoon a generous portion directly onto the center of each prepared foil sheet.
Now, let’s seal it up. Bring the two long sides of the foil together up over the food. Then, starting at one end, fold the edges down together in a series of tight, narrow folds until the seal is flush with the food. It will look a bit like a flat, sealed tube.
Next, turn your attention to the short ends. Crimp and fold them tightly inward toward the food, creating a secure, leak-proof packet. Most importantly, leave a little room inside for air to circulate and steam to expand! You’re not making a vacuum seal; you’re building a miniature oven. A properly sealed pack will puff up dramatically in the heat—and that’s exactly what you want to see.
According to the science behind how aluminum foil is manufactured, its malleability and heat conductivity make it the perfect tool for this job, creating an ideal steaming environment.
How to Cook Your Foil Pack: Oven, Grill, and Campfire
The beautiful thing about this recipe is its incredible versatility. Your cooking method will impart a different character to the dish, so you can choose your own adventure based on the weather, your mood, or what equipment you have available. No matter which path you choose, however, the result is a hands-off, easy weeknight dinner that’s bursting with flavor.
Oven-Baked Method (The Most Common)
For most folks, the oven is the go-to, and for good reason—it’s consistent and foolproof.
First, preheat your oven to 400°F (200°C). While it’s heating up, place your securely sealed foil packs on a large baking sheet. I can’t stress this enough: always use a baking sheet. It makes transferring the packs in and out of the oven a breeze and acts as a crucial safety net, catching any rogue sauce that might bubble out of a tiny leak.
Once the oven is hot, slide the baking sheet onto the middle rack. Now, just walk away! Let the oven work its magic for 20-25 minutes. You’ll know they’re getting close when the packs have puffed up like little silver pillows.
Here’s the most important tip: let the packs rest for a full 5 minutes after you pull them out. This allows the furious bubbling inside to settle and the ingredients to finish cooking gently in the residual heat. When you’re ready to open them, do so carefully by making a small slit in the top with a knife, pointing the opening away from you to avoid a steam burn. The aroma that wafts out is nothing short of incredible.
Grilling Method (For Smoky Flavor)
If you want to add a fantastic smoky char to your meal, the grill is your best friend.
Preheat your grill to a medium-high heat. You’re aiming for about 375-400°F. Unlike the oven, you’ll place the foil packs directly onto the grill grates. Close the lid to create an oven-like environment and let them cook for 15-20 minutes.
Since grills often have hot spots, you’ll want to flip the packs over once, halfway through the cooking time. Use a good pair of tongs for this. The rest period after grilling is just as crucial, so let them sit off the heat for a few minutes before diving in.
Campfire/Campground Cooking
This method truly makes for a memorable campfire meal. You’ll need a nice bed of hot coals, not roaring flames.
Place the foil packs directly onto the hot coals or onto a grill grate positioned over the fire. Cook for 20-25 minutes, using tongs to rotate them a quarter turn every 5 to 7 minutes for even cooking. The high, direct heat will create an incredible caramelization on the bottom. The same resting rule applies—let them cool slightly before the big reveal.
No matter which method you use, the result is a succulent, flavor-packed meal with a cleanup process that’s as simple as tossing the foil away.
Serving Suggestions, Nutrition, and Pro Tips
You’ve patiently waited, and the moment of truth has arrived. You’ve carefully opened your steaming foil pack and are greeted by an incredible aroma. Now what? How you serve and accessorize this meal can elevate it from a simple dinner to a truly memorable culinary experience. Furthermore, understanding the nutritional profile empowers you to make it a regular part of your healthy meal plan.
Serving Suggestions and Presentation Tips
Honestly, the beauty of this dish is its flexibility. For the ultimate no-dishes dinner, you can simply eat it straight from the foil—just be careful of the heat! Alternatively, for a more composed plate, carefully slide the entire contents onto a bed of fluffy white rice, brown rice, or quinoa. The grains will soak up the incredible sauce, which is honestly the best part.
Presentation is a breeze. Sprinkle the top with a flourish of the reserved sliced green onions, a generous pinch of sesame seeds, and perhaps a light drizzle of extra sesame oil for a restaurant-quality finish. If you enjoy a bit of heat, a sprinkle of red pepper flakes or a dash of sriracha adds a wonderful kick. For a refreshing contrast, serve it with a simple side of quick-pickled cucumbers or a light green salad.
Nutritional Information and Dietary Considerations
Let’s talk about what’s in this delicious package. A typical serving of this beef and vegetable pack(without rice) is a well-balanced meal. It provides a hearty dose of protein from the beef, essential vitamins and fiber from the broccoli and carrots, and healthy fats from the sesame oil.
Naturally, the exact numbers depend on your specific ingredients (like the leanness of your beef), but you can feel good about serving a meal that is both satisfying and nutritious.
Making It Healthier
This recipe is wonderfully adaptable to various health goals.
-
Leaner Protein: Use 93/7 lean ground beef or thinly sliced sirloin to reduce saturated fat.
-
Lower Sodium: Opt for low-sodium soy sauce to control salt intake.
-
Reduced Sugar: You can easily cut the brown sugar in half or substitute it with a natural alternative like maple syrup.
Dietary Modifications
Fortunately, this family-friendly dinner can suit many dietary needs with a few simple swaps:
-
Gluten-Free: Ensure your meal is gluten-free by using tamari or a certified gluten-free soy sauce instead of regular soy sauce.
-
Low-Carb/Keto: This is a fantastic low-carb dinner option. Simply omit the brown sugar or use a keto-friendly sweetener, and serve your pack over cauliflower rice instead of traditional grains.
-
Vegetarian/Vegan: Easily transform this into a plant-based feast by substituting the beef with extra-firm tofu (pressed and cubed) or chickpeas.
Pro Tips for the Absolute Best Foil Pack Experience
After making countless foil packet dinners, I’ve picked up a few non-negotiable tricks for guaranteed success:
-
Heavy-Duty is Non-Negotiable: Flimsy foil tears. Heavy-duty foil is an essential investment for leak-free cooking.
-
Uniformity is Key: Cutting your beef and vegetables into similar-sized pieces is the secret to even cooking. No one wants a crunchy carrot next to a piece of overcooked beef!
-
Don’t Overcrowd: If you’re doubling the recipe, make more packs rather than overstuffing one. A single layer of food cooks perfectly; a big pile steams unevenly.
-
The Resting Period is Crucial: I’ll say it again: let it rest! Those 5 minutes off the heat allow the sauce to thicken slightly and the flavors to meld together perfectly.
-
Double-Wrap for Security: If you’re grilling or cooking over a campfire, double-wrapping each pack in a second sheet of foil provides extra insurance against rips and leaks.
Creative Variations and Make-Ahead Magic
One of the greatest strengths of the foil pack dinner concept is that it is a fantastic template. Once you’ve mastered the classic combination, a world of culinary creativity opens up. You are absolutely not limited to just beef, broccoli, and carrots! Furthermore, this method is a meal-prepper’s dream, offering a brilliant strategy for getting a head start on a busy week.
Creative Variations on the Classic Recipe
Feel free to get creative and use what you have in your fridge. This recipe is incredibly forgiving and welcomes experimentation.
Protein Swaps
While beef is delicious, other proteins work wonderfully in this easy weeknight dinner format.
-
Chicken: Diced boneless, skinless chicken breasts or thighs are a fantastic, lean alternative. They absorb the marinade beautifully.
-
Shrimp: For a quicker-cooking option, use large, raw shrimp (peeled and deveined). Since they cook faster, you might want to add them to the pack halfway through the cooking time or use a few extra layers of foil to protect them from the direct heat.
-
Salmon: A hearty portion of salmon fillet placed on top of the vegetable bed becomes incredibly flaky and moist when steamed in the packet.
Vegetable Add-Ins and Swaps
The vegetable possibilities are nearly endless. The key is to choose veggies that have similar cooking times or to cut harder vegetables into smaller pieces.
-
Classic Stir-Fry Mix: Think sliced bell peppers, snap peas, and water chestnuts for a different crunch.
-
Earthier Flavors: Sliced mushrooms or zucchini halves are excellent additions that hold up well to steaming.
-
Sweetness and Color: Baby corn or red onion wedges can add a lovely sweetness and vibrant color to your pack.
Sauce Variations
A simple change to the sauce can transport your taste buds across the globe.
-
Spicy Kick: Add a tablespoon of sriracha, chili garlic paste, or a spoonful of gochujang (Korean chili paste) to the sauce mixture for a pleasant, warming heat.
-
Thai-Inspired: Use coconut aminos as the base and add a spoonful of peanut butter and a squeeze of lime juice to the sauce for a creamy, tangy twist.
-
Citrus Twist: Add the zest and juice of an orange to the classic sauce base for a brighter, sweeter profile that pairs wonderfully with chicken or shrimp.
Meal Prepping, Storage, and Reheating Instructions
The make-ahead potential of this dish is a huge win for anyone looking to streamline their weekly routine.
-
Make-Ahead Magic: You can assemble the foil packs completely up to 24 hours in advance. Simply prepare them as directed, place the sealed packs on a baking sheet, and store them in the refrigerator. When you’re ready to cook, you can put them directly into the preheated oven, though you may need to add 2-3 extra minutes to the cooking time since they’ll be starting from cold.
-
Storing Leftovers: If you have leftovers, do not store them in the foil. Remove the food from the foil and place it in an airtight container in the refrigerator. It will keep well for up to 3 days. Following the official USDA guidelines for safe food storage and reheating is always recommended for best practices.
-
Reheating: The best way to reheat is in the microwave until piping hot throughout. For a better texture, you can reheat the leftovers in a skillet on the stovetop for a few minutes; this helps re-crisp the vegetables slightly. Do not reheat the food while it’s still sealed in the foil packet.
Frequently Asked Questions (FAQs)
Even with a straightforward recipe, questions can pop up. That’s perfectly normal! This section tackles the most common queries head-on, ensuring you feel confident and prepared to create the perfect foil pack dinner every single time.
Frequently Asked Questions About Beef and Veggie Foil Packs
Can I use frozen vegetables instead of fresh?
Honestly, it’s not recommended. While convenient, frozen vegetables release a tremendous amount of water as they thaw and cook inside the sealed packet. Consequently, instead of steaming to a crisp-tender perfection, they will boil in their own liquid, resulting in a soggy, mushy texture and a diluted sauce. For the best results and to avoid a watery pack, fresh vegetables are definitely the way to go.
How do I know when the beef in the foil pack is fully cooked?
Food safety is paramount, especially when cooking with meat. The absolute safest and most accurate way is to use an instant-read meat thermometer. Carefully open one pack at the end of the cooking time and insert the thermometer into the thickest piece of beef.
-
Ground beef should reach an internal temperature of 160°F (71°C).
-
Whole cuts like sirloin or flank steak should reach at least 145°F (63°C).
If you don’t have a thermometer, you can visually check that the ground beef is no longer pink and the juices run clear. However, for guaranteed safety and perfect doneness, a thermometer is a small investment with a big payoff.
Can I make these foil packs ahead of time?
Absolutely! In fact, they are a fantastic meal-prep strategy. You can assemble the packs completely—meaning you can add the meat, veggies, and sauce, and seal them—and then store them in the refrigerator for up to 24 hours before cooking. This makes them an incredible option for busy weeknights. Just remember, because they will be going into the oven cold from the fridge, you might need to add 2-3 extra minutes to the cooking time.
My foil pack leaked. How can I prevent this?
A leaky pack is usually a simple fix! First, ensure you are using heavy-duty aluminum foil; standard foil is much more prone to tearing. Second, when sealing, make sure your folds are tight and crimped securely. Leave a little room inside for steam expansion, but ensure the seams are well-constructed. Finally, always place the packs on a baking sheet before putting them in the oven. This will catch any small leaks and make cleanup effortless.
Is it safe to cook with aluminum foil?
According to current research from major health agencies, cooking with aluminum foil is generally considered safe for most people. The amount of aluminum that leaches into food during the cooking process is minimal and typically well within the safe intake levels established by health authorities.
However, for those who prefer to avoid it or are cooking with highly acidic ingredients (like tomatoes) which can increase leaching, you can use parchment paper. Create a packet with parchment first, then wrap it loosely in foil for structural support, especially on the grill. It’s worth noting that the health benefits of soy-based sauces often include being a source of essential minerals. Ultimately, for this recipe, using aluminum foil is a safe and effective cooking method.
Conclusion: Your New Go-To, No-Fuss Dinner Awaits
And there you have it—your complete, no-stone-left-unturned guide to mastering the Beef, Broccoli, Carrots, and Soy Sauce Foil Pack. This isn’t just a recipe; it’s a revelation in easy cooking that genuinely delivers on its promise of massive flavor with minimal cleanup.
From selecting your ingredients to mastering the art of the seal, and from experimenting with bold new variations to safely storing your leftovers, you now possess all the knowledge you need to make this dish a cornerstone of your weekly meal rotation. So, the next time that dreaded “what’s for dinner?” question pops up, you’ll have the perfect answer ready to go.
Don’t just take my word for it, though. The real magic happens in your own kitchen. Gather your ingredients, tear off that foil, and get ready to experience the joy of a delicious, wholesome meal that leaves you with a clean kitchen and a very happy family. It’s time to wrap, bake, and savor your way to a simpler, more flavorful way of eating.
Now, go forth and conquer dinner!
Beef, Broccoli, Carrots, and Soy Sauce Foil Pack
Description
🥢 Beef, Broccoli, Carrots, and Soy Sauce Foil Pack
Ingredients (Serves 4)
-
1 lb flank steak or sirloin, thinly sliced against the grain
-
2 cups broccoli florets
-
1 cup carrots, julienned or thinly sliced
-
1 small onion, thinly sliced (optional)
-
2 tbsp sesame oil (or olive oil)
-
3 tbsp soy sauce
-
2 tbsp oyster sauce (optional, for depth)
-
1 tbsp hoisin sauce (optional, for sweetness)
-
1 tbsp honey or brown sugar
-
2 garlic cloves, minced
-
1 tsp fresh ginger, grated
-
½ tsp crushed red pepper flakes (optional)
-
Salt & black pepper, to taste
-
Sesame seeds & chopped green onions (for garnish)
Instructions
1. Make the Sauce
In a bowl, whisk together soy sauce, oyster sauce, hoisin, honey, garlic, ginger, sesame oil, red pepper flakes, salt, and black pepper.
2. Prepare the Foil Packs
-
Tear 4 large sheets of heavy-duty aluminum foil.
-
Divide beef, broccoli, carrots, and onion evenly among the foil sheets.
-
Drizzle each with sauce and toss lightly to coat.
-
Fold foil over and seal tightly into packets.
3. Cook
-
Grill Method: Place packets on medium-high grill for 12–15 minutes, flipping halfway.
-
Oven Method: Bake at 400°F (200°C) for 18–20 minutes.
-
Campfire Method: Place on hot coals for 10–12 minutes.
4. Serve
-
Carefully open foil packs (steam will escape).
-
Garnish with sesame seeds and green onions.
-
Serve with steamed rice, noodles, or enjoy straight from the foil for easy cleanup.