
Introduction & The Allure of the Tart
Chocolate Salted Caramel Tarts: Your Guide to a Perfect Gourmet Dessert
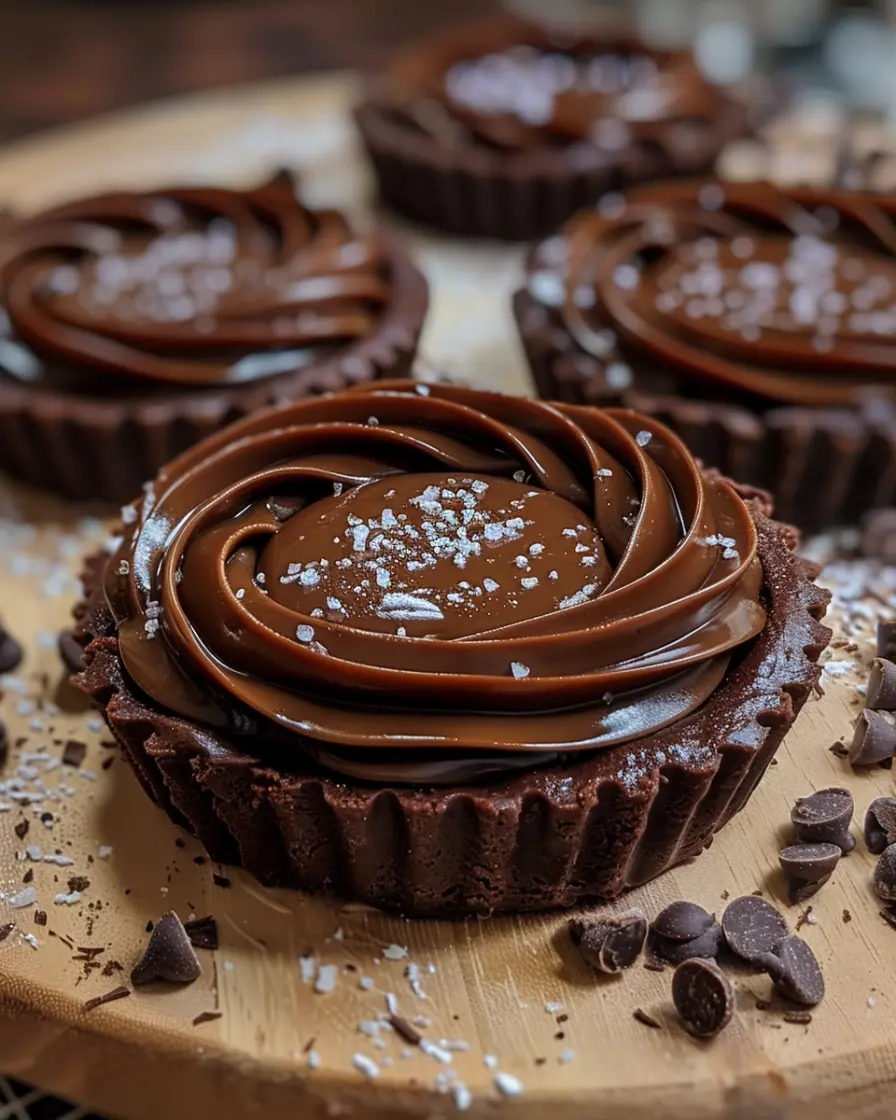
Let’s be honest, few desserts command attention quite like a meticulously crafted Chocolate Salted Caramel Tart. Picture this: a fragile, buttery shell that shatters at the slightest touch, giving way to a river of deep, silky smooth caramel that’s both profoundly sweet and intriguingly salty. And just when you think it can’t get any better, a final layer of rich, decadent chocolate ganache sweeps across your palate, completing a symphony of textures and flavors. It’s the kind of show-stopping dessert that whispers of patisserie windows and professional skill. Surprisingly, however, creating this masterpiece in your own kitchen is not just possible; it’s an incredibly rewarding journey.
This guide, therefore, is designed to demystify every single step. We’ll walk through the entire process, from whipping up a flawless shortcrust pastry to mastering the alchemy of sugar and cream for the perfect salted caramel filling. Ultimately, you’ll gain the confidence to create a dessert that doesn’t just taste incredible but also tells a story of patience, precision, and passion. So, preheat your oven and ready your whisk—we’re about to dive into the art of the perfect gourmet tart.
The Irresistible Harmony of Sweet and Salty
Why does this particular combination feel like a culinary revelation? Well, it all boils down to basic science and sheer genius. Our taste buds are hardwired to adore sweetness, a throwback to energy-rich foods. Salt, on the other hand, enhances flavor and complexity. When you combine the two, you’re not just tasting sugar and salt; you’re experiencing a dramatic contrast that makes each element pop. The intense sweetness of the caramel sauce is suddenly elevated, becoming deeper and more nuanced with a sprinkle of sea salt flakes. This isn’t just a dessert; it’s an experience that dances across your tongue.
Demystifying the Gourmet Tart: Why This Recipe Works
Now, I can already hear some of you thinking, “This looks far too complicated.” Honestly, I get it. The thought of making pastry, tackling homemade caramel, and preparing ganache can be daunting. But here’s the secret: this recipe breaks the entire process into three manageable, foolproof components. First, we’ll craft a crisp, buttery shortcrust pastry that acts as our foundation. Next, we’ll conquer the heart of the tart: a luscious, homemade caramel infused with quality salt. Finally, we’ll crown it all with a simple yet luxurious chocolate ganache. By understanding the ‘why’ behind each step—like why we chill the dough or how to avoid crystallized sugar—you’ll not only create an incredible tart but also level up your baking skills for good.
Deconstructing Perfection & Recipe Setup
The Anatomy of a Flawless Chocolate Salted Caramel Tart
Before we dive into the ingredients, let’s appreciate the architecture of this decadent dessert. Think of it as a delicious three-act play where every layer has a critical role to play. Understanding this structure is, without a doubt, the key to your success.
1. The Foundation: A Crisp, Buttery Shortcrust Pastry
The crust is the unsung hero; it’s the structural support for all that glorious filling. For this recipe, we’re using a pâte sablée-inspired dough. Now, that’s just a fancy term for a sweet, sandy, and crumbly pastry. Unlike a flaky pie crust, this one is delightfully tender and melts in your mouth, providing the perfect textural contrast to the smooth fillings above it. Its job is to be sturdy, flavourful, and never, ever soggy.
2. The Heart: A Deep, Salty-Sweet Caramel Filling
Ah, the star of the show! This isn’t just any caramel; it’s a deeply amber, complex, and indulgent treatthat walks the tightrope between sweet and salty. The goal here is a texture that’s thick enough to slice but still soft and oozy at room temperature. Using a good quality fleur de sel or flaky sea salt makes all the difference, providing little bursts of salinity that cut through the richness.
3. The Crown: A Luxuriously Smooth Chocolate Ganache
Finally, the chocolate layer. This isn’t a heavy, fudgy layer; it’s a sleek, sophisticated chocolate ganachemade from just two ingredients: good chocolate and cream. It adds a final note of richness that complements the caramel without overpowering it. The quality of chocolate you use here is paramount—this is your chance to shine!
The Foolproof Recipe for Chocolate Salted Caramel Tarts
Alright, bakers, it’s time to get down to business. Here’s everything you need to know to get started on this baking from scratch adventure.
Recipe Notes & Equipment
Yields: One 9-inch tart or 8 individual tarts
Prep time: 45 minutes (plus significant chilling time)
Cook time: 30 minutes
Equipment list:
-
A tart pan with a removable bottom (non-negotiable for clean removal!)
-
Food processor (optional but helpful for the pastry)
-
Medium saucepan (light-colored so you can see the caramel color)
-
Heatproof bowl
-
Kitchen scale (highly recommended for accuracy)
-
Pastry brush
-
Baking beans/pie weights or dry rice for blind baking
The Shortcrust Pastry (Pâte Sablée)
Part 1: The Shortcrust Pastry (Pâte Sablée)
Trust me, a homemade tart shell is a game-changer. While it requires a bit of patience, the payoff is a fragrant, buttery base that store-bought versions simply can’t match.
Ingredients:
-
1 ½ cups (180g) all-purpose flour
-
¼ cup (50g) granulated sugar
-
½ tsp salt
-
½ cup (115g) unsalted butter, cold and cubed
-
1 large egg yolk
-
2 tbsp ice water
Step-by-Step Instructions:
1. Making the Dough:
First, pulse the flour, sugar, and salt together in a food processor. Alternatively, you can whisk them together in a large bowl. Next, add the cold, cubed butter. Pulse (or use a pastry cutter) until the mixture resembles coarse sand with a few pea-sized butter bits remaining. After that, whisk the egg yolk and ice water together and drizzle it over the flour mixture. Pulse or stir just until the dough begins to clump together. Be careful not to overwork it!
2. Chilling is Crucial:
Turn the crumbly dough out onto a work surface and gently knead it just enough to bring it together into a disc. Seriously, wrap this disc in plastic wrap and refrigerate for at least 1 hour, or even overnight. This step is vital as it allows the gluten to relax and the butter to firm up, which prevents your beautiful tart shell from shrinking dramatically in the oven.
3. Rolling and Lining:
Once chilled, let the dough sit at room temperature for about 10 minutes to become pliable. Then, on a lightly floured surface, roll it out into a circle about 2 inches wider than your pan. To avoid sticking, gently lift and turn the dough as you roll. Carefully drape the dough into your tart pan, letting the edges slump naturally into the corners. Press it in gently without stretching it, as stretched dough will shrink back later. Finally, trim the excess by rolling your pin over the top of the pan.
4. The Art of Blind Baking:
Now, for the secret to a crisp, fully cooked base: blind baking. This means baking the shell with weights to hold its shape. Prick the base all over with a fork, then chill the lined pan for another 30 minutes. Meanwhile, preheat your oven to 375°F (190°C). Afterwards, line the chilled shell with parchment paper and fill it with your baking beans or dry rice, pushing them into the sides. For a fantastic visual guide, check out this definitive guide to blind baking a pie crust.
5. Final Bake:
Bake with weights for 15-18 minutes until the edges are set. Then, carefully remove the parchment and weights. Wow, return it to the oven for another 10-15 minutes, or until the bottom is dry and golden brown all over. Let it cool completely before filling.
The Salted Caramel Filling & Chocolate Ganache
Part 2: The Salted Caramel Filling
Okay, here’s the part that makes everyone nervous—but don’t be! Making homemade caramel is less about complex skill and more about paying attention. You’ve got this.
Ingredients:
-
1 cup (200g) granulated sugar
-
6 tbsp (85g) unsalted butter, cubed
-
½ cup (120ml) heavy cream, warm
-
1 ½ tsp flaky sea salt (e.g., Maldon), plus more for garnish
Step-by-Step Instructions (The Dry Method):
1. Melting the Sugar:
Pour the sugar into your light-colored saucepan and place it over medium heat. The sugar will begin to melt around the edges. As it does, gently swirl the pan occasionally to encourage even melting. However, resist the urge to stir it with a spoon! This can cause the sugar to crystallize and become grainy.
2. Achieving the Perfect Amber Color:
Eventually, the sugar will transform into a clear liquid, then gradually turn to a golden, and finally a deep amber color. This whole process can take 5-10 minutes. You’re looking for the color of a shiny penny. If you have a thermometer, aim for around 350°F (177°C). If you don’t, your eyes are the best tool.
3. Incorporating the Butter:
As soon as you hit that perfect amber hue, turn off the heat and immediately add the cubed butter. Stand back a little—it will bubble and sputter ferociously! Whisk constantly until the butter is fully melted and incorporated.
4. Adding the Cream:
Next, slowly drizzle in the warm cream while whisking non-stop. The mixture will bubble up again violently, but just keep whisking until everything is smooth and homogenous. If you encounter any hard clumps, simply return the pan to very low heat and whisk until they dissolve.
5. Finishing with Salt & Cooling:
Remove the pan from the heat and whisk in the sea salt. Congratulations, you’ve made caramel! Now, let this glorious salted caramel filling cool in the pan for about 10-15 minutes. It will thicken slightly, which is perfect. Then, pour it into your cooled tart shell and spread it evenly. Refrigerate for at least 1 hour to set completely before adding the chocolate. For more tips on avoiding common pitfalls, this resource is excellent for troubleshooting common caramel mistakes.
Part 3: The Chocolate Ganache Layer
The final act! This is where we add a layer of pure, unadulterated chocolate luxury. It’s incredibly simple, but the quality of your chocolate is the star here.
Ingredients:
-
1 cup (240ml) heavy cream
-
8 oz (225g) high-quality semi-sweet or dark chocolate, finely chopped
-
2 tbsp (28g) unsalted butter, softened
Step-by-Step Instructions:
1. Heating the Cream:
Pour the heavy cream into a saucepan and heat it over medium heat until it just begins to simmer; you’ll see small bubbles form around the edges. Immediately remove it from the heat.
2. Melting the Chocolate:
Place your finely chopped chocolate in a heatproof bowl. Pour the hot cream over the chocolate, ensuring it’s completely covered. Let this sit undisturbed for 3-5 minutes. This allows the heat from the cream to gently melt the chocolate.
3. Adding Butter & Gloss:
After it has sat, begin to whisk the mixture slowly, starting from the center and working your way out, until you have a smooth, shiny, and unified chocolate ganache. Finally, whisk in the softened butter until it’s fully blended. This addition gives the ganache an extra-rich flavor and a beautiful sheen.
4. Assembling and Setting the Tart:
Retrieve your tart from the fridge. Now, pour the slightly cooled (but still pourable) ganache over the set caramel layer. Gently tilt the pan to spread it into an even layer. Refrigerate the assembled tart for at least 4 hours, but ideally overnight, to allow it to set completely for the cleanest slices.
Pro Tips, Troubleshooting, and Presentation
Expert Tips for a Perfect Tart Every Time
You’ve mastered the steps; now let’s talk about the pro secrets that elevate a good tart to a great one.
Preventing a Soggy Bottom:
This is the arch-nemesis of any tart baker! Fortunately, you have a few weapons. First, ensure your shell is fully baked and golden brown before adding any filling. Second, many bakers use a secret weapon: a quick egg wash seal. After the initial blind bake, you can brush the hot shell with a beaten egg yolk and return it to the oven for 2 minutes. This creates a waterproof barrier. Also, let your caramel cool slightly so it’s not scalding hot when it hits the pastry.
Choosing Your Chocolate:
Since the ganache is a primary flavor, this is not the time to skimp. Use a high-quality baking bar or couverture chocolate that you enjoy eating on its own, ideally with a cocoa content between 55-70%. The flavor will be infinitely more complex and less cloyingly sweet than using chocolate chips.
The Right Salt:
For the filling, a fine sea salt works well for even distribution. However, for that gorgeous garnish on top, nothing beats the texture and clean, crisp saltiness of flaky sea salt like Maldon. Its delicate pyramids dissolve beautifully on the tongue, offering little bursts of flavor.
The Make-Ahead Marvel:
The best part? This is a fantastic make-ahead dessert. You can bake the tart shell up to 2 days in advance and keep it wrapped at room temperature. The caramel can be made a week ahead and refrigerated; just warm it gently to make it pourable. The fully assembled tart keeps beautifully in the fridge for 3-4 days.
Troubleshooting Common Tart Disasters
Even pros have off days. Here’s how to fix (or avoid) common issues.
Why is my caramel grainy?
This is usually caused by sugar crystals forming. To prevent it, avoid stirring the melting sugar and use a brush dipped in water to wash down any sugar crystals on the side of the pan. If it happens, you can often rescue it by adding a couple tablespoons of cream and heating it gently until the crystals dissolve.
My caramel is too hard/too runny.
Hard caramel is simply overcooked. Unfortunately, there’s no fix but to start over. Runny caramel is undercooked; you can return it to the heat and cook it to a slightly higher temperature.
My pastry shrank!
This is almost always due to the dough being stretched when pressed into the pan or not being chilled for long enough. Always let the dough slump in and avoid pulling it. Chilling relaxes the gluten, which is the key to preventing shrinkage.
The ganache split or is oily.
This means the cream was too hot and separated the cocoa solids from the cocoa butter. You can sometimes save it by adding a splash of cold cream and whisking vigorously until it comes back together.
How to Serve and Present Your Masterpiece
The grand finale! Presentation is everything for this dinner party dessert.
Slicing a Clean Piece:
For those picture-perfect slices, run a sharp, thin-bladed knife under very hot water. Wipe it dry, and then make a clean, swift cut through the tart. Repeat—heating and wiping the knife between each cut—for flawless slices every time.
Garnishing for Impact:
Right before serving, add your final touches. A light sprinkle of flaky sea salt is a must. A drizzle of leftover caramel, a dollop of freshly whipped cream, or a few fresh raspberries add color and extra flavour.
Serving Temperature:
For the ideal texture and flavor, take the tart out of the fridge about 15-20 minutes before you plan to serve it. This allows the caramel and chocolate to soften slightly, becoming gloriously creamy and oozy.
FAQs (Frequently Asked Questions)
Chocolate Salted Caramel Tart FAQs
Can I use store-bought caramel for this tart?
While a quality store-bought caramel sauce can be a time-saving shortcut, it truly won’t compare to the deep, complex flavor of homemade. For a truly special gourmet dessert, taking the time to make your own is highly recommended.
How long do chocolate salted caramel tarts last?
Stored tightly covered in the refrigerator, your tart will stay fresh and delicious for 4-5 days. Be aware that the crust may gradually soften a bit from the moisture of the fillings.
Can I freeze this tart?
Freezing the fully assembled tart is not recommended. The caramel can become overly hard and the ganache can lose its smooth texture upon thawing. However, you can successfully freeze the baked, unfilled tart shell for up to a month.
What can I use instead of baking beans for blind baking?
Dry rice or dried lentils are perfect, economical substitutes for pie weights. You can keep them after baking and reuse them solely for this purpose. Sugar is another great option.
My ganache is too thin. How can I thicken it?
If your ganache is too runny to set properly, it might be because your cream-to-chocolate ratio was off or your chocolate was under-measured. You can thicken it by letting it cool at room temperature, stirring occasionally. Alternatively, add a bit more finely chopped chocolate to the warm ganache and stir until melted and combined.
Conclusion
The Joy of Creating Something Extraordinary
And there you have it—the complete journey to creating your own breathtaking Chocolate Salted Caramel Tart. From the simple beginnings of flour and butter to the thrilling transformation of sugar into amber nectar, each step is a lesson in the magic of baking from scratch. This isn’t just about following a recipe; it’s about embracing the process, learning the techniques, and ultimately, sharing a creation made with your own hands.
Sure, it requires more patience than dumping a mix into a bowl, but the result? Oh, the result is pure, unadulterated bliss. It’s the proud moment you present your masterpiece, the silent “wow” as your guests take their first bite, and the personal satisfaction of knowing you crafted something extraordinary. So, go on—embrace the challenge, source the finest chocolate you can find, and bake with confidence. You are now equipped to create a tart that’s not just a dessert, but a magnificent experience. Happy baking
Print
Chocolate Salted Caramel Tarts
Description
🍫✨ Chocolate Salted Caramel Tarts
Ingredients (Makes 6 mini tarts or 1 large tart)
For the tart crust:
-
1 ¼ cups all-purpose flour
-
¼ cup cocoa powder (unsweetened)
-
½ cup unsalted butter, cold and cubed
-
¼ cup sugar
-
1 large egg yolk
-
2–3 tbsp cold water
For the salted caramel filling:
-
1 cup granulated sugar
-
6 tbsp unsalted butter (room temp, cubed)
-
½ cup heavy cream (warm)
-
1 tsp sea salt (adjust to taste)
For the chocolate ganache topping:
-
200 g (7 oz) dark or semi-sweet chocolate, chopped
-
1 cup heavy cream
-
Flaky sea salt, for garnish
Instructions
1. Make the tart crust
-
In a bowl, whisk together flour, cocoa powder, and sugar.
-
Cut in the butter until the mixture resembles coarse crumbs.
-
Add egg yolk and just enough cold water to form a dough.
-
Shape into a disk, wrap, and refrigerate for 30 minutes.
-
Roll out and press into tart pans. Prick bottoms with a fork.
-
Blind bake at 350°F (175°C) for 15 minutes with parchment + pie weights, then 5 more minutes without. Cool completely.
2. Make the salted caramel
-
In a saucepan, heat sugar over medium heat, stirring occasionally, until it melts into an amber liquid.
-
Add butter carefully (it will bubble). Stir until melted.
-
Slowly pour in warm cream, whisking until smooth.
-
Remove from heat, stir in sea salt, and let cool slightly.
-
Pour caramel into cooled tart shells. Chill for 30 minutes to set.
3. Make the ganache topping
-
Heat cream until steaming (not boiling).
-
Pour over chopped chocolate. Let sit 2 minutes, then stir until smooth.
-
Spread ganache over set caramel layer.
-
Chill for at least 1 hour.
4. Garnish & serve
-
Sprinkle with flaky sea salt before serving.
-
Serve chilled or at room temperature.