
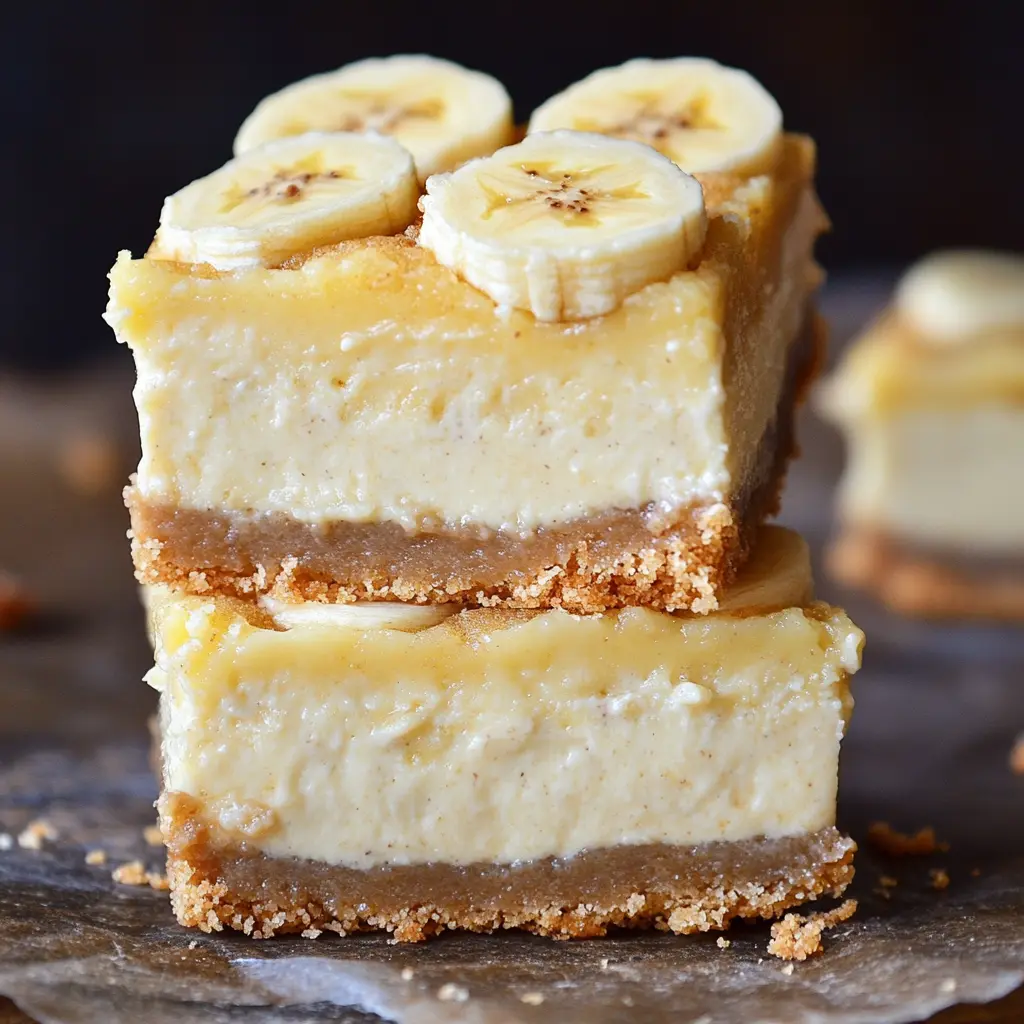
Picture this: the creamy, dreamy comfort of classic Southern banana pudding meets the rich, indulgent luxury of New York-style cheesecake. Now, imagine that glorious fusion transformed into a no-bake dessert you can slice into perfect, portable bars. Sounds like a fantasy, right? Well, prepare to have your taste buds utterly dazzled, because these Banana Pudding Cheesecake Bars are about to become the undisputed champion of your recipe box. This dessert is a true crowd-pleaser, masterfully combining familiar flavors in a stunningly easy-to-make format that requires zero oven time. Consequently, it’s perfect for sweltering summer days, hectic weeknights, or any occasion demanding a show-stopping sweet that practically makes itself ahead of time. We’re talking about a buttery Nilla wafer crust, a luxuriously smooth cream cheese filling bursting with banana essence, layers of fresh fruit, and a billowy whipped cream topping. So, without further ado, let’s dive into the delicious details and uncover why this recipe is an absolute game-changer.
Banana Pudding Cheesecake Bars: Your New Favorite No-Bake Dessert
Alright, let’s get real for a second. Who honestly has the time or energy to slave over a complicated dessert after a long day? Seriously, between preheating the oven, mastering a water bath, and anxiously watching the timer, traditional baked cheesecakes can feel like a high-stakes culinary gamble. Fortunately, however, this recipe throws all that stress right out the window! Essentially, we’re harnessing the incredible power of your refrigerator to create a no-bake wonder that is miraculously simple yet impossibly elegant.
Moreover, this isn’t just another dessert; it’s a portable piece of genius. Imagine the scene: you’re at a potluck, and beside the store-bought cookies and sheet cakes, you unveil a tray of these beautifully layered, homemade cheesecake bars. Suddenly, you become a legend. Conversely, picture a quiet family night where a craving for something sweet and special strikes. Instead of resorting to the same old routine, you can whip up something extraordinary without breaking a sweat. Indeed, the magic lies in the flawless marriage of two iconic treats, resulting in a crowd-pleasing dessert that delivers the best of both worlds in every single, sublime bite.
Furthermore, the textural adventure alone is worth the journey. Firstly, your teeth sink through a cloud of fresh whipped cream. Then, they hit the dense, velvety, and intensely flavorful cream cheese filling. Next, you discover a surprise layer of soft banana slices and crunchy Nilla wafer pieces. Finally, you land on that sturdy, sweet, and buttery crust that holds the entire masterpiece together. Honestly, it’s a symphony of contrast and harmony that will have everyone begging for the recipe. So, if you’re ready to create a dessert that is as easy to make as it is to devour, you’re in exactly the right place.
The Anatomy of a Perfect Banana Pudding Cheesecake Bar
Before we charge into the kitchen, let’s break down this magnificent creation layer by layer. Understanding the role of each component is, without a doubt, the secret to achieving dessert perfection.
The Foundation: A Buttery, Crunchy Nilla Wafer Crust
Every great bar needs an unwavering foundation, and this crust is an absolute rockstar. Forget boring bases; we’re using Nilla wafers for a reason. Their distinct vanilla flavor and perfect crumb consistency are the undisputed champions for authentic banana pudding vibes. When blended with melted butter and a touch of sugar, these crumbs transform into a press-in crust that’s both gloriously buttery and satisfyingly crisp. This layer provides the essential textural counterpoint to the lush filling above, ensuring every bite has a delightful crunch.
The Star: The Luxurious No-Bake Cheesecake Filling
Here’s where the real magic happens. The filling is a masterful blend of richness and lightness. Full-fat cream cheese is non-negotiable here; it provides the structure and tangy backbone of our cheesecake layer. To this, we add instant banana pudding mix—the ingenious shortcut that packs an intense, nostalgic banana flavor while helping the filling set beautifully without heat. Some recipes call for sweetened condensed milk for a decadent creaminess, while others use whipped heavy cream for a fluffier, mousse-like texture. Often, it’s a winning combination of both!
The Layers: Fresh Bananas and More Crunch
Merely flavoring the filling isn’t enough; we’re going for full-on banana bliss. A layer of thinly sliced, ripe-yet-firm bananas is nestled right in the middle of the cheesecake layer. But wait, there’s more! We also scatter additional broken Nilla wafer pieces throughout. This brilliant move ensures that iconic cookie crunch isn’t just at the bottom—it’s a happy surprise in the center, making for a far more exciting eating experience.
The Crowning Glory: Whipped Cream Topping
Finally, what would banana pudding be without its fluffy white hat? A light, sweetened whipped cream topping is the final flourish. It adds a cloud-like freshness that cuts through the richness of the cheesecake layer below. For the purists, a few extra wafer crumbs and a fan of banana slices on top are the only garnishes you need for a picture-perfect finish.
The Definitive No-Bake Banana Pudding Cheesecake Bars Recipe
Grab your mixing bowls and get ready for some fun! This recipe is straightforward, but a few pro tips along the way will guarantee spectacular results.
Gathering Your Ingredients (The Shopping List)
For the Crust:
-
2 cups (about 200g) Nilla wafer crumbs
-
6 tablespoons (85g) unsalted butter, melted
-
2 tablespoons granulated sugar
For the Filling:
-
16 ounces (452g) full-fat cream cheese, softened to room temperature
-
1 (3.4 oz) box instant banana pudding mix
-
1 cup (240ml) cold whole milk
-
1 (14 oz) can sweetened condensed milk
-
1 teaspoon vanilla extract
-
2-3 large, firm-ripe bananas, sliced
-
1 cup additional Nilla wafers, roughly broken
For the Topping:
-
1 cup (240ml) heavy cream, cold
-
3 tablespoons powdered sugar
-
1/2 teaspoon vanilla extract
-
Nilla wafers and banana slices for garnish
Essential Equipment You’ll Need
You won’t need anything fancy! Just a 9×9 inch square baking pan (or a 7×11 inch dish), a food processor or zip-top bag and rolling pin for crushing cookies, a stand mixer or hand beaters, and the usual measuring cups and spatulas.
Step 1: Crafting the Perfect Nilla Wafer Crust
First, line your pan with parchment paper, leaving some overhang on two sides. This little trick will be your best friend when it’s time to lift the entire slab of bars out for slicing. Next, pulverize the wafers into fine crumbs using your food processor or the brute-force method in a bag. Then, in a medium bowl, stir the crumbs together with the melted butter and sugar until the mixture resembles wet sand. Pour it into your prepared pan and press it down firmly and evenly using the bottom of a measuring cup. You want a solid, compact base. Pop this in the refrigerator to chill and set while you make the filling.
Step 2: Creating the Ultra-Creamy Cheesecake Filling
Now, for the main event. In the bowl of your mixer fitted with the paddle attachment, beat the softened cream cheese on medium-high speed for a good 2-3 minutes until it’s completely smooth and lump-free. Scrape down the bowl. This is crucial! Reducing the speed to low, gradually add the instant pudding mix, cold milk, sweetened condensed milk, and vanilla extract. Once incorporated, turn the speed back up to medium and beat for another 2-3 minutes until everything is perfectly blended and silky. The mixture will be thick and glorious.
Step 3: The Art of Layering for Maximum Flavor
Retrieve your chilled crust from the fridge. Spread half of the cheesecake filling evenly over the crust. Now, arrange a single layer of banana slices on top of the filling. Sprinkle the broken Nilla wafer pieces over the bananas. Finally, carefully spread the remaining half of the filling over this layer, sealing the bananas and wafers inside. Smooth the top with your spatula. This layering technique ensures every single bite is packed with flavor and texture.
Step 4: Chilling to Perfection (The Hardest Part!)
Cover the pan tightly with plastic wrap and refrigerate for at least 6 hours, but honestly, overnight is ideal. This patience-testing step is non-negotiable; it allows the pudding mix to work its setting magic and lets all the flavors meld together into something extraordinary.
Pro Tips for Flawless Banana Pudding Cheesecake Bars
You’ve got the basics down, but these next-level tips will elevate your bars from great to absolutely legendary.
How to Prevent Soggy Crust and Bananas
This is the number one question, and the solution is simple! First, ensure your crust is well-chilled and firm before adding any filling. Second, don’t use overripe, mushy bananas. Choose ones that are yellow and firm. Third, and this is a pro move: after spreading the first half of the filling, let it set in the fridge for 15 minutes before adding the bananas. This creates a protective barrier. You can also lightly toss your banana slices in a teaspoon of lemon juice, but it’s not essential if you serve within a day.
Achieving the Perfect Slice: A Guide to Clean Cuts
Want those picture-perfect, clean-edged bars? Here’s how. Run a thin, sharp knife under very hot water. Wipe it dry, and then slice straight down. Wipe the blade clean and reheat it for every single cut. The heat smoothly glides through the cold filling and crust without dragging or smearing. For truly pristine squares, use a bench scraper!
Delicious Variations to Suit Every Taste
-
Chocolate Lover’s: Drizzle the top with melted chocolate or sprinkle with chocolate chips between layers.
-
Peanut Butter Twist: Swirl 1/2 cup of creamy peanut butter into the cheesecake filling before layering.
-
Tropical Vibes: Add a layer of toasted coconut flakes with the bananas and wafers.
-
Salted Caramel Swirl: A drizzle of salted caramel sauce on top adds a wonderful sweet-salty contrast.
Storing, Freezing, and Dietary Info
How to Store and For How Long
Always keep these bars covered in the refrigerator. They are best enjoyed within 3-4 days. After that, the bananas will continue to soften and release moisture, potentially making the crust softer. The whipped cream topping is best added fresh right before serving.
Can You Freeze Banana Pudding Cheesecake Bars?
Yes, you can! However, for the best texture, freeze them without the fresh whipped cream topping and banana garnish. Wrap the entire chilled block (or individual bars) tightly in plastic wrap and then in aluminum foil. Freeze for up to 2 months. Thaw overnight in the refrigerator. The texture of the bananas will be a bit softer after thawing, but the flavor will still be fantastic. Add your fresh topping and garnish after thawing.
Easy Ingredient Swaps for Dietary Needs
-
Gluten-Free: Simply use your favorite gluten-free vanilla cookie to make the crust.
-
Lighter Version: Use reduced-fat cream cheese, fat-free milk, and light frozen whipped topping (like Cool Whip) for the topping.
-
Vegan: Substitute with vegan cream cheese, plant-based milk (like oat or almond), vegan instant pudding mix, and a vegan sweetened condensed milk alternative (you can find recipes online using coconut milk).
Banana Pudding Cheesecake Bars FAQs
Can I use homemade pudding instead of instant pudding mix?
It’s not recommended for this specific no-bake recipe. Cooked pudding has a different consistency and moisture content, and it likely won’t set the filling properly in the same way. The instant pudding mix is a key stabilizer here.
Why is my cheesecake filling runny?
This usually happens for one of three reasons: 1) The cream cheese wasn’t fully softened, leading to lumps that prevent proper mixing. 2) The ingredients weren’t beaten long enough to fully incorporate and thicken. 3) It simply hasn’t chilled long enough. Give it more time! Always use full-fat ingredients for the best structure.
How far in advance can I make these bars?
You can assemble the crust and filling (without the fresh whipped cream topping) up to 2 days in advance. For the absolute best presentation and to prevent the bananas from browning, add the fresh whipped cream and garnish just a few hours before you plan to serve them. You can learn more about the best practices for this in this official guide to freezing bananas.
Can I use a different pan size?
Absolutely! A 9×9″ pan will give you classic, thicker bars. For a larger crowd, use a 9×13″ pan; you’ll need to increase the recipe by 1.5x to maintain a good layer thickness. The chilling time may need to be extended slightly for the larger pan.
Time to Indulge!
And there you have it! You are now armed with everything you need to create the most incredible, conversation-stopping, soul-satisfying no-bake dessert of the season. This recipe is more than just a list of ingredients; it’s a passport to becoming the undisputed dessert hero in your friend group and family. The process is surprisingly simple, the payoff is enormous, and the joy on people’s faces when they take that first bite is absolutely priceless. So, what are you waiting for? It’s time to head to the kitchen, channel your inner pastry chef, and create some magic.
Banana Pudding Cheesecake Bars
Description
🍌 Banana Pudding Cheesecake Bars
Ingredients:
For the Crust:
-
2 cups crushed Nilla wafers (or graham crackers)
-
½ cup unsalted butter, melted
-
2 tbsp sugar
For the Cheesecake Filling:
-
16 oz (2 packages) cream cheese, softened
-
½ cup sugar
-
2 large eggs
-
1 tsp vanilla extract
-
½ cup sour cream
For the Banana Pudding Layer:
-
1 (3.4 oz) box instant banana pudding mix
-
1 ½ cups cold milk
-
1 cup heavy cream, whipped (or Cool Whip)
-
2 ripe bananas, sliced
For Topping:
-
Crushed Nilla wafers
-
Whipped cream (optional)
Instructions:
-
Make the Crust:
-
Preheat oven to 325°F (163°C).
-
Mix crushed Nilla wafers, melted butter, and sugar.
-
Press firmly into the bottom of a greased 9×13-inch baking dish.
-
Bake for 8 minutes, then let cool.
-
-
Cheesecake Layer:
-
Beat cream cheese and sugar until smooth.
-
Add eggs one at a time, then vanilla and sour cream.
-
Spread evenly over cooled crust.
-
Bake for 25–30 minutes, until set. Cool completely.
-
-
Banana Pudding Layer:
-
Whisk together pudding mix and cold milk until thickened.
-
Fold in whipped cream until smooth and fluffy.
-
Spread pudding mixture over the cheesecake layer.
-
Top with sliced bananas.
-
-
Chill & Serve:
-
Refrigerate for at least 4 hours (or overnight) to set.
-
Just before serving, top with crushed Nilla wafers and whipped cream.
-