
The Ultimate Caramel Cornflake Brownies: Your Guide to a Sweet & Salty Sensation
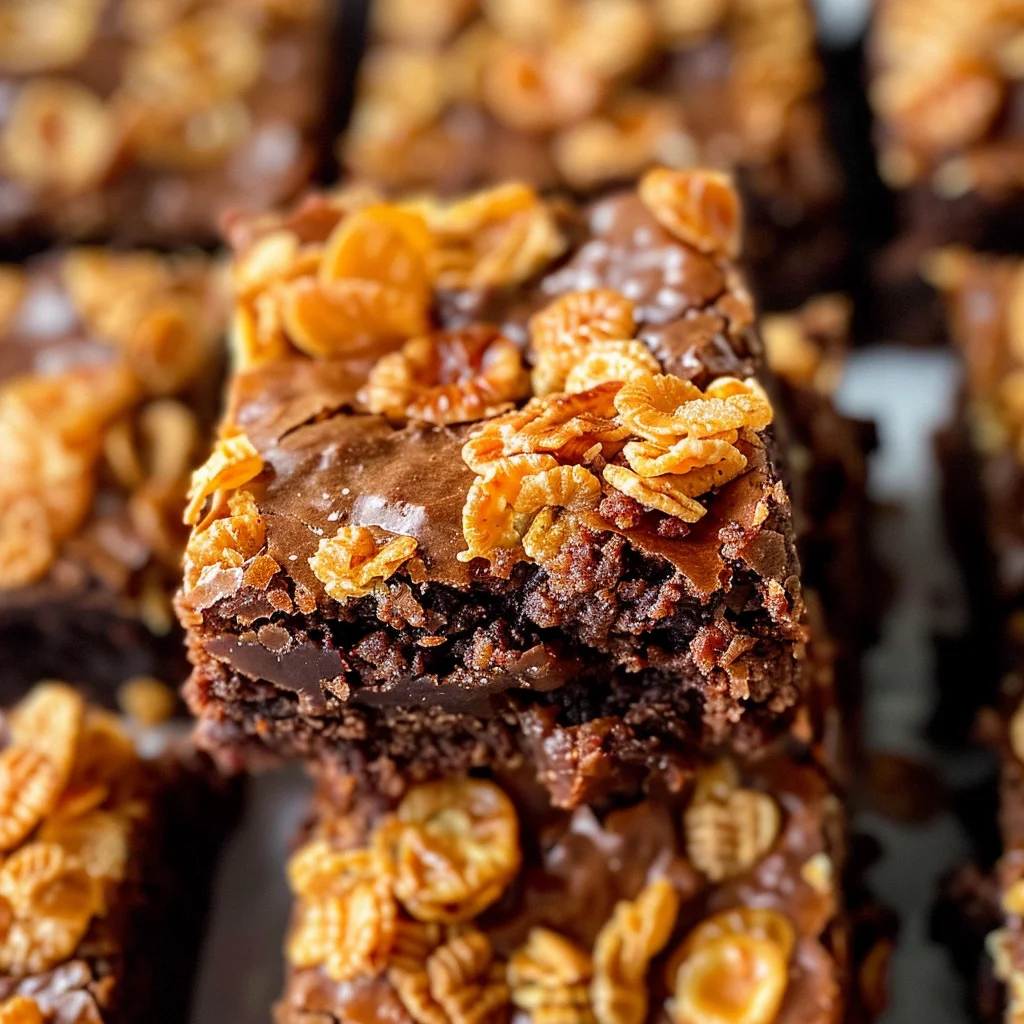
Imagine this: you sink your teeth into a square of pure bliss. First, your taste buds meet a crispy, incredibly addictive caramelized crown, a symphony of crackle and crunch. Then, your teeth sink through a layer of rich, gooey caramel, its sweet stickiness a perfect contrast. Finally, you reach the base—a deep, dark, and profoundly fudgy brownie that just might be the chewiest you’ve ever had. This, my friends, is not just a dessert; it’s a textural adventure. This is the magic of Caramel Cornflake Brownies.
Frankly, this treat is a masterclass in combining flavors and textures. Consequently, it has skyrocketed in popularity, becoming a staple at bake sales and a star on social media feeds. Moreover, this article is your definitive guide to creating this masterpiece in your own kitchen. We’ll walk through an easy, foolproof recipe, delve into expert baking tips to avoid common pitfalls, and explore fun variations. Ultimately, you’ll be equipped to whip up a batch of these unforgettable sweet and salty bars that will have everyone begging for the recipe.
Introduction and The Concept
Introduction: The Irresistible Crunch of Caramel Cornflake Brownies
Alright, let’s be honest—who can truly resist a good brownie? Seriously, the classic chocolate square is a timeless hero of the dessert world. But what happens when you take that beloved treat and crank its appeal up to eleven? You embark on a journey to create Caramel Cornflake Brownies, the undisputed champion of contrasting texture and triumphant taste.
Essentially, this dessert is a glorious fusion of three iconic layers. Firstly, it starts with a base of dense, chocolatey brownie. Secondly, a river of luxurious caramel flows through the middle, offering a chewy, sweet surprise. Finally, and most importantly, the whole thing is crowned with a crackly, crunchy top made from cornflakes and chocolate. This isn’t just a brownie; it’s an experience. Believe it or not, the combination might sound unusual, but one bite will instantly convert you. It’s the kind of bake that disappears from the kitchen counter in record time!
Why This Recipe Works: A Triumph of Texture
So, why does this particular recipe resonate so deeply with people? Well, it perfectly captures the current culinary love affair with the sweet and salty combination. Furthermore, in a world of homogenous textures, it delivers a spectacular burst of variety in every single bite. The soft, the chewy, and the crunchy all live in perfect harmony, making it an utterly moreish and satisfying dessert.
The Foundation: Ingredients & Equipment
Gathering Your Arsenal: Ingredients and Equipment
Before we dive into the mixing and baking, let’s talk strategy. Assembling your ingredients and tools beforehand—a practice chefs call mise en place—is the ultimate secret to a stress-free, successful baking session. Honestly, it makes the entire process feel like a well-choreographed dance instead of a frantic kitchen scramble.
Deconstructing the Ingredients: The Role of Each Component
Every single ingredient in this recipe has a specific job to do. Understanding their roles is your first step toward baking brilliance.
For the Brownie Base:
-
Butter: We use melted butter, not oil, for a supremely chewy texture and that classic, rich, buttery flavor we all crave in a homemade brownie.
-
Sugar: A combination of white and brown sugar is key. The white sugar sweetens and helps create a delicate crust, while the brown sugar, with its molasses content, adds moisture, depth, and a hint of caramel note that complements the topping perfectly.
-
Eggs: These are the workhorses, providing structure and binding all our delicious ingredients together.
-
Cocoa Powder: Using high-quality cocoa powder instead of melted chocolate is a fantastic shortcut. It delivers an intense chocolatey depth and keeps the batter from becoming too heavy, ensuring that fudgy texture we’re after.
-
Flour: All-purpose flour is our reliable foundation. For the best results, always fluff your flour with a spoon, spoon it into your measuring cup, and level it off with a knife. This prevents accidentally using too much, which is a common culprit for dry, cakey brownies.
For the Caramel Layer:
-
The Shortcut: Let’s be practical! Using store-bought soft caramels or a can of ready-made dulce de leche is a huge time-saver and delivers fantastic, consistent results. There’s absolutely no shame in this game.
For the Cornflake Crunch Topping:
-
Cornflakes: Their light, airy, and crisp structure is absolutely non-negotiable. They provide the iconic crunch without being too dense or hard.
-
Chocolate: You can use milk chocolate for a sweeter profile or dark chocolate for a more sophisticated, less sweet bite. Alternatively, a blend of both is pure magic.
-
Golden Syrup: This is the secret weapon for a shiny, clumpy, and perfectly bound cornflake cluster. It prevents the topping from being dry and crumbly. If you don’t have it, maple syrup is a great substitute.
-
Salt: Do not, I repeat, do not skip the salt! A good pinch of sea salt is the maestro that conducts the entire sweet and salty orchestra, balancing the sweetness and making the flavors pop.
Essential Baking Tools
You likely have everything you need already! Here’s your checklist:
-
An 8×8 or 9×9 inch square baking pan.
-
Parchment paper (for foolproof removal and clean-up!).
-
A medium saucepan and heatproof bowls for melting.
-
A trusty spatula and a whisk.
-
A kitchen scale (optional but highly recommended for precision).
The Step-by-Step Recipe
Crafting Perfection: The Step-by-Step Method
Alright, bakers, it’s showtime! Let’s transform these simple ingredients into something spectacular. Follow these steps, and you simply cannot go wrong.
Prep Work: Setting the Stage for Success
First things first, preheat your oven to 160°C (325°F). This slightly lower temperature is crucial for cooking the brownie through without burning our precious cornflake topping. Next, line your square baking pan with parchment paper, leaving some overhang on two sides. This creates handy “handles” to lift the entire slab out later for pristine slicing.
Step 1: Creating the Fudgy Brownie Base
-
In a medium saucepan, gently melt the butter over low heat. Once melted, remove it from the heat and immediately whisk in both sugars. You’re aiming for a glossy, slightly grainy mixture.
-
Add the eggs and vanilla extract to the warm butter-sugar mix. Whisk vigorously for a good minute until the mixture is smooth, slightly thickened, and well combined. This step helps create that shiny, crackly brownie top.
-
Sift the cocoa powder, flour, and salt directly into the wet ingredients. This prevents lumps and ensures a smooth batter. Now, put the whisk away! Grab a spatula and gently fold the dry ingredients into the wet until just combined. A few streaks of flour are okay; overmixing is the enemy of fudginess!
Step 2: Preparing the Gooey Caramel Layer
-
The Quick Method (Recommended): Place your soft caramels and a tablespoon of cream or milk in a microwave-safe bowl. Heat in 20-second bursts, stirring well between each, until completely melted and smooth.
-
The Scratch Method: If you’re feeling ambitious, you can make a quick dry caramel or simply gently warm a can of dulce de leche to make it easier to drizzle.
Step 3: Mastering the Cornflake Crunch Topping
In a separate large bowl, combine the chocolate, butter, and golden syrup. Melt this trio gently either in the microwave or over a pan of simmering water (a bain-marie), stirring until luxuriously smooth. Now, add the cornflakes and a pinch of salt. Using your spatula, gently fold and stir until every single flake is gleaming with chocolatey goodness. Be careful not to crush them—we want clusters, not dust!
Step 4: The Art of Layering and Baking
-
Spread your brownie batter evenly into your prepared pan.
-
Dollop spoonfuls of the prepared caramel sauce all over the brownie base. Then, take a knife or a skewer and gently swirl it through the batter to create beautiful marbled rivers of caramel. Don’t overdo it!
-
Finally, carefully spoon the cornflake crunch mixture over the entire surface. Gently press it down to adhere without squashing it.
-
Bake for 25-30 minutes. The top should be set and look dry, and the edges will be pulling away slightly from the pan. The key test? A toothpick inserted into the brownie part (avoid the caramel swirls!) should come out with a few moist crumbs attached, not wet batter. If it’s clean, you’ve overbaked!
Expertise, Troubleshooting, and Variations
Beyond the Recipe: Pro Tips for Brownie Brilliance
You’ve mastered the basics; now let’s elevate your skills. These little nuggets of wisdom are what separate a good bake from a great one.
The Science of the Swirl: How to Get It Right
Swirling seems simple, but there’s a trick to it! The goal is to create pockets of caramel, not to mix it entirely into the batter. Use a knife or a chopstick and make slow, deliberate figure-eight motions. Just a few passes are enough. If your caramel sinks, it might be too warm or thin. Let it cool for a few minutes before dolloping.
Troubleshooting Common Brownie Disasters
Even the best bakers have off days. Here’s how to fix common issues:
Why are my brownies cakey, not fudgy?
This is usually a triple threat: overmixing the batter after adding flour, using too much flour, or simply baking for too long. Remember, fold gently, measure flour correctly, and trust the toothpick test!
Why did my caramel layer disappear/harden?
A disappearing act means the caramel was likely too liquid and sank completely. A hard, chewy layer suggests the caramel you used was already very firm and needed more cream to soften it before swirling.
Why is my cornflake topping soft or soggy?
This is almost always due to humidity or improper storage. However, underbaking is another culprit. Ensure the brownies are fully baked and cooled completely in the pan before covering them. Storing them in an airtight container with a paper towel underneath can help absorb excess moisture.
Creative Variations to Suit Every Taste
The basic recipe is a dream, but feel free to make it your own!
The Salted Caramel Upgrade:
This is a no-brainer! Simply sprinkle a few flakes of fancy sea salt over the top of the cornflake layer right after it comes out of the oven.
Nutty Delight:
Add a handful of chopped toasted pecans, walnuts, or peanuts into the cornflake mixture for an extra layer of flavor and crunch.
Chocolate Overload:
Stir a half-cup of dark or milk chocolate chips directly into the brownie batter before pouring it into the pan.
Maltesers Magic:
Replace two tablespoons of the flour with malted milk powder for a nostalgic, malty flavor that pairs wonderfully with chocolate and caramel.
Dietary Tweaks:
For a gluten-free version, use a 1-to-1 gluten-free flour blend and certified gluten-free cornflakes. For dairy-free, use plant-based butter and dairy-free chocolate.
Serving, Storing, and Conclusion
The Final Act: Serving and Storing Your Masterpiece
The aroma filling your kitchen is torture, I know. But patience is your final, most important ingredient!
The Patience Payoff: Cooling is Non-Negotiable
You must let the brownies cool completely in the pan set on a wire rack. I recommend at least 2 hours, if not more. This allows the caramel to set and the brownie base to firm up. Cutting into them warm will result in a glorious, but messy, puddle. For the cleanest slices, you can even chill the entire slab in the fridge for an hour.
How to Cut Clean Brownie Squares
Use a sharp knife. For the absolute cleanest cuts, you can even lightly run the knife under hot water, wipe it dry, and then slice. Wipe the blade clean between each cut for picture-perfect squares.
Storage Secrets for Maximum Freshness
Store these caramel cornflake brownies in an airtight container at room temperature for 3-4 days. For longer storage, they freeze beautifully! Wrap individual squares in cling film and place them in a freezer bag for up to 3 months. Thaw at room temperature.
Conclusion: Your New Signature Dessert
And there you have it! You are now armed with the knowledge, the recipe, and the tricks to create what might just become your signature dessert. These bars are more than the sum of their parts—they are a joyful, textural, flavor-filled experience. So, preheat that oven, and get ready to make something truly unforgettable.
Frequently Asked Questions (FAQs)
Caramel Cornflake Brownies FAQs
Can I use other cereals instead of cornflakes?
Absolutely! While cornflakes provide the ideal light and crispy crunch, Rice Krispies will work well for a finer texture. For a nuttier flavor, crushed-up shredded wheat biscuits could be a fun experiment. Just be prepared for a slightly different final product.
Can I make caramel cornflake brownies without eggs?
You can certainly try for a vegan version. A common substitute is a “flax egg” (1 tbsp ground flaxseed mixed with 3 tbsp water per egg, left to thicken for 5 minutes). However, be aware that this will alter the texture of the brownie base, typically making it more dense and cake-like rather than fudgy and chewy.
Why is my caramel layer hard and chewy after baking?
This typically happens if you use a pre-made caramel that is already very firm. To prevent this, ensure you add a tablespoon of cream or milk when melting it to soften it up. Using a softer product like dulce de leche is also a great way to guarantee a softer set.
How long do these brownies stay fresh?
Stored correctly in an airtight container at room temperature, they are at their best within 3-4 days. The cornflake topping will gradually lose its maximum crispness but will still be delicious. For longer storage, freezing is your best bet. They can be frozen for up to 3 months.
Print
Caramel Cornflake Brownies
Description
Caramel Cornflake Brownies
Ingredients
For the Brownie Base
-
1 cup (2 sticks) unsalted butter
-
8 oz dark chocolate, chopped
-
1 1/2 cups sugar
-
4 large eggs
-
1 tsp vanilla extract
-
1 cup all-purpose flour
-
1/4 cup cocoa powder
-
1/2 tsp salt
For the Caramel Cornflake Topping
-
1 cup caramel sauce (store-bought or homemade)
-
4 cups cornflakes
-
Pinch of sea salt (optional, for balance)
Instructions
-
Make the brownies:
-
Preheat oven to 350°F (175°C). Line a 9×13-inch pan with parchment.
-
In a saucepan, melt butter and chocolate together until smooth. Remove from heat, whisk in sugar, then eggs one at a time. Stir in vanilla.
-
Sift in flour, cocoa, and salt. Fold gently until combined. Pour batter into the pan and spread evenly.
-
-
Bake: Bake for 25–30 minutes, until set but still fudgy. Let cool slightly.
-
Make the topping: In a large bowl, warm caramel sauce until pourable. Add cornflakes and stir until fully coated.
-
Assemble: Spread caramel cornflake mixture over the cooled brownies, pressing down gently so it sticks. Chill for 30 minutes to set.
-
Slice & serve: Cut into squares and enjoy the chewy-fudgy-crunchy layers!