
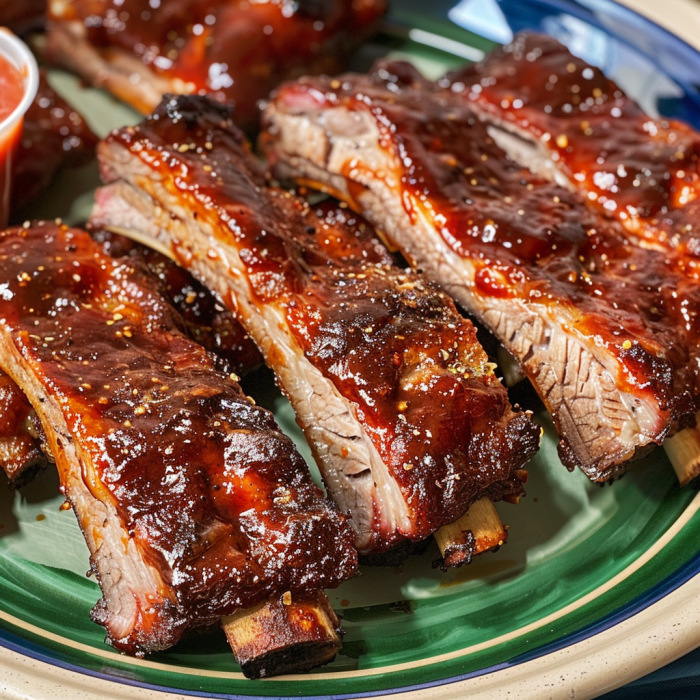
Ah, the sizzle of the platter, the unmistakable smoky-sweet aroma, and the sight of those glistening, fall-off-the-bone ribs—Chili’s Baby Back Ribs are nothing short of a legend. For decades, that iconic jingle has been stuck in our heads, and the craving for their perfectly sauced, incredibly tender ribs is a universal experience. Most of us have believed that achieving that specific magic at home is a pipe dream, a secret locked away in restaurant kitchens. Well, prepare to have your mind blown. This guide is your ultimate ticket to replicating that iconic flavor in your own kitchen. We’re not just sharing a recipe; we’re handing you the master key to the entire process, from selecting the perfect rack of ribs to mastering the cooking methods that deliver legendary results. So, tie on your apron and get ready for a delicious adventure. Your taste buds are in for a treat!
You Can Make Chili’s Famous Baby Back Ribs at Home: The Ultimate Copycat Recipe
Let’s be honest; who hasn’t found themselves humming that ridiculously catchy tune after a long day, suddenly hit with an undeniable craving for a full slab of Chili’s finest? It’s a cultural phenomenon, a benchmark for what great, approachable barbecue ribs should be. Consequently, the idea of crafting this restaurant-style masterpiece yourself can feel pretty daunting. Frankly, it might even seem impossible without a giant smoker and years of pitmaster experience.
However, I’m here to tell you that the secret is surprisingly within reach. Believe it or not, you absolutely can achieve that iconic flavor and texture right in your own oven or on your backyard grill. This journey isn’t just about following a list of ingredients; instead, it’s about understanding the three pillars that make these ribs so special: a powerfully flavorful dry rub, a tangy and sweet signature barbecue sauce, and a patient, low-and-slow cooking technique that transforms tough meat into pure, succulent bliss.
Therefore, this comprehensive guide will walk you through every single step without any guesswork. Ultimately, we’ll cover everything from the science behind the perfect rack to troubleshooting common pitfalls. Furthermore, we’ll explore multiple cooking methods to suit your equipment, ensuring you get phenomenal results whether you’re using an oven, a grill, or a smoker. Get ready to roll up your sleeves—you’re about to become the hero of your own dinner table.
What Makes Chili’s Baby Back Ribs So Good?
Alright, let’s get down to brass tacks. Why exactly do these ribs hold such a special place in our hearts (and stomachs)? It isn’t just one thing; honestly, it’s a masterful combination of factors that creates a true symphony of flavor and texture.
First off, the cut is crucial. Chili’s uses baby back ribs, which are a superior choice for this specific style. Unlike their larger, fattier spare rib cousins, baby backs are shorter, more curved, and taken from the top of the rib cage where the meat is leaner and incredibly tender. They cook faster and offer a more elegant “finger food” experience, which is perfect for a restaurant setting. Consequently, this choice immediately sets a high bar for tenderness.
Furthermore, the flavor profile is uniquely balanced and incredibly addictive. It’s not just about slathering on any old BBQ sauce. The experience starts with a savory, slightly peppery bark from a well-developed dry rub that forms a delicious crust. Then, you get the star of the show: that signature sauce. It’s not overly smoky, too vinegary, or cloyingly sweet. Instead, it’s a perfect tangy, sweet, and slightly smoky glaze that caramelizes beautifully on the grill. This one-two punch of seasoned meat and iconic sauce is what makes recreating them at home so utterly rewarding.
Ingredients for Your Copycat Chili’s Baby Back Ribs
Now, for the fun part: gathering your arsenal! To nail this copycat recipe, you’ll need to break it down into three components: the rub, the sauce, and the main event—the ribs themselves.
For the Essential Dry Rub
This spice blend is the foundation of all the flavor that penetrates the meat. You’ll likely have most of these in your pantry already:
-
Brown Sugar: The cornerstone for sweetness and that beautiful caramelization.
-
Paprika: Provides a deep red color and a sweet, earthy base note.
-
Chili Powder: Delivers a mild, complex heat and depth.
-
Garlic Powder & Onion Powder: These offer a potent, savory backbone that fresh aromatics can’t provide in a dry application.
-
Kosher Salt & Black Pepper: The essential enhancers for all the other flavors.
-
A Pinch of Cayenne Pepper: (Optional) For those who like a little extra kick.
For the Signature Barbecue Sauce
This is where the magic happens! Whipping up this sauce from scratch is non-negotiable for the authentic taste.
-
Ketchup: Forms the convenient and flavorful base of the sauce.
-
Apple Cider Vinegar: Provides the necessary tangy punch to cut through the richness.
-
Worcestershire Sauce: Adds a deep, complex umami flavor.
-
Molasses: Imparts a richer, darker sweetness than sugar alone.
-
Liquid Smoke: This is the secret weapon for mimicking that wood-fired, smoky flavor without a grill or smoker.
The Star of the Show: The Ribs
When selecting your baby back ribs, look for a rack that is pale pink to red in color with a good amount of meat covering the bones. Avoid racks that look overly fatty or have a grayish tint. A full slab typically weighs between 2-3 pounds and will handily feed two to three very happy people.
Essential Equipment You’ll Need
You don’t need a professional kitchen setup to pull this off. Here’s what will make your life easier:
The Must-Haves:
-
A heavy-duty baking sheet or roasting pan.
-
Aluminum foil is absolutely critical for the oven-braising method.
-
A sharp knife for trimming and portioning.
-
Small bowls for mixing your rub and sauce.
-
A saucepan for simmering your homemade BBQ sauce to perfection.
The Nice-to-Haves:
-
A grill (gas or charcoal) for the most authentic flavor.
-
Tongs and a basting brush for safe flipping and saucing.
-
An instant-read thermometer takes the guesswork out of knowing when they’re perfectly done.
-
For a deeper dive into grill mastery, consider reading this guide on how to master the art of grilling.
Step-by-Step Prep: Setting the Stage for Success
Before any heat is applied, a little prep work is essential. Honestly, this is the step most people rush, but taking your time here pays massive dividends.
Step 1: Removing the Membrane
This is arguably the most important step for achieving truly tender ribs. On the bony side of the rack, you’ll find a thin, shiny membrane called the silverskin. If left on, it becomes tough and chewy, acting as a barrier against your flavorful rub. To remove it, slide a butter knife under the membrane on one end of the rack, then lift and loosen it. Next, grab a paper towel for a better grip, pull it up, and tear it off in one smooth motion. Voila! You’ve just unlocked maximum tenderness.
Step 2: Trimming Excess Fat
While some fat is good for flavor, you’ll want to trim off any large, hard chunks of fat that won’t render down during cooking. A quick pass with your knife is all it takes.
Step 3: Applying the Dry Rub
Pat the ribs completely dry with paper towels; this helps the rub stick. For an even better bond, some cooks swear by a very light smear of yellow mustard—don’t worry, you won’t taste it! Afterwards, generously sprinkle your homemade dry rub onto every surface of the ribs, pressing the spices into the meat. Let them sit for at least 30 minutes to absorb the flavors, or even better, cover and refrigerate them for a few hours.
How to Cook Your Copycat Ribs to Perfection
Here’s where we diverge into the various paths to glory. Choose your own adventure based on the equipment you have!
The Low-and-Slow Oven Method (The Most Accessible)
This method is foolproof and delivers incredibly fall-off-the-bone results. First, preheat your oven to 275°F (135°C). Then, create a tight packet with your seasoned ribs and heavy-duty aluminum foil, double-wrapping it to trap all the steam. After that, place the packet on a baking sheet and bake for 2.5 to 3 hours. The low temperature slowly breaks down the collagen and fat, essentially braising the ribs in their own juices until they are meltingly tender.
The Grilling Method (For Authentic Smoky Flavor)
For that classic barbecue char, the grill is your best friend. The key is indirect heat. On a gas grill, turn on only one burner. On a charcoal grill, push the coals to one side. You’ll cook the ribs over the cool side, with the lid closed, turning them occasionally. Furthermore, soak some wood chips (hickory is classic) and place them in a smoker box or a foil pouch over the active flame to generate authentic smoke. This process usually takes about 1.5 to 2 hours at around 250-300°F.
The Smoker Method (For Barbecue Purists)
If you have a smoker, you’re ready to level up. The famous 3-2-1 method is a fantastic guideline:
-
3 hours: Smoke the ribs unwrapped with your chosen wood at 225°F.
-
2 hours: Wrap the ribs tightly in foil with a splash of apple juice or cider vinegar to braise.
-
1 hour: Unwrap, sauce them, and return them to the smoker to set the glaze.
Regardless of your method, always remember to consult the USDA guidelines for safe meat handling to ensure your internal temperature is safe.
The Finishing Touch: Glazing with Sauce
No matter how you cook them, the golden rule is to only apply the sauce in the last 20-30 minutes of cooking. Why? Because the sugar in the sauce will burn if exposed to heat for too long. Instead, brush on a thin layer, let it set, and then repeat for a gorgeous, sticky glaze.
The Copycat Chili’s Dry Rub and BBQ Sauce Recipes
The Dry Rub Recipe
Ingredients:
-
1/4 cup brown sugar
-
2 tbsp paprika
-
1 tbsp chili powder
-
2 tsp garlic powder
-
2 tsp onion powder
-
1 tbsp kosher salt
-
2 tsp black pepper
-
1/2 tsp cayenne pepper (optional)
Instructions:
Simply combine all ingredients in a bowl and mix thoroughly. That’s it! Store any extra in an airtight container.
The Barbecue Sauce Recipe
Ingredients:
-
1 1/2 cups ketchup
-
1/2 cup apple cider vinegar
-
1/4 cup brown sugar
-
2 tbsp molasses
-
2 tbsp Worcestershire sauce
-
1 tsp garlic powder
-
1 tsp onion powder
-
1 tbsp liquid smoke
-
Salt and pepper to taste
Instructions:
Combine all ingredients in a medium saucepan over medium heat. After that, bring to a simmer, stirring frequently. Then, reduce the heat and let it bubble gently for 15-20 minutes until it thickens slightly. Let it cool before using; it will thicken a bit more as it sits.
Serving Your Masterpiece and Classic Side Dishes
The moment of truth! First, let the ribs rest for about 10 minutes after they come off the heat; this allows the juices to redistribute throughout the meat. Then, slice them between the bones into individual portions. Serve with extra warmed sauce on the side for dipping.
To complete the full Chili’s experience, you’ve gotta have the sides! Think classic:
-
Loaded mashed potatoes or seasoned french fries
-
Sweet corn on the cob with a sprinkle of chili powder
-
Creamy coleslaw for a cool, crunchy contrast
-
A soft, warm dinner roll to sop up all that extra sauce
Expert Tips for the Best Ribs Ever
-
Patience is a Virtue: Rushing the cooking process is the number one enemy of good ribs. Low and slow is the only way to go for that perfect tender texture.
-
Don’t Skip the Rest: Letting the ribs rest after cooking is non-negotiable. It makes all the difference in juiciness.
-
Troubleshooting:
-
Tough? They need more time. Wrap them and put them back on the heat.
-
Dry? They might have been overcooked or not wrapped properly. Next time, try adding a splash of liquid to the foil packet.
-
Sauce Burning? You put it on too early! Stick to the last 20-30 minutes.
-
For more on selecting the perfect rack, check out this definitive guide to baby back ribs.
Frequently Asked Questions About Copycat Chili’s Ribs
Can I make these ribs ahead of time?
Absolutely! You can cook the ribs fully, let them cool completely, and then refrigerate them for up to 3 days. To reheat, wrap them in foil and warm in a 300°F oven until heated through. Add a fresh coat of sauce at the very end.
Can I use store-bought barbecue sauce?
You can, but for a true copycat flavor, making the sauce is highly recommended. If you’re in a pinch, look for a Kansas City-style sauce that is thick, sweet, and tangy.
How do I know when the ribs are done?
You can use the “bend test.” Pick up the rack with tongs from the center; if it bends easily and the surface cracks a bit, it’s ready. Alternatively, an instant-read thermometer inserted between the bones should read between 190-203°F for fall-off-the-bone tenderness.
What’s the best way to reheat leftover ribs?
The oven is your best bet. Re-wrapping them in foil and warming at a low temperature (around 300°F) prevents them from drying out. Avoid the microwave, as it will make the meat rubbery.
Conclusion: Your Ribs Are Ready!
And there you have it! From a humble rack of pork to a spectacular, restaurant-worthy feast, you’ve now mastered the art of the Copycat Chili’s Baby Back Ribs. This isn’t just a recipe; it’s a new skill you can break out for game days, family gatherings, or whenever that famous jingle gets stuck in your head. The process is a labor of love, but the result—sticky fingers, satisfied smiles, and the proud knowledge that you made it yourself—is worth every single minute. Now, go forth and impress! You’ve definitely earned those bragging rights.
Print
Copycat Chili’s Baby Back Ribs
Description
🥢 Copycat Chili’s Baby Back Ribs
Ingredients (4–6 servings):
For the ribs:
-
2 racks baby back ribs (about 4 lbs)
-
2 tbsp olive oil
-
Salt & black pepper, to taste
-
1 tsp garlic powder
-
1 tsp onion powder
-
1 tsp smoked paprika
For the glaze / sauce:
-
1 cup ketchup
-
½ cup brown sugar
-
¼ cup apple cider vinegar
-
2 tbsp honey
-
1 tbsp Worcestershire sauce
-
1 tsp chili powder
-
½ tsp smoked paprika
-
½ tsp garlic powder
-
½ tsp onion powder
-
Pinch of cayenne (optional, for heat)
Instructions:
-
Preheat oven: 300°F (150°C). Line a baking sheet with foil.
-
Prep ribs: Remove the membrane from the back of the ribs. Rub ribs with olive oil, salt, pepper, garlic powder, onion powder, and smoked paprika.
-
Bake ribs: Wrap ribs tightly in foil and bake 2–2 ½ hours until tender.
-
Make glaze: While ribs bake, combine all glaze ingredients in a saucepan. Simmer 5–10 minutes until slightly thickened.
-
Glaze & broil: Remove ribs from oven, discard top foil. Brush ribs generously with glaze. Broil or grill 5–10 minutes until caramelized and sticky, watching carefully to avoid burning.
-
Serve: Slice between bones and serve with extra glaze on the side.