
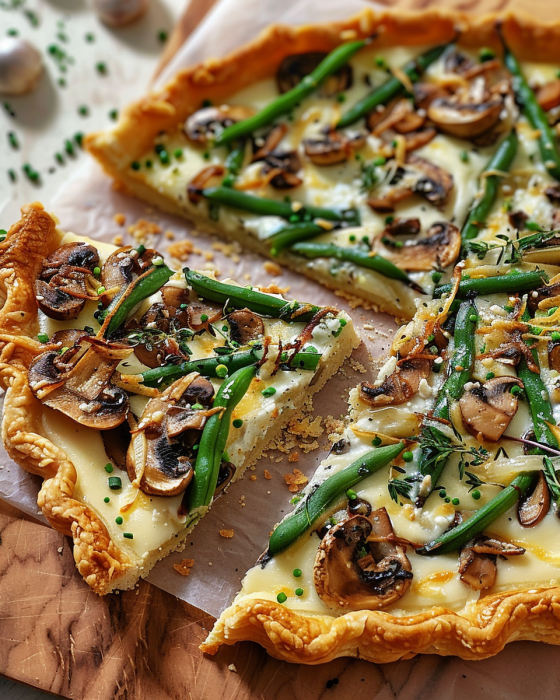
The Ultimate Cheesy Green Bean & Mushroom Tart: A Savory Masterpiece
Picture this, if you will: a golden, impossibly flaky crust cradling a rich, savory filling. Imagine the heady aroma of buttery, sautéed mushrooms and fresh thyme wafting from your oven, promising a meal that is both comforting and elegant. This, my friends, is the magic of a perfectly executed Cheesy Green Bean & Mushroom Tart. It’s a dish that effortlessly bridges the gap between a humble weeknight dinner and a show-stopping centerpiece for your next brunch gathering. Seriously, it’s that versatile!
Now, you might be thinking that such a creation belongs in a fancy bakery case, not your home kitchen. Well, I’m here to tell you that’s simply not true. This recipe is designed to be approachable, breaking down the process into simple, foolproof steps. We’ll explore the symphony of textures and flavors—from the tender-crisp green beans and earthy mushrooms to the luxuriously creamy, cheesy custard that binds it all together. So, preheat your oven and let’s embark on a culinary journey to create a savory masterpiece that will have everyone asking for seconds.
Why This Recipe Will Become a Favorite
Alright, let’s get down to brass tacks. Why should this particular tart earn a permanent spot in your recipe rotation? For starters, it’s incredibly elegant yet approachable. Consequently, it possesses this amazing ability to look like you slaved away for hours, while in reality, the process is straightforward and utterly rewarding. Whether you’re a seasoned baker or a nervous newbie, this guide will walk you through it.
Furthermore, its versatile serving options are a huge win. Are you needing a stunning vegetarian main course for a special dinner? Look no further. Alternatively, perhaps you need a spectacular side dish to accompany a holiday roast? This tart has you covered. Moreover, sliced into smaller pieces, it transforms into the most sophisticated appetizer at any party. Honestly, it’s the culinary equivalent of a little black dress—appropriately fabulous for any occasion.
Speaking of entertaining, let’s talk about the make-ahead friendly nature of this dish. Without a doubt, we all crave recipes that remove the last-minute stress. Fortunately, you can prepare the crust and the vegetable filling components a day in advance. Simply store them separately in the fridge, then assemble and bake the next day. It’s a genuine game-changer for stress-free hosting.
Finally, and perhaps most importantly, this recipe boasts a crowd-pleasing flavor profile. Combining the deep, earthy umami from the mushrooms with the sharp, salty notes of a good cheese blend and the fresh, crisp contrast of green beans, it creates a harmony of flavors that appeals to virtually everyone. In other words, it’s a guaranteed hit that will have people coming back for just one more sliver.
Deconstructing the Perfect Tart: A Guide to Ingredients
Before we dive into the method, let’s geek out on the ingredients for a moment. Understanding the role each one plays isn’t just culinary homework; it’s the secret weapon for making this savory tart truly unforgettable. Trust me, a little knowledge here goes a long way.
First up, the foundation: the crust. You’ve got two fantastic paths here. Using a high-quality, all-butter store-bought puff pastry is your ticket to incredible, shatteringly flaky layers with minimal effort—a brilliant shortcut for a busy day. On the other hand, a simple homemade shortcrust pastry (pâte brisée) offers a sturdier, more buttery and crumbly base that stands up beautifully to the hearty filling. The choice is yours, and honestly, both are winners.
Next, let’s talk vegetables. For the green beans, fresh is genuinely best. Their snappy texture and vibrant green color hold up magnificently in the bake. (If you’re in a pinch, frozen will work, but be sure to thaw and pat them dry thoroughly). The key step here? Blanching them first. This quick boil-and-shock process locks in that gorgeous color and ensures they cook to tender-crisp perfection in the oven, rather than turning mushy.
Now, for the umami bomb: the mushrooms. Standard button mushrooms work just fine, but oh boy, if you upgrade to cremini (baby bellas) or even a mix with some shiitake or oyster mushrooms, you’re in for a deeply flavorful treat. These varieties pack a more intense, earthy flavor that makes the filling taste profoundly rich and complex.
Of course, we can’t forget the star of the show: the cheese blend. This is where personality shines through! A combination is ideal for both flavor and meltability. Gruyère cheese is a classic for a reason—it’s nutty, slightly sweet, and melts like a dream. Pair it with some sharp white cheddar for a tangy punch, and a handful of Parmesan for a salty, savory kick. This trio is a power group that simply can’t be beaten.
Finally, the supporting cast: aromatics like onion and garlic form the flavor base, while herbs like thyme or rosemary add a fragrant, earthy note. The eggs and cream, meanwhile, are the unsung heroes. They create a luxurious, rich custard filling that sets perfectly, slicing neatly into beautiful portions.
Essential Equipment for Tart Success
You don’t need a kitchen full of fancy gadgets, but a few key tools will make your life infinitely easier and your tart infinitely better.
-
A Tart Pan with a Removable Bottom: This is non-negotiable. The fluted edges look beautiful, and the removable base allows you to seamlessly lift the tart out for pristine, crumb-free slicing and a stunning presentation. Don’t try to fight with a regular pie dish here!
-
A Good Skillet: You’ll need a reliable skillet for sautéing the mushrooms and onions to golden-brown perfection.
-
Blind Baking Weights: These are essential for pre-baking the crust to avoid a soggy bottom. You can use proper ceramic or metal weights, or even a bag of dried beans or rice you keep specifically for this purpose.
-
Basic Prep Gear: A mixing bowl or two, a whisk for the custard, a pastry brush for egg wash, and a sharp knife for prepping veggies round out your kit.
How to Make a Cheesy Green Bean & Mushroom Tart: Step-by-Step Instructions
Alright, enough talk—let’s get cooking! Follow these steps carefully, and you’ll be rewarded with a pure masterpiece.
Step 1: Preparing the Tart Crust
First things first, let’s get that crust ready. If you’re using store-bought puff pastry, let it thaw according to package instructions, usually on the counter for about 30-40 minutes. Once pliable, gently unfold it and roll it out just enough to fit your tart pan, press it in, and trim the edges. Prick the bottom all over with a fork; this is called docking, and it prevents the dough from puffing up too much.
Now, for the crucial step: blind baking. This means pre-baking the crust before adding the wet filling. Why? It ensures a crisp, fully cooked, and not-soggy-at-all bottom—the hallmark of a great tart. To do this, line your pastry-lined pan with parchment paper and fill it with your pie weights. Bake this in a preheated 400°F (200°C) oven for about 15 minutes. Then, carefully lift out the parchment with the weights, and return the bare crust to the oven for another 5-7 minutes until it’s dry and just starting to turn golden. Let it cool slightly while you make the filling. For a deeper dive, this expert guide on how to blind bake a pie crust is an excellent resource.
Step 2: Cooking the Filling Components
While the crust is cooling, bring a large pot of salted water to a rolling boil. This is for blanching the green beans. Prepare a separate large bowl filled with ice water. Add the green beans to the boiling water and cook for just 2-3 minutes—you want them bright green and still very crisp. Immediately drain them and plunge them into the ice bath to stop the cooking process. This sets the color and texture perfectly. Drain again and set aside.
Now, for the mushrooms. Heat a tablespoon of olive oil and a knob of butter in your skillet over medium-high heat. Add your mushrooms in a single layer; don’t crowd the pan, or they’ll steam instead of brown (you can do this in batches). Let them cook, without moving them too much, until they release their water and become deeply golden brown. This is where the flavor is built! About halfway through, add your finely chopped onion. Once the onions are soft and translucent, add the garlic and cook for another minute until fragrant. Season generously with salt, pepper, and a tablespoon of fresh thyme leaves. If you want to master this step, check out this scientific guide to sautéing mushrooms for maximum flavor. Let this mixture cool slightly.
Step 3: Creating the Cheesy Custard
This step is wonderfully simple. In a medium bowl, whisk together 3 large eggs, 1 cup of heavy cream (or half-and-half for a slightly lighter option), a good pinch of salt, some black pepper, and a tiny grate of nutmeg (it adds a wonderful, warm background note). Whisk until it’s completely smooth and homogenous. Then, stir in about 1 ½ cups of your grated cheese blend, reserving the last half cup for sprinkling on top later.
Step 4: Assembling and Baking the Tart
Time to bring it all together! Reduce your oven temperature to 375°F (190°C). Take your pre-baked tart shell. Evenly distribute the mushroom and onion mixture across the bottom. Artfully arrange the blanched green beans on top of the mushrooms—you can do a spoke pattern or just a rustic jumble.
Place the tart pan on a baking sheet (this catches any potential drips and makes it easier to handle). Now, slowly and carefully pour the cheesy custard mixture over the vegetables, allowing it to seep into all the gaps. Finally, sprinkle the remaining cheese over the entire surface.
Bake for 30-35 minutes. You’re looking for the edges of the crust to be a deep golden brown, the custard to be fully set (it shouldn’t jiggle in the center when you gently shake the pan), and the cheese on top to be bubbly and spotted with brown.
Here’s the hardest part: you must let it rest! Allow the tart to cool in the pan on a wire rack for at least 15-20 minutes. This allows the custard to set fully, ensuring you get clean, beautiful slices instead of a messy scramble. Then, gently push the removable bottom up to release the tart from the fluted ring. Slice, serve, and accept the compliments!
Pro Tips for the Absolute Best Tart
You’ve got the basics down, but these pro tips will elevate your tart from great to absolutely legendary.
-
Banish the Soggy Bottom Forever: We’ve already tackled blind baking, but another key is ensuring your mushroom filling isn’t watery. After sautéing, if there’s any liquid in the bottom of the pan, keep cooking until it’s all evaporated. A wet filling is the enemy of a crisp crust!
-
Season in Layers: Don’t just rely on salting at the end. Salt the blanching water for the beans. Season the mushrooms generously while they cook. And season the custard. This builds deep, complex layers of flavor in every single bite.
-
The Egg Wash Edge: For a gorgeous, professional-looking golden shine on your crust edges, brush them with a simple egg wash (one egg beaten with a tablespoon of water or milk) before the final stage of blind baking and again before assembling (if using shortcrust).
-
The Perfect Slice: For the cleanest cuts, use a sharp, thin-bladed knife. Wipe it clean between each slice for picture-perfect portions every time.
Creative Variations and Dietary Tweaks
This recipe is a fantastic template—feel free to get creative and make it your own!
-
Protein Power: Add some cooked, crumbled bacon or diced ham into the filling with the mushrooms. Flaked, pre-cooked salmon would also be a delicious addition.
-
Garden Variety: Don’t have green beans? Asparagus tips, broccoli florets, or even sautéed leeks would be magnificent substitutes.
-
Cheese Please: Experiment with different cheeses! Smoked Gouda would add a wonderful depth, or a little bit of tangy goat cheese crumbled on top before baking.
-
Gluten-Free: Absolutely doable! Use a certified gluten-free puff pastry or your favorite gluten-free flour blend to make a shortcrust pastry.
-
Vegan Version: This is a trickier but possible adaptation. Use a vegan puff pastry, a plant-based cheese that melts well, and a custard made from silken tofu blended with plant-based milk, nutritional yeast, and cornstarch. Sauté the veggies in olive oil.
How to Serve Your Savory Masterpiece
This tart is a dream to serve because it’s fantastic warm, at room temperature, or even cold straight from the fridge!
For a light lunch or dinner, pair a wedge with a simple mixed green salad tossed in a sharp vinaigrette. The acidity cuts through the richness of the tart beautifully. It also makes a wonderful partner for a cup of roasted tomato or red pepper soup.
For a bigger holiday or brunch spread, it shines alongside other dishes like roasted potatoes, glazed carrots, or a fresh fruit salad.
Storing and Reheating Your Leftover Tart
Got leftovers? No problem! This tart stores wonderfully.
-
Storage: Once completely cooled, cover the tart tightly with plastic wrap or place it in an airtight container. It will keep happily in the refrigerator for up to 3 days.
-
Reheating: To restore its glory, reheating in the oven or a toaster oven is 100% the best method. Preheat to 350°F (175°C) and warm a slice for 10-15 minutes, until heated through and the crust is crisp again. The microwave will work in a pinch, but it will make the crust soft.
-
Freezing: You can freeze the fully baked and cooled tart. Wrap it tightly in several layers of plastic wrap and then foil. Freeze for up to 2 months. Thaw overnight in the refrigerator and reheat in the oven as directed above.
Frequently Asked Questions (FAQs)
Can I use canned green beans instead of fresh?
I wouldn’t recommend it. Canned green beans are already very soft and mushy; they will completely lose their texture and become overly soft during baking, resulting in a less enjoyable tart. Frozen beans are a much better substitute if fresh aren’t available.
Do I really have to blind bake the crust? It seems like an extra step.
Yes, I strongly recommend it! Blind baking is absolutely critical for a savory tart with a wet filling like this custard. If you skip it, the bottom of your crust will be soggy, pale, and undercooked. That one extra step ensures a perfectly crisp, flaky base.
Why did my filling turn out watery?
This almost always happens if the mushrooms weren’t cooked long enough. Mushrooms release a tremendous amount of water. If you don’t sauté them until all that liquid has evaporated and they’ve achieved a nice brown color, that water will leach out into your custard during baking. Always cook your mushrooms until they are dry and golden!
Can I make this tart ahead of time?
You absolutely can! It’s a fantastic make-ahead dish. You can blind bake the crust and prepare the mushroom filling and blanched green beans up to 24 hours in advance. Store them separately in the fridge. When you’re ready, let the components come to room temperature for about 20 minutes, then assemble and bake as directed. You may need to add a few extra minutes to the baking time if the filling is cold.
Cheesy Green Bean & Mushroom Tart
Description
Cheesy Green Bean & Mushroom Tart
Ingredients:
-
1 sheet puff pastry (thawed if frozen)
-
1 tbsp olive oil
-
1 tbsp butter
-
8 oz mushrooms, sliced (cremini or button work well)
-
1 small onion or 2 shallots, thinly sliced
-
2 cups green beans, trimmed and blanched (about 3 minutes in salted boiling water, then cooled)
-
2 cloves garlic, minced
-
½ cup heavy cream (or crème fraîche)
-
1 cup shredded cheese (Gruyère, Fontina, or Mozzarella for melty richness)
-
½ cup Parmesan, grated
-
1 tsp fresh thyme leaves (or ½ tsp dried)
-
Salt and black pepper, to taste
-
1 egg, beaten (for egg wash)
Instructions:
-
Preheat oven: Set to 400°F (200°C). Line a baking sheet with parchment paper.
-
Prepare puff pastry: Roll puff pastry slightly larger to fit your baking sheet. Place it on the parchment. Score a 1-inch border around the edges with a sharp knife (don’t cut all the way through). Prick the center with a fork to prevent puffing. Brush the border with egg wash. Bake for 10 minutes until lightly golden, then set aside.
-
Cook mushrooms & onions: In a skillet, heat olive oil and butter over medium heat. Add onions and mushrooms. Cook until golden and softened, about 6–8 minutes. Add garlic, thyme, salt, and pepper. Cook another minute.
-
Make the creamy base: Reduce heat slightly, stir in cream and half of the shredded cheese. Cook until slightly thickened, about 2–3 minutes.
-
Assemble tart: Spread the mushroom mixture evenly inside the pre-baked puff pastry border. Arrange the blanched green beans neatly on top (either lined up or slightly fanned out). Sprinkle remaining shredded cheese and Parmesan over the top.
-
Bake: Return to oven for 15–20 minutes, until pastry is golden and cheese is melted and bubbling.
-
Serve: Let rest 5 minutes before slicing. Serve warm as a side dish or with a salad for a complete meal.