
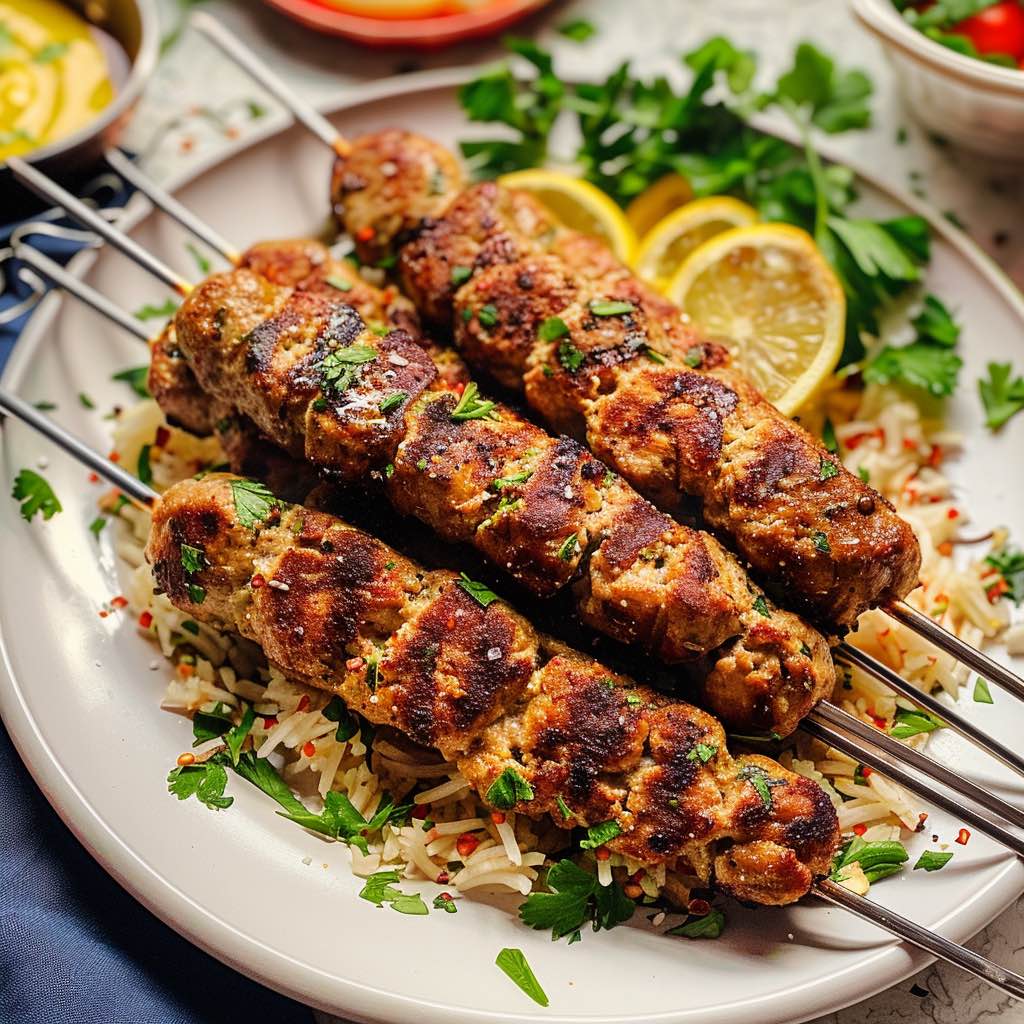
Chicken Kofta Kebabs: The Ultimate Guide to Perfectly Spiced Middle Eastern Skewers
Introduction to Chicken Kofta Kebabs
Chicken kofta kebabs bring the vibrant flavors of Middle Eastern cuisine right to your dinner table. These juicy, aromatic skewers combine ground chicken with fragrant spices to create a meal that’s both satisfying and surprisingly easy to prepare. Whether you’re firing up the grill for a summer barbecue or cooking indoors year-round, chicken kofta kebabs deliver restaurant-quality results every time.
The beauty of chicken kofta kebabs lies in their versatility. Furthermore, they work perfectly as a main course, appetizer, or even as part of a mezze spread. Additionally, these kebabs are naturally lighter than traditional beef kofta while still packing incredible flavor. Therefore, they’ve become increasingly popular among health-conscious food lovers worldwide.
In this comprehensive guide, you’ll discover everything needed to master chicken kofta kebabs. From selecting the right ingredients to achieving that perfect char, we’ll walk through each step in detail. Moreover, you’ll learn professional techniques that ensure juicy, tender results every single time.
What Makes Chicken Kofta Kebabs Special
The Origin Story
Chicken kofta kebabs trace their roots back to ancient Middle Eastern and South Asian cuisines. Indeed, the word “kofta” comes from Persian, meaning “pounded meat.” Traditionally, cooks would pound meat with spices to create smooth, uniform mixtures. Consequently, this technique spread throughout the region, with each culture adding unique twists.
Over centuries, the recipe evolved significantly. However, the core concept remained consistent: finely ground meat mixed with aromatic spices and herbs. Today, chicken kofta kebabs represent a modern adaptation that maintains authentic flavors while offering a lighter protein option.
Texture and Flavor Profile
The texture of chicken kofta kebabs sets them apart from other grilled meats. Specifically, the ground chicken creates a tender, almost creamy interior. Meanwhile, the exterior develops a beautiful caramelized crust when properly cooked. This contrast makes every bite incredibly satisfying.
Flavor-wise, these kebabs showcase a complex blend of warm spices. Cumin, coriander, and paprika provide earthiness. Fresh herbs like cilantro and parsley add brightness. Additionally, garlic and onion create depth. Together, these elements produce a taste profile that’s bold yet balanced.
Nutritional Benefits
Chicken kofta kebabs offer several nutritional advantages. First, chicken provides lean protein without excessive fat. Second, the spices contain antioxidants and anti-inflammatory compounds. Third, when served with vegetables, these kebabs become part of a well-rounded meal.
A typical serving delivers approximately 25-30 grams of protein. Moreover, using chicken breast keeps the fat content moderate. Therefore, these kebabs fit easily into various dietary plans, including low-carb and Mediterranean-style diets.
Essential Ingredients for Authentic Flavor
The Protein Base
Ground chicken forms the foundation of these kebabs. Ideally, use a mixture of ground chicken breast and thigh meat. This combination provides the best texture and flavor balance. Specifically, thigh meat adds moisture and richness, while breast meat keeps things lean.
When purchasing ground chicken, look for packages labeled 85-90% lean. Furthermore, ensure the meat appears fresh with a pink color and no off odors. If possible, ask your butcher to grind chicken specifically for kofta. This ensures the right consistency.
Aromatic Spice Blend
The spice mixture defines the character of chicken kofta kebabs. Here’s what you’ll need:
-
Cumin: Provides earthy, warm notes
-
Coriander: Adds citrusy, slightly sweet flavor
-
Paprika: Contributes mild heat and color
-
Cinnamon: Offers subtle sweetness and warmth
-
Black pepper: Delivers sharp, pungent heat
-
Cayenne pepper: Optional for extra spiciness
Each spice plays a crucial role. Therefore, don’t skip any unless you have dietary restrictions. Additionally, use freshly ground spices when possible for maximum flavor impact.
Fresh Herbs and Aromatics
Fresh ingredients brighten the meat mixture significantly. Include these essential components:
-
Cilantro: Adds fresh, citrusy notes
-
Parsley: Provides clean, herbal flavor
-
Garlic: Creates pungent depth
-
Onion: Builds savory foundation
-
Fresh ginger: Optional but adds zing
Chop herbs finely to distribute flavor evenly. Similarly, mince garlic and onion into tiny pieces. This ensures they blend seamlessly into the meat mixture.
Binding Agents
Several ingredients help bind the mixture together:
Breadcrumbs: Absorb excess moisture while providing structure. Use plain, unseasoned breadcrumbs or make your own from day-old bread. Alternatively, substitute with panko for a lighter texture.
Egg: Acts as a natural binder. One large egg typically suffices for every pound of meat. Moreover, it helps proteins stick together during cooking.
Yogurt: Plain Greek yogurt adds moisture and tang. Additionally, it tenderizes the chicken naturally. Use about 2-3 tablespoons per pound of meat.
Finishing Touches
Don’t forget these final ingredients:
-
Salt: Essential for flavor development
-
Lemon juice: Brightens overall taste
-
Olive oil: Prevents sticking and adds richness
Each element contributes to the final product. Therefore, measure carefully for consistent results.
Step-by-Step Recipe Instructions
Preparation Phase
Step 1: Gather Your Ingredients
Start by assembling everything you’ll need. Consequently, this makes the process smoother. Measure out:
-
2 pounds ground chicken
-
1 medium onion, finely minced
-
4 garlic cloves, minced
-
1/2 cup fresh cilantro, chopped
-
1/4 cup fresh parsley, chopped
-
1/2 cup breadcrumbs
-
1 large egg
-
3 tablespoons plain Greek yogurt
-
2 teaspoons ground cumin
-
2 teaspoons ground coriander
-
1 teaspoon paprika
-
1/2 teaspoon cinnamon
-
1/2 teaspoon black pepper
-
1/4 teaspoon cayenne (optional)
-
1 1/2 teaspoons salt
-
2 tablespoons lemon juice
-
2 tablespoons olive oil
Step 2: Prep Your Aromatics
Mince the onion very finely. Indeed, large chunks prevent proper binding. Similarly, mince garlic until nearly paste-like. Chop herbs finely but not into mush. Therefore, aim for pieces about the size of rice grains.
Step 3: Mix the Spice Blend
Combine all dry spices in a small bowl. This ensures even distribution throughout the meat. Additionally, pre-mixing prevents clumping. Set aside until needed.
Mixing the Kofta
Step 4: Combine Wet Ingredients
In a large bowl, whisk together egg, yogurt, lemon juice, and olive oil. This creates a uniform base. Furthermore, it helps distribute moisture evenly throughout the mixture.
Step 5: Add Aromatics
Add minced onion, garlic, cilantro, and parsley to the wet ingredients. Mix thoroughly to combine. Consequently, every bite will contain these flavorful elements.
Step 6: Incorporate Ground Chicken
Add ground chicken to the bowl. Sprinkle the spice blend over the top. Additionally, add breadcrumbs and salt at this stage.
Step 7: Mix Thoroughly
Using clean hands, mix everything together gently but thoroughly. Work the mixture for about 2-3 minutes. However, avoid overmixing, which can make the kebabs tough. The mixture should feel cohesive and slightly sticky.
Step 8: Rest the Mixture
Cover the bowl with plastic wrap. Refrigerate for at least 30 minutes. This resting period allows flavors to meld. Moreover, chilled meat shapes more easily.
Shaping the Kebabs
Step 9: Prepare Skewers
If using wooden skewers, soak them in water for 30 minutes beforehand. This prevents burning during cooking. Alternatively, metal skewers work great and require no soaking.
Step 10: Form the Kebabs
Remove the mixture from the refrigerator. Wet your hands with cold water to prevent sticking. Take about 1/3 cup of mixture and shape it around a skewer. Form a long, oval shape about 4-5 inches in length. Press firmly to ensure the meat adheres to the skewer.
Continue until all mixture is used. You should get approximately 10-12 kebabs. Place formed kebabs on a baking sheet lined with parchment paper.
Step 11: Final Chill
Refrigerate shaped kebabs for another 15-20 minutes. This helps them hold together during cooking. Subsequently, you’ll experience fewer instances of meat falling off skewers.
Cooking Methods Explained
Grilling Method
Grilling creates the most authentic chicken kofta kebabs. Indeed, the smoky char adds incredible flavor.
Step 1: Preheat the Grill
Heat your grill to medium-high (about 375-400°F). Oil the grates generously to prevent sticking. Therefore, use a paper towel dipped in oil and tongs to coat the grates thoroughly.
Step 2: Place Kebabs on Grill
Arrange chicken kofta kebabs on the grill, leaving space between each. Close the lid. Cook for 4-5 minutes without moving them. This allows a crust to form.
Step 3: Rotate and Continue Cooking
Carefully rotate kebabs a quarter turn. Cook for another 3-4 minutes. Repeat until all sides are evenly browned. Total cooking time should be 12-15 minutes.
Step 4: Check Internal Temperature
Use a meat thermometer to verify doneness. Chicken kofta kebabs should reach 165°F internally. Additionally, juices should run clear when pierced.
Step 5: Rest Before Serving
Remove kebabs from the grill. Let them rest for 5 minutes. Consequently, juices redistribute throughout the meat, ensuring maximum moisture.
Oven-Baking Method
Baking works excellently when outdoor grilling isn’t possible. Furthermore, it provides consistent results year-round.
Step 1: Preheat Oven
Heat oven to 400°F. Line a baking sheet with parchment paper. Additionally, lightly oil the parchment to prevent sticking.
Step 2: Arrange Kebabs
Place chicken kofta kebabs on the prepared sheet. Space them about an inch apart. Lightly brush each kebab with olive oil.
Step 3: Bake
Cook for 10 minutes. Then, carefully flip each kebab. Bake for another 10-12 minutes until golden brown and cooked through.
Step 4: Optional Broiling
For extra char, finish under the broiler. Turn broiler to high. Broil kebabs for 2-3 minutes, watching carefully to prevent burning.
Stovetop Method
A grill pan or cast-iron skillet replicates grilling indoors. Moreover, this method offers excellent control over heat.
Step 1: Heat Your Pan
Place a grill pan or cast-iron skillet over medium-high heat. Let it heat for 3-4 minutes. Add 1-2 tablespoons of oil.
Step 2: Cook Kebabs
Carefully place kebabs in the hot pan. Don’t overcrowd. Cook 3-4 kebabs at a time for best results. Sear for 3-4 minutes per side.
Step 3: Reduce Heat if Needed
If kebabs brown too quickly, reduce heat to medium. Continue cooking, turning occasionally, until done. Total time should be about 12-15 minutes.
Step 4: Drain Excess Fat
Transfer cooked kebabs to a paper towel-lined plate. This removes excess oil. Subsequently, serve immediately for best texture.
Serving Suggestions and Sides
Traditional Accompaniments
Chicken kofta kebabs pair beautifully with classic Middle Eastern sides. Consider these authentic options:
Flatbreads: Warm pita, naan, or lavash bread complement the kebabs perfectly. Additionally, they’re ideal for scooping up sauces and vegetables.
Rice Dishes: Serve over fluffy basmati rice or aromatic saffron rice. Furthermore, rice pilaf with herbs and nuts adds elegance to the meal.
Salads: A fresh cucumber and tomato salad provides cool contrast. Similarly, fattoush salad with crispy pita chips offers textural variety.
Sauce Pairings
The right sauce elevates chicken kofta kebabs significantly. Try these options:
Tahini Sauce: Creamy, nutty tahini mixed with lemon juice and garlic creates a classic pairing. Thin with water to desired consistency.
Yogurt-Based Sauces: Plain Greek yogurt mixed with cucumber, mint, and garlic makes refreshing tzatziki. Alternatively, add herbs for a simple yogurt sauce.
Hummus: Smooth chickpea hummus provides protein-rich accompaniment. Moreover, its creamy texture complements the kebabs beautifully.
Harissa: For heat lovers, spicy harissa paste adds fiery kick. Use sparingly or serve on the side.
Complete Meal Ideas
Build complete, balanced meals around your chicken kofta kebabs:
Mediterranean Plate: Serve kebabs with hummus, tabbouleh, baba ganoush, and warm pita. Add olives and pickled vegetables for authentic touch.
Bowl Format: Create a grain bowl with quinoa or bulgur as base. Top with chicken kofta kebabs, roasted vegetables, and your choice of sauce.
Wrap or Sandwich: Slice kebabs and stuff them into pita pockets. Add lettuce, tomatoes, cucumbers, and sauce. This makes a perfect handheld meal.
Family-Style Feast: Arrange kebabs on a large platter. Surround with various sides, sauces, and breads. Let everyone build their own plates. This encourages sharing and conversation.
Pro Tips for Perfect Kofta
Ingredient Selection Tips
Quality ingredients make a significant difference. Therefore, follow these guidelines:
Choose Fresh Ground Chicken: Purchase ground chicken with a recent packaging date. Alternatively, grind your own using a food processor. Fresh meat binds better and tastes superior.
Use Fresh Spices: Spices lose potency over time. Replace ground spices every 6-12 months. Consequently, your kebabs will have more vibrant flavor.
Don’t Skip the Yogurt: Greek yogurt tenderizes chicken naturally. Moreover, it adds moisture without excess fat. Never omit this ingredient.
Mixing Techniques
Proper mixing ensures tender, well-bound kebabs:
Avoid Overmixing: Mix just until ingredients combine. Overworked meat becomes tough and dense. Therefore, stop as soon as everything looks uniform.
Keep Everything Cold: Cold meat holds together better. Additionally, it’s easier to shape. Work quickly and return mixture to refrigerator between batches if needed.
Test for Seasoning: Before shaping all kebabs, cook a small patty. Taste and adjust seasonings if necessary. This prevents disappointment later.
Shaping Secrets
These techniques ensure kebabs stay on skewers:
Pack Firmly: Press meat firmly around skewers. Loose packing leads to kebabs falling apart. However, don’t compress so hard that meat becomes dense.
Wet Your Hands: Keep a bowl of cold water nearby. Dip hands frequently to prevent sticking. This makes shaping much easier.
Smooth the Surface: Run wet fingers along each kebab to smooth out cracks. Smooth surfaces cook more evenly. Additionally, they look more appealing.
Chill Before Cooking: Always refrigerate shaped kebabs before cooking. This crucial step firms up the meat. Subsequently, kebabs hold together much better during cooking.
Cooking Tips
Master these techniques for perfect results:
Don’t Rush the Heat: Let your grill, oven, or pan heat thoroughly. Consequently, kebabs develop better crust and are less likely to stick.
Oil Generously: Chicken is lean and can stick easily. Use plenty of oil on cooking surfaces. Additionally, brush kebabs lightly with oil before cooking.
Resist Flipping Too Soon: Let kebabs cook undisturbed until they release naturally. Trying to flip too early causes sticking and tearing.
Use a Thermometer: Don’t guess about doneness. A meat thermometer ensures food safety. Moreover, it prevents overcooking and dry meat.
Popular Variations
Spice Level Variations
Adjust heat levels to suit different preferences:
Mild Version: Omit cayenne pepper entirely. Use sweet paprika instead of hot paprika. This creates family-friendly kebabs that kids will love.
Medium Heat: Follow the standard recipe as written. The result offers gentle warmth without overwhelming spice.
Spicy Version: Double the cayenne pepper. Additionally, add red pepper flakes or diced jalapeños to the mixture. Serve with cooling yogurt sauce to balance heat.
Herb Combinations
Different herbs create unique flavor profiles:
Classic Middle Eastern: Use equal parts cilantro and parsley as the base recipe suggests. This combination is authentic and balanced.
Mediterranean Style: Replace cilantro with additional parsley. Add fresh dill and mint. This creates a Greek-inspired version.
Indian-Inspired: Use only cilantro for herbs. Additionally, increase ginger and add garam masala to the spice blend. This variation resembles seekh kebab.
Add-In Options
Incorporate these ingredients for variety:
Vegetables: Finely grated zucchini or carrots add moisture and nutrients. Squeeze out excess liquid before adding. Aim for no more than 1/2 cup per pound of meat.
Cheese: Crumbled feta cheese creates pockets of creamy tang. Use sparingly, about 1/4 cup per pound of chicken.
Nuts: Finely chopped pistachios or pine nuts add crunch. Toast them first for maximum flavor. Use 2-3 tablespoons per batch.
Alternative Proteins
Apply this recipe to other proteins:
Turkey: Substitute ground turkey for a similar lean option. The cooking method remains identical.
Mixed Poultry: Combine ground chicken and turkey for interesting flavor. Use equal parts of each.
Lamb: Traditional kofta often uses lamb. Mix ground lamb with chicken for richer flavor. However, this increases fat content significantly.
Nutritional Information
Basic Nutrition Facts
Per serving (2 kebabs):
-
Calories: 280-320
-
Protein: 28-32g
-
Fat: 14-16g
-
Carbohydrates: 8-10g
-
Fiber: 1-2g
-
Sodium: 450-550mg
These numbers vary based on specific ingredients used. Furthermore, cooking method affects final calorie count. Grilling produces the leanest results.
Health Benefits
Chicken kofta kebabs offer several nutritional advantages:
High Protein Content: Each serving provides substantial protein. This supports muscle maintenance and satiety. Moreover, protein helps stabilize blood sugar levels.
Moderate Calorie Count: Compared to beef or lamb kofta, chicken versions contain fewer calories. Therefore, they fit well into weight management plans.
Rich in Vitamins: Chicken provides B vitamins, especially B6 and niacin. Additionally, garlic and onions contribute vitamins C and B6.
Mineral Content: These kebabs contain iron, zinc, and selenium. Cumin and other spices add extra minerals. Furthermore, yogurt contributes calcium.
Dietary Considerations
Chicken kofta kebabs accommodate various diets:
Low-Carb/Keto: Skip breadcrumbs or use almond flour instead. Serve with vegetables rather than rice or bread. This keeps carbs minimal.
Gluten-Free: Simply use gluten-free breadcrumbs. Alternatively, substitute with ground oats or omit entirely. The recipe works perfectly either way.
Dairy-Free: Replace yogurt with coconut yogurt or additional olive oil. The kebabs will still be delicious and moist.
Paleo: Omit breadcrumbs entirely. Add an extra egg to help with binding. Use only whole-food ingredients.
Making It Lighter
Reduce calories with these modifications:
Use All Breast Meat: Ground chicken breast contains less fat. However, add extra yogurt to maintain moisture.
Reduce Oil: Cut added oil by half. Spray cooking surfaces instead of brushing with oil.
Increase Vegetables: Add more grated vegetables to the mixture. This increases volume while decreasing calorie density.
Serve with Vegetables: Skip rice and bread. Instead, serve over a large salad or with roasted vegetables only.
Storage and Reheating Guide
Refrigerator Storage
Properly stored chicken kofta kebabs last several days:
Cool Completely: Let kebabs reach room temperature before storing. However, don’t leave them out longer than 2 hours.
Use Airtight Containers: Place kebabs in containers with tight-fitting lids. Alternatively, wrap tightly in aluminum foil or plastic wrap.
Layer with Parchment: If stacking kebabs, separate layers with parchment paper. This prevents them from sticking together.
Storage Duration: Refrigerated kebabs stay fresh for 3-4 days. Mark containers with the date to track freshness.
Freezer Storage
Freeze kebabs for longer storage:
Flash Freeze First: Arrange cooked kebabs on a baking sheet. Freeze until solid (about 2 hours). This prevents them from sticking together.
Package Properly: Transfer frozen kebabs to freezer bags or containers. Remove as much air as possible. This prevents freezer burn.
Label Clearly: Write the date and contents on each package. Frozen kebabs maintain quality for 2-3 months.
Freeze Uncooked: Alternatively, freeze shaped, uncooked kebabs. Wrap individually in plastic wrap. Store in freezer bags. Cook from frozen, adding a few extra minutes.
Reheating Methods
Restore chicken kofta kebabs to their original glory:
Oven Method: Preheat oven to 350°F. Arrange kebabs on a baking sheet. Cover loosely with foil to prevent drying. Heat for 10-15 minutes until warmed through.
Microwave Method: Place kebabs on a microwave-safe plate. Cover with a damp paper towel. Heat in 30-second intervals until hot. However, this method may affect texture.
Stovetop Method: Heat a skillet over medium heat. Add a small amount of oil or water. Place kebabs in the pan. Cover and heat, turning occasionally, for 5-7 minutes.
Air Fryer Method: Preheat air fryer to 350°F. Arrange kebabs in a single layer. Heat for 5-7 minutes. This method restores the exterior crisp beautifully.
Meal Prep Strategies
Make chicken kofta kebabs part of your weekly routine:
Batch Cooking: Double or triple the recipe. Cook all kebabs at once. Store portioned servings for quick meals throughout the week.
Prep Components Separately: Mix the kofta mixture but don’t shape. Store in the refrigerator for up to 24 hours. Shape and cook as needed for freshest results.
Marinated Components: Prepare double batches of spice blends. Store in airtight containers. This speeds up future preparations significantly.
Build Bowl Kits: Portion cooked kebabs with grain, vegetables, and sauce into individual containers. Grab and go for convenient lunches. Check out our guide on [meal prep bowls] for more ideas.
Frequently Asked Questions
Can I make chicken kofta kebabs without skewers?
Absolutely! Shape the mixture into oval patties instead. Cook them directly on the grill or in a pan. These are often called kofta patties. They taste identical to skewered versions. However, they’re easier to flip and serve.
Why do my chicken kofta kebabs fall apart?
Several factors cause this issue. First, the mixture might be too wet. Add more breadcrumbs to absorb excess moisture. Second, insufficient mixing prevents proper binding. Work the mixture thoroughly for 2-3 minutes. Third, skipping the chilling step weakens structure. Always refrigerate shaped kebabs before cooking. Finally, flipping too early causes breakage. Let kebabs cook undisturbed until they release naturally.
Can I make the mixture ahead of time?
Yes, advance preparation works well. Mix all ingredients and refrigerate for up to 24 hours. In fact, this resting period enhances flavor development. The spices have more time to permeate the meat. Just shape and cook when ready to serve. For longer storage, freeze the mixture in portioned bags. Thaw overnight in the refrigerator before using.
What’s the best type of skewer to use?
Both metal and wooden skewers work well. Metal skewers conduct heat, cooking meat from the inside out. They’re reusable and environmentally friendly. Additionally, flat metal skewers prevent spinning. Wooden skewers require soaking but are disposable. They’re ideal for large gatherings. Bamboo skewers are affordable and work similarly. Choose based on your cooking method and personal preference.
How do I prevent the meat from spinning on the skewer?
Use flat-sided metal skewers instead of round ones. The flat surface provides grip. Alternatively, use two parallel skewers per kebab. Thread the meat onto both simultaneously. This technique is especially helpful for round wooden skewers. Additionally, pack the meat very firmly. Press it onto the skewer with significant pressure.
Can I grill these kebabs on a charcoal grill?
Definitely! Charcoal grilling adds wonderful smoky flavor. Set up a two-zone fire with coals on one side. Start kebabs over direct heat for 2-3 minutes per side. Then move to indirect heat to finish cooking. This prevents burning while ensuring thorough cooking. Total time remains about 12-15 minutes. Monitor carefully as charcoal creates higher heat than gas.
What can I substitute for breadcrumbs?
Several alternatives work well. Ground oats provide similar binding. Pulse regular oats in a food processor until fine. Almond flour creates a low-carb option. Crushed crackers or cornflakes also work. For a gluten-free version, use certified gluten-free breadcrumbs. Alternatively, simply add an extra egg and omit breadcrumbs entirely. The kebabs will be slightly softer but still delicious.
How do I know when chicken kofta kebabs are done?
Use a meat thermometer for accuracy. Insert it into the thickest part of a kebab. The internal temperature should reach 165°F. Additionally, juices should run clear when pierced. The exterior should be golden brown with slight charring. Cut into one kebab to check. The meat should be uniformly white with no pink areas. Cooking time typically ranges from 12-15 minutes depending on thickness.
Conclusion
Chicken kofta kebabs represent the perfect intersection of flavor, nutrition, and ease of preparation. These aromatic skewers bring authentic Middle Eastern taste to any table while remaining accessible to home cooks of all skill levels. Throughout this guide, you’ve learned everything needed to create restaurant-quality chicken kofta kebabs in your own kitchen.
From selecting the freshest ingredients to mastering multiple cooking methods, each step contributes to the final result. The blend of warm spices, fresh herbs, and tender chicken creates an irresistible combination. Moreover, the versatility of this dish means it works equally well for casual weeknight dinners and special occasions.
Remember the key points: mix gently but thoroughly, chill the mixture properly, and don’t rush the cooking process. These simple principles guarantee success every time. Additionally, don’t hesitate to experiment with the variations suggested above. Make the recipe your own by adjusting spices, herbs, and accompaniments to suit your preferences.
Whether grilled outdoors, baked in the oven, or cooked on the stovetop, chicken kofta kebabs deliver consistently delicious results. Their impressive presentation belies their straightforward preparation. Furthermore, they’re endlessly adaptable to different dietary needs and flavor preferences.
Chicken Kofta Kebabs
Description
Chicken Kofta Kebabs
Ingredients:
-
1 lb (450g) ground chicken
-
1 small onion, finely grated or minced
-
2 cloves garlic, minced
-
2 tablespoons fresh parsley, chopped
-
2 tablespoons fresh cilantro, chopped
-
1 teaspoon ground cumin
-
1 teaspoon ground coriander
-
½ teaspoon paprika
-
¼ teaspoon ground cinnamon (optional, adds warmth)
-
½ teaspoon salt
-
¼ teaspoon black pepper
-
1 tablespoon olive oil (for brushing)
-
Skewers (wooden or metal; soak wooden skewers 30 minutes if using)
Optional Dipping Sauce:
-
Yogurt with a squeeze of lemon, garlic, and chopped mint or cilantro
Instructions:
-
Prepare the Mixture
-
In a large bowl, combine ground chicken, onion, garlic, parsley, cilantro, cumin, coriander, paprika, cinnamon, salt, and pepper.
-
Mix gently until well combined, being careful not to overwork the meat.
-
-
Form the Kebabs
-
Divide the mixture into 6–8 portions.
-
Mold each portion around a skewer into a long oval or sausage shape, pressing firmly to adhere.
-
-
Cook the Kebabs
-
Grill: Preheat grill to medium-high. Brush kebabs with olive oil. Grill 4–5 minutes per side until fully cooked and lightly charred.
-
Oven/Broiler: Preheat oven to 400°F (200°C). Place kebabs on a foil-lined baking sheet, brush with olive oil, and bake 15–20 minutes, turning halfway, until cooked through.
-
Air Fryer: Cook at 375°F (190°C) for 12–15 minutes, turning halfway.
-
-
Serve
-
Serve hot with warm pita, rice, or salad.
-
Drizzle with yogurt sauce or tahini if desired.
-