
Instant Pot Carnitas: The Ultimate Guide to Tender, Crispy Mexican Pulled Pork
Introduction
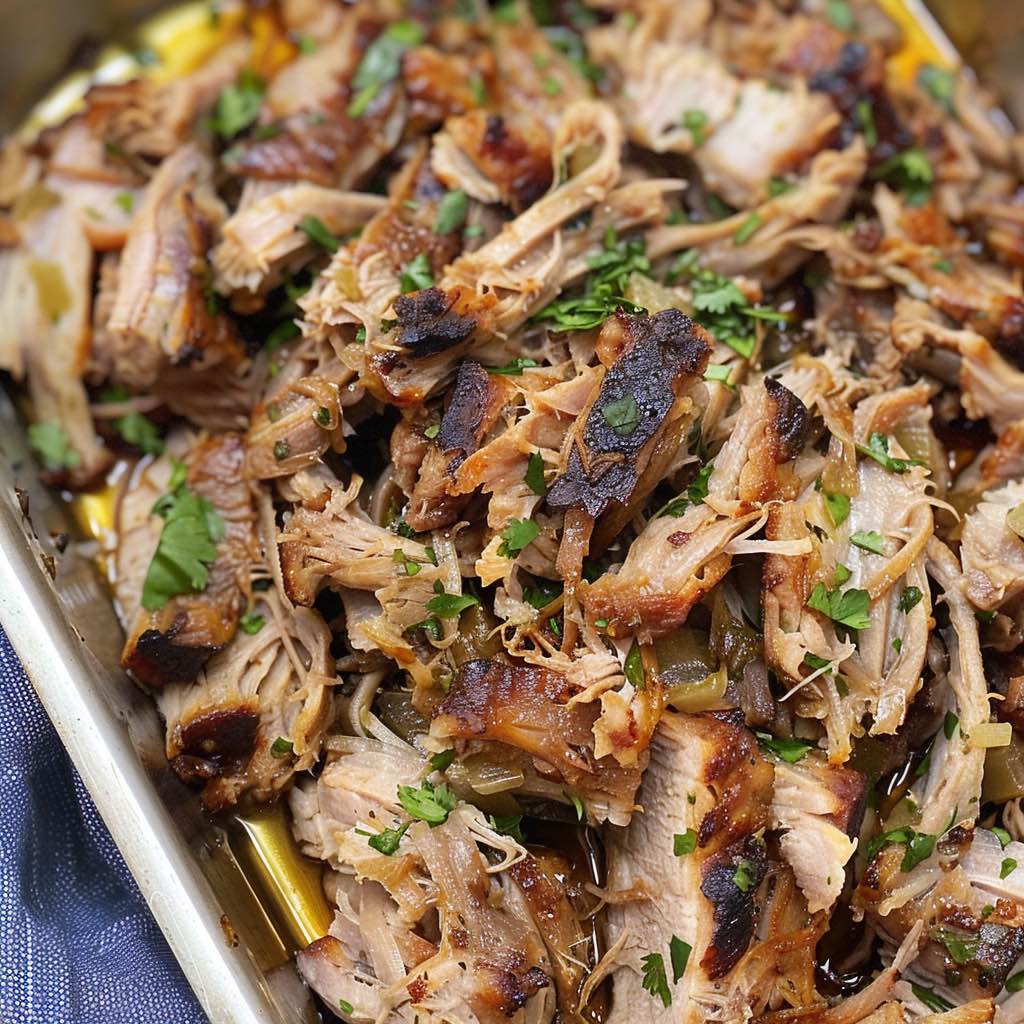
Instant Pot carnitas transform traditional Mexican pulled pork into a weeknight-friendly masterpiece. This beloved dish features melt-in-your-mouth tender pork with irresistibly crispy edges. Moreover, using a pressure cooker cuts cooking time from hours to under one hour without sacrificing flavor. The result is succulent, richly spiced meat perfect for tacos, burritos, nachos, and countless other dishes.
What Are Carnitas?
Carnitas literally translate to “little meats” in Spanish. This traditional Mexican dish originated in the state of Michoacán. Traditionally, cooks slowly simmer pork pieces in lard until incredibly tender. The meat develops a deep, rich flavor and golden-brown exterior. Additionally, authentic carnitas balance tender, juicy interiors with crispy, caramelized edges.
The traditional cooking method involves a confit-style preparation. However, modern adaptations make this dish more accessible for home cooks. Furthermore, pressure cooking maintains authentic flavor while dramatically reducing preparation time.
Why Use an Instant Pot for Carnitas?
The Instant Pot revolutionizes carnitas preparation in several important ways. First, pressure cooking reduces cooking time by 60-70% compared to traditional methods. Second, the sealed environment locks in moisture and intensifies flavors. Third, less active cooking time means more freedom for other meal preparations.
Additionally, the Instant Pot’s sauté function allows browning meat directly in the pot. This creates a flavorful crust before pressure cooking. Consequently, fewer dishes and simpler cleanup make weeknight carnitas entirely achievable.
Temperature consistency represents another significant advantage. The pressure cooker maintains steady heat throughout cooking. Therefore, results become more predictable and reliable than stovetop methods.
Essential Ingredients for Instant Pot Carnitas
Core Ingredients
The foundation of excellent Instant Pot carnitas requires surprisingly few components. Quality pork shoulder forms the base. Fresh citrus juices provide brightness and help tenderize meat. Moreover, aromatic spices create depth and complexity.
Salt and pepper season the meat thoroughly. Garlic cloves add pungent, savory notes. Orange juice contributes natural sweetness and acidity. Lime juice brightens the overall flavor profile.
Spice Blend Components
Cumin provides earthy, warming tones characteristic of Mexican cuisine. Dried oregano, particularly Mexican oregano, adds herbal complexity. Bay leaves contribute subtle background flavor. Furthermore, black pepper adds gentle heat without overwhelming other flavors.
Chili powder or chipotle paste introduces smoky depth. Ground coriander complements cumin beautifully. Additionally, some recipes include cinnamon for subtle warmth. Brown sugar or piloncillo balances savory elements.
Aromatic Vegetables
Onions add sweetness and depth to the cooking liquid. Jalapeños contribute mild heat and green, fresh notes. Orange zest intensifies citrus flavor. These aromatics infuse the meat during pressure cooking.
Choosing the Right Pork Cut
Why Pork Shoulder Works Best
Pork shoulder, also called pork butt or Boston butt, delivers optimal results. This cut contains ample marbling throughout. Therefore, the fat renders during cooking, keeping meat incredibly moist. Additionally, tough connective tissue breaks down under pressure, creating fork-tender texture.
Boneless pork shoulder simplifies preparation and eating. However, bone-in versions add extra flavor to the cooking liquid. Either option works well for Instant Pot carnitas.
Cuts to Avoid
Pork loin proves too lean for traditional carnitas. This cut dries out during extended cooking. Similarly, pork tenderloin lacks the necessary fat content. Consequently, these cuts produce disappointing, stringy results rather than succulent pulled pork.
Selecting Quality Pork
Look for pork shoulder with visible fat marbling throughout. The meat should appear pink to deep rose in color. Fresh pork has minimal odor. Additionally, ask your butcher to cut the roast into manageable chunks if desired.
Plan for approximately 3-5 pounds of pork shoulder for standard recipes. This amount feeds 6-8 people generously. Moreover, carnitas reheat beautifully, making larger batches worthwhile.
Step-by-Step Instant Pot Carnitas Recipe
Preparation Phase
Begin by cutting pork shoulder into 2-inch cubes. Uniform sizing ensures even cooking. Pat the meat dry with paper towels. Moisture on the surface prevents proper browning.
Combine spices in a small bowl. This creates an even seasoning blend. Generously season all pork pieces with the spice mixture. Additionally, massage seasonings into the meat for maximum flavor penetration.
Browning the Meat
Set the Instant Pot to sauté mode on high. Add oil to coat the bottom of the pot. Wait until the oil shimmers and begins to smoke slightly. This indicates proper temperature for browning.
Working in batches prevents overcrowding. Overcrowding creates steam instead of browning. Cook pork pieces approximately 1-2 minutes per side. Deep golden-brown crust indicates proper browning.
Transfer browned pieces to a plate. Repeat with remaining pork chunks. However, don’t skip this step despite temptation. Browning creates essential flavor compounds through the Maillard reaction.
Building the Braising Liquid
Return all browned pork to the Instant Pot. Add orange juice, lime juice, and aromatics. Pour in broth or water to partially cover the meat. The liquid should reach about halfway up the pork pieces.
Add bay leaves, garlic cloves, and sliced jalapeños. Gently stir to distribute ingredients evenly. Nevertheless, avoid disturbing the spice coating too much.
Pressure Cooking Process
Secure the Instant Pot lid and set the valve to sealing. Select manual or pressure cook mode on high. Set the timer for 45 minutes. This duration ensures tender, shreddable meat.
When cooking completes, allow natural pressure release. This takes approximately 10-15 minutes. Natural release prevents meat from toughening. Additionally, it allows flavors to continue developing.
Achieving Perfectly Crispy Carnitas
Shredding the Meat
Remove tender pork from the Instant Pot using a slotted spoon. Transfer pieces to a large cutting board or baking sheet. Let the meat cool slightly for easier handling. Then, shred into bite-sized pieces using two forks.
Alternatively, simply pull the meat apart by hand. The pork should fall apart with minimal effort. Additionally, taste and adjust seasoning if needed.
Oven Crisping Method
Preheat your oven broiler to high. Spread shredded carnitas on a large baking sheet in a single layer. Drizzle some reserved cooking liquid over the meat. This adds moisture and prevents drying during crisping.
Place the baking sheet 4-6 inches from the broiler element. Broil for 5-7 minutes until edges turn golden and crispy. Watch carefully to prevent burning. Furthermore, stir once halfway through for even crisping.
Stovetop Crisping Method
Heat a large skillet over high heat. Add a small amount of oil or reserved pork fat. Working in batches, add shredded meat in a single layer. Press down gently with a spatula.
Cook undisturbed for 3-4 minutes until the bottom crisps. Flip and repeat on the other side. However, avoid over-crisping, which can dry out the meat. The goal is crispy edges while maintaining juicy interiors.
Flavor Variations and Customizations
Spice Profile Adjustments
Increase chipotle peppers for smokier, spicier carnitas. Add extra cumin for earthier depth. Include cinnamon sticks for subtle sweetness. Moreover, experiment with different dried chiles for unique heat profiles.
Reduce spices for milder versions suitable for children. Alternatively, add hot sauce during shredding for customizable heat levels. Each family member can adjust spiciness to personal preference.
Citrus Variations
Replace orange juice with pineapple juice for tropical sweetness. Add grapefruit juice for complex, slightly bitter notes. Increase lime juice for brighter, tangier results. Furthermore, fresh orange zest intensifies citrus flavor without extra liquid.
Aromatic Enhancements
Include whole cumin seeds for more pronounced flavor. Add Mexican cinnamon (canela) for authentic taste. Incorporate fresh cilantro stems during cooking. Additionally, whole peppercorns provide subtle heat.
Experiment with different onion varieties. White onions offer sharp bite. Yellow onions contribute sweetness. Red onions add color and mild flavor.
Nutritional Information
Calorie and Macronutrient Breakdown
One cup of carnitas contains approximately 380-476 calories. Protein content ranges from 47-48 grams per cup. Fat content typically measures 28-29 grams per serving. Importantly, carnitas contain virtually zero carbohydrates.
A standard 4-ounce serving provides about 227 calories. This serving size offers 29 grams of protein. Fat content in this portion equals approximately 12 grams. Therefore, carnitas represent an excellent protein source for low-carb diets.
Vitamin and Mineral Content
Carnitas provide significant iron, contributing to healthy red blood cell production. Potassium content supports proper muscle and nerve function. Additionally, pork supplies B vitamins essential for energy metabolism.
Vitamin A content can be substantial depending on preparation. Calcium and other minerals vary based on ingredients used. Furthermore, carnitas made with bone-in pork offer additional minerals.
Healthier Preparation Options
Trim excess visible fat before cooking to reduce calories. Use low-sodium broth to control salt content. Choose leaner portions of pork shoulder when possible. Moreover, skim fat from cooking liquid before serving.
Load tacos with fresh vegetables to increase fiber and nutrients. Serve carnitas in lettuce wraps instead of tortillas for fewer carbs. Additionally, pair with brown rice instead of white for added fiber.
Serving Suggestions and Toppings
Traditional Taco Format
Warm corn or flour tortillas create the classic carnitas vehicle. Soft tacos allow flavors to shine without overwhelming the meat. Additionally, street taco-sized tortillas provide perfect portion control.
Top tacos with diced white onion and fresh cilantro. Add lime wedges for squeezing over the top. Include salsa verde or your favorite hot sauce. Furthermore, crumbled cotija cheese adds salty, tangy richness.
Creative Serving Ideas
Layer carnitas over crispy tortilla chips for loaded nachos. Pile meat onto Mexican sandwich rolls for hearty tortas. Stuff into flour tortillas with rice and beans for satisfying burritos. Moreover, fill crispy taco shells for crunchy taquitos.
Create carnitas bowls with rice, black beans, and fresh vegetables. Use as protein for hearty breakfast hash. Add to quesadillas with melted cheese. Additionally, top sweet potatoes for fusion-style loaded spuds.
Complementary Side Dishes
Mexican rice, also called Spanish rice, complements carnitas perfectly. Refried beans add creamy texture and additional protein. Fresh corn salad provides crunch and sweetness. Furthermore, cilantro-lime rice brightens the overall plate.
Grilled or roasted vegetables balance rich meat. Avocado or guacamole adds healthy fats and cooling creaminess. Mexican street corn offers smoky, spicy contrast. Additionally, pickled vegetables cut through fatty richness.
Essential Toppings
Pico de gallo provides fresh tomato brightness. Sliced radishes add peppery crunch. Shredded cabbage or coleslaw contributes cooling texture. Moreover, jalapeño slices increase heat for spice lovers.
Sour cream or Mexican crema adds tangy richness. Diced avocado or guacamole contributes buttery smoothness. Fresh lime juice brightens every bite. Furthermore, hot sauce allows customizable spice levels.
Check out our guide on [insert link] for more Mexican-inspired side dishes.
Storage and Reheating Tips
Proper Storage Methods
Allow carnitas to cool completely before storing. Transfer to airtight containers within two hours of cooking. Refrigerate for up to 5 days for best quality. Furthermore, store cooking liquid separately for adding moisture during reheating.
For longer storage, freeze carnitas in portion-sized containers. Properly stored frozen carnitas maintain quality for 3 months. Label containers with date and contents. Additionally, freeze flat in freezer bags for space-efficient storage.
Thawing Frozen Carnitas
Transfer frozen carnitas to the refrigerator 24 hours before needed. This ensures safe, even thawing. Alternatively, use the defrost function on your microwave for faster thawing. However, avoid thawing at room temperature due to food safety concerns.
Reheating Methods
For microwave reheating, use 30-second intervals until heated through. Add a tablespoon of water or broth to prevent drying. Cover the container to trap steam. Nevertheless, microwave reheating won’t restore crispiness.
For crispy reheated carnitas, use a skillet over medium-high heat. Add 1-2 tablespoons of oil or reserved fat. Cook for 5-7 minutes, stirring occasionally. This method restores the desired crispy texture.
Oven reheating works well for larger quantities. Spread carnitas on a baking sheet. Heat at 350°F for 10-15 minutes. Additionally, finish under the broiler for extra crispiness.
Common Mistakes to Avoid
Insufficient Browning
Skipping the browning step eliminates crucial flavor development. Pale meat lacks the depth properly seared carnitas deliver. Therefore, take time to brown all sides thoroughly. Additionally, work in batches to avoid overcrowding.
Incorrect Pressure Release
Quick-releasing pressure too soon can toughen meat. Natural release allows gradual temperature reduction. This process keeps meat tender and juicy. Furthermore, patience during this step pays off significantly.
Over-Crisping
Leaving carnitas under the broiler too long dries them out. Watch carefully during the crisping process. Remove from heat when edges turn golden brown. Moreover, some meat should remain tender, not all crispy.
Using Incorrect Pork Cuts
Lean pork loin produces dry, disappointing results. Choose well-marbled pork shoulder instead. The extra fat content ensures moist, flavorful carnitas. Additionally, don’t trim all visible fat before cooking.
Under-Seasoning
Generous seasoning is essential for flavorful carnitas. Don’t be timid with salt and spices. The pork absorbs significant seasoning during cooking. Furthermore, taste and adjust seasoning after shredding.
Frequently Asked Questions
Can I make Instant Pot carnitas without browning the meat?
While technically possible, browning creates essential flavor depth. The Maillard reaction during searing produces complex, savory notes. Skipping this step results in less developed flavor. However, if time-constrained, acceptable results are still achievable. Therefore, brown meat whenever possible for best results.
How do I know when carnitas are done cooking?
Properly cooked carnitas shred easily with minimal effort. The internal temperature should reach 195-205°F. At this temperature, connective tissue fully breaks down. Additionally, the meat should appear tender and pull apart effortlessly. Use a meat thermometer for verification if uncertain.
Can I make carnitas in advance?
Yes, carnitas actually improve when made ahead. Flavors continue developing during storage. Prepare carnitas 1-2 days before serving. Additionally, reheat using methods described earlier for crispy texture. This makes carnitas excellent for meal prep.
What’s the best way to serve Instant Pot carnitas?
Traditional tacos remain the most popular serving method. However, carnitas work beautifully in burritos, nachos, and bowls. Additionally, try carnitas in breakfast scrambles or on loaded fries. The versatility makes carnitas suitable for any meal.
How can I make carnitas spicier?
Add more jalapeños or include serrano peppers during cooking. Incorporate chipotle peppers in adobo sauce for smoky heat. Additionally, serve with hot sauce for adjustable spiciness. Mix in crushed red pepper flakes before serving. Each method increases heat while maintaining authentic flavor.
Do carnitas freeze well?
Carnitas freeze excellently for up to 3 months. Portion into meal-sized containers before freezing. Thaw overnight in the refrigerator for best results. Furthermore, frozen carnitas maintain flavor and texture remarkably well. This makes batch cooking particularly worthwhile.
Conclusion
Instant Pot carnitas deliver authentic Mexican flavors with remarkable convenience. This method produces tender, juicy meat with crispy edges in a fraction of traditional time. Moreover, versatile serving options make carnitas suitable for tacos, bowls, nachos, and countless other dishes. The combination of pressure cooking efficiency and delicious results makes this recipe a home cooking staple.
Whether preparing weeknight dinners or entertaining guests, Instant Pot carnitas never disappoint. The relatively simple ingredient list belies the complex, satisfying flavors achieved. Furthermore, excellent storage and reheating properties support meal planning and batch cooking. Try this recipe today and discover why carnitas remain one of Mexico’s most beloved dishes.
Ready to make perfect Instant Pot carnitas? Gather your ingredients, fire up your pressure cooker, and prepare for amazingly tender, flavor-packed Mexican pulled pork that will become your new go-to recipe!
Print
Instant Pot Carnitas
Description
Instant Pot Carnitas
Ingredients:
-
3–4 lbs pork shoulder (pork butt), cut into large chunks
-
1 tablespoon salt
-
1 teaspoon black pepper
-
2 teaspoons chili powder
-
1 teaspoon cumin
-
1 teaspoon smoked paprika
-
1 teaspoon oregano
-
1 onion, chopped
-
4 cloves garlic, minced
-
1 orange, juiced (keep the spent halves)
-
1 lime, juiced
-
1 cup chicken broth
-
2 tablespoons olive oil
Instructions:
-
Season the pork:
In a large bowl, mix pork chunks with salt, pepper, chili powder, cumin, paprika, and oregano. Toss to coat evenly. -
Sauté in Instant Pot:
Turn Instant Pot to Sauté mode. Add olive oil and brown the pork chunks in batches (about 2–3 minutes per side). Remove and set aside. -
Add aromatics:
Add onion and garlic to the pot and sauté until fragrant (about 1 minute). -
Deglaze:
Pour in chicken broth, orange juice, lime juice, and add the orange halves. Scrape the bottom of the pot to release any browned bits. -
Pressure cook:
Return pork to the pot. Seal the lid and set to Pressure Cook (High) for 35 minutes.
Allow a 15-minute natural release, then quick release the rest. -
Shred the pork:
Remove pork with tongs and shred with two forks. Discard orange halves and large onion pieces. -
Crisp it up (optional but amazing!):
Spread shredded pork on a baking sheet. Drizzle with a bit of the cooking liquid and broil for 5–8 minutes until crispy edges form.