Brown Sugar Balsamic Glazed Chicken: A Complete Guide to This Sweet and Savory Dish
Introduction
Brown sugar balsamic glazed chicken is a simple yet elegant main dish. It combines tender chicken with a sweet and tangy glaze. The brown sugar adds richness and depth. The balsamic vinegar provides a sophisticated tartness. This dish is perfect for busy weeknights. It’s also impressive enough for special occasions.
The beauty of this recipe lies in its simplicity. You need just a handful of pantry staples. The result? A restaurant-quality meal ready in under 30 minutes. This brown sugar balsamic glazed chicken works for salads, pasta, or as a standalone entrée. Whether you’re cooking for two or eight, this dish scales easily.
What Is Brown Sugar Balsamic Glazed Chicken?
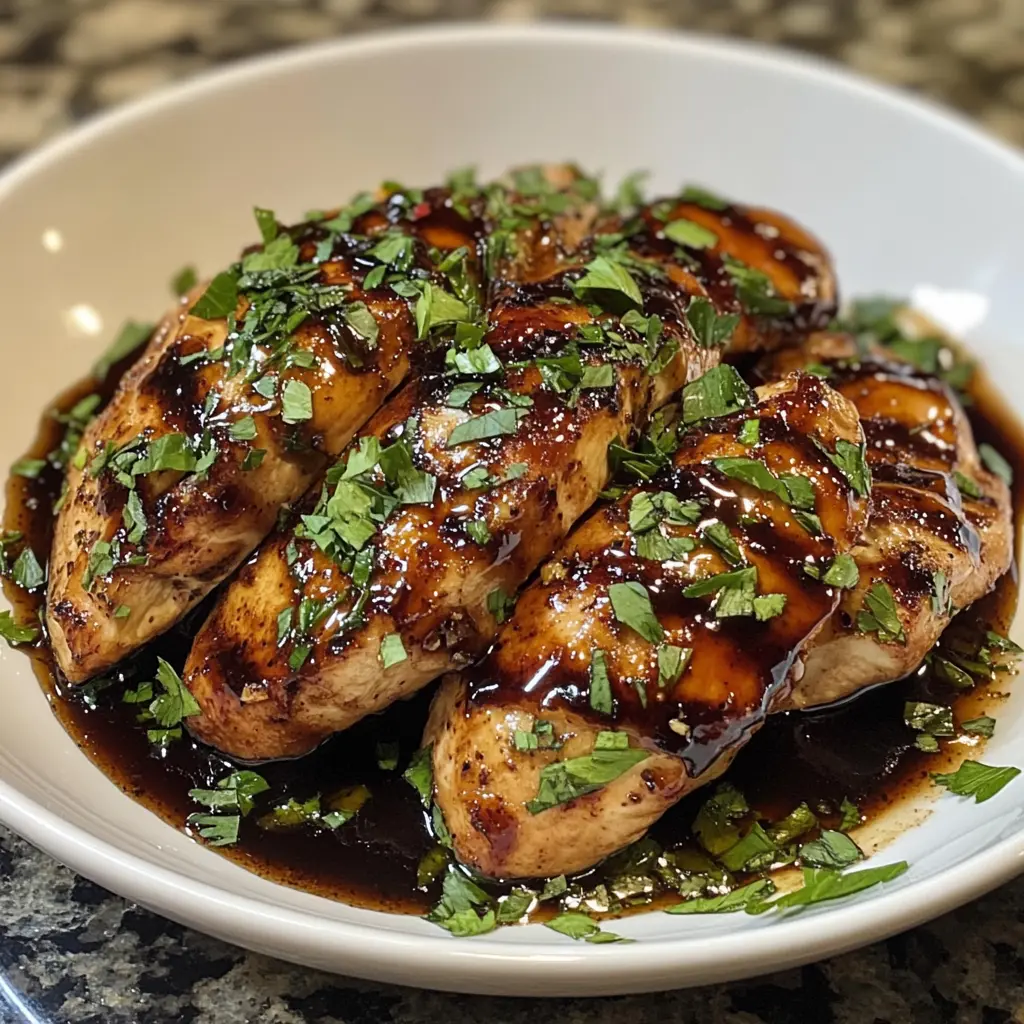
Brown sugar balsamic glazed chicken features chicken that’s coated in a glossy, caramelized glaze. The glaze consists primarily of balsamic vinegar and brown sugar. These two ingredients create a complex flavor profile. The sweetness balances the vinegar’s natural acidity.
This dish originated from Mediterranean cooking traditions. Balsamic vinegar comes from Modena, Italy. It’s aged in wooden barrels for depth and complexity. When reduced with brown sugar, it becomes thick and syrupy. The mixture clings beautifully to the chicken. This creates a savory-sweet coating.
The chicken stays moist and tender throughout cooking. The glaze caramelizes on the surface. This creates a flavorful crust. Inside, the meat remains juicy and succulent. This contrast makes the dish truly memorable.
Key Ingredients for Your Glaze
Creating the perfect brown sugar balsamic glazed chicken starts with quality ingredients. Here’s what you’ll need:
Essential Glaze Components
-
Balsamic Vinegar: Use authentic balsamic or quality store-bought varieties. It provides the signature tang.
-
Brown Sugar: Packed brown sugar dissolves smoothly into the vinegar. It adds caramel notes and sweetness.
-
Olive Oil: Extra virgin olive oil adds richness and helps prevent sticking.
-
Honey: A teaspoon of honey enhances sweetness and improves glaze consistency.
-
Garlic: Minced fresh garlic (4-5 cloves) adds aromatic depth.
Seasoning Essentials
-
Salt: Kosher salt seasons the chicken properly.
-
Black Pepper: Freshly cracked pepper adds bite and complexity.
-
Fresh Herbs: Thyme and oregano complement the balsamic flavors beautifully.
-
Optional Additions: Dijon mustard, tomato paste, and paprika enhance the glaze further.
Quality Matters
Using quality ingredients makes a noticeable difference. Premium balsamic vinegar has better flavor. Fresh garlic outperforms jarred alternatives. Fresh herbs beat dried ones every time. These small choices elevate your final dish significantly.
Step-by-Step Cooking Instructions
Making Your Balsamic Glaze
Creating a homemade brown sugar balsamic glaze is straightforward and rewarding. Follow these simple steps:
Step 1: Combine Base Ingredients
In a small saucepan, combine one cup of balsamic vinegar with two tablespoons of brown sugar. Stir well. Add one teaspoon of honey. Mix thoroughly until combined.
Step 2: Bring to a Boil
Place the saucepan over medium-high heat. Bring the mixture to a gentle boil. Watch for steam rising from the surface. This indicates the reduction has begun.
Step 3: Reduce Heat and Simmer
Lower the heat to medium-low once boiling starts. Let the glaze simmer gently for about 20 minutes. Stir occasionally to prevent sticking. The mixture should reduce by approximately half.
Step 4: Cool and Store
Remove from heat once the glaze thickens. It should coat the back of a spoon. Allow it to cool completely before using. This is important because the reduction thickens further as it cools. Store in a mason jar in your refrigerator for up to two weeks.
Preparing the Chicken
Step 1: Pat Dry
Remove chicken from packaging and pat thoroughly dry. Moisture prevents proper browning. Use paper towels to absorb excess moisture completely.
Step 2: Season Generously
Sprinkle salt and freshly cracked pepper on all chicken surfaces. Don’t skimp on seasoning. It’s the foundation of great flavor.
Step 3: Create Your Marinade Base
In a large mixing bowl, whisk together one-quarter cup extra virgin olive oil and three tablespoons of your prepared balsamic glaze. Add one tablespoon of tomato paste. Include minced garlic. Mix in fresh thyme and dried oregano. Whisk until fully combined.
Step 4: Marinate the Chicken
Add the seasoned chicken to the marinade bowl. Toss until completely coated. If time allows, cover and refrigerate for 2-4 hours. Even 15-30 minutes helps develop flavors. For quick meals, proceed immediately.
Cooking Methods: Oven vs. Stovetop vs. Grill
Oven Method (Most Reliable)
The oven method is perfect for beginners and delivers consistent results every time.
Instructions:
Preheat your oven to 425 degrees Fahrenheit. Position the oven rack in the middle. Transfer marinated chicken to a baking dish or heat-safe skillet. Ensure chicken pieces don’t overlap. Bake for 25-30 minutes for boneless chicken breasts.
Check the internal temperature with a meat thermometer. It should reach 165 degrees Fahrenheit at the thickest part. For boneless thighs, add 5-10 minutes to cooking time.
During the last 5 minutes of baking, brush additional balsamic glaze on the chicken. This creates a thicker, more caramelized coating. Return to the oven briefly to set the glaze.
Remove from the oven and let rest for 5 minutes. This allows juices to redistribute throughout the meat.
Stovetop Method (Fastest Option)
This method delivers excellent results in just 15 minutes from start to finish.
Instructions:
Heat two tablespoons of olive oil in a large skillet over medium-high heat. The oil should shimmer and move easily. Add your marinated chicken pieces carefully.
Don’t move the chicken immediately. Let it cook undisturbed for 5 minutes. This develops a golden-brown crust. Flip the chicken carefully after this time.
Reduce heat to medium. Brush a light layer of balsamic glaze on the cooked side. After 3 minutes, flip the chicken again. Apply glaze to the other side. Cook for another 3-4 minutes.
Use your meat thermometer to confirm 165 degrees Fahrenheit. Transfer the cooked chicken to a clean cutting board. Let it rest for 3 minutes before serving.
Grill Method (Summer Favorite)
Grilling creates beautiful grill marks and a slight smokiness.
Instructions:
Heat your grill to high heat. Let it preheat for 10 minutes. Clean the grates thoroughly with a grill brush.
Place chicken on the hot grill. Cook for 5-6 minutes undisturbed. You want distinct grill marks. Flip the chicken and cook for 3-4 minutes on the other side.
Move the chicken to a cooler area of the grill. This prevents the glaze from burning. Brush glaze on one side. Flip and glaze the other side. Cook for 1-2 minutes more.
Check the internal temperature at 165 degrees Fahrenheit. Remove from the grill and rest for 5 minutes.
Tips for Perfect Results Every Time
Temperature Control Is Key
Using a meat thermometer eliminates guesswork. Insert it at the thickest part without touching bone. The target temperature is always 165 degrees Fahrenheit.
Overcooking results in dry meat. Undercooking poses food safety risks. A thermometer ensures perfection. They’re inexpensive and invaluable.
Choose Your Chicken Cut Wisely
Chicken breasts are lean and cook quickly (18-25 minutes). They’re perfect for weeknight meals. Butterfly thicker breasts for even cooking.
Chicken thighs contain more fat and stay juicier. They require slightly longer cooking (25-30 minutes). They’re forgiving if slightly overcooked.
Bone-in chicken adds flavor through the bones. These require additional cooking time. They’re ideal for oven preparation.
Make Your Glaze Ahead
Preparing balsamic glaze in advance saves time. Make a batch on Sunday. Store it in your refrigerator for up to two weeks. Use it for multiple meals throughout the week.
A thicker glaze clings better to chicken. If yours is too thin, simmer it longer. If it’s too thick, thin with a bit of balsamic vinegar.
Pound Your Chicken Evenly
Even thickness ensures uniform cooking. Place chicken on a cutting board. Cover with plastic wrap. Use a meat mallet to pound gently but firmly.
This step prevents some pieces from overcooking while others remain underdone. It also tenderizes the meat naturally.
Don’t Skip the Resting Period
After cooking, always let chicken rest for 3-5 minutes. This allows carryover cooking to finish. Juices redistribute throughout the meat. Cutting immediately causes juices to escape.
The result is noticeably juicier, more tender chicken. This simple step makes a huge difference.
Apply Glaze Multiple Times
One glaze application creates a thin coating. Multiple applications build layers. Each layer caramelizes slightly. This creates a thicker, glossier, more flavorful coating.
Apply glaze at the beginning of cooking. Apply again midway through. Apply a final coat at the end. This technique is the secret to restaurant-quality results.
Serving Suggestions and Pairings
Side Dishes That Complement This Dish
Brown sugar balsamic glazed chicken pairs beautifully with numerous sides. Here are excellent options:
Grain-Based Sides:
-
Fluffy white or brown rice absorbs the glaze beautifully
-
Creamy risotto complements the sweet and tangy flavors
-
Polenta provides a subtle corn flavor contrast
-
Couscous offers light, fluffy texture
Vegetable Options:
-
Roasted Brussels sprouts have a natural sweetness that harmonizes with the glaze
-
Green beans with garlic provide fresh, bright notes
-
Roasted asparagus offers earthiness and elegance
-
Steamed broccoli adds nutritional value and mild flavor
Salad Combinations:
-
Mixed greens with balsamic vinaigrette echo the dish’s main flavors
-
Arugula salad with parmesan adds peppery sophistication
-
Tomato and cucumber salad provides refreshing contrast
-
Spinach salad with nuts and dried fruit balances sweetness
Meal Composition Ideas
Weeknight Family Dinner:
Pair glazed chicken with simple steamed rice and roasted vegetables. This comes together quickly after work. Everyone enjoys familiar, comforting flavors.
Date Night Dinner:
Combine glazed chicken with creamy risotto and a sophisticated arugula salad. Add lemon-roasted asparagus for elegance. This feels special without requiring extensive effort.
Summer Gathering:
Grill the chicken and serve with fresh salad and crusty bread. Guests can build their own plates. It’s casual yet impressive.
Leftover Lunch Transformation:
Shred cooled chicken and use for salads, sandwiches, or wraps. The glaze adds flavor to these applications. Leftovers are versatile and delicious.
Nutritional Information
Per Serving (6 oz. boneless chicken breast with 2 tablespoons glaze)
| Nutrient | Amount |
|---|---|
| Calories | 285 |
| Protein | 38 grams |
| Fat | 8 grams |
| Saturated Fat | 2 grams |
| Carbohydrates | 12 grams |
| Fiber | 0 grams |
| Sugar | 10 grams |
| Sodium | 520 milligrams |
Nutritional Benefits
Protein-Rich Chicken: Chicken breast provides lean protein. This supports muscle growth and repair. It keeps you feeling full longer.
Minimal Carbohydrates: This dish works well for low-carb diets. The glaze adds carbs but in moderate amounts. Pair with low-carb sides for optimal benefits.
Heart-Healthy Fats: Olive oil in the glaze contains heart-protective monounsaturated fats. These support cardiovascular health.
Micronutrients: Garlic and herbs add selenium, manganese, and various antioxidants. These compounds support overall wellness.
Storage and Leftovers
Refrigerating Your Chicken
Allow cooked chicken to cool to room temperature first. Never place hot food directly in the refrigerator. Transfer to an airtight container once cooled. Store for 3-4 days.
The glaze helps preserve the chicken. It adds moisture that prevents drying out. Reheating is therefore easier and more successful.
Reheating Methods
Oven Reheating (Best):
Preheat your oven to 350 degrees Fahrenheit. Place chicken in a baking dish. Cover loosely with foil to prevent drying. Heat for 10-12 minutes until warmed through.
Stovetop Reheating:
Heat a skillet over medium heat. Add a small amount of olive oil. Place chicken in the skillet. Heat for 3-4 minutes per side.
Microwave Reheating (Fastest):
Place chicken on a microwave-safe plate. Cover with a damp paper towel. Heat on 50% power for 1-2 minutes. This gentler heat prevents overcooking.
Freezing for Future Meals
Cook your chicken and store it in the refrigerator for one day. Then transfer to freezer-safe containers. Freeze for up to 3 months.
Thaw overnight in the refrigerator before reheating. Thawed chicken reheats beautifully. The glaze maintains its flavor and texture perfectly.
Frequently Asked Questions
Can I Use Homemade Balsamic Glaze?
Absolutely, and we encourage it! Homemade glaze tastes superior to store-bought. However, store-bought balsamic glaze works well too. Choose quality brands when buying pre-made. Check that it contains minimal additives.
What If My Glaze Is Too Runny?
Runny glaze indicates insufficient reduction. Simmer it longer over medium-low heat. Check consistency by coating a spoon’s back. When it drips slowly rather than running, it’s ready.
Should I Marinate Overnight?
Marinating overnight isn’t necessary but is beneficial. Even 30 minutes develops good flavor. For maximum depth, refrigerate for 4 hours. Beyond 24 hours, the vinegar can overpower other flavors.
Can I Substitute the Brown Sugar?
Yes, several substitutes work well in this brown sugar balsamic glazed chicken recipe. Regular sugar works but adds less molasses flavor. Coconut sugar adds interesting depth. Honey creates a slightly different sweetness profile.
What’s the Best Cut of Chicken?
Boneless, skinless chicken breasts are most popular. Thighs work beautifully and stay juicier. Bone-in chicken adds flavor but requires longer cooking. Choose based on your preferences and available time.
How Do I Know When the Chicken Is Done?
Use a meat thermometer inserted at the thickest part. The internal temperature must reach 165 degrees Fahrenheit. This is the USDA food safety standard. Check multiple spots to ensure full doneness.
Can I Make This Dairy-Free?
This recipe is naturally dairy-free. All ingredients contain no dairy products. It’s perfect for those with dairy restrictions or preferences.
How Many Servings Does This Make?
This recipe serves 4-6 people depending on chicken size. One large chicken breast plus glaze feeds one person adequately. Adjust quantities based on your guest count.
Conclusion
Brown sugar balsamic glazed chicken represents simple cooking at its finest. This dish combines basic ingredients into something truly special. The sweet glaze contrasts beautifully with the chicken’s savory nature. The result is a balanced, memorable meal.
You now have everything needed to create this dish successfully. Follow our step-by-step instructions carefully. Use quality ingredients when possible. Control your temperatures precisely. Apply your glaze multiple times for professional results.
This brown sugar balsamic glazed chicken works for casual weeknight dinners. It’s equally impressive for special occasions. Your family will enjoy it. Your guests will ask for the recipe.
Start making this dish today. Prepare your glaze ahead if time-pressed. Cook using your preferred method. Serve with sides that complement the flavors beautifully. You’ll quickly understand why this classic dish remains so beloved.
Print