
Baked Clams Oreganata: The Ultimate Guide to This Classic Italian-American Appetizer
Baked Clams Oreganata is a beloved Italian-American appetizer that combines tender clams with savory breadcrumbs, garlic, and oregano for a flavor-packed dish. This simple yet elegant seafood starter has become a staple at holiday gatherings and special occasions, particularly during the traditional Feast of the Seven Fishes on Christmas Eve. Whether serving guests or treating the family to something special, this crispy-topped delight delivers restaurant-quality results right at home.
What Are Baked Clams Oreganata?
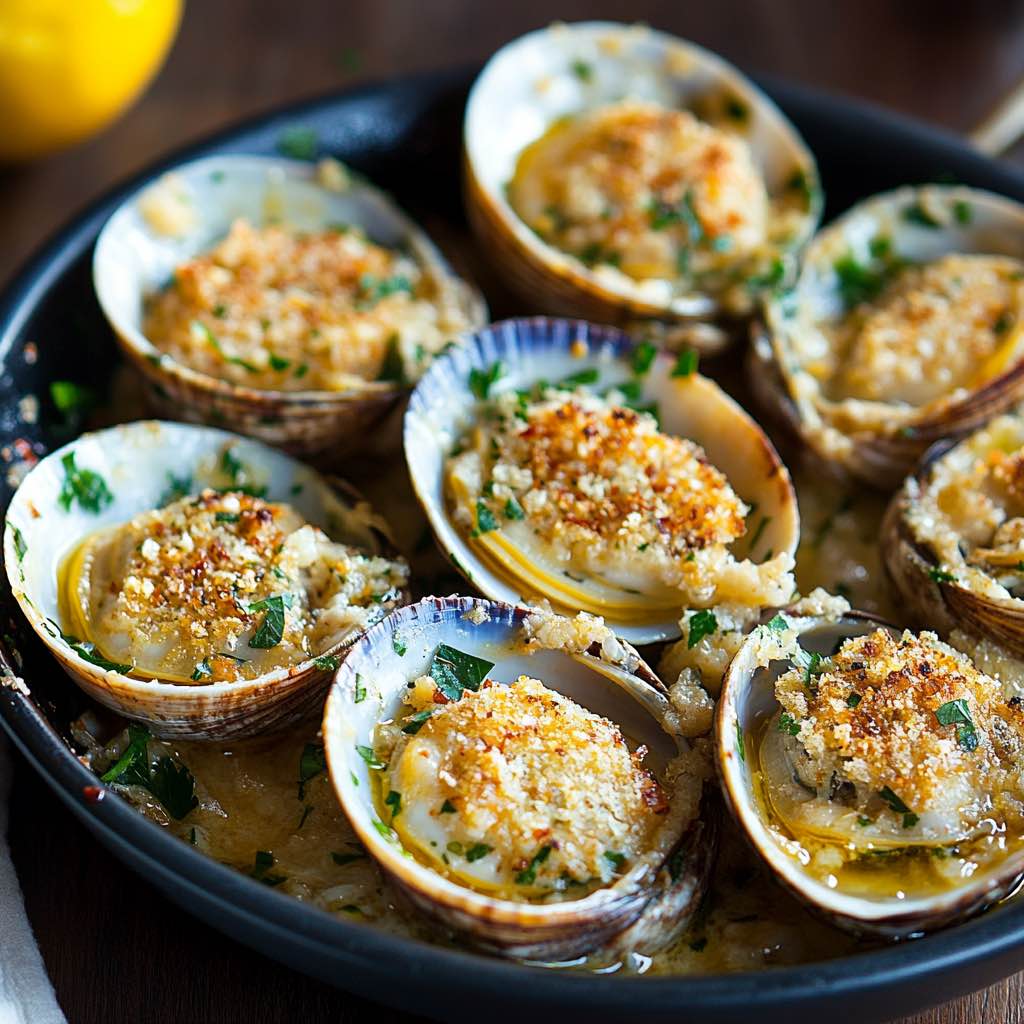
Baked Clams Oreganata consists of fresh clams topped with seasoned breadcrumbs, garlic, oregano, and olive oil, then baked until golden brown and crispy. The name “oreganata” derives directly from the generous use of oregano in the breadcrumb mixture. This dish typically features six or twelve clams served on the half shell, making it perfect for sharing as an appetizer.
The preparation showcases the natural brininess of the clams while the topping adds texture and aromatic depth. Fresh lemon juice squeezed over the clams just before eating brightens the flavors and cuts through the richness. This combination creates a balanced bite that highlights both the seafood and the savory coating.
The History Behind This Italian-American Classic
Origins in Rhode Island
The story of stuffed clams begins in early 1900s Rhode Island, where clams were initially considered a poor man’s food. The humble practice of stuffing them with bread only reinforced this perception. However, everything changed when Julius Keller, a chef at the upscale Narragansett Pier Casino resort, served “clams casino” to a party of eight guests.
Evolution to New York City
Keller’s creation added peppers and bacon to the baked stuffed clams, playing off the resort’s name. This luxurious twist gained popularity among Italian and Portuguese communities throughout New England. Given the large Italian-American population in the northeastern United States, the dish naturally migrated to New York City through Italian-American culinary pathways.
Modern Day Popularity
Today, Baked Clams Oreganata remains a cornerstone of New York red sauce cuisine and is enjoyed throughout the East Coast. The dish has become synonymous with Italian-American celebrations, particularly the Feast of the Seven Fishes. Its enduring popularity speaks to the perfect balance between accessibility and elegance.
Why This Recipe Works
Simple Ingredients, Maximum Flavor
This recipe succeeds because it relies on quality ingredients rather than complicated techniques. Fresh clams provide natural sweetness and brininess. The breadcrumb mixture amplifies these flavors without overwhelming them. Olive oil adds richness while oregano and garlic deliver aromatic complexity.
Textural Contrast
The crispy, golden-brown breadcrumb topping contrasts beautifully with the tender clam meat beneath. This textural interplay keeps each bite interesting and satisfying. The breadcrumbs absorb the clam’s natural juices during baking, becoming flavorful and moist underneath while staying crunchy on top.
Versatile and Forgiving
Baked Clams Oreganata adapts easily to different preferences and skill levels. The dish works with fresh or canned clams, making it accessible year-round. It can be prepared in advance and frozen, perfect for entertaining. The recipe scales up or down effortlessly depending on the number of guests.
Essential Ingredients You’ll Need
Fresh Clams
Littleneck clams are the gold standard for this recipe due to their tender texture and sweet flavor. Cherrystone clams also work well, though they’re slightly larger. Look for clams that are tightly closed or snap shut when tapped, indicating freshness. Plan for six to twelve clams per serving depending on whether this is an appetizer or main course.
Breadcrumbs
Panko breadcrumbs create an extra-crispy topping. Traditional Italian breadcrumbs work equally well for a finer texture. Some recipes use fresh breadcrumbs made from stale bread for authentic Italian flavor. The breadcrumbs should be coarse enough to provide texture but fine enough to adhere to the clams.
Aromatics and Seasonings
Fresh garlic is essential, providing pungent flavor that mellows during baking. Fresh oregano offers the most vibrant taste, though dried oregano works in a pinch. Italian parsley adds freshness and color to the finished dish. Red pepper flakes provide optional heat for those who enjoy a spicy kick.
Fat Component
Extra-virgin olive oil moistens the breadcrumbs and adds fruity richness. Some recipes incorporate butter for additional richness, though olive oil alone keeps the dish lighter. The fat helps the breadcrumbs toast evenly and prevents them from drying out during baking.
Additional Ingredients
Grated Parmesan cheese adds umami depth and helps bind the topping. Fresh lemon wedges for serving brighten the flavors. Chicken or vegetable broth moistens the breadcrumb mixture to the perfect consistency. These components work together to create a cohesive, flavorful topping.
Nutritional Benefits of Clams
Lean Protein Source
Clams deliver an impressive amount of protein with minimal fat and calories. One cup of clams contains approximately 24 grams of protein with only 1.8 grams of fat. This makes them an excellent choice for those seeking lean protein sources in their diet. The protein in clams supports muscle maintenance and overall health.
Rich in Essential Vitamins
Clams rank among the best dietary sources of vitamin B12, providing 824% of the reference daily intake per 100 grams. They also contain significant amounts of vitamins C and A. Vitamin B12 supports nervous system function and red blood cell formation. These vitamins play crucial roles in maintaining overall health and wellness.
Packed with Minerals
Littleneck clams provide excellent sources of iron, zinc, selenium, potassium, and calcium. These minerals support various bodily functions from bone health to immune system support. The iron content helps prevent anemia and supports oxygen transport throughout the body. Selenium acts as an antioxidant, protecting cells from damage.
Heart-Healthy Omega-3s
Clams contain omega-3 fatty acids, which help reduce the risk of heart disease. These beneficial fats help break down triglycerides in the blood. Clams are also low in mercury compared to many other seafood options, making them a safer choice for regular consumption. The omega-3 content supports brain health and reduces inflammation.
Step-by-Step Preparation Guide
Cleaning and Purging Clams
Start by scrubbing each clam under cold running water with a stiff-bristled brush. This removes grime, sand, and salt from the exterior shells. Soak the clams in 1 gallon of water mixed with 1/3 cup of salt for 20 minutes to help them expel any sand. Repeat this soaking process up to two more times for exceptionally clean clams.
Preparing Clams for Baking
Preheat the oven to 450 degrees F. Place the cleaned clams on a sheet tray and put them in the preheated oven for 2 to 3 minutes until they just begin to open. This step makes shucking easier without actually cooking the clams. Using a butter knife, pry the clams open and remove the top shell, discarding it.
Releasing the Clam Meat
Completely pull the clam away from the bottom shell and place it back in the bottom shell. This step ensures easy eating when the dish is served. Reserve any clam juice that releases during this process, as it adds essential flavor to the breadcrumb mixture. The juice contains concentrated seafood flavor that enhances the entire dish.
Shucking Clams Like a Pro
Choosing the Right Tool
Never use a sharp paring knife or oyster knife for shucking clams. A clam knife has a sturdy but thin blade with a rounded edge specifically designed for this task. The proper tool makes the job safer and more efficient. Investing in a quality clam knife pays off if making this dish regularly.
Proper Technique
Hold the clam with a kitchen towel or glove for protection, with the hinge facing your palm. Insert the knife where the two shells meet, opposite the hinge. Twist the knife gently to break the seal, then run it along the inside of the shell to cut the abductor muscles. This releases the clam cleanly from both shell halves.
Safety Considerations
Work over a bowl to catch all the valuable clam juices. Never attempt to shuck clams without hand protection, as the knife can slip and cause injury. Discard any clams with open shells before cooking, as these are dead and potentially unsafe to eat. Safety should always be the top priority when working with shellfish.
Alternative Method
For easier shucking, refrigerate the cleaned clams for an hour to help relax the muscles holding them shut. Alternatively, the quick oven method mentioned earlier (2-3 minutes at 450°F) makes the shells pop open slightly. Either approach significantly reduces the effort required for shucking. Choose the method that feels most comfortable.
Making the Perfect Oreganata Topping
Toasting the Breadcrumbs
Combine breadcrumbs with minced garlic, chopped oregano, parsley, and red pepper flakes in a bowl. Heat olive oil in a skillet over medium heat and add the breadcrumb mixture. Toast the breadcrumbs, stirring constantly, until they turn golden brown. This toasting step develops deeper flavor and ensures crispiness.
Achieving the Right Consistency
Add the reserved clam juice or chicken broth gradually until the mixture becomes moist but not wet. The breadcrumbs should hold together when squeezed but still feel somewhat loose. Too much liquid creates a soggy topping, while too little results in dry, crumbly breadcrumbs. Aim for a consistency similar to wet sand.
Flavor Balancing
Taste the breadcrumb mixture and adjust seasoning as needed. Salt enhances all the other flavors but should be added carefully since clams are naturally salty. Parmesan cheese adds savory depth and helps bind the mixture. Fresh herbs provide brightness that balances the rich, garlicky breadcrumbs.
Assembly Technique
Spoon the breadcrumb mixture onto each clam, pressing it gently to fill the shell. Mound the topping slightly so it forms a nice crust when baked. Drizzle a small amount of olive oil over the top of each clam. This extra oil helps achieve a golden, crispy finish.
Baking Tips for Best Results
Oven Temperature
Preheat the oven to 350-450 degrees F depending on the recipe. Higher temperatures create a crispier topping in less time. Lower temperatures allow for more even cooking throughout. Most recipes fall in the 400-450°F range for optimal results.
Baking Time
Bake the clams for 18-30 minutes until the topping turns golden brown and crispy. The exact time depends on oven temperature and the size of the clams. Check at the minimum time and continue baking if needed. The breadcrumbs should be deeply golden and crunchy on top.
Using the Broiler
Some recipes finish the clams under the broiler for extra crispiness. Adjust the oven rack to the top position and preheat the broiler. Watch carefully as the topping can burn quickly under high heat. Broiling for 1-2 minutes at the end creates an irresistibly crispy crust.
Testing for Doneness
The clams are ready when the breadcrumb topping is golden brown and crispy. The edges should be slightly darker than the center. Let the clams cool for a few minutes before serving to avoid burning mouths. The resting time also allows the juices to settle and flavors to meld.
Serving Suggestions
Classic Presentation
Arrange the baked clams on a large platter lined with rock salt or crumpled aluminum foil to keep them stable. Scatter fresh lemon wedges around the platter for guests to squeeze over their clams. Garnish with additional fresh parsley for color and freshness. This presentation looks impressive yet remains simple.
Accompaniments
Serve the clams as an appetizer before a larger Italian meal. They pair beautifully with a crisp green salad and crusty bread for soaking up juices. Consider offering hot sauce or red pepper flakes on the side for guests who enjoy extra heat. A light soup makes an excellent follow-up course.
Portion Planning
Plan for 6-12 clams per person when serving as an appetizer. Double that amount if serving as a main course. The rich breadcrumb topping means a little goes a long way. Having extra ensures no one leaves hungry while avoiding waste.
Common Variations and Substitutions
Using Canned Clams
Substitute two 6.5-ounce cans of minced clams when fresh clams are unavailable. Drain the clams but reserve the juice for the breadcrumb mixture. Spoon the mixture into small ramekins or cleaned clam shells for baking. This variation makes the recipe accessible year-round.
Breadcrumb Options
Panko breadcrumbs create the crispiest topping. Regular Italian seasoned breadcrumbs offer convenience and good flavor. Fresh breadcrumbs made from stale bread provide authentic Italian taste. Each type produces slightly different textures, all delicious.
Herb Variations
Experiment with fresh basil, thyme, or rosemary alongside or instead of oregano. Each herb brings unique aromatics to the dish. Fresh herbs always taste brighter than dried versions. Adjust quantities based on personal preference and herb intensity.
Adding Vegetables
Some recipes incorporate finely diced bell peppers or celery into the breadcrumb mixture. Cherry tomatoes can be halved and placed alongside the clams on the baking sheet. Minced shallots offer a milder alternative to onions. These additions create more complex flavor profiles.
Storage and Make-Ahead Options
Refrigerating Assembled Clams
Cover assembled, unbaked clams with plastic wrap or place in an airtight container. Refrigerate for up to 24 hours before baking. Remove from the refrigerator and let sit at room temperature for 15 minutes before baking. This make-ahead option simplifies entertaining.
Freezing for Later
Lay assembled, unbaked clams on a baking sheet and freeze for 1-2 hours. Transfer the partially frozen clams to an airtight freezer bag, removing as much air as possible. Return to the freezer and use within 2 months for best quality. Defrost in the refrigerator overnight before baking.
Reheating Leftovers
Reheat leftover baked clams in a 350°F oven for 10-12 minutes until warmed through. Cover loosely with foil to prevent the topping from burning. Alternatively, reheat in a toaster oven for better crust retention. The microwave works in a pinch but sacrifices the crispy texture.
Storing Breadcrumb Mixture
The prepared breadcrumb mixture can be stored separately in an airtight container in the refrigerator for up to 3 days. This allows for quick assembly when ready to bake. The mixture can also be frozen for up to 3 months. Thaw in the refrigerator before using.
Troubleshooting Common Problems
Soggy Breadcrumb Topping
Excess liquid in the breadcrumb mixture causes sogginess. Add liquid gradually and stop when the mixture just holds together. If the topping seems too wet, mix in additional breadcrumbs to absorb moisture. Toast the breadcrumbs longer before mixing with liquid for better absorption.
Dry, Crumbly Topping
Insufficient liquid or oil creates a dry topping that won’t hold together. Add more clam juice or broth one tablespoon at a time. Drizzle extra olive oil over the assembled clams before baking. The fat keeps the breadcrumbs moist while promoting browning.
Bland Flavor
Under-seasoning is the most common cause of bland-tasting clams. Taste the breadcrumb mixture before assembly and adjust salt, garlic, and herbs. Remember that flavors mellow during cooking, so season assertively. Fresh herbs make a significant difference compared to dried versions.
Tough, Rubbery Clams
Overcooking turns tender clams tough and rubbery. Follow recommended baking times carefully and check early. If using fresh clams, avoid pre-cooking them too long when opening the shells. The goal is to heat through without overcooking the delicate meat.
Frequently Asked Questions
Can I make Baked Clams Oreganata without fresh clams?
Yes, canned clams work well as a substitute for fresh clams. Use two 6.5-ounce cans of minced clams, draining and reserving the juice. Spoon the breadcrumb mixture into small ramekins since you won’t have shells. The flavor remains excellent even without fresh clams.
How far in advance can I prepare this dish?
Assembled clams can be refrigerated for up to 24 hours or frozen for up to 2 months. This flexibility makes the dish perfect for entertaining since most of the work happens ahead of time. Simply bake when ready to serve for fresh, hot appetizers.
What type of clams work best for this recipe?
Littleneck clams are ideal due to their tender texture and sweet flavor. Cherrystone clams also work well, though they’re slightly larger. Both varieties hold up well to baking and provide beautiful natural shells for serving. Choose clams that are similar in size for even cooking.
Do I need to purge the clams before cooking?
Yes, purging helps remove sand and grit from inside the clams. Soak them in salted water for 20 minutes, then drain and repeat 2-3 times. This extra step ensures a pleasant eating experience without crunchy bits of sand. The process takes minimal effort but makes a significant difference.
Can this recipe be doubled or tripled for a crowd?
Absolutely, this recipe scales up easily for large gatherings. Simply multiply all ingredients by the desired factor and use multiple baking sheets if necessary. The baking time remains the same regardless of quantity. This makes it an excellent choice for parties and holiday celebrations.
How do I know when the clams are done baking?
The clams are ready when the breadcrumb topping turns golden brown and crispy. The edges should be slightly darker than the center. Internal temperature isn’t as important as achieving that perfect crispy, golden crust. Let them cool briefly before serving.
Conclusion
Baked Clams Oreganata delivers impressive flavor and presentation with surprisingly simple preparation. This Italian-American classic combines tender clams with crispy, garlicky breadcrumbs for an irresistible appetizer. The dish works equally well for casual family dinners or elegant holiday celebrations.
The recipe’s versatility allows for fresh or canned clams, make-ahead preparation, and various flavor customizations. With proper technique and quality ingredients, anyone can master this restaurant-worthy dish at home. The nutritional benefits of clams make this an indulgent choice that’s still good for you.
Print
Baked Clams Oreganata
Description
Baked Clams Oreganata
Ingredients
-
12 fresh littleneck clams, scrubbed clean
-
3 tbsp butter, melted
-
2 tbsp olive oil
-
3 cloves garlic, minced
-
½ cup plain breadcrumbs
-
2 tbsp grated Parmesan cheese
-
2 tbsp fresh parsley, finely chopped
-
1 tsp dried oregano
-
½ tsp crushed red pepper flakes (optional)
-
Salt and pepper, to taste
-
1 lemon, cut into wedges
Instructions
-
Prepare the Clams:
-
Preheat oven to 425°F (220°C).
-
Place clams in a shallow baking dish with a bit of water (about ¼ inch).
-
Bake for 5–7 minutes, until clams just open. Remove immediately — discard any that don’t open.
-
-
Make the Oreganata Topping:
-
In a skillet, heat butter and olive oil over low heat.
-
Add garlic and sauté for 1 minute (don’t let it brown).
-
Stir in breadcrumbs, Parmesan, parsley, oregano, red pepper flakes, salt, and pepper.
-
Mix well until the crumbs are lightly toasted and fragrant.
-
-
Assemble the Clams:
-
Remove the top shells and loosen the clams from the bottom shell.
-
Spoon a small amount of breadcrumb mixture over each clam.
-
Drizzle lightly with olive oil.
-
-
Bake:
-
Arrange clams on a baking sheet.
-
Bake for 8–10 minutes, until the tops are golden and crisp.
-
-
Serve:
-
Serve hot with lemon wedges for squeezing.
-
Optional: garnish with a bit of extra parsley or a drizzle of melted butter.
-