
Overall Article Introduction
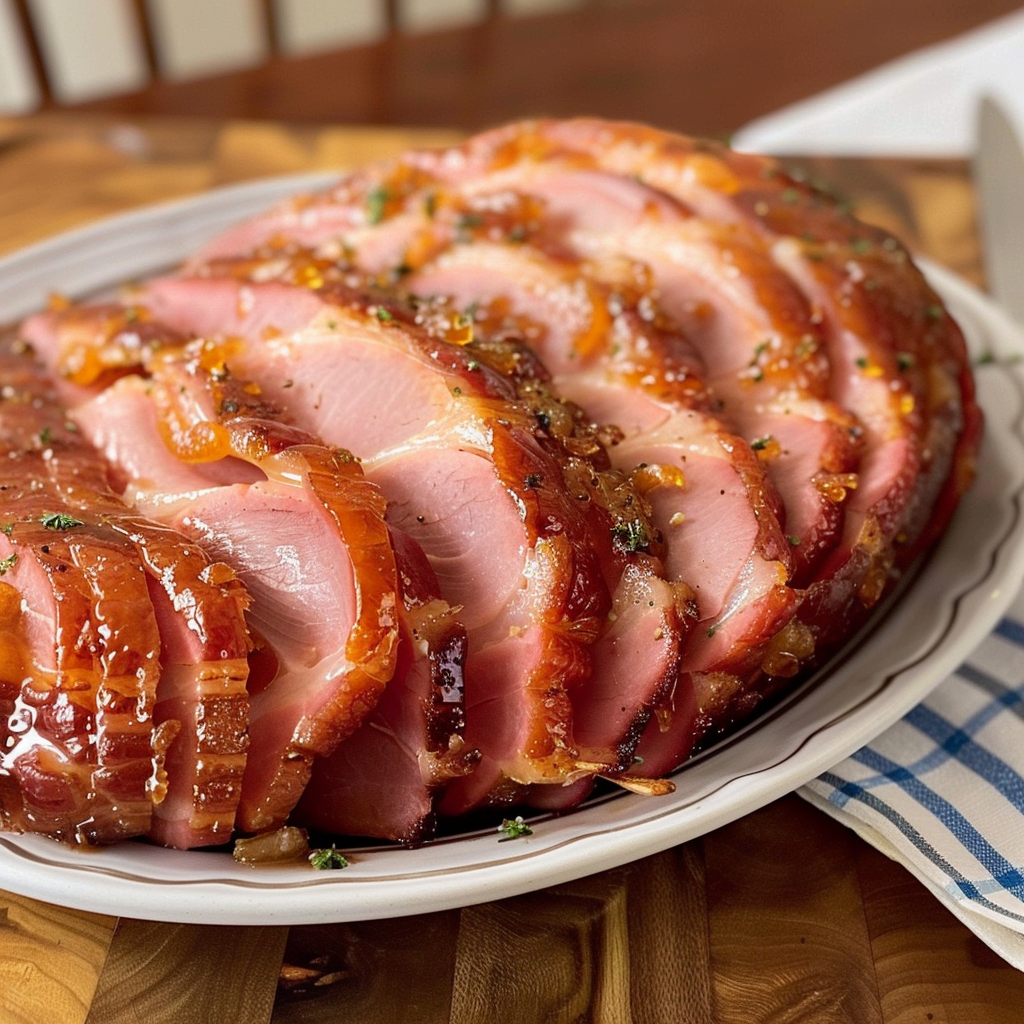
Ah, the baked ham with brown sugar glaze. Is there any other dish that so effortlessly commands the center of the holiday table? It’s a glorious sight: a magnificent ham, swathed in a cloak of shimmering, deeply caramelized glaze, promising a perfect symphony of salty, sweet, and savory in every single bite. Furthermore, despite its utterly impressive appearance, creating this masterpiece is far simpler than you might imagine. Consequently, this guide is designed to be your ultimate companion, walking you through every single step from selecting the perfect ham at the store to carving it with confidence. Moreover, we’ll unlock the secrets to that iconic sticky glaze, troubleshoot any potential kitchen hiccups, and even explore the wonderful world of leftovers. So, without a doubt, get ready to create a show-stopping meal that will have everyone coming back for seconds.
Introduction & The Foundation
Baked Ham with Brown Sugar Glaze: Your Ultimate Guide to a Perfect Holiday Centerpiece
Picture this: the warm, inviting aroma of roasting meat and caramelizing sugar fills your home. Meanwhile, gathered around your table, friends and family chatter in anticipation. Then, you present it—a stunning, golden-brown baked ham, glistening under the lights, its sweet and spicy fragrance announcing the start of a memorable feast. Honestly, is there anything more quintessentially celebratory? This iconic holiday ham recipe isn’t just a meal; it’s a delicious tradition, a hearty centerpiece that symbolizes abundance and joy.
Ultimately, the true beauty of a spiral ham or a classic bone-in ham lies in its brilliant simplicity. For instance, while it looks like a million bucks, it’s surprisingly forgiving and incredibly straightforward to prepare, making it an ideal choice for both seasoned cooks and nervous beginners. Additionally, a brown sugar glaze for ham is the magical element that transforms a good ham into an extraordinary one. It creates that irresistible sticky-sweet crust that contrasts beautifully with the savory, juicy meat inside. Best of all, this entire process is largely hands-off, freeing you up to manage the rest of your holiday dinner chaos. And let’s not forget the fantastic bonus—the glorious ham leftovers that keep the celebration going for days!
Why This Brown Sugar Glazed Ham Recipe is a Winner
Let’s be real; holiday cooking can be seriously stressful. Surprisingly, however, this easy ham glazemethod is your ticket to a stress-free, crowd-pleasing main dish. Why does it work so well? Well, first of all, we’re starting with a fully cooked ham, which means our job is simply to heat it through and work our magic on the outside. Basically, you can’t undercook it! Secondly, the glaze ingredients are pantry staples—brown sugar, mustard, a little juice—that come together in a saucepan in mere minutes. No fancy techniques are required.
Furthermore, the versatility of this best baked ham is truly unmatched. It’s the star of Easter brunch, the hero of Christmas dinner, and the perfect centerpiece for any large gathering in between. And oh, the leftovers! Honestly, some people argue that the sandwiches, soups, and breakfasts you make from the leftovers are even better than the main event. This one recipe, therefore, gifts you with days of delicious meals. Talk about a win-win!
Understanding Your Ham & Essential Tools
Choosing the Right Ham: A Buyer’s Guide
Walking up to the meat counter can feel overwhelming, right? Don’t you worry; choosing the perfect holiday ham is easier than you think. The most critical thing to understand is that nearly all hams you buy at a regular supermarket are already fully cooked or “ready-to-eat.” These are often called “city hams.” Essentially, your mission is to warm it up and make the exterior taste incredible.
Now, onto the big choices:
-
Bone-In vs. Boneless: Here’s the scoop—a bone-in ham will always have more flavor and stay juicier during baking. The bone acts like a little internal heater, promoting even cooking. Plus, you can use it later to make a phenomenal pot of soup! On the other hand, a boneless ham is easier to carve and often yields more servings per pound. It’s a trade-off between ultimate flavor and sheer convenience.
-
Spiral-Cut vs. Whole: A spiral ham is pre-sliced, which is a huge time-saver and allows the glaze to seep into every nook and cranny. However, this can sometimes lead to the edges drying out a tad faster. A whole ham gives you complete control over the slicing and can retain a bit more moisture. For a first-timer, a spiral-cut ham is a fantastic, foolproof option.
So, what size should you buy? A good rule of thumb is to estimate ¾ to 1 pound per person for a bone-in ham and about ½ pound per person for a boneless ham. This ensures you’ll have plenty for the feast and, happily, plenty for leftovers!
Essential Equipment You’ll Need
You don’t need a kitchen full of fancy gadgets to pull this off. In fact, you likely already have everything you need:
-
A large roasting pan with a rack. The rack is key—it lifts the ham out of its juices so the bottom doesn’t get soggy and the heat can circulate evenly.
-
A sharp knife for scoring the diamond pattern on the fat cap. This isn’t just for looks; it helps the glaze penetrate and allows fat to render.
-
A probe thermometer. This is, without a doubt, your most important tool. Guesswork leads to dry ham; a thermometer guarantees perfect results every single time.
-
A basting brush for slathering on that gorgeous, sticky glaze.
-
Aluminum foil for tenting and protecting the ham during the initial heating phase.
-
A sturdy carving knife and fork for the grand finale.
The Ingredients – Building Flavor
Deconstructing the Perfect Brown Sugar Glaze
Alright, let’s talk about the star of the show: that incredible, shiny, crackly glaze. What makes it so darn good? It’s all about the balance of flavors. We’re building a powerhouse team where each player has a crucial role.
-
The Sweet Base (Brown Sugar): This is non-negotiable. Brown sugar is the foundation, and its molasses content is the secret weapon. It provides a deeper, almost toffee-like flavor and a richer color than white sugar could ever achieve. It’s also what creates that gorgeous, sticky caramelization in the oven’s heat.
-
The Acidic Component (Dijon Mustard): Now, wait! Don’t skip this. You might think mustard is just for savory foods, but its tangy sharpness is absolutely essential. It cuts through the overwhelming sweetness of the sugar and the richness of the ham, creating a complex and balanced flavor profile that isn’t cloying. In other words, it makes the glaze taste grown-up.
-
The Liquid (Pineapple Juice): Liquid is necessary to dissolve the sugar into a spreadable paste. Pineapple juice is a classic choice because its tropical sweetness and acidity complement the other flavors perfectly. However, orange juice, apple cider, or even ginger ale work wonderfully too!
-
The Spices (Ground Cloves): A little pinch of ground cloves or allspice adds a warm, aromatic depth. It’s that mysterious “what is that delicious flavor?” note that makes the glaze taste truly special. A little goes a very long way, though!
Gathering Your Ingredients (Shopping List)
Before you get started, make sure you have everything on hand. Here’s your simple shopping list:
For the Ham:
-
1 (8-10 lb) fully cooked, bone-in ham
For the Glaze:
-
1 cup packed light or dark brown sugar
-
1/2 cup pineapple juice or orange juice
-
1/4 cup Dijon mustard
-
1/4 teaspoon ground cloves (or 20-30 whole cloves for studding)
-
(Optional) 2 tablespoons honey or maple syrup for extra richness
-
(Optional) 1 tablespoon apple cider vinegar for a brighter tang
The Step-by-Step Cooking Method
Step 1: Preparation – Bringing the Ham to Temperature
First things first, preheat your oven to a moderate 325°F (165°C). Then, carefully remove the ham from all its packaging. If your ham comes with a plastic cap or a small disk over the bone, be sure to take that off! Place the ham, flat-side down, on the rack in your roasting pan. Now, if you have a whole ham (not spiral-cut), take your sharp knife and score the surface fat in a diamond pattern. Don’t cut too deep into the meat—just through the fat layer. This helps the glaze seep in and gives you those beautiful, crispy edges. Let the ham sit out for about 45-60 minutes to take the chill off; this promotes much more even heating.
Step 2: The Initial Bake – Heating it Gently
Once the oven is hot, it’s time to get cooking. Loosely tent the entire roasting pan with aluminum foil, creating a little dome over the ham. This little trick is crucial because it traps steam and gently heats the ham without drying out the exterior. Slide it into the oven and let it bake. Generally, you’ll heat it for about 10-15 minutes per pound. But—and this is a big but—you absolutely cannot rely on time alone. This is where your thermometer becomes your best friend. You’re aiming to heat the ham until its internal temperature reaches about 100-110°F. This gentle warming phase is the key to a juicy result.
Step 3: Crafting the Glaze – Simmering to Perfection
While the ham is warming, let’s make the magic potion. In a small saucepan, combine the brown sugar, your chosen liquid (like pineapple juice), Dijon mustard, and ground cloves. Whisk it all together over medium heat. Eventually, it will come to a gentle simmer. Let it bubble away for 4-5 minutes, whisking occasionally, until the sugar is completely dissolved and the mixture has thickened slightly. It should coat the back of a spoon. Then, remove it from the heat and set it aside. Your kitchen will smell absolutely incredible at this point.
Step 4: Glazing and Caramelizing – Creating the Crust
Okay, here comes the fun part! Carefully pull the ham out of the oven. It should be warm but not yet glazed. Increase your oven temperature to 400°F (205°C). Remove and discard the foil tent. Using your basting brush, generously paint on about half of your glorious glaze, getting it into all the scored lines and slices. Now, pop the ham back into the now-hotter oven, uncovered, for about 15-20 minutes. Pull it out again—it should already be starting to bubble and brown—and brush on the remaining glaze. Return it to the oven for one final 15-20 minute blast. Watch it closely now! You want the glaze to become dark, bubbly, and beautifully caramelized. It might even crackle a bit. That’s exactly what you want!
Step 5: The Final Check – Resting is Crucial
How do you know it’s done? You check its temperature, of course! Insert your thermometer into the thickest part of the meat, making sure not to touch the bone. You are looking for a reading of 140°F (60°C), which is the USDA recommended safe internal temperature for a pre-cooked ham. Once it hits that magic number, take it out! Now, here is the step everyone wants to skip but absolutely shouldn’t: RESTING. Loosely tent the ham with foil again and let it sit for at least 20-30 minutes. This allows the frantic, hot juices to relax and redistribute throughout the meat. If you slice it immediately, all those precious juices will just run out onto the cutting board, leaving you with a drier ham. Patience is a virtue that is deliciously rewarded here.
Serving, Carving, and Leftovers
How to Carve a Bone-In Ham Like a Pro
Carving a ham seems intimidating, but it’s actually a simple process. First, place your beautifully rested ham on a sturdy cutting board, flat-side down. Find a small, sharp knife. Locate the bone—it will run through the center. Make a single, vertical cut down to the bone, about three inches from the thinner end. Then, make a long, horizontal cut along the top, following the natural seam of the muscle, to loosen a large section of meat. You can now slice this section vertically into your desired thickness. Simply work your way around the bone, repeating this process until you’ve carved all the meat. It’s easier than it looks, I promise!
Serving Suggestions: The Perfect Accompaniments
What goes with this glorious main event? The possibilities are endless! Classic pairings include creamy scalloped potatoes, buttery roasted asparagus or green beans, rich mac and cheese, and soft, warm dinner rolls to soak up any extra glaze. For a refreshing contrast, a bright creamy coleslaw is always a winner.
The Wonderful World of Ham Leftovers
Honestly, the feast is just the beginning! The leftover ham is a gift that keeps on giving. Think beyond basic sandwiches (though a classic ham and Swiss on rye is heavenly). How about dicing it for a hearty ham and bean soup, frying it up with some rice and veggies for ham fried rice, or folding it into a fluffy omelet or quiche? You can also chop it for a delicious pot pie or the ultimate split pea soup. The options are truly limitless.
Expert Tips, Troubleshooting, and Variations
Pro Tips for the Best Glazed Ham Ever
Want to take your ham from great to legendary? Here are some insider secrets:
-
Baste with Juices: During the initial heating phase, open the oven every 30 minutes or so and baste the ham with the pan juices. This adds an extra layer of flavor and moisture.
-
Check the Label: Always double-check the packaging for any specific heating instructions for your pre-cooked ham, as some brands may have slight variations.
-
Go Low and Slow: If you have all the time in the world, you can heat the ham at an even lower temperature, like 275°F, for longer. This results in an unbelievably juicy texture.
-
Make Extra Glaze: Whip up a double batch of glaze and serve the extra on the side. Your guests will thank you.
Troubleshooting Common Ham Issues
Even pros run into the occasional snag. Here’s how to fix them:
-
Glaze isn’t caramelizing? Your oven might not be hot enough. Crank it up to 425°F for the last few minutes, or carefully use the broiler for 2-3 minutes (watch it like a hawk!).
-
Ham is drying out? It was likely overheated. Next time, keep it tented with foil for the entire warming phase and only remove it for the final glazing step. And always, always use a thermometer to avoid overshooting the temperature.
-
Glaze is too thin? Simmer it for a few more minutes to reduce and thicken it. If it’s too thick and pasty, simply whisk in another tablespoon of juice or water until it’s spreadable.
Delicious Glaze Variations to Try
Feel like mixing it up? The basic formula is your playground!
-
Maple-Orange Glaze: Substitute the pineapple juice with fresh orange juice and add 2 tablespoons of pure maple syrup.
-
Spicy Ginger Glaze: Add 1 tablespoon of freshly grated ginger and a pinch of cayenne pepper to the mix for a warm, spicy kick.
-
Apple Cider Glaze: Use reduced apple cider instead of pineapple juice and add a pinch of cinnamon.
FAQs
Frequently Asked Questions
What is the best temperature to cook a pre-cooked ham?
The best temperature to heat a pre-cooked ham is 325°F (165°C). This gentle heat warms it through perfectly without driving out all its precious moisture. You only increase the heat at the very end to caramelize the glaze and create that perfect sticky crust.
How long do you cook a ham per pound?
For a fully cooked ham at 325°F, a good estimate is 10-15 minutes per pound to reach the target internal temperature of 140°F. However, this is just a guideline. Ovens can vary dramatically, so the only way to know for sure is to use a reliable meat thermometer. It’s your true guarantee of perfection.
Do you cover ham when baking?
Yes, but only for part of the time. You cover it tightly with foil for the initial gentle heating phase to prevent it from drying out. Then, you remove the foil for the last 30-40 minutes of cooking to allow the applied glaze to caramelize, bubble, and become deliciously sticky.
Can I make the glaze ahead of time?
Absolutely! In fact, it’s a great way to get ahead. The brown sugar glaze can be made up to 3 days in advance. Just store it in an airtight container in the refrigerator. When you’re ready to use it, gently reheat it on the stove or in the microwave, adding a splash of water or juice if it’s too thick, so it’s easy to brush onto the ham.
Baked Ham with Brown Sugar Glaze
Description
🍖 Baked Ham with Brown Sugar Glaze
Ingredients:
-
1 fully cooked bone-in ham (about 8–10 lbs)
-
Whole cloves (optional, for studding)
For the glaze:
-
1 cup brown sugar (light or dark)
-
½ cup honey (or maple syrup)
-
¼ cup Dijon mustard (or yellow for milder flavor)
-
2 tbsp apple cider vinegar (or orange juice)
-
½ tsp ground cinnamon
-
¼ tsp ground cloves (optional)
Instructions:
-
Preheat oven to 325°F (160°C).
-
Place ham cut-side down in a roasting pan. Score the surface in a crisscross diamond pattern (about ½-inch deep) and, if desired, stud with whole cloves.
-
Make the glaze: In a saucepan, combine brown sugar, honey, mustard, vinegar, cinnamon, and cloves. Simmer 2–3 minutes until smooth and slightly thickened.
-
Brush ⅓ of the glaze all over the ham. Cover loosely with foil.
-
Bake: Roast ham for 1 ½–2 hours (about 15 minutes per pound), basting with glaze every 30 minutes.
-
For the last 20 minutes, uncover and brush on remaining glaze. Let the top caramelize until golden and sticky.
-
Remove from oven, rest 15 minutes before carving, and serve with pan juices or extra glaze.