
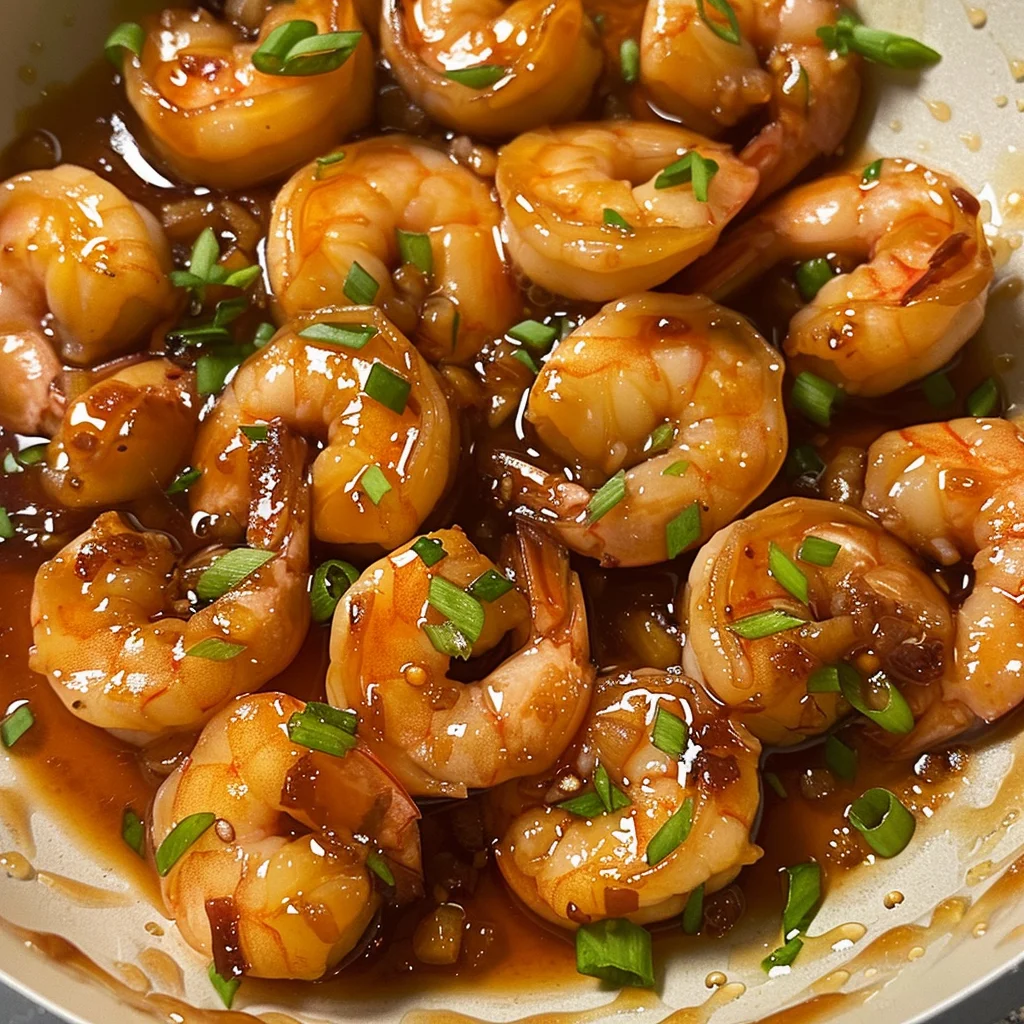
Introduction & The Allure of Honey Garlic Shrimp
Honey Garlic Shrimp: Your Ultimate Guide to a Perfect, Flavor-Packed Meal
Alright, let’s be honest—who can honestly resist a plate of sizzling, glistening shrimp drenched in a sticky, sweet, and savory sauce? Frankly, not many of us! Honey Garlic Shrimp isn’t just another recipe; it’s a global phenomenon for a darn good reason. This dish, believe it or not, manages to hit every single note on the flavor spectrum, creating a symphony in your mouth that is nothing short of magical.
Furthermore, its charm lies in its incredible versatility. Consequently, whether you’re a busy parent scrambling for a quick weeknight dinner, a novice cook looking for a surefire hit, or a seasoned chef wanting to whip up something effortlessly impressive, this dish has your back. Moreover, the aroma of garlic sizzling in a pan, mingling with the sweet scent of honey and savory soy sauce, is practically guaranteed to make your kitchen smell like a five-star restaurant. Ultimately, this guide will walk you through every single step, unraveling the secrets to creating not just a good, but an absolutely phenomenal Honey Garlic Shrimp experience right at home.
Why Honey Garlic Shrimp is a Universal Favorite
So, what’s the big deal about this particular combination, anyway? Well, the appeal is genuinely universal, and it all boils down to basic human taste buds. Firstly, we’re hardwired to love the powerful one-two punch of sweet and savory flavors. The honey provides a natural, floral sweetness that caramelizes beautifully, while the garlic and soy sauce bring that deep, umami-rich savoriness that makes you crave more.
Secondly, let’s talk about speed. In today’s frantic world, we’re all searching for those easy dinner ideasthat don’t compromise on taste. Thankfully, this dish is a notorious 20-minute meal! From fridge to table in less time than it takes to watch a sitcom, it’s the ultimate solution for hectic evenings when takeout seems tempting.
Finally, it’s all about accessibility. The ingredient list is refreshingly simple and doesn’t require a trip to a specialty grocery store. You likely have most of the components in your pantry right now! This simplicity, however, leads to a complex and restaurant-quality flavor that feels both familiar and excitingly gourmet. It’s a family-friendly meal that feels like a special treat, proving that you don’t need complicated techniques to create something truly memorable.
Understanding the Core Components
Deconstructing the Dish: The Magic of Honey and Garlic
Before we fire up the stove, let’s get to know our all-star team of ingredients. Understanding each component’s role is, without a doubt, the secret key to mastering this Asian shrimp recipe. It transforms you from someone who just follows a recipe into a cook who can intuitively create a balanced sauce every single time.
The Star Ingredients and Their Roles
Imagine each ingredient as a member of a band; they all need to work in harmony to create a hit song!
-
Honey: Obviously, the lead singer. This natural sweetener is the star of the show, providing a lush, caramel-like depth that forms the base of our glorious glaze. However, not all honey is created equal! A robust, darker honey like wildflower will give a more intense flavor than a lighter clover honey.
-
Garlic: The charismatic lead guitarist. It provides the powerful, pungent kick that defines the dish. Freshly minced garlic is absolutely non-negotiable here—please avoid the pre-minced jarred stuff! Its flavor is brighter, sharper, and infinitely more authentic.
-
Soy Sauce: The steady bass player, providing the foundational umami and saltiness. It deepens the entire flavor profile and balances the honey’s sweetness. For a gluten-free alternative, tamari or coconut aminos work beautifully.
-
Acid (Lemon Juice, Lime, or Rice Vinegar): The brilliant keyboardist, adding a essential high note. A splash of acid at the end cuts through the richness, brightening all the other flavors and preventing the dish from tasting overly heavy.
-
Thickener (Cornstarch): The expert drummer, keeping everything together. It’s what transforms a thin, watery sauce into that luxurious, sticky glaze that clings perfectly to every single shrimp.
Choosing Your Shrimp: A Buyer’s Guide
Now, for the main event: the shrimp! Navigating the seafood counter can be confusing, so here’s the real deal.
Fresh vs. Frozen Shrimp
Here’s a little industry secret: most “fresh” shrimp at the counter were actually frozen solid shortly after being caught and then thawed for display. Therefore, you are often better off buying high-quality frozen shrimp yourself! This way, you control the thawing process and know exactly how long they’ve been stored. Look for bags with shrimp that are individually quick frozen (IQF); they’re easier to work with since you can use exactly the amount you need.
Size Matters: Understanding Shrimp Count (e.g., 21/25, 31/40)
Those numbers on the bag? They’re simpler than they look! They indicate how many shrimp make up one pound. For instance, a label that says “21/25” means there are 21 to 25 shrimp in that pound. For this recipe, a medium-large shrimp (like 31/40 or 21/25 count) is the perfect sweet spot. They’re substantial enough to feel satisfying but still cook through in minutes.
Tail-On vs. Tail-Off: Presentation and Practicality
This is purely a matter of preference! Tail-on shrimp undoubtedly make for a more beautiful, restaurant-style presentation. However, tail-off shrimp are far more practical for a quick weeknight dinner—especially with kids—as they are easier to eat. You really can’t go wrong either way.
The Flavor Foundation: Building a Balanced Sauce
Creating the ultimate sauce is all about balance. Think of yourself as a flavor scientist!
-
Sweet: Primarily from honey, but a tablespoon of brown sugar can add a deeper molasses note.
-
Salty & Umami: Soy sauce is the workhorse here.
-
Sour/Acidic: A squeeze of fresh lemon juice is classic, but lime juice or rice vinegar also work wonders.
-
Spicy/Heat: This is optional but highly recommended! A pinch of red pepper flakes, a spoonful of sriracha, or even some minced ginger can add a wonderful layer of complexity.
-
Aromatic: Fresh garlic is king, but ginger and green onions play a supporting role.
The goal is to taste as you go! Does it taste too sweet? Add a dash more soy sauce. Too salty? A bit more honey and lemon juice will balance it out. You are the boss of your sauce!
Mastering the Method – Techniques for Perfection
Cooking Honey Garlic Shrimp: Step-by-Step Mastery
Alright, enough talk—let’s get cooking! This process is blissfully fast, so it’s crucial to have all your ingredients prepped and within arm’s reach. This is called mise en place, and it’s the ultimate secret to avoiding a kitchen disaster.
Step 1: The Essential Prep – Patting Dry and Seasoning
First things first, ensure your thawed shrimp are as dry as a desert. After patting them thoroughly with paper towels, season them simply with a little salt and pepper. This step is the absolute most important trick for getting a beautiful sear instead of a sad steam. Meanwhile, whisk together your sauce ingredients in a separate bowl; this ensures everything incorporates smoothly later.
Step 2: The Sear – How to Get Perfectly Cooked Shrimp, Not Rubbery
Heat a large skillet or wok over medium-high heat until it’s properly hot. Add a neutral oil with a high smoke point, like avocado or vegetable oil. Now, add the shrimp in a single, uncrowded layer—if you cram them all in, they’ll steam! Cook them for just 1-2 minutes per side. You are looking for them to turn pink and opaque with a slight golden sear. They should curl into a loose “C” shape. Immediately remove them from the pan; they will continue to cook a little from residual heat, and we don’t want rubbery shrimp!
Step 3: Crafting the Sauce – Simmering to Glazy Perfection
In that same, now-flavor-packed pan, you’ll see delicious browned bits stuck to the bottom. That’s called the fond, and it’s pure flavor gold! Pour your pre-mixed sauce into the pan; it will sizzle and bubble magnificently. As you scrape the bottom with a wooden spoon, the fond will dissolve into the sauce, making it infinitely more delicious.
Let the sauce simmer for 2-3 minutes. As it heats, the cornstarch will activate, and the liquid will reduce, transforming from a thin, watery liquid into a thick, glossy, luxurious glaze. This is the magic happening right before your eyes!
Step 4: The Grand Finale – Coating and Garnishing
Reduce the heat to low and return the cooked shrimp to the pan. Gently toss and stir until every single shrimp is lovingly coated in that sticky, irresistible glaze. This should only take about 30 seconds—just long enough to reheat the shrimp. Finally, turn off the heat and stir in a final splash of fresh lemon juice and your garnishes. This last-minute addition of fresh acid brightens the entire dish spectacularly.
Advanced Technique: How to Velvet Shrimp for a Restaurant-Quality Texture
Want to take your shrimp to a mind-blowing, restaurant-level tender? Then you need to try velveting! This classic Chinese technique involves marinating the shrimp in a mixture of egg white, cornstarch, and a splash of rice wine or vinegar for 30 minutes. Afterwards, you blanch them in oil or water before the final stir-fry. The result? Shrimp with an unbelievably silky, smooth, and tender texture that is simply divine.
Common Pitfalls and How to Avoid Them
Even the best of us can make mistakes! Here’s how to fix the most common issues:
-
Rubbery, Overcooked Shrimp: The number one mistake! The solution is simple: cook shrimp quickly over high heat and remove them the second they turn opaque. They cook in minutes, so never walk away.
-
Watery Sauce: This usually means the sauce didn’t simmer long enough to reduce and thicken. If you’re in a pinch, create a quick slurry with a bit more cornstarch and cold water, then whisk it into the simmering sauce.
-
Burnt Garlic: Garlic burns in a heartbeat! If you’re sautéing it first, always do it over medium heat. In our recipe, adding it directly to the sauce prevents this entirely.
Recipe Variations & Dietary Adaptations
Beyond the Basic Recipe: Delicious Variations to Try
Once you’ve mastered the classic, a world of variations opens up! This versatile recipe is a fantastic canvas for your culinary creativity.
Spicy Honey Garlic Shrimp
Craving some heat? This is an easy win! Simply add one or two teaspoons of sriracha or chili garlic paste directly into the sauce mixture. Alternatively, you can add a half teaspoon of red pepper flakes to the pan just before you add the sauce to toast them slightly and unlock their smoky heat.
Honey Garlic Shrimp Stir-Fry
Turn your shrimp into a complete, one-pan meal. Before you cook the shrimp, quickly stir-fry a mix of colorful vegetables like bell peppers, broccoli florets, snap peas, and thinly sliced carrots. Remove them from the pan, then cook your shrimp and make the sauce as directed. Finally, toss everything back together for a vibrant and healthy shrimp stir-fry.
Crockpot/Slow Cooker Honey Garlic Shrimp
Yes, you can even make this in a slow cooker! However, because shrimp cook so quickly, you must add them at the very end to prevent them from turning to mush. Combine the sauce ingredients (hold the cornstarch) in the crockpot and cook on low for 2-3 hours. Then, mix your cornstarch with a little cold water to make a slurry, stir it in, and cook for another 20 minutes until thickened. Finally, add the raw shrimp and cook for an additional 15-20 minutes, just until they are opaque and cooked through.
Dietary Adaptations: Gluten-Free, Keto, and Low-Sugar Options
This dish is wonderfully adaptable to various dietary needs.
-
Gluten-Free: This is incredibly easy! Simply swap the regular soy sauce for tamari (which is naturally gluten-free) or coconut aminos. Double-check that all other ingredients are certified gluten-free.
-
Keto: The main hurdle is the honey. Instead, use a sugar-free maple syrup or a keto-friendly honey substitute. Thicken the sauce with a small amount of xanthan gum instead of cornstarch.
-
Low-Sugar: You can significantly reduce the amount of honey and add a natural sugar-free sweetener like monk fruit or stevia that holds up well to heat. Increasing the lemon juice and garlic can help compensate flavor-wise.
Serving, Pairing, and Storing
Serving Suggestions and Leftovers
You’ve created a masterpiece—now let’s plate it up! Presentation is key, and the right pairings can turn this single dish into a magnificent feast.
The Perfect Pairings: What to Serve with Honey Garlic Shrimp
The best side dishes are those that soak up the incredible sauce.
-
Grains: A simple bed of fluffy jasmine rice or white rice is a classic for a reason. For a healthier twist, try brown rice, quinoa, or cauliflower rice.
-
Noodles: Toss the shrimp with cooked lo mein noodles, spaghetti, or even zucchini noodles (zoodles) for a low-carb option.
-
Vegetables: Keep it light with steamed broccoli, roasted asparagus, or a simple green salad with a ginger-sesame dressing.
How to Store and Reheat Leftovers
While this dish is truly best served immediately, leftovers can still be enjoyed.
-
Storing: Let the shrimp cool completely before placing them in an airtight container. They will keep in the refrigerator for up to 2 days.
-
Reheating: The microwave is the easiest method but can make the shrimp rubbery if you’re not careful. Reheat them at 50% power in short 30-second bursts, stirring in between. For a better texture, reheat them gently in a skillet over low heat, adding a tiny splash of water or lemon juice to loosen the sauce.
Frequently Asked Questions (FAQs)
Honey Garlic Shrimp FAQs
How long does it take to cook honey garlic shrimp?
Answer: From start to finish, this entire dish typically takes about 20 minutes, making it an ideal quick weeknight dinner. The actual hands-on cooking time is only about 10-12 minutes.
Can I use pre-minced garlic from a jar?
Answer: You can for convenience, but freshly minced garlic will provide a far superior, brighter, and more potent garlic flavor that is key to the dish. The jarred stuff often has a muted, slightly acidic taste.
Why is my sauce not thickening?
Answer: If your sauce is too thin, you likely didn’t simmer it long enough for the cornstarch to activate. Simply let it bubble for another minute or two. If it’s still runny, create a cornstarch slurry (mix 1 tsp cornstarch with 1 tbsp cold water) and stir it into the simmering sauce. It should thicken within 60 seconds.
Can I make honey garlic shrimp ahead of time?
Answer: It’s best served immediately for the optimal texture of the shrimp. However, you can absolutely get a head start! You can make the sauce 2-3 days ahead of time and store it in the fridge. You can also clean and dry the shrimp the day before. When ready to eat, just cook the shrimp fresh and heat the sauce for a meal that tastes like you just made it from scratch. For more information on handling seafood, you can check the official guidelines for safe internal temperature for seafood.
Print
Honey Garlic Shrimp
Description
🍯🧄 Honey Garlic Shrimp
Ingredients (4 servings):
-
1 lb (450g) large shrimp, peeled & deveined
-
3 tbsp honey
-
3 tbsp soy sauce (low sodium preferred)
-
2 cloves garlic, minced
-
1 tbsp fresh ginger, grated (optional but recommended)
-
1 tbsp olive oil (or sesame oil)
-
1 tsp cornstarch + 2 tsp water (optional, for thicker sauce)
-
Sesame seeds & chopped green onions, for garnish
Instructions:
-
Marinate shrimp: In a bowl, whisk together honey, soy sauce, garlic, and ginger. Add shrimp and marinate 15–20 minutes.
-
Cook shrimp: Heat oil in a skillet over medium-high. Add shrimp (reserve marinade) and cook 1–2 minutes per side until pink and opaque. Remove shrimp and set aside.
-
Make sauce: Pour reserved marinade into the skillet. Simmer 2–3 minutes, stirring. For thicker sauce, whisk in cornstarch slurry and cook until glossy.
-
Combine: Return shrimp to the skillet, tossing to coat in sauce.
-
Serve: Garnish with sesame seeds and green onions. Serve over rice, noodles, or steamed veggies.