
Part 1: Introduction & The Allure of the Black Velvet Cupcake
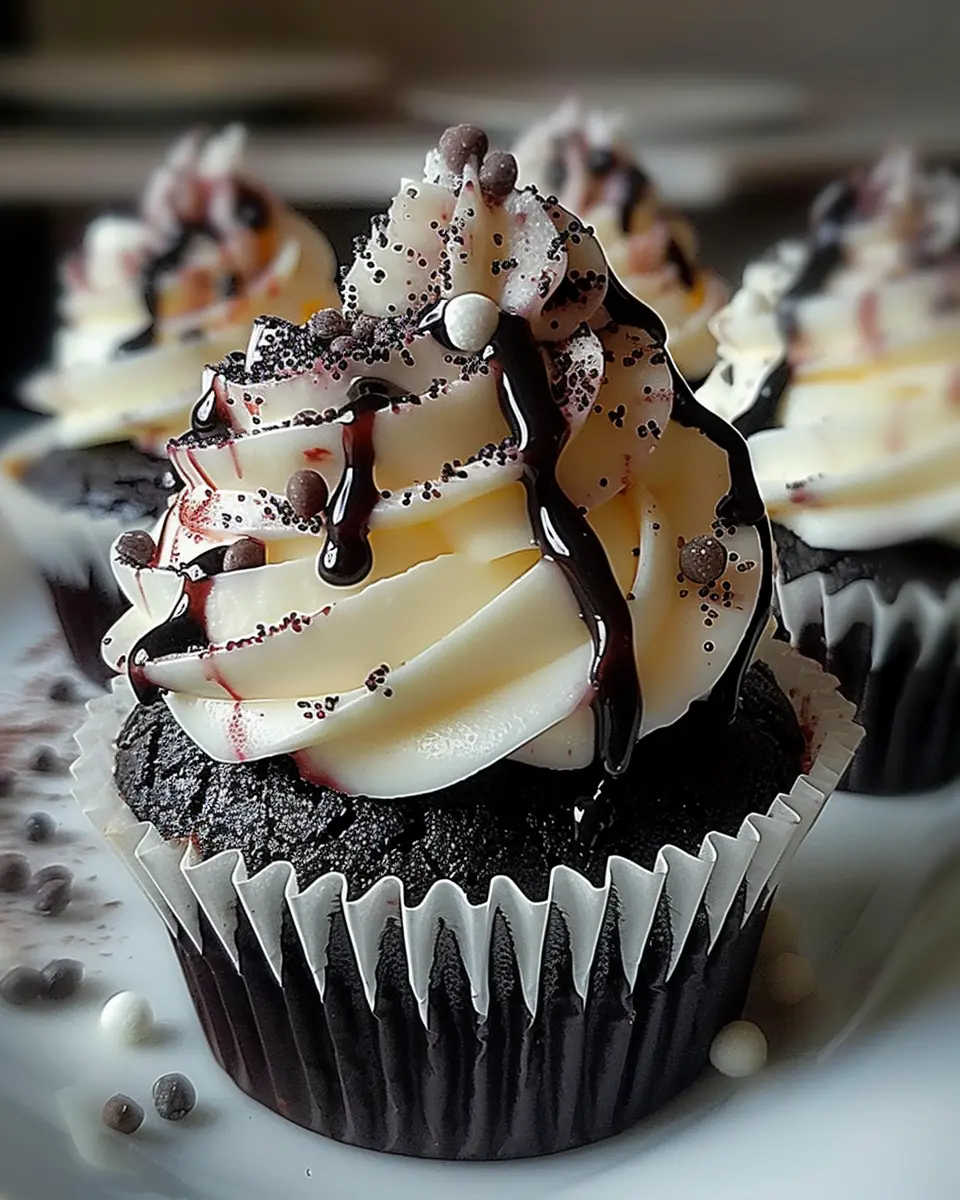
Alright, let’s be honest—we’ve all seen a million chocolate cupcakes. Don’t get me wrong, a classic is a classic for a reason, but sometimes you crave something that breaks the mold, something with a little more drama and a whole lot more wow factor. Picture this: a cupcake so profoundly, mysteriously dark it seems to absorb the light around it, crowned not with a heavy blanket of buttercream, but with a billowy, ethereal cloud of sweet marshmallow frosting. This isn’t just a dessert; it’s an experience. This, my friends, is the magic of the Black Velvet Marshmallow Cupcake.
Forget everything you thought you knew about decadent chocolate desserts. This modern masterpiece takes the beloved, tender-crumbed concept of its famous red cousin and turns the volume all the way up to eleven. The result is a stunning visual contrast and a flavor combination that’s nothing short of addictive. Consequently, these gorgeous treats are perfect for Halloween parties, sophisticated soirées, or any day you feel like turning your kitchen into a gourmet bakery. Ultimately, this guide will walk you through every single step, ensuring your homemade cupcakes are not only breathtaking but also impossibly delicious.
Why This Combination is Irresistible
So, what’s the big deal about this particular pairing? Well, it’s all about balance. On one hand, you have the cake itself—deep, rich, and boasting an almost Oreo-like intensity thanks to its special ingredient. Conversely, the frosting is its perfect opposite: light, sweet, airy, and wonderfully fluffy. Together, they create a harmonious dance of flavors and textures that avoids being overly sweet or one-note. Instead of a sugar crash, you get a sophisticated indulgence where the deep cocoa notes are perfectly lifted by the vanilla-kissed mallow. Honestly, it’s a match made in dessert heaven.
Part 2: Deconstructing the Black Velvet Mystique
Before we dive into the mixing bowls, let’s clear up a common question. What on earth is black velvet, anyway? Is it just a red velvet cupcake that’s had a goth phase? Well, not exactly. While they share a similar DNA—think that signature tender, “velvety” crumb structure achieved with buttermilk and vinegar—the difference is far more than skin deep. It’s a fundamental shift in flavor profile that makes all the difference.
The Secret Ingredient: Black Cocoa Powder
Alright, lean in close because this is the real magic trick. The star of the show, the reason for that jaw-droppingly dark color and unique flavor, is black cocoa powder. Now, this isn’t your average grocery store cocoa. Seriously, don’t even bother looking for it next to the Hershey’s. Black cocoa is an ultra-Dutch-processed cocoa. Essentially, it’s been alkalized to neutralize its natural acidity, which results in a darker color and a much milder, less bitter flavor.
So, what does it taste like? Imagine the deep, aromatic flavor of an Oreo cookie—that’s black cocoa. It’s less fatty and more intensely chocolatey in a dark, mysterious way, without being overwhelming. If you’re wondering where to find this baking unicorn, you’ll typically have the best luck online or at specialty baking stores. In a pinch, you can mix regular Dutch-process cocoa with an extreme amount of black gel food coloring, but honestly, for the true authentic experience, seeking out the real deal is 100% worth the effort. For a deep dive into the science behind black cocoa powder, this expert resource is fantastic.
The Science Behind the Velvet Crumb
Now, for the “velvet” part of the equation. This isn’t just a fancy name; it’s a literal description of the texture, achieved through some simple kitchen chemistry. The key players here are the acid (from the buttermilk and vinegar) and the base (baking soda). When they meet in the batter, they have a wild party, producing lots of carbon dioxide bubbles. These bubbles are what give the cake its incredible lift and that fine, soft, tender crumb that simply melts in your mouth.
Furthermore, the acid in the buttermilk also works to tenderize the gluten strands in the flour, preventing the cake from becoming tough and chewy. And about the fat: you’ll notice many black velvetrecipes, including this one, use oil instead of butter. Why? Well, oil coats the flour proteins more effectively than butter does, which again, leads to a more tender texture. Plus, oil is 100% fat, whereas butter contains water, so using it guarantees an unbelievably moist chocolate cupcake that stays that way for days. It’s a winning combination of science and flavor that creates something truly special.
Part 3: The Ultimate Black Velvet Cupcake Recipe
Alright, enough talk—it’s time to get our hands dirty and bake! This recipe has been meticulously tested to deliver a perfectly moist, shockingly dark cupcake with that signature tight, tender crumb. Trust the process, follow these steps, and you’ll be a black velvet master in no time. Seriously, this is your foolproof ticket to decadent chocolate dessert heaven.
Gathering Your Ingredients
First things first, let’s get everything organized. Baking is a science, and having your mise en place(that’s just a fancy way of saying “everything in its place”) is the first step to success. Here’s what you’ll need for the cupcakes:
Dry Ingredients:
-
1 ½ cups (190g) all-purpose flour (spooned and leveled!)
-
½ cup (50g) black cocoa powder – This is non-negotiable for the real deal.
-
1 cup (200g) granulated sugar
-
1 tsp baking soda
-
½ tsp fine sea salt
-
1 tsp instant espresso powder (optional, but it deepens the chocolate flavor amazingly)
Wet Ingredients:
-
1 cup (240ml) buttermilk, at room temperature
-
½ cup (120ml) vegetable or canola oil
-
2 large eggs, at room temperature
-
1 tbsp pure vanilla extract
-
1 tsp white vinegar
-
1-2 tbsp black gel food coloring – Yes, gel! Liquid will make your batter runny.
Step-by-Step Baking Instructions
Now, let’s walk through this together. Don’t rush; patience is a virtue, especially in baking.
-
Preparing the Pans: Start by preheating your oven to 350°F (175°C). This is crucial for the perfect rise. Then, line a standard 12-cup muffin tin with your favorite cupcake liners. Pro tip: if you want really flat bottoms and easy removal, use two liners per cup!
-
The Dry Whisk: In a medium-sized bowl, take all of your dry ingredients—the flour, black cocoa powder, sugar, baking soda, salt, and espresso powder. Give them a good, thorough whisk. This isn’t just about mixing; you’re aerating the flour and ensuring the leavening agents are evenly distributed, which prevents nasty bitter pockets of baking soda.
-
The Wet Mix: In a larger separate bowl, whisk together the oil and sugar until they’re just combined. Then, beat in the eggs, one at a time, followed by the vanilla extract and that all-important black gel food coloring. Go ahead and add a full tablespoon to start; you can always add more to achieve that inky, abyss-like color we’re after.
-
The Critical Combination: Here’s where many folks go wrong. You’re going to add the dry ingredients and the buttermilk to the wet ingredients, but you’ll do it in alternating batches. Start with about one-third of the dry mix, and stir it in until it’s just combined. Then, add half of the buttermilk, mixing again. Repeat with another third of the dry, the rest of the buttermilk, and finally the last of the dry mix. Overmixing is the enemy of a tender crumb! You just want to see no more streaks of flour.
-
The Final Activate: For your final trick, quickly stir in the one teaspoon of white vinegar. You’ll see the batter react almost immediately, becoming slightly lighter and bubbly. That’s the acid activating the baking soda—this is what gives our cupcakes their beautiful lift! Now, working swiftly, divide the batter evenly between the 12 prepared liners, filling each about 2/3 of the way full.
-
Baking to Perfection: Slide your tin into the preheated oven and bake for 18-22 minutes. Resist, and I mean resist, the urge to open that oven door before the 15-minute mark! A sudden draft can make them fall. They’re done when a toothpick inserted into the center comes out with just a few moist crumbs attached. Let them cool in the pan for 5 minutes before transferring them to a wire rack to cool completely. I know it’s hard, but you must let them cool entirely before frosting. Otherwise, you’ll have a puddle of marshmallow—a delicious tragedy, but a tragedy nonetheless.
Part 4: Crafting the Perfect Marshmallow Frosting
Your kitchen likely already smells incredible from the deep, aromatic scent of the black cocoa cupcakes. Now, for the pièce de résistance: a cloud-like, ethereal frosting that balances that rich intensity with a touch of sweet, airy magic. This isn’t your standard buttercream; it’s a light, fluffy, and divinely sweet marshmallow frosting that elevates these cupcakes from great to absolutely sublime. While it requires a bit more care, the payoff is, without a doubt, worth every second.
Ingredients for the Frosting
Gather these simple, high-quality ingredients. Because there are so few components, each one truly shines through, so quality matters here.
-
3 large egg whites – Ensure they are free of any yolk, as even a speck of fat can prevent your meringue from whipping up properly.
-
¾ cup (150g) granulated sugar – This sweetens the frosting and, when dissolved, gives the meringue its structure.
-
A pinch of fine sea salt – This is crucial to cut the sweetness and round out the flavor profile.
-
½ tsp cream of tartar – This stabilizer is your best friend! It helps the egg whites achieve maximum volume and prevents them from collapsing. You can substitute it with 1 tsp of fresh lemon juice in a pinch.
-
1 tsp pure vanilla extract – Adds that classic, warm vanilla flavor we associate with marshmallows.
Mastering the Method: Swiss Meringue
This method might seem fancy, but it’s actually very straightforward and results in a stunningly smooth, stable, and not-too-sweet frosting. It involves gently heating the egg whites and sugar together before whipping them into glossy peaks.
-
The Double Boiler: Find a heatproof bowl (glass or stainless steel are ideal) that can fit snugly over a saucepan without touching the water. Fill the saucepan with about an inch of water and bring it to a simmer over medium-low heat. Meanwhile, combine the egg whites, sugar, salt, and cream of tartar in the bowl. Whisk them together until they’re just combined.
-
Gentle Heating: Place the bowl over the simmering water, ensuring the bottom doesn’t touch it. This is now your double boiler. Heat the egg white mixture, whisking constantly but gently, until the sugar has completely dissolved and the mixture feels very warm to the touch. A good test is to rub a bit between your fingers; if it feels gritty, keep heating. You want to heat it until it reaches about 160°F (71°C) on a digital thermometer. This step pasteurizes the eggs for safety and dissolves the sugar for a smooth meringue.
-
The Whipping Stage: Now, carefully remove the bowl from the heat. Seriously, it will be hot! Using a hand mixer or a stand mixer fitted with the whisk attachment, beat the mixture on high speed. You’re aiming for stiff, glossy peaks. This can take a good 5-10 minutes, so be patient! You’ll know it’s ready when the meringue is bright white, hugely increased in volume, and the beaters leave sharp peaks that don’t droop at all. Halfway through, add the vanilla extract.
Frosting Variations
While the Swiss meringue is the gold standard, here are a couple of fantastic alternatives:
-
Marshmallow Fluff Frosting: For a quicker, no-cook option, beat 1 cup (2 sticks) of softened unsalted butter until light and fluffy. Gradually beat in one 7-ounce jar of marshmallow fluff until just combined. It’s super simple and delivers on that classic flavor, though the texture is denser.
-
Toasted Marshmallow: Once you’ve piped your beautiful Swiss meringue swirls, break out the kitchen torch! Gently wave the flame over the peaks and edges of the frosting until they turn a beautiful golden brown. This adds an incredible smoky, caramelized flavor that’s simply out of this world.
Part 5: Assembly, Decoration, and Presentation
The moment of truth has arrived! You’ve baked unbelievably moist chocolate cupcakes and whipped up a bowl of ethereal marshmallow frosting. Now, it’s time to bring them together to create your stunning Black Velvet Marshmallow Cupcakes. This stage is where your inner artist gets to shine; after all, we eat with our eyes first. A little care here transforms them from simple homemade cupcakes into a professional-looking, jaw-dropping decadent chocolate dessert.
Assembling Your Masterpiece
First, a non-negotiable rule: your cupcakes must be completely, utterly, 100% cool to the touch. I know the anticipation is killer, but frosting a warm cupcake is a recipe for a melty, slidey mess. Patience is your ultimate secret weapon here.
Next, let’s talk tools. While you can absolutely slather on the frosting with a knife for a rustic look, for those iconic bakery-style swirls, a piping bag is the way to go. Don’t let it intimidate you! To fill a piping bag without the fuss, simply place your chosen tip in the bag and then cuff the top of the bag over your hand, creating a wide opening. Use a spatula to fill the bag about halfway, uncuff it, twist the top to push the frosting down, and you’re ready to go.
Piping Techniques: The tip you choose defines your final look. For those classic, high, beautiful swirls, a large open star tip (like a Wilton 1M or 6B) is perfect. Hold the bag perpendicular to the center of the cupcake, apply even pressure, and pipe a tight spiral starting from the outside edge working inward, finishing by lifting straight up to create a peak. Alternatively, for a more modern, sleek look, a large round tip (like a Wilton 2A) creates beautiful dollops.
Creative Decoration Ideas
Once frosted, the final flourish is all yours. Here are some ideas to spark your creativity:
-
The Classic Elegant: Simply place a single mini marshmallow right on top of the peak. For a touch of glamour, a light dusting of edible gold lustre dust or a delicate drizzle of golden syrup looks incredible against the black and white.
-
The Spooky Spectacular: These cupcakes are a natural-born star at any Halloween dessert table. A sprinkle of black sanding sugar, a few black sprinkles, or a drizzle of melted dark chocolate creates a wonderfully wicked vibe. A plastic spider ring nestled on the side is always a crowd-pleaser.
-
The Chocolate Lover’s Dream: Enhance that deep cocoa flavor by lightly dusting the tops with a bit more black cocoa powder or a flurry of shaved dark chocolate curls. This adds a slight bitterness that contrasts wonderfully with the sweet frosting.
-
The Festive Fun: For a different holiday, coordinate your sprinkles! Red and green for Christmas, pastels for Easter, or bright colors for a birthday—the dramatic black base makes any color pop brilliantly.
Part 6: Pro Tips, Storage, and Making Ahead
You’ve mastered the recipe and the technique, but a true baking pro knows the secrets lie in the details. These final tips and tricks are what will ensure your Black Velvet Marshmallow Cupcakes are flawless every single time. From avoiding common pitfalls to planning ahead for a stress-free dessert, this is your ultimate guide to cupcake success.
Expert Tips for Cupcake Success
Let’s turn those good cupcakes into absolutely legendary ones. Keep these pointers in mind:
-
Weigh Your Flour: This is the single best thing you can do for consistent baking results. Too much flour is the top culprit for dry, dense cupcakes. If you don’t have a scale, fluff your flour with a spoon, spoon it gently into your measuring cup, and level it off with a knife. Never pack it down!
-
The “Just Combined” Rule: When alternating the wet and dry ingredients, mix until you see the last streak of flour disappear—and then stop immediately! Overmixing develops gluten, leading to a tough, chewy crumb instead of that signature velvety texture.
-
Oven Door Etiquette: That oven window is there for a reason. Resist the primal urge to open the door during the first 15 minutes of baking. A sudden drop in temperature can cause your beautiful cupcakes to fall in the center.
-
Gel is Gold: I’ll say it again: black gel food coloring is essential. Liquid food coloring adds unwanted moisture and will never, ever achieve that intense, inky black color we’re famous for.
Storing and Making Ahead
Life is busy, and sometimes you need to bake ahead of time. Here’s how to keep your creations perfect.
-
Unfrosted Cupcakes: These keep wonderfully! Once completely cool, store them in an airtight container at room temperature for up to 2 days. For longer storage, wrap them individually in plastic wrap and freeze for up to 2 months. Thaw overnight in the container on the counter.
-
Frosted Cupcakes: This is a bit trickier. The marshmallow frosting is best enjoyed the day it’s made. However, you can store them, uncovered, at cool room temperature for a few hours. If you must refrigerate them (for up to 24 hours), place them in a single layer in an airtight container. Be aware: the meringue can “weep” or become slightly sticky in the fridge. Always let them come to room temperature for about 30 minutes before serving to get the best texture and flavor back.
-
The Ultimate Make-Ahead Strategy: For a stress-free event, bake the cupcakes 1 day ahead and store them airtight at room temperature. Make the frosting and assemble your gorgeous decorated cupcakes the day you plan to serve them. This is the perfect balance for freshness, flavor, and your sanity!
Part 7: Troubleshooting Common Problems
Even the most seasoned bakers have an occasional kitchen mishap. Don’t panic if something doesn’t go perfectly the first time! Baking is a science, and every flop teaches you something. This section is your quick-reference guide to diagnosing and solving the most common issues that can pop up with black velvet cupcakes and their fluffy frosting.
Troubleshooting Your Cupcakes
Let’s tackle the cake first. If your cupcakes didn’t turn out as planned, one of these issues is likely the culprit.
-
Problem: My cupcakes are dry and crumbly.
-
The Likely Culprits: The most common cause is overbaking. Even a few minutes too long can evaporate precious moisture. Alternatively, too much flour is a classic mistake. Did you scoop directly from the bag with the measuring cup? That packs the flour down, leading to an over-measured, dry batter.
-
The Solution: Use a kitchen timer and check for doneness a minute or two before the timer goes off. Remember the toothpick test should yield moist crumbs, not a completely clean pick. Next time, spoon and level your flour or, better yet, use a scale for perfect accuracy.
-
-
Problem: The cupcakes didn’t rise properly and are dense.
-
The Likely Culprits: Your leavening agent is the prime suspect. Baking soda loses its potency over time. If your box has been in the pantry for over six months, it’s probably tired. Another possibility is overmixing the batter after adding the flour, which developed too much gluten.
-
The Solution: Test your baking soda by dropping a small pinch into a cup of vinegar. If it doesn’t bubble vigorously, it’s time to buy a new box. And always remember to mix until just combined.
-
-
Problem: The frosting is runny or won’t form stiff peaks.
-
The Likely Culprits: This is almost always a fat or temperature issue. Even a tiny speck of egg yolk or a greasy bowl can sabotage your meringue. Secondly, if the sugar mixture wasn’t heated enough, the sugar won’t fully dissolve, leaving a gritty, weak meringue that can’t hold its structure.
-
The Solution: Ensure your bowl and beaters are impeccably clean and free of any grease. When heating the egg whites and sugar, be patient and heat them until the mixture is smooth and hot to the touch (160°F/71°C). Unfortunately, a runny meringue cannot be fixed; you have to start over.
-
-
Problem: The color isn’t as deep black as I wanted.
-
The Likely Culprit: Not enough black cocoa powder or not enough black gel food coloring. Natural cocoa powders will result in a reddish-brown cake, not a black one.
-
The Solution: You absolutely must use black cocoa for the base. If you’ve done that and it’s still not dark enough, don’t be shy with the gel coloring! Add it tablespoon by tablespoon until the batter achieves that desired midnight hue.
-
Part 8: Frequently Asked Questions (FAQs)
Even with the most detailed guide, a few questions always pop up. Let’s tackle the most common head-scratchers to ensure your black velvet marshmallow cupcake journey is completely smooth from start to finish. Consider this your personal baking hotline.
Frequently Asked Questions
Can I make Black Velvet Cupcakes without black cocoa?
Well, you can, but you won’t get the same result. Using regular natural or Dutch-process cocoa will give you a delicious chocolate cupcake, but it will be brown, not black, and it will lack that specific Oreo-like flavor profile. To approach the real deal, you’d need to use a combination of regular Dutch-process cocoa and a very large amount of black gel food coloring. For the authentic experience, though, seeking out true black cocoa is highly recommended.
What can I use instead of buttermilk?
No buttermilk? No problem! This is an incredibly easy fix. Simply make a buttermilk substitute: for every cup of buttermilk needed, place 1 tablespoon of either white vinegar or fresh lemon juice in a measuring cup. Then, fill the cup with whole milk up to the 1-cup line. Give it a stir and let it sit for about 5-10 minutes. It will curdle and thicken slightly, and it will work perfectly in the recipe’s chemical reaction.
Why is my marshmallow frosting runny?
Ah, the classic meringue dilemma. A runny frosting typically points to one of two issues:
-
Grease Contamination: Even a microscopic trace of fat (from egg yolk or a not-spotlessly-clean bowl) can prevent egg whites from whipping up properly.
-
Insufficient Heating: If the sugar and egg whites weren’t heated to a high enough temperature (the target is 160°F / 71°C), the sugar won’t fully dissolve and won’t create the stable structure needed for stiff peaks. Unfortunately, a runny meringue can’t be saved; it’s best to start fresh with a meticulously clean bowl.
Can I make these cupcakes vegan?
You absolutely can, with a few smart swaps! For the vegan black velvet cupcakes, use a plant-based milk (soy or oat work well) mixed with vinegar for the buttermilk, a flax egg or commercial egg replacer, and ensure your sugar is vegan. For the frosting, a traditional Swiss meringue is off the table. Instead, you can try an aquafaba meringue (using the liquid from a can of chickpeas) or opt for the simpler vegan marshmallow fluff frosting alternative mentioned earlier.
How do I get a really deep black color?
This is a two-part mission. First, the foundation: you must use black cocoa powder. This gets you about 80% of the way there. Second, you need to amplify that color. This is where a high-quality black gel food coloring becomes essential. Liquid food coloring simply won’t be potent enough and will water down your batter. Add the gel coloring a tablespoon at a time until the batter achieves that stunning, midnight black color you’re after.
And there you have it—your complete masterclass in creating the stunning, the sophisticated, the utterly irresistible Black Velvet Marshmallow Cupcake. From demystifying the unique black cocoa powder to mastering the art of a flawless Swiss meringue frosting, you are now armed with all the knowledge, tips, and tricks needed to recreate this show-stopping decadent chocolate dessert in your own kitchen.
This journey is about more than just following a recipe; it’s about embracing the creativity and science of baking. You’ve learned how a bit of kitchen chemistry creates that legendary velvety texture, how patience leads to the perfect frosting, and how a few simple decoration choices can transform a treat into a masterpiece. Whether you’re baking for a spooky Halloween party, an elegant celebration, or simply to satisfy a serious chocolate craving, these cupcakes are guaranteed to impress.
So, preheat that oven, gather your ingredients, and get ready to amaze yourself and everyone around you. You’ve got this. Now, go forth and bake!
Black Velvet Marshmallow Cupcakes
Description
🖤 Black Velvet Marshmallow Cupcakes
Ingredients (Makes 12 cupcakes)
For the Cupcakes:
-
1 cup all-purpose flour
-
½ cup unsweetened dark cocoa powder (black cocoa works best for that deep velvet look)
-
1 tsp baking soda
-
½ tsp baking powder
-
½ tsp salt
-
1 cup granulated sugar
-
½ cup vegetable oil
-
2 large eggs (room temp)
-
1 tsp vanilla extract
-
1 cup buttermilk (or 1 cup milk + 1 tbsp vinegar, let sit 5 min)
For the Marshmallow Frosting:
-
1 jar (7 oz) marshmallow crème (Fluff)
-
½ cup unsalted butter, softened
-
2 cups powdered sugar
-
1 tsp vanilla extract
-
2–3 tbsp heavy cream (as needed for consistency)
Optional Decoration:
-
Mini marshmallows, toasted
-
Black sprinkles or edible glitter
-
Chocolate drizzle
Instructions
-
Make the Cupcakes:
-
Preheat oven to 350°F (175°C) and line a muffin tin with cupcake liners.
-
In a bowl, whisk together flour, cocoa powder, baking soda, baking powder, and salt.
-
In another bowl, whisk sugar, oil, eggs, and vanilla until smooth.
-
Mix in buttermilk.
-
Slowly add dry ingredients to wet, mixing until just combined (don’t overmix).
-
Divide batter evenly into liners (about ¾ full).
-
Bake 18–20 minutes, or until a toothpick comes out clean. Cool completely.
-
-
Make the Marshmallow Frosting:
-
Beat butter until light and fluffy.
-
Add marshmallow crème, powdered sugar, and vanilla. Beat until smooth.
-
Add heavy cream, one tablespoon at a time, until fluffy and spreadable.
-
-
Assemble:
-
Pipe frosting generously on cooled cupcakes.
-
Decorate with toasted marshmallows, sprinkles, or a chocolate drizzle.
-