
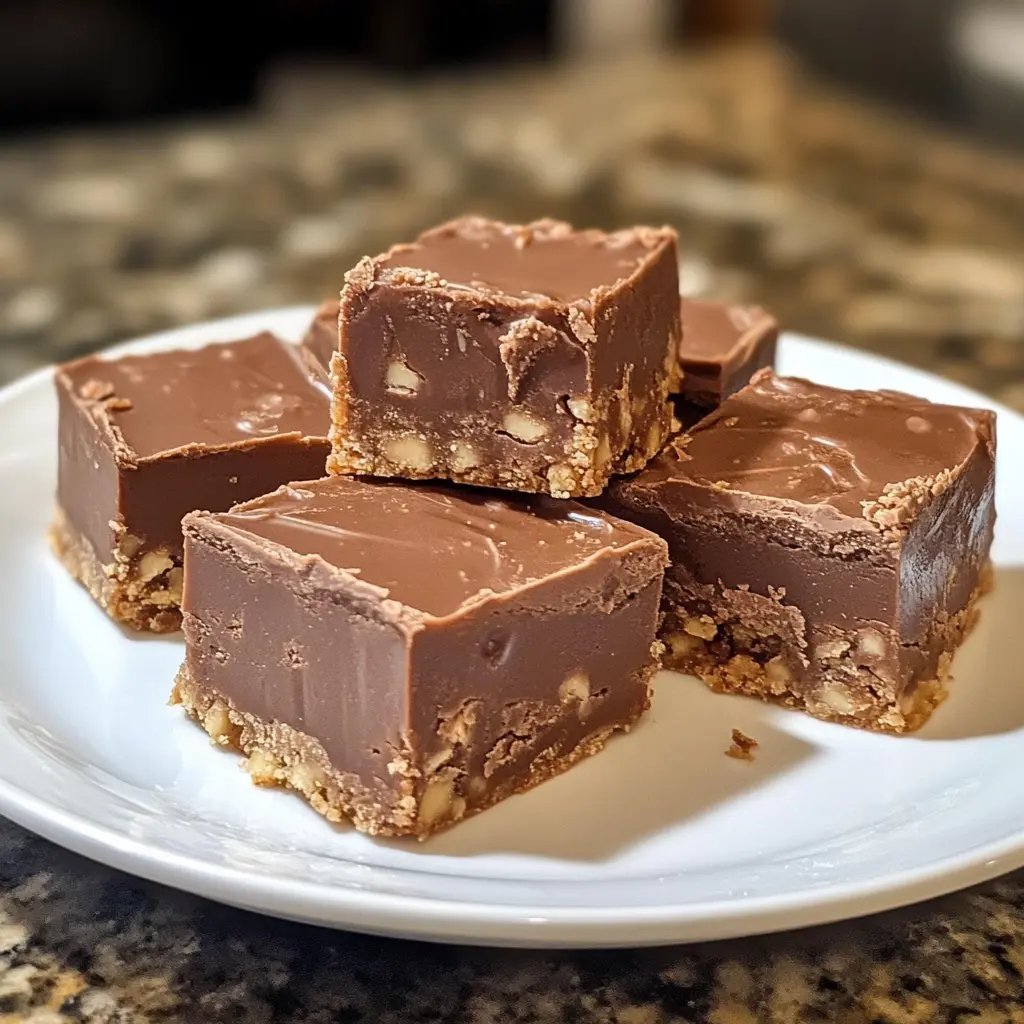
Chocolate Peanut Butter Freezer Fudge Squares: The Ultimate No-Bake Dessert
Are you craving a decadent dessert that requires zero baking and minimal effort? Chocolate Peanut Butter Freezer Fudge Squares deliver rich, creamy satisfaction in every bite. These no-bake treats combine the irresistible flavors of chocolate and peanut butter into perfectly portioned squares that you can store in your freezer for up to three months. Whether you’re a busy parent, a dessert enthusiast, or someone who simply can’t resist the chocolate-peanut butter combination, this freezer-friendly fudge will become your go-to sweet treat.
What Are Chocolate Peanut Butter Freezer Fudge Squares?
Chocolate Peanut Butter Freezer Fudge Squares are a simple, no-bake dessert that combines just a few wholesome ingredients. Unlike traditional fudge that requires precise temperature control and candy thermometers, freezer fudge relies on the cold temperature to set. This makes it incredibly beginner-friendly and foolproof.
The basic recipe features two distinct layers. First, you have a creamy peanut butter layer made with natural peanut butter, coconut oil, and a touch of sweetener. Then, a chocolate layer sits on top, created by adding cocoa powder to the same base mixture. The result is a rich, fudgy square that melts in your mouth.
Many recipes include only four to five ingredients total. This simplicity means you can whip up a batch in less than 15 minutes of active preparation time. Additionally, the fudge is naturally gluten-free and can easily be made vegan, making it suitable for various dietary preferences.
Why Choose Freezer Fudge Over Traditional Fudge?
No Baking Required
Traditional fudge demands precise heating and cooling techniques. In contrast, freezer fudge eliminates these complications entirely. You simply mix your ingredients and let the freezer do the work. This approach saves time and reduces the risk of crystallization or grainy textures that often plague conventional fudge recipes.
Quick Preparation
From start to finish, you can have freezer-ready fudge in under 20 minutes of hands-on time. The longest part of the process is simply waiting for the layers to freeze. Meanwhile, traditional fudge requires constant stirring, temperature monitoring, and careful timing.
Perfect for Hot Weather
During summer months, turning on the oven becomes unbearable. Freezer fudge provides a cool solution for satisfying your sweet tooth. Furthermore, the frozen texture offers a refreshing treat on hot days.
Extended Shelf Life
Properly stored freezer fudge lasts up to three months in the freezer. Traditional fudge typically keeps for only one to two weeks at room temperature. Therefore, you can make large batches and enjoy them over time.
Essential Ingredients for Perfect Fudge Squares
Creamy Peanut Butter
The foundation of any peanut butter freezer fudge is, naturally, peanut butter. Choose a creamy, natural variety without added oils or sugars for the best results. Natural peanut butter provides healthy fats and protein while maintaining a smooth texture when frozen.
Some recipes call for as little as two tablespoons, while others use up to three-quarters of a cup per layer. The amount depends on your desired serving size. Look for peanut butter with minimal ingredients – just peanuts and perhaps a touch of salt.
Coconut Oil
Coconut oil serves a crucial role in freezer fudge. It helps the mixture solidify when frozen while keeping the texture creamy rather than rock-hard. Use refined coconut oil if you want to avoid any coconut flavor in your final product.
Typically, recipes call for about one-quarter cup of melted coconut oil per layer. This ratio creates the perfect balance between firmness and creaminess. Additionally, coconut oil provides healthy medium-chain triglycerides.
Natural Sweeteners
Most freezer fudge recipes use natural sweeteners like pure maple syrup or honey. These liquid sweeteners blend seamlessly with peanut butter and coconut oil. They also add subtle flavor complexity beyond simple sweetness.
You’ll generally need one to two tablespoons of sweetener per layer. However, adjust based on your taste preferences. Some people prefer less sweet fudge, while others enjoy a more indulgent treat.
Unsweetened Cocoa Powder
For the chocolate layer, unsweetened cocoa powder or raw cacao powder works beautifully. Just one tablespoon transforms your peanut butter mixture into rich chocolate fudge. Cacao powder offers additional antioxidants compared to regular cocoa powder.
Choose high-quality cocoa powder for the best flavor. Dutch-processed cocoa provides a milder, smoother taste, while natural cocoa offers a more intense chocolate experience.
Optional Add-Ins
Many people customize their freezer fudge with additional ingredients:
-
Mini chocolate chips for extra chocolate bursts
-
Coarse sea salt for a sweet-salty contrast
-
Chopped nuts for added crunch
-
Vanilla extract for enhanced flavor depth
-
Chia seeds or flaxseeds for extra nutrition
Step-by-Step Preparation Guide
Prepare Your Pan
Start by lining an 8×4 inch loaf pan with parchment paper. This size works perfectly for most freezer fudge recipes. Make sure the parchment paper extends over the sides. This creates handles that make removing the fudge effortless later.
Alternatively, use a small square baking dish if you prefer thinner squares. Some recipes even suggest using a small bowl or plate for individual portions. The key is ensuring your container fits comfortably in your freezer.
Mix the Peanut Butter Layer
In a medium bowl, combine your creamy peanut butter, melted coconut oil, and maple syrup. Stir vigorously until the mixture becomes completely smooth and uniform. This usually takes about one to two minutes of mixing.
The consistency should resemble thick, pourable cake batter. If your mixture seems too thick, add a tiny bit more melted coconut oil. Conversely, if it’s too thin, add more peanut butter.
Pour half of this mixture into your prepared pan. Use a rubber spatula to spread it evenly to all corners. Tap the pan gently on the counter several times. This releases any air bubbles and helps the layer settle evenly.
Freeze the First Layer
Place your pan in the freezer for 5 to 10 minutes. This initial freeze prevents the layers from mixing together later. You want the peanut butter layer firm but not completely frozen.
Meanwhile, prepare your chocolate layer. This efficient timing keeps your total preparation time minimal.
Create the Chocolate Layer
Add unsweetened cocoa powder and an additional tablespoon of maple syrup to the remaining peanut butter mixture. Mix thoroughly until no streaks of cocoa powder remain. The mixture should be uniformly brown and silky smooth.
Taste the chocolate mixture at this point. If you prefer sweeter fudge, add a bit more maple syrup. Remember, freezing dulls sweetness slightly, so the mixture should taste just slightly sweeter than you want the final product.
Add the Final Layer
Remove your pan from the freezer. Carefully pour the chocolate mixture over the chilled peanut butter layer. Use your spatula to spread it gently, being careful not to disturb the bottom layer.
If desired, sprinkle coarse sea salt on top now. You can also add extra chocolate chips, pressing them lightly into the surface. These finishing touches add visual appeal and flavor complexity.
Final Freeze
Return the pan to the freezer for 1 to 2 hours, or until completely firm. The fudge should feel solid to the touch when ready. For best results, leave it overnight to ensure thorough freezing.
Some recipes suggest freezing for as little as 15 to 20 minutes for the final set. However, longer freezing times create better texture and easier cutting.
Cutting and Serving
Once frozen solid, lift the parchment paper to remove the entire fudge block from the pan. Place it on a cutting board. Let it sit at room temperature for about one to two minutes before cutting. This brief thawing makes slicing easier and cleaner.
Use a sharp knife to cut the fudge into squares. Wipe the knife clean between cuts for the neatest edges. Most recipes yield 12 to 16 squares depending on your preferred portion size.
Serve the squares immediately while still cold. They taste best when eaten straight from the freezer. The frozen texture provides a satisfying, ice-cream-like consistency.
Customization Ideas and Flavor Variations
Layered Variations
Instead of just two layers, create multiple thin layers for a striped effect. Alternate between peanut butter and chocolate layers three or four times. This creates an impressive visual presentation when sliced.
You can also swirl the layers together instead of keeping them separate. Use a toothpick or skewer to create marbled patterns. This technique gives you chocolate-peanut butter flavor in every bite.
Different Nut Butters
While peanut butter is traditional, other nut butters work equally well. Almond butter creates a more delicate flavor profile. Cashew butter offers natural sweetness and creaminess. Sunflower seed butter provides a nut-free alternative for those with allergies.
Each nut butter brings its own nutritional profile and taste. Experiment to find your favorite combination. You can even mix different nut butters within the same recipe.
Chocolate Variations
For a richer chocolate layer, add melted dark chocolate to your cocoa powder mixture. White chocolate creates a stunning color contrast when paired with the brown peanut butter layer. Milk chocolate offers a sweeter, more indulgent option.
You can also use chocolate protein powder instead of cocoa powder. This boosts the protein content significantly. Just adjust the liquid ingredients slightly to compensate for the powder’s thickness.
Crunchy Additions
Mix in crushed graham crackers, vanilla wafers, or pretzels for added texture. Chopped peanuts, almonds, or walnuts provide both crunch and nutritional value. Rice cereal creates a lighter, airier texture reminiscent of candy bars.
Fold these additions into your base mixture before pouring into the pan. Alternatively, sprinkle them between layers for strategic crunch placement. Just avoid adding too many mix-ins, which can prevent proper freezing.
Flavor Enhancements
A teaspoon of vanilla extract enhances both chocolate and peanut butter flavors. Cinnamon adds warmth and complexity without overpowering the main flavors. A pinch of espresso powder intensifies chocolate notes dramatically.
For adventurous flavor combinations, try adding orange zest to the chocolate layer. Mint extract creates a refreshing twist. Even a small amount of cayenne pepper adds sophisticated heat.
Healthier Modifications
Reduce the sweetener for a less sugary treat. Add protein powder to boost nutrition. Include superfood additions like chia seeds, hemp hearts, or cacao nibs. These modifications make your freezer fudge squares more nutrient-dense.
You can also use sugar-free sweeteners like monk fruit or stevia for a keto-friendly version. Just remember that some alternative sweeteners affect texture and taste differently than natural options.
Storage Tips and Shelf Life
Freezer Storage
The name says it all – store your Chocolate Peanut Butter Freezer Fudge Squares in the freezer. Transfer them to an airtight container or freezer-safe bag after cutting. Properly stored, they last up to three months without losing quality.
Separate layers with parchment paper to prevent sticking. This makes grabbing individual squares easier. Label your container with the preparation date to track freshness.
Refrigerator Storage
While freezer storage is ideal, refrigeration works for shorter-term storage. The fudge will last about one week in the refrigerator. However, the texture becomes softer and less firm than when frozen.
Refrigerated fudge works well if you prefer a creamier, less icy texture. It also thaws more quickly when you’re ready to eat it. Just keep it in an airtight container to prevent absorbing other food odors.
Room Temperature Considerations
Unlike traditional fudge, freezer fudge cannot be stored at room temperature. The coconut oil will melt, causing the squares to lose their shape. If you’re serving them at a party, keep them chilled until just before serving.
They can sit out for 15 to 20 minutes without completely melting. This brief warming period actually enhances the flavor and creates the perfect eating texture. However, return any uneaten portions to the freezer promptly.
Portioning for Convenience
Consider cutting your fudge into individual portions before freezing. Wrap each square in parchment paper, then store all wrapped squares in a larger container. This makes it easy to grab a single serving without thawing the entire batch.
Alternatively, use silicone molds to create pre-portioned squares from the start. Mini muffin tins work perfectly for bite-sized treats. This approach eliminates the need for cutting entirely.
Nutritional Information and Benefits
Calorie and Macronutrient Content
Traditional chocolate peanut butter fudge contains approximately 170 to 250 calories per square. The macronutrient breakdown typically includes 67% carbohydrates, 31% fat, and 2% protein in commercial versions.
However, homemade freezer fudge made with natural ingredients offers a better nutritional profile. The healthy fats from peanut butter and coconut oil provide sustained energy. Protein content increases when using natural peanut butter.
Healthy Fats
Peanut butter contributes heart-healthy monounsaturated and polyunsaturated fats. These fats support cardiovascular health and help you feel satisfied longer. Coconut oil provides medium-chain triglycerides, which your body processes differently than other fats.
The fat content in freezer fudge isn’t something to fear. These natural fats support hormone production, nutrient absorption, and brain function. Just enjoy your fudge in appropriate portion sizes.
Protein Benefits
Natural peanut butter contains approximately 7 to 8 grams of protein per quarter cup. This protein helps stabilize blood sugar and prevents energy crashes. It also supports muscle maintenance and recovery.
For extra protein, add protein powder to your recipe. Collagen peptides dissolve seamlessly into the mixture. Plant-based protein powders work equally well for vegan versions.
Vitamins and Minerals
Peanut butter provides significant amounts of magnesium, which supports muscle and nerve function. It also contains vitamin E, a powerful antioxidant that protects cells from damage. Additionally, you’ll get potassium, which helps regulate blood pressure.
Cocoa powder contributes iron, magnesium, and antioxidants called flavonoids. These compounds support heart health and cognitive function. Natural sweeteners like maple syrup provide small amounts of minerals like manganese and zinc.
Portion Control Advantages
Pre-portioned squares make portion control effortless. Unlike keeping a pint of ice cream in the freezer, you can easily grab one or two squares and put the rest away. This built-in portion control prevents overindulging.
Each square provides a satisfying treat without excessive calories. The combination of fat and protein helps you feel full, reducing the temptation to eat multiple pieces.
Serving Suggestions for Every Occasion
Everyday Snacking
Keep a container of Chocolate Peanut Butter Freezer Fudge Squares in your freezer for afternoon energy slumps. One or two squares provide just enough sweetness and energy to power through the rest of your day. They’re perfect for satisfying chocolate cravings without derailing healthy eating goals.
Pack them in lunch boxes as a special treat. Kids and adults alike appreciate this homemade dessert. The squares remain frozen for several hours in an insulated lunch bag with an ice pack.
Dessert Presentations
For elegant dinner party desserts, serve freezer fudge squares on individual dessert plates. Drizzle with melted chocolate or caramel sauce for extra indulgence. Add fresh berries or a dollop of coconut whipped cream for color and freshness.
Create a dessert board featuring various freezer fudge flavors. Include different nut butter bases, chocolate varieties, and topping combinations. This interactive presentation lets guests sample multiple options.
Special Occasions
Package freezer fudge squares in decorative boxes for holiday gifts. They’re perfect for Christmas, Valentine’s Day, or teacher appreciation gifts. The long freezer life means recipients can enjoy them over several weeks.
For birthday parties, serve the squares on sticks like ice cream bars. Dip them in melted chocolate and add sprinkles for festive appeal. Kids especially love this fun presentation.
Accompaniments
Pair your fudge squares with hot beverages for a delightful contrast. Coffee’s bitterness balances the sweetness beautifully. Hot chocolate creates an ultra-indulgent chocolate experience. Herbal tea provides a lighter, more refreshing accompaniment.
For a dessert platter, combine freezer fudge with fresh fruit. Strawberries, banana slices, and apple wedges complement the rich chocolate-peanut butter flavors. The fruit’s natural sugars and acidity cut through the richness.
Post-Workout Treats
The combination of protein, healthy fats, and natural sugars makes freezer fudge an excellent post-workout snack. The carbohydrates help replenish glycogen stores, while protein supports muscle recovery. Enjoy one or two squares within 30 minutes of finishing your workout.
The cold temperature also feels particularly refreshing after exercise. The treat provides both physical and psychological rewards for completing your workout.
Troubleshooting Common Issues
Fudge Won’t Set Properly
If your fudge remains soft even after extended freezing, you likely need more coconut oil. The oil is what solidifies when cold, giving fudge its firm texture. Add an extra tablespoon or two to your next batch.
Alternatively, your freezer temperature might not be cold enough. Check that your freezer maintains 0°F (-18°C) or below. Place the fudge toward the back of the freezer where temperatures stay most consistent.
Layers Are Mixing Together
When your chocolate and peanut butter layers blend instead of staying separate, you didn’t freeze the first layer long enough. Always allow at least 10 minutes for the initial layer to set. Even better, freeze it for 15 to 20 minutes.
Pour the second layer very gently over the first. Don’t dump it from high above, which can break through the bottom layer. Instead, pour slowly near the edge and let it spread naturally.
Fudge Is Too Hard
Overly hard fudge contains too much coconut oil or was frozen too long at very low temperatures. Reduce the coconut oil by one to two tablespoons in your next batch. You can also let the fudge sit at room temperature for 3 to 5 minutes before eating.
Using natural peanut butter with its natural oils also helps maintain creaminess. Conventional peanut butters with added stabilizers can sometimes freeze harder.
Grainy Texture
Graininess usually results from insufficient mixing or using natural sweeteners that crystallized. Mix each layer for at least one full minute to ensure complete blending. Gently warm your maple syrup before adding it to help it incorporate smoothly.
If using coconut oil, make sure it’s completely liquid when mixing. Partially solid coconut oil creates lumps that won’t smooth out during freezing.
Fudge Crumbles When Cut
Crumbly fudge lacks enough binding ingredients. Add more coconut oil or peanut butter to create better cohesion. Also, make sure you’re letting the fudge thaw for 1 to 2 minutes before cutting.
Use a very sharp knife and clean it between each cut. A warm knife works even better – run it under hot water, dry it, then make your cut. This creates clean edges without pressure that causes crumbling.
Coconut Flavor Is Too Strong
If you dislike the taste of coconut in your chocolate peanut butter fudge, use refined coconut oil instead of virgin. Refined coconut oil has been processed to remove the coconut flavor. You’ll get all the functional benefits without any taste interference.
Alternatively, try using cocoa butter as a replacement for coconut oil. It provides similar setting properties with a subtle chocolate undertone instead.
Frequently Asked Questions
How long do Chocolate Peanut Butter Freezer Fudge Squares last?
When stored properly in an airtight container in the freezer, these fudge squares last up to three months. In the refrigerator, they’ll stay fresh for about one week. They cannot be stored at room temperature because the coconut oil will melt, causing them to lose their shape.
Can I make this recipe vegan?
Absolutely! Most Chocolate Peanut Butter Freezer Fudge Square recipes are naturally vegan when you use maple syrup instead of honey as your sweetener. Make sure your chocolate chips, if using any, are dairy-free. The base ingredients – peanut butter, coconut oil, cocoa powder, and maple syrup – are all plant-based.
Do I need to use coconut oil?
Coconut oil is the preferred ingredient because it solidifies when frozen, creating the perfect fudge texture. However, you can substitute cocoa butter for similar results. Regular butter won’t work as well because it doesn’t set as firmly when frozen, and it’s not vegan-friendly.
Can I use crunchy peanut butter instead of creamy?
While creamy peanut butter creates the smoothest texture, crunchy peanut butter works if you enjoy extra texture. The peanut pieces add pleasant crunch throughout your fudge squares. Just know that the final product won’t be as silky smooth as versions made with creamy peanut butter.
Why is my fudge oily?
Excess oil separation happens when you use too much coconut oil or natural peanut butter that wasn’t stirred well. Make sure to mix your natural peanut butter thoroughly before measuring. If oil pools on top of your finished fudge, reduce the coconut oil by one tablespoon in your next batch.
Can I add protein powder to this recipe?
Yes! Protein powder makes an excellent addition to Chocolate Peanut Butter Freezer Fudge Squares. Add 2 to 4 tablespoons to your base mixture. You may need to adjust the liquid ingredients slightly since protein powder absorbs moisture. Start with less and add more coconut oil if the mixture seems too thick.
What’s the best way to cut clean squares?
For the cleanest cuts, let your frozen fudge sit at room temperature for 1 to 2 minutes before cutting. Use a very sharp knife and wipe it clean between each cut. Running the knife under hot water and drying it before each cut also helps create neat edges without crumbling.
Can I make these nut-free?
For nut-free Chocolate Peanut Butter Freezer Fudge Squares, substitute sunflower seed butter or tahini for the peanut butter. Both create similar creamy textures and work beautifully in this recipe. The flavor will be slightly different but equally delicious. This makes the treat safe for people with nut allergies.
Now you have everything you need to create perfect Chocolate Peanut Butter Freezer Fudge Squares. This simple, no-bake dessert combines rich chocolate and creamy peanut butter into convenient, freezer-friendly portions. With just a few wholesome ingredients and minimal preparation time, you can enjoy these decadent treats for up to three months. Whether you stick to the basic recipe or experiment with creative variations, these fudge squares will satisfy your sweet cravings while providing beneficial nutrients from peanut butter and natural ingredients. Start with the classic version, then explore different nut butters, add-ins, and toppings to make this recipe uniquely yours.
Print
Chocolate Peanut Butter Freezer Fudge Squares
- Total Time: 10 minutes
- Yield: 16 1x
Ingredients
1 cup creamy peanut butter
1/4 cup unsalted butter, softened
2 cups powdered sugar
1 teaspoon vanilla extract
1 1/2 cups semisweet chocolate chips
2 tablespoons heavy cream or milk
Instructions
1. Prepare the Peanut Butter Layer
-
In a medium bowl, mix peanut butter, softened butter, powdered sugar, and vanilla until smooth.
-
Press evenly into the bottom of an 8×8-inch baking pan lined with parchment paper.
2. Prepare the Chocolate Layer
-
In a microwave-safe bowl, melt chocolate chips with heavy cream in 20–30 second intervals, stirring until smooth.
-
Pour the melted chocolate over the peanut butter layer, spreading evenly.
3. Freeze
-
Place the pan in the freezer for 1–2 hours, or until firm.
4. Cut and Serve
-
Lift fudge from the pan using parchment paper and cut into squares.
-
Store in the freezer or refrigerator until ready to serve.
Notes
Nut-free option: Substitute peanut butter with almond butter or sunflower seed butter.
Chocolate variations: Use dark chocolate or milk chocolate according to preference.
Storage: Keep in an airtight container in the freezer for up to 2 weeks.
Make-ahead: Perfect for prepping ahead for gatherings or treats.
- Prep Time: 10
Nutrition
- Calories: 180